Overview
The Employee Master File contains multiple screens of information. Upon initial entry into this screen, WinTeam displays basic employee information in the tabbed section. Multiple links at the top of the screen allow you to go to additional areas of the Employee Master File record.
The Rollover button on the toolbar is available if you are on a current employee record. You can rollover (copy) from one employee record to another. Not all fields are rolled over. You are required to enter the employee name and address fields along with the new pay rate, unless you have added a Custom Setting. For more information, see Rolling Over an Employee Master File Record.
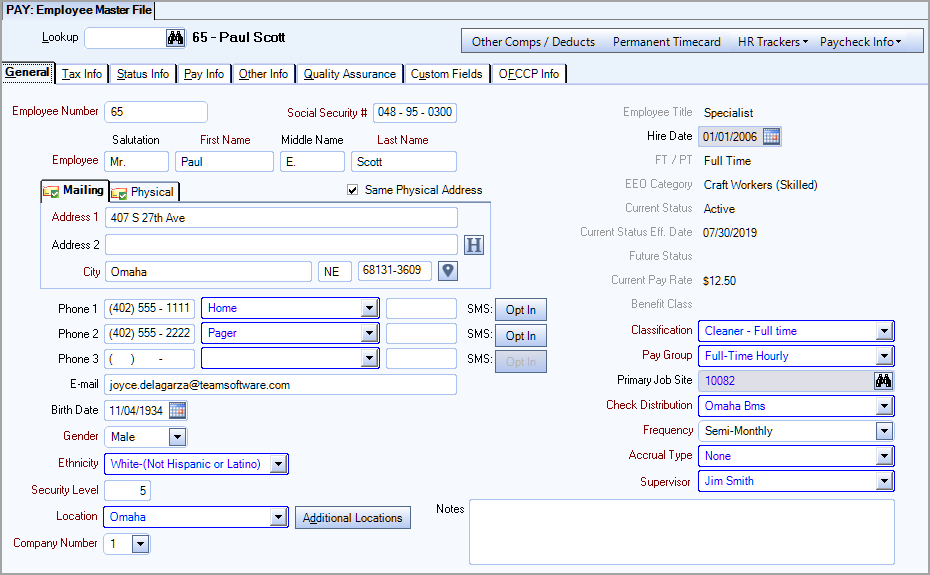
You can access the Employee Master File from the Human Resources Menu, the Payroll Menu, and from numerous other places throughout WinTeam.
Key Functionality
Click the Advanced filter button to create or edit a filter for finding and/or sorting specific records. You can also select a Saved filter. Click the Apply Filter/Sort button to apply any filter or sort criteria you created. Click the Remove Filter/Sort button to remove a filter or sort, if one is currently applied. For more information see Advanced Filtering.
The Diary enables you to keep notes concerning issues or to track using Follow Up Dates. Record any interaction you want to remember—such as a phone conversation or a handwritten letter you mailed or received. For more information see Diaries.
Click the Diary button to access the Employee Diary screen.
You may use the Rollover button![]() on the toolbar to create a new Employee Master File record. Various custom settings exist for controlling the information the information that is rolled over, as well as ensuring certain information will only be visible to users with the appropriate administrative rights. For more information see Rollover Functionality and Rolling Over an Employee Master File Record.
on the toolbar to create a new Employee Master File record. Various custom settings exist for controlling the information the information that is rolled over, as well as ensuring certain information will only be visible to users with the appropriate administrative rights. For more information see Rollover Functionality and Rolling Over an Employee Master File Record.
The Employee Lookup field can be used with numbers or names. To search for a record in a list, select the Quick Lookup button.
If you enter an Employee Number and the number matches an existing record, the record displays.
To search for a record in a list with the focus set to the Number/ID field, press F4. To search for a record in a list, with the focus set to the Description/Name field, press F5.
Since you are on a master file screen, you can press the shortcut key ALT + L to place your cursor in the Lookup field.
For more information see Using Quick Lookups or Lookup Employees.
Hover over the Change Information icon to see User Added, Date Added, User Changed and Date Changed information. WinTeam records the logon name of the user entering or changing this record. The Date Added is the original date this record was entered into the system. The Date Changed is the date the record was last changed. Right-click on the Change Info icon to filter for records added or changed by a specific user or date.
When you hover over the User Changed or Date Changed filters, you can:
- Filter By Selection - Filters for all records that match your current records field value.
- Filter by Exclusion - Excludes from your filter all records that match your current records field value.
- Filter For - Filters based on the text/value you enter.
- Sort Ascending - If you already have a filter applied, the Sort Ascending command is available. Also used to include all records in the filter and sort in ascending order based on the current records field value.
- Sort Descending - If you already have a filter applied, the Sort Descending command is available. Also used to include all records in the filter and sort in descending order based on the current records field value.
Click the  icon to open the Import Applicant screen.
The Import Applicant screen displays only those applicants that match the user security for Location and Company (SYS: User Security (Other tab). If the applicant's Location or Company is not assigned to the logged on user, the applicant information is not available. This is similar functionality to the eHub Employee Change Requests button.
Click the employee request icon to open the Apply Employee Change Requests window which contains all approved requests to change employees' address, phone, e-mail, pay rate, primary job, and Time Off Tracker, or status submitted through multiple channels. The updated employee information then can be imported into the corresponding employee's Employee Master File record. A count displays when you hover over the icon to inform you of how many change requests are pending. This count includes all types of employee requests, not just address changes.
![]()
Note: Location security is implemented for Enterprise and ASP customers—employee change requests are limited to display only locations to which the user has access.
Click the  icon to open the Employee Transfer window. This window gives you the ability to transfer an employee from one location to another even if you do not have security privileges for the employee's original location. See Employee Transfer for additional information.
Displays status message one day before the Begin Date of time off through the End Date (or one day prior to the Return Date).
Click Other Comp/Ded to open the employees Other Compensations and Deductions screen.
Click Permanent TimeCard to open the Permanent TimeCards screen.
Absence Tracker
Click HR Trackers, and then click Absence Tracker to open the Employee Absence Tracker.
Benefit Tracker
Click HR Trackers, and then click Benefit Tracker to open the HR: Benefits By Employee screen.
Compliance Tracker
Click HR Trackers, and then click Compliance Tracker to open the HR: Compliance Tracker by Employee screen.
Equipment Tracker
Click HR Trackers, and then click Employee Equipment Tracker to open the employee's Equipment Tracker screen.
Time Off Planner
Click HR Trackers, and then click Employee Time Off Planner to open the Employee Time Off Planner.
Check History
Click Paycheck Info, and then click Check History to open the Employee Master File Check History for the selected employee.
Hours Summary
Click Paycheck Info, and then click Hours Summary to open the Employee Master File Hours Summary for the selected employee.
W-2 Summary
Click Paycheck Info, and then click W-2 summary to open the Employee Master File W-2 Summary for the selected employee.
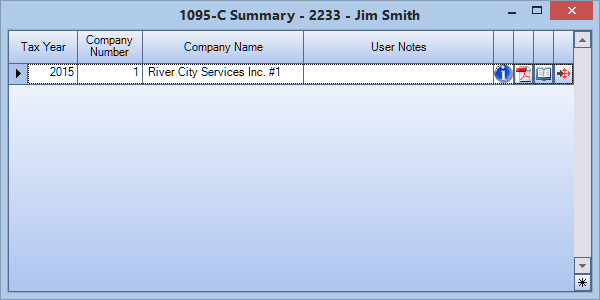
1095-C Summary
Click to open the 1095-C Summary grid for the selected employee, where you can view 1095-C information for multiple tax years. Grid columns may be dragged and dropped into any order you prefer. Grid functionality allows you to sort, filter, group, export and more (right-click anywhere in the grid to display options). Four buttons are displayed on the right of each line in the grid. Hovering over the Change Information Icon will display Notes related to the most recent Form 1095-C and the user who made changes. Clicking the Acrobat icon will display a .pdf file of the Employee's most recent Form 1095-C, which you can view and/or print. Clicking the View Instructions icon will display the Form 1095-C Page 2 instructions. Clicking the History button displays the History screen featuring all System and User Notes for the Tax Year.
Note: The user must have the appropriate security to view the 1095-C summary for an employee. The user must have the Pay Show Full SSN security group to view the 1095-C PDF because it contains the employee’s social security number. The Pay Show Full SSN security group is automatically included in PAY ALL and SYS ALL. If you want to use it separately from PAY ALL and SYS ALL, you must set up a separate security group and add it to that group.
Use the Employee Number field to create a new employee record or display an existing employee record.
Type the Employee Number in this field, or use the Lookup to locate an employee record.
When creating a new record, the Employee Number entry is dependent on the current PAY: Defaults (Employee Master File Settings tab) settings:
- If Use Social Security Numbers is selected for Employee Numbers on the PAY: Defaults (Employee Master File Settings tab) screen, enter the employees social security number for Employee Number.
- If Computer Assign is selected for Employee Numbers on the PAY: Defaults (Employee Master File Settings tab) screen, do not enter a value for Employee Number. The system assigns an Employee Number when you save the new record. However, if you check the Allow Overrides option for Computer Assign, you can enter an Employee Number or change the Employee Number.
Warning: Exercise caution when changing an Employee Number. In order to change an employee number, you must be assigned to the SYS ALL, PAY ALL, or PAY Employee Master File Security Group.
Use the Social Security # field to enter the employee's 9-digit social security number. If you select Use Social Security Number for Employee Numbers on the Payroll Defaults screen, the system automatically completes this field with the Employee # entry.
Note: If you do not have the proper security rights to view full SSN's, you may still enter the full SSN when adding an employee.
Warning: Exercise caution when entering the SSN. The logged on User must have "PAY Show Full SSN's" rights to make the changes. For more information, see Securing Social Security Numbers.
Note: If the Country ID on the System Defaults screen is Canada, the system formats all social security numbers as 123-456-789, instead of the US format of 123-45-6789. All reports will print with the correct format.
To validate the SSN when creating a new employee record, use this setting:
| Section | Item | Value |
|---|---|---|
| Payroll | ValidateSSN | Yes |
With this setting in place, after you enter a SSN on a new record, the validation popup displays. After entering the social security number the first time, the system will then blank out the Social Security Number field forcing the User to renter the Social Security Number from the source document.
Salutation
Use the Employee Salutation field to enter the employees title abbreviation.
Example: Mr., Mrs., or Ms., etc.
First Name
Use the Employee First Name field to enter the employees legal first name. Do not use nicknames.
Middle
Use the Employee Middle field to enter the employees middle initial or middle name.
Last Name
Use the Employee Last Name field to enter the employees last name. Enter an extension to their name, such as Jr. or Sr., after you enter the last name.
Example: Smith Sr., Johnson Jr.
Note: Special characters cannot be used in the First, Middle and Last Name fields. If any of these are entered, upon tabbing they will be removed. Hyphens are allowed since hyphenated names are common.
~ ! @ # $ % ^ & * ( ) _ = ` { } [ ] \ , . ; ' : " < > ? + / |
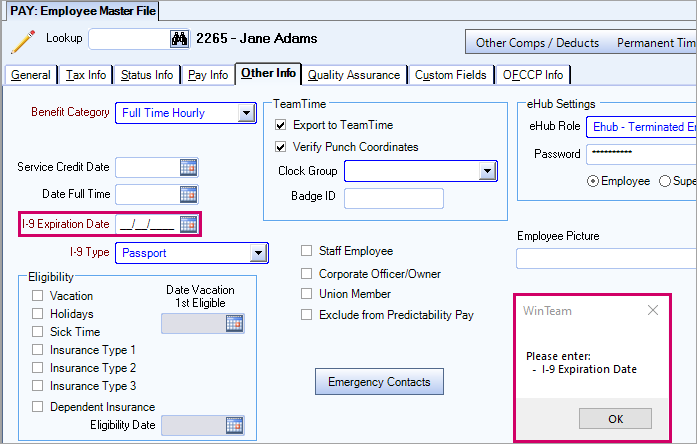
This check box only displays when the employee's status is Inactive. It is a feature to help accelerate the process of reactivating employees. When you select this check box, you must enter the I-9 Expiration Date on the Other Info tab before you can save or close the record.

Address 1
Use the Address field to enter the employees street address, including the street number, street name, and apartment number (if applicable). The system uses this address as the primary mailing address.
Address 2
Use the second address line to enter additional information (such as a mail stop for large buildings). Do not enter apartment or suite numbers on this line.
City
Use the City field to enter the city of the employees mailing/physical address. You can use the Zip Code Custom Setting to populate this field.
| Section | Item | Value | Module and Purpose |
|---|---|---|---|
| Addresses | UseZipsForCityState | Yes |
This setting automatically fills in the City and State (City and Province) fields when entering a Zip Code. It also removes the City and State fields from the tab stop order. |
| Addresses | TabCityState | Yes | This setting will leave the City and State fields (City and Province) in the tab stop order when the Zip Code Custom Setting is in place. |
For more information see Auto Populating City and State Fields.
State
Use the State field to enter the state of the employees mailing address. You can enter the entire state name or the two-character state abbreviation. When adding a new employee record, the system carries this entry over to the State field on the Tax Information tab. You can use the Zip Code Custom Setting to populate this field.
Zip Code
Use the Zip field to enter the ZIP/postal code of the employees mailing address. The field is preformatted to accept the optional four-digit extension. If the first character you type is an alpha character, the system changes the format to a Postal Code for Canadian addresses.
Click to link to Google Maps to quickly view maps and get directions. The link generates a map centered on the address you have entered in WinTeam. For more information see Using Google Mapping.
This button  displays when the latitude and longitude was used to validate the address. Click the Address Override button to display the Latitude Longitude Override window. This window displays the Latitude, Longitude, Location Code, Municipality ID and School ID. See this link for additional information on address override.
Phone 1, Phone 2, and Phone 3
Use the Phone 1 field to enter the employees primary contact phone number.
Use the Phone 2 field to enter the employees alternate phone number.
Use the Phone 3 field to enter another alternate phone number for the employee.
You must enter the area code for all phone numbers, including local phone numbers.
To specify the type of phone number, type or select the Phone Description to the right of the Phone field. (Example: Home, Day, Evening, or Cell.)
Phone Description
Use the Phone Description field to identify the corresponding Phone field.
Type or select the Phone Description. (Example: Home, Day, Evening, or Cell.)
To add a new Phone Description, double-click in the Phone Description field, or type a new Phone Description and press Enter. The Phone Descriptions add/edit list displays.
SMS Opt In
Use the Opt In button to initiate the process to set up the phone number to receive SMS text messages from WinTeam.
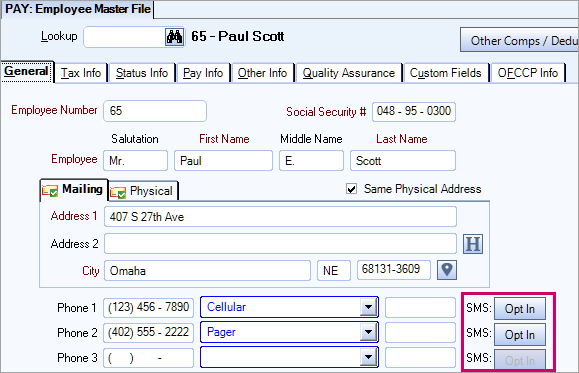
Click Yes in the message box to send a message to the phone number.
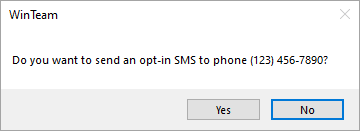
The employee must reply to this message to complete the opt in process.
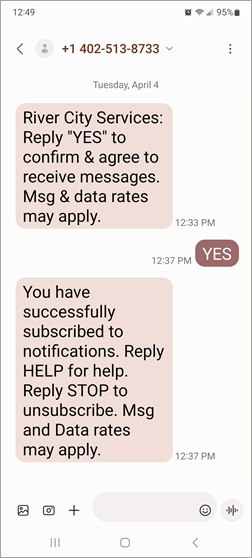
The status displays as Pending before the employee responds and changes to Opted In after the employee's response is received.


The status displays as Opted Out after the employee responds. You must manually clear the phone number and add it again if you want to reactivate the Opt In button.

There are capabilities to view the SMS opt-in status using advanced filtering. As SMS capabilities continue to expand, customers want to know which employees opted-in to receive SMS messages or have insight into the general opt-in statuses of employees. This helps gauge who in the workforce is and is not setup up to receive SMS and is also helps identify which groups of the workforce might need additional assistance to get opted-in when additional SMS capabilities are available.
The different states of the SMS opt-in status are:
- Pending–An opt-in prompt has been sent to the employee, but they have not responded with "yes"
- Opted In–Fully opted-in for SMS
- Opted Out–The employee has sent a "stop" to stop receiving SMS
- Blank–A phone number has not had any opt-in prompts sent or other statuses to date
Fields in the advanced filter:
- Phone1SMSStatus
- Phone2SMSStatus
- Phone3SMSStatus
An example of how the filters can be used to identify all records that have any type of opt-in status across any of the three phone fields.

Use the E-mail field to enter a valid e-mail address for the employee. You can enter multiple e-mail addresses by separating each address with a semi-colon. If an invalid address is entered a message displays, and the changes are reverted to the original state.
Use this setting to make the E-mail field a required entry.
| Section | Item | Value |
|---|---|---|
| Payroll | RequireEmail | True |
Birthdate
Use the Birth Date field to enter the employee's date of birth. Type the date in MMDDYY format, or use the Date Control to select a date. You can type in a 4-digit year, if applicable. If you have an employee who was born before 1930, in the system interrupts the year to be "2029", instead of "1929". You can correct this by typing in a 4-digit year.
Use this setting to make the Birth Date a required field.
| Section | Item | Value |
|---|---|---|
| Payroll | BirthDateRequired | Yes |
Gender
Use the Gender field to select the employee's gender as Male, Female, Unknown, or Nonbinary, depending on what is enabled. You may use Gender to limit the employees listed on the EEOC Report.
Ethnicity
Use the Ethnicity field to select the employee's Ethnicity. When adding a new employee, the system displays the default Ethnicity assigned in the Ethnicity add/edit list. To add a new Ethnicity , double-click in the Ethnicity field, or type a new Ethnicity and press Enter. The Ethnicity add/edit list displays.
You may use Ethnicity to limit the employees listed on the EEOC Report.
Note: If an administrator with the proper security permissions has selected the Cannot View Sensitive Fields security feature in System Security, it is possible you will not see the Birth Date, Gender and Ethnicity fields in the Employee Master File General tab. These fields may be hidden to protect sensitive employee information. If these fields are not visible, they will remain so when using the Rollover button to create a new Employee Master File.
Use the Security Level field to restrict access to this employees information and to restrict who can create payroll checks for this employee. Type a Security Level between 1 and 9. As the number for Security Level increases, access becomes more restricted.
Note: The ability of certain employees to view and edit employee record information is set up on the User Security screen.
This field is visible only for clients who are licensed for more than one location. Use the Location field to select the Location to which this employee belongs.
Note: Only the Locations that the logged on User has rights to will display in this list.
You may double-click in this field to access the Location record. This is a required field.
This field is visible for Clients who are licensed for more than one company. Use the Company field to indicate the Company to which this employee belongs.
Note: Only the Companies to which the logged-on User has rights will display in this list.
This is a required field for multi-company users. In order to change the Company Number for an existing employee, you must have the "Can Change Emp Company" check box selected on the User Security screen. Be advised that changing an Employee's Company results in all future payroll checks to belong to the new Company. For more information, see Transferring Employees between Companies.
This button is visible only if a change has been made to employees Company Number. Click the Company History button (or press ALT + H)to display the Company History screen.
If an Employee has a Status of Inactive this check box displays. Select the check box if this employee is eligible to be rehired. Once selected, the Eligible for Rehire text displays with green text. The Eligible for Rehire check box is enabled or disabled based on the Security Feature from the PAY Employee Master File Screen 'General - Cannot Change Eligible for Rehire'.
The Security Feature 'General - Cannot Change Eligible for Rehire' is not selected by default by any System Security Groups.
To use this Security Feature you will need to create a Custom Security Group.
- When the Security Feature is NOT selected, a User can select or clear the Eligible for Rehire check box with no restrictions.
- When the Security Feature is selected, the user cannot change the Eligible for Rehire check box.
To have WinTeam automatically select the 'Eligible for Rehire' check box when an employees status is changed from Inactive to Active use this Custom Setting:
| Section | Item | Value |
|---|---|---|
|
Payroll |
EligibleForRehire | True |
Note: This only affects employees that are marked as Inactive once the Custom Setting is put in place. It does not impact current Inactive employees.
This button displays if the following Custom Setting is in place and you are licensed for DocLink.
| Section | Item | Value |
|---|---|---|
| DocLink | ApplicantImport | Yes |
Once you click DocLink Import, the system connects to FileBound Applications Project. From there you can select a record marked "Ready for Hire", and then import information to the new Employee Master File record.
In US databases, this field is labeled Employee Title and it contains the information from the Title field in the Pay Info History Info grid on the Pay Info tab of the Employee Master File.
In Canadian databases, this field is labeled Title/Occupational Level and it contains the information from the Title/Occupational Level field in the Pay Info History Info grid on the Pay Info tab of the Employee Master File.
The Hire Date field is required and is used to define the date that the individual became an employee of the company, normally the first day scheduled for work. Do not change the Hire Date when an employee takes a Leave of Absence.
For a new record, the current date is the default value. If the current date is incorrect, type the correct date in MMDDYY format or use the Date Control to select a date. If you enter a Hire Date more than 14 days in the future you will receive a warning message, but are allowed to continue.
Note: The system uses the Hire Date to generate the Employee Master (New Hire) Report from the Human Resources Reports menu.
In order to change the hire date, two conditions must exist; there must only be one Status record and only one Pay Info record. If true, the hire date can be changed on the General Tab first, then this will update the Status info date automatically. Then, changes can be made on the Pay Info tab accordingly.
Displays if the Employee is Full Time, Part Time, a Subcontractor, or Other/Casual set on the Pay Info tab of the Employee Master File.
The Current Status field is read-only and is used to view the employees employment status. This information carries over from the Status Info tab, therefore changes must be made there.
The Current Status Effective Date field is read-only and is used to view the effective date of the employees Current Status. This information carries over from the Status Info tab, therefore changes must be made there.
The Future Status field is read-only and is used to view the employees future change of status, if applicable. This information carries over from a future Date Effective in the Status Info History grid of the Status Info tab and must be entered or modified there.
The Current Pay Rate field is read-only and is used to view the employees current rate of pay. This information carries over from the Pay Information tab, therefore changes must be made there.
The Benefit Class field displays the Benefit Class set up on the PAY: Titles/Occupational Groups screen. This is a read-only field.
The Classification field is used to assign the employee to a Classification, which normally describes the employees position. When adding a new employee, the system displays the default Classification selected in the Classification add/edit list.
Type or select the employees Classification. To add a new Classification, double-click in the Classification field, or type a new Classification and press Enter. The Classifications add/edit list displays.
Select the Employee Type to define payroll characteristics, such as Full-Time Hourly, Full-Time Salary, or Part-Time Hourly. When adding a new employee, WinTeam displays the default Employee Type selected in the Employee Types add/edit list.
Type or select the employees Employee Type. To add a new Employee Type, double-click in the Employee Type field, or type a new Employee Type and press Enter. The Employee Types add/edit list displays.
Note: When processing payroll, you can pick the Employee Types to pay on the Create a New Batch - Automatic Checks - Employee Filters screen.
To remove the ability to change an Employee Type, the General - Cannot Change Employee Type Feature must be selected. If a scheduled employee changes from an hourly employee to a salary employee during a scheduled week, the Scheduling Activity Report will reflect the previous hourly rate. If an employee changes from an hourly employee to a salary employee, the first pay record will show $0.00 since a previous pay rate for an hourly employee does not exist.
The Primary Job Site field displays the employee's primary Job location by Job Number. If this field appears grayed out, this field is read-only and the Primary Job Site Number is required to be entered on the Pay Info tab. This is controlled by an option (Track Employee Primary Job History check box) in Payroll Defaults (Employee Master File Settings tab).
If the field is not grayed out (the Track Employee Primary Job History check box in Payroll Defaults is NOT selected), type the Job Number for the Primary Job Site in this field, or use the Lookup to locate the Primary Job Site. If this Job number does not match the Employee's Salary Dept Job (on the Pay Info tab) the user will receive a warning message indicating the Jobs do not match.
You can double-click on the blue text (blue text indicates that double-clicking takes you to a related screen) in the Primary Job Site field to display the related Job Master File record.
If this is a new Employee Master File record and the Track Employee Primary Job History check box in Payroll Defaults (Employee Master File Settings tab) is selected, this field will be locked. You will need to enter the Primary Job Number on the Pay Info tab first.
Note: The system uses the information in the Primary Job Site field to complete the Supervisor field when entering a new employee record. The entry is based on the information for this Job on the Job Master File screen. The system will look to the Primary Job site and consider this the employee's work site if there are no Wages being paid on a check, and only Other Compensations payment(s), for tax calculations. The Payroll Tax Codes of the Employee's Primary Job are used when determining the proper taxes to withhold.
Select the Check Distribution check box to specify how to deliver the employee's paycheck, such as Mail, Hold For Pickup, or Delivery By Supervisor. When adding a new employee, the system displays the default Check Distribution selected in the Check Distribution add/edit list.
Type or select the employee's Check Distribution method.To add a new Check Distribution, double-click in the Check Distribution field, or type a new Check Distribution and press Enter. The Check Distributions add/edit list displays.
Note: When processing payroll, you can select the Paycheck Distributions to pay on the Create a New Batch - Automatic Checks - Employee Filters screen.
For more information see Learning about Check Distributions.
The Frequency field is used to define how often to issue the employee's paycheck. The options in the list carry over from the Pay Periods on the PAY: Defaults (Timekeeping and Overtime Setup tab) window that have the check box Available on EE Screen selected. The default frequency is set on the PAY: Defaults window–when the No Default option is selected as the default frequency, you must manually select a Frequency for each employee before you can close or save the employee master file record.
Note: When processing payroll, you can pick the Frequency to pay on the Create a New Batch Automatic Checks Paycheck Frequency screen.
Use the Accrual Type field to define the filters when accruing labor.
When performing the Labor Accrual based on Timekeeping, the Accrual Type in the Employee Master File allows you to filter for those employees that share the same Accrual Type (typically this would follow your Pay Frequencies). Each Job is also set up using the same list of Accrual Types. The Accrual Type in the Employee Master File allows you further filtering in those situations where employees of differing Pay Frequencies are working at the same Job site.
When performing Labor Accrual based on a Payroll Batch, the Accrual Type filters the checks that are included in the selected Batches.
Type or select the employees Accrual Type.
To add a new Accrual Type, double-click in the Accrual Type field, or type a new Accrual Type and press Enter. The Accrual Types add/edit list displays.
Use the Supervisor field to identify the employees direct supervisor. The system displays the default Supervisor based on the Primary Job Site entry.Type or select the employees Supervisor. To add a new Supervisor, double-click in the Supervisor field, or type a new Supervisor and press Enter. The Supervisors add/edit list displays.
Use the Notes field to enter any notes pertaining to this employee. If you enter more than one line of information, the system automatically wraps the lines of information for you.
Note: All changes made to tax information are applicable for future paychecks, but are never retroactive.
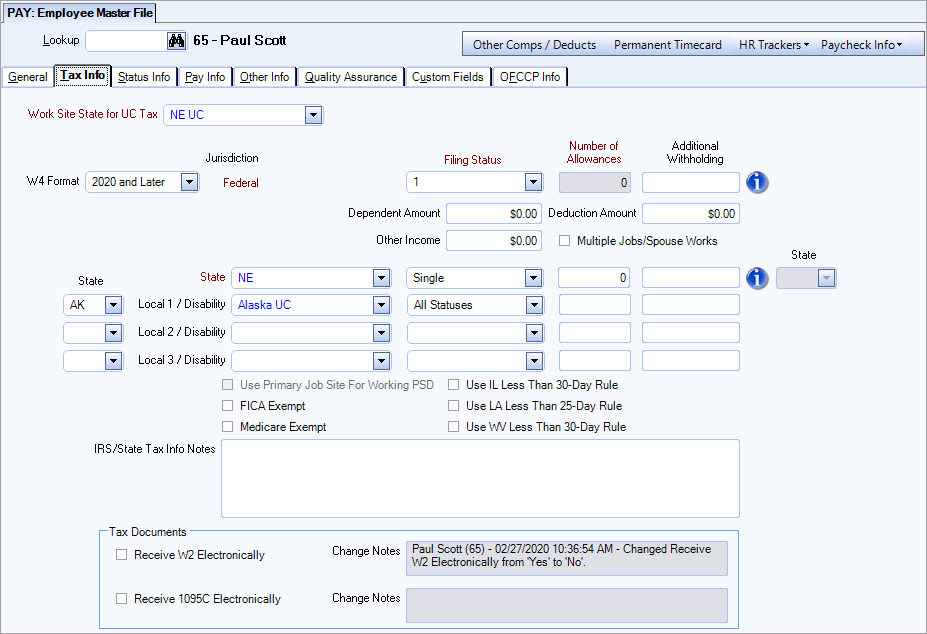
This setting locks Additional Withholding fields on the Employee Master File (Tax Info tab). This will lock Additional Withholding fields for Local fields.
| Section | Item | Value |
|---|---|---|
| Payroll | DisableTaxWithholding | Yes |
Enter the Work Site State Unemployment Compensation code for this employee. State Unemployment Compensation is maintained on the Tax Tables screen.
Unemployment wages must be reported to only one state. The state reported to is normally the employee's primary work-site state. However, if the employee works in multiple states on a regular basis, use the series of tests promulgated by the US Department of labor to determine the correct state:
1. Location of service
2. Base of operations
3. Direction and control
4. Residence
For clarification on the four steps, see the following Federal Department of Labor guidance at https://oui.doleta.gov/dmstree/uipl/uipl2k4/uipl_2004a1.htm
Type or select the State for UC Tax for this employee.
If an employee had their unemployment reported in another state and then they switch to a different state during the year, the UC amount that was applied in the other state counts towards the new state UC taxable earnings.
When the state selected is set to AK UC, the AK Occupational Code and AK GEO Code required fields will display.
Use the Federal Jurisdiction fields to enter the information from the employee’s W-4 form. Federal tax information is maintained in the tax detail tables.
See the following resources for information about the 2019/2020 W4 tax calculation amount differences:
W4 Format
You can select 2019 and Earlieror 2020 and Later for the W4 Format—the default value is 2020 and Later.
When 2019 and Earlier is selected, the following fields are available:
- Filing Status (Single, Married, Married-Single Rate, Exempt)
- Number of Allowances
- Additional Withholding
When 2020 and Later is selected, the following fields are available:
- Filing Status (Single, Married, Head of Household, Exempt)
- Additional Withholding
- Dependent Amount
- Deduction Amount
- Other Income
- Multiple Jobs/Spouse Works
- Number of Allowances
Note: The Deduction Amount and Other Income fields are tied to the basic pay security levels. If the user's write security is lower than the employee, but the user still has read permissions these fields do not display.
Filing Status
Type or select the filing status for this employee. Select Exempt to prevent withholding of federal taxes.
Important: Puerto Rico does not pay USA Federal Taxes, so it important to set up Puerto Rico employees so that no Federal taxes are calculated. Any employee that works and lives in Puerto Rico, should be set up with a Filing Status ofExemptin the Employee Master File. As long as the Exempt filing status is being used, there will be no Federal Tax withholding calculated when payroll is processed.
Number Of Allowances
Type the number of allowances, if applicable, from the employee’s W-4 form.
Canada – Customers can use this field to enter an allowance dollar amount instead of the standard exemption amount.
Iowa – This field is used to enter the dollar value for the allowance amount. This is based on the Form IA-W4. When IA is selected as the state, the following message displays on the window: "Enter allowance amount into the Number of Allowances field."
Montana – This field is used to enter the dollar value for the reduced withholding amount. This is based on the Form MW-4. When MT is selected as the state, the following message displays on the window: "Enter reduced withholding amount into the Number of Allowances field, if applicable". If an amount is entered into this field, then that is set as the tax amount and the state income tax calculation is not done.
Additional Withholding
Type the amount of additional withholding, if applicable, from the employee's W-4 form.
Dependent Amount
Type the dependent amount, if applicable, from the employee’s W-4 form.
Deduction Amount
Type the deduction amount, if applicable, from the employee’s W-4 form.
Other Income
Type the other income amount, if applicable, from the employee’s W-4 form.
Multiple Jobs/Spouse Works
Select this check box only if this same check box is selected on the employee’s W-4 form.
Use the state jurisdiction fields to enter the employee's state tax information. State tax information is maintained in the tax detail tables. States with the In Drop Down Lists check box selected in Pay Taxes are available as a state jurisdiction.
Warning: Each state has different rules about handling an employee's withholding when a state W-4 has not been submitted. Since each state varies, we do not have a default in WinTeam. We suggest you contact your state for guidance handling these deductions.
Important: The specific state jurisdiction information that is required depends on whether the state has its own W4 or follows the federal W4.
State
Type or select the state of jurisdiction, which is normally the employee's state of residence. When adding a new employee, this field defaults to the entry in the State on the General tab after you enter the State for UC Tax field.
Note: The State of Jurisdiction field affects how the system computes state taxes. If an employee lives in one state and works in another, unless there is reciprocity between the states, the system may withhold taxes from both the Live In and Work In states.
Filing Status
Type or select the filing status for this employee. State filing statuses are either based on that state’s W4 or the federal W4 (if the state is following the federal W4.) Select Exempt to prevent withholding of state income taxes.
Number Of Allowances
A value is required if the state does not follow the federal W4. This field is set to zero and disabled if the state follows the federal W4 AND the W4 Format is 2020.
Note: You can enter a decimal number in this field to accommodate for those states who allow for 1/2 an exemption. For example, Illinois allows persons over 65 or those who are blind to take a 1/2 exemption—there could be other scenarios where this may be used. If you do enter a decimal number, the system displays this warning message, and then allows you to continue. The default selection is No, so you must press Yesto have your entry accepted.
Additional Withholding
Type the amount of additional state withholding, if applicable. The system displays a State field for selection of the state designated for the additional withholding. WinTeam prevents you from entering a state code that does not withhold state income tax.
The state of Missouri allows employees to request an additional withholding called Reduced Withholding. When an employee requests Reduced Withholding, you must do the following:
- Select Exempt under Filing Status
- Enter the withholding amount in the Additional Withholding field
- Select MO for state in the Total of Additional and Reduced Withholding amounts if applicable field
The State Code filter can be used if you populate the State Code in the PAY: Taxes screen. The State Code field is for information purposes only. See Using the State Code Filter to Limit the Localities for more information.
If the State Code filter is populated, the Local 1 and 2 boxes will display only the associated City and County/School District government types.
If the State Code filter is left blank, the Local 1 and 2 boxes will display all City and County/School government types.
Note: If you change the selection to a State Code filter on an existing Employee record, it will remove the existing Local code from the Local field.
Use the three local / disability fields to enter the name of a city or county assessing income or other local taxes. You can also use these fields to enter disability tax information.
When a state has a disability tax tied to unemployment compensation, the system does not default the disability tax code into the Local 3 / Disability field. You must enter and update the disability tax code.
Important: The system does not automatically enter, default, clear, or change information in any of the local tax fields.
Filing Status
Type or select the local filing status for the employee. SelectExemptto prevent withholding of local taxes.
Number Of Allowances
Type the number of allowances, if applicable.
Additional Withholding
Type the amount of additional local withholding, if applicable.
This check box is applicable only for those companies that do business in the state of Pennsylvania and is only visible if the database has a tax code with a Formula Reference Code beginning with the letters PSD. This check box is enabled when any PA tax code that contains the PSD in the Formula Reference Code in Local 1, Local 2, or Local 3 jurisdiction field is selected for an Employee.
Select this check box when Illinois state income tax withholding does not apply to the employee.
Under Illinois SB 1515 and effective January 1, 2020, nonresident employees are subject to Illinois income tax only if they work 30 or more days within the state. See Illinois Public Act 101-0585 and Illinois Publication 130 for details.
Important: Please work with your internal council before stopping any tax withholding. If you do manually stop tax withholding for an employee, you must remember to remove that manual stop after the employee works 30 days.
Use the FICA Exempt check box if the employee works exclusively for a municipality, such as a school or government building, where the location pays the FICA benefits for the employee. This is similar to subcontracting the employee to the municipality.
FICA Exempt Earnings are included in Gross Earnings calculations, but excluded from Taxable Earnings calculations.
Use the Medicare Exempt check box if the employee works exclusively for a municipality, such as a school or government building, where the location pays the FICA benefits for the employee. This is similar to subcontracting the employee to the municipality.
Medicare Exempt Earnings are included in Gross Earnings calculations, but excluded from Taxable Earnings calculations.
The Earned Income Credit fields are for informational purposes only and are no longer computed during payroll processing. As of 2011, the employee claims the Earned Income Tax Credit (EITC) through the filing of Form 1040 or 1040A with their tax return.
The IRS/ State Tax Info Notices text box can be used to enter IRS or state tax information for an employee.
Employers may receive notices from the government (IRS) or state indicating withholding requirements for an employee (i.e. If an employee historically did not have enough withheld and owed back taxes, etc.).
This can also be used to track employees who are exempt from withholding and have provided a valid certificate of proof.
These notes can be included on the Employee Master File Report by selecting theInclude Notescheck box.
Receive W2 Electronically
Select the Receive W2 Electronically check box to indicate the W-2 form is distributed to the employee electronically. This check box is cleared by default. The System Notes field to the right of this check box contains summary information about when this check box was selected, cleared, and if it was automatically selected as part of the partial employee import process.
Note: When running the Employee W-2 Report, you can elect to distribute hard copies, electronic copies, or distribute a hard copy and an electronic copy.
Receive 1095C Electronically
Select the Receive 1095C Electronically check box to indicate the 1095-C form is distributed to the employee electronically. This check box is cleared by default. The System Notes field to the right of this check box contains summary information about when this check box was selected, cleared, and if it was automatically selected as part of the partial employee import process.
Note: When running the Employee 1095-C Report, you can elect to distribute hard copies, electronic copies, or distribute a hard copy and an electronic copy.
The Status Information tab is used to view and change the status of an employee. An employee may have one of three valid statuses: Active, Inactive or Leave of Absence. The status displays in the Current Status field on the Employee Master File (General tab).
Note: If there is only one record in the on the Status Info tab and the Hire Date is different from the General tab, the status record cannot be deleted. This situation could occur during a conversion or when the data was imported.
If you enter a status for a future date, that record remains displayed in the Status Info Changes section until the Date Effective becomes a current or past date. At that time, the Status Info Change record will move to the top record in the Status Info History section. The history records display in Date Effective order (the most recent on the first line).
Status Info history records can be added, changed, AND deleted unless a User has the following applicable Features selected for the PAY: Employee Master File Screen.
- Status Info - Cannot Add History
- Status Info - Cannot Change History
- Status Info - Cannot Delete History
- Status Info - Tab Read-Only
For more information, see User Security.
Note: When an inactive employee is set back to active, a message box displays if there is existing direct deposit information for the employee (this does not apply to LOA status employees). The message box contains the option for you to delete the old direct deposit information. If you choose to delete it, the system automatically clears the Begin Direct Deposit check box.
When the Status is set to Inactive, an Eligibility for Rehire prompt box displays. Select either Yes or No to indicate if the employee is eligible for rehire in the future. When Yes is selected, the Eligible for Rehire check box on the General tab is automatically selected. When No is selected, this check box remains cleared.
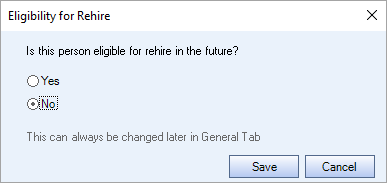
Note: If the Payroll | EligibleForRehire | True is enabled this prompt box does not display since this custom setting always makes employees eligible for rehire.
This setting restricts the ability to add a new Status Info record for more than x days in the past. # is number of backdate days.
If a user is set up to add, change, AND delete Status Info History, they can overwrite the date restriction for the Status Info History. If the User does not have all three features, the date restriction set up in the Custom Setting applies.
This is controlled by using Security Features available for the Pay Employee Master File Screen.
| Section | Item | Value |
|---|---|---|
| Payroll | BackDateStatus | # |
The ability for a User to override the date restriction is set up in the following manner:
- If a user is set up to add, change, AND delete Status Info History, they can overwrite the date restriction for the Status Info History. If the User does not have all three features, the date restriction set up in the Custom Setting applies.
This is controlled by using Security Features available for the Pay Employee Master File Screen.
Status Info History grid
Enter the effective date of the corresponding Status. WinTeam displays the Status Info History records in descending order according to this date. The most current record is at the top of the list.
This date is used as the Hire Date when running the Employee Master File - New Hire Report. It is also used as the Status Effective Date on the Employee Master File Report.
When an employee is terminated (either Hourly or Salary employee), the Effective Date that is entered with their Inactive Status record should be the “last day that the employee was considered active – or last day they worked”. Behind the scenes the system then considers that the employee is not active as of the day following.
For instance, if someone’s last day working (or last day you wanted to consider them active) was 12/31/10, you would want to enter 12/31/10. Effective 1/01/2011 the employee will be considered inactive.
Throughout the system, if you try and enter a transaction record on a day that the employee is inactive, you will either be warned or, in some cases, you will not be allowed at all (as is the case with Personnel Scheduling). For more information see Removing Inactive Employees from Personnel Schedules.
Select the Status to indicate employment status as of the Effective Date. Valid options are Active, Inactive, or Leave of Absence.
When Inactive is selected, theEligible for Rehirecheck box displays on the General tab. TheEligible for Rehirecheck box is enabled or disabled based on the Security Feature from the PAY Employee Master File Screen 'General - Cannot Change Eligible for Rehire'.
To have WinTeam automatically select the 'Eligible for Rehire' check box when an employees status is changed from Inactive to Active use this Custom Setting:
| Section | Item | Value |
|---|---|---|
|
Payroll |
EligibleForRehire | True |
Note: This only affects employees that are marked as Inactive once the Custom Setting is put in place. It does not impact current Inactive employees.
Type or select the Reason for the status change. To add a new Reason, double-click in the Reason field, or type a new Reason and press Enter. The Status Reasons Add/Edit list displays.
Note: When entering a new Inactive status reason, users must select a Status Inactive Category: Voluntary, Involuntary, or Other. The NA Status Inactive Category is used only for Active Status Reasons.
This field is available if the Status is Leave of Absence. The Expected Return From Leave Date field can be used to track and manage Leave of Absence status records. Enter the date the Employee is expected to return from Leave of Absence.
The Employee Master File Report can be filtered using the Return From Leave Dates Category.
This field is used mostly for reporting purposes for the Termination Report.
When an employee has a status change made to Inactive or Leave of Absence, the Primary Job Site information from the General top, automatically populates here.
Use the Notes field to enter any additional information pertaining to the status change. If you enter more than one line of text, the system automatically wraps the information. To start a new line or paragraph, press Ctrl + Enter.
The PAY: Employee Master File Pay Info tab is used to record information that relates to payroll for each employee. WinTeam updates the Pay Info tab when changes are made to an employee's rate of pay, Pay Type or the Primary Job (if you have selected to track Primary Job Numbers in PAY: Defaults).

Note: The Effective Date in the Pay Info History grid only applies to the pay Amount changes. For example, if you enter a future Effective Date with a different Primary Job, this Job will reflect now on the General tab and in reporting.
This Custom Setting restricts the ability to add a new Pay Info record for more than x days in the past. This setting applies to the Effective Date in Employee Pay Rate Creator and Prorate Salary also.
If a user is set up to add, change, AND delete Pay Info History, they can overwrite the date restriction for the Pay Info History. If the User does not have all three features, the date restriction set up in the Custom Setting applies.
This is controlled by using Security Features available for the Pay Employee Master File Screen.
| Section | Item | Value |
|---|---|---|
| Payroll | BackDatePayInfo | # |
The ability for a User to override the date restriction is set up in the following manner:
- If a user is set up to add, change, AND delete Pay Info History, they can overwrite the date restriction for the Pay Info History. If the User does not have all three features, the date restriction set up in the Custom Setting applies.
A Custom Setting can be used to cause the Pay Info tab to not display when performing an Employer rollover for Users who do not have Admin rights. Another setting disables the Add New button on the Pay Info tab of existing employees for User that do not have Admin rights.
Displays the current rate of pay.This field defaults to the rate in the top line of the Pay Info History grid. Current Pay Rate is blank if the Pay Type field is Other Comp Only.
Enter the scheduled date for the employee's next review. A pay rate change is not required for a review date to occur.
Type the Date of Next Review, or use the Date Control to select a date.
If a Pay Info History record was created through the Employee Pay Rate CreatorANDa Next Review Date was entered on that screen, once the Pay Rate Creator has updated, the Next Review Date field will also be updated on the Pay Info History tab.
The Review Date can be used in the Employee Pay Rate Creator in order to limit employees. You can run a filter on this field to identify employees due for review.
Select the Use Job Lunch Parameters check box to have the system automatically deduct lunch breaks during Timesheet entry based on the Lunch Parameters defined in the Job Master File (Timekeeping info tab).
Click theRates By Jobbutton to open the Rates By Job screen where pay and bill rates can be defined for a Job by Employee, Employee Title, Hours Description, Job Post or Shifts.
The Salary Distribution section displays when you select a Pay Type of Salaried (in the Pay Info History grid).
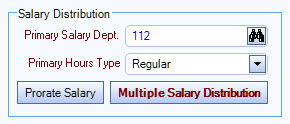
Primary Salary Dept
The Primary Salary Dept. field is used to select the Primary Job Number assigned to this employee.
Type the Primary Job Number for this employee, or use the Lookup to locate the Job Number.
If this Job number does not match the Employee's Primary Job Site (on the General tab) the user will receive a warning message indicating the Jobs do not match.
Primary Hours Type
The Primary Hours Type field is used to specify the usual type of hours for this employee and Job. The options are based on the Primary Job selection.
Note: If a previously used Hours Type for this Employee Master File is made Inactive, it will continue to display in the list, but will be unavailable.
Prorate Salary
Using this button will allow you to calculate a salary for a partial pay period based on the days the employee is active during the pay period. Click the Prorate Salary button to open the Prorate Salary Calculator window. See this link for steps to use this process for new hires, terminations and short pay.
Multiple Salary Distribution
The Multiple Salary Distribution can be used to allocate a percentage of the employee's salary to additional Jobs.
ClickMultiple Salary Distributionto open the Salary Distribution screen. If Multiple Salary Distribution is used, the Multiple Salary Distribution button displays with bold, maroon text.
Enter information concerning the employee's participation in a 401K plan. If the company does not participate in a 401K plan, this area does not display. To enter or edit the company's 401K plan participation information, go to the PAY: Defaults screen.
Participate
Select this option if the employee participates in the company 401K plan. If you select the Participate field, a Deduction options group displays for a Percentage or Dollar Amount to deduct from this employee's paycheck.
PLEASE NOTE that immediately upon selection, WinTeam will begin including employees' earnings for 401K.
Date Eligible
If the employee plans to participate in the 401K plan, enter the date the employee becomes eligible to begin the plan. The Date Eligible must be greater than or equal to the Hire Date.
If the Date Eligible is less than or equal to the ending date of the pay period being processed, the 401k will be figured and deducted from their paycheck (as long as the Participate check box is selected).
Deduction
Select whether the 401K deduction is a Percentage of the employee's pay or a flat Dollar Amount.
If Percentage is selected, enter the corresponding amount in the field to the right of the Percentage option. For example, if the deduction is 5 percent, enter 5.00%.
If Dollar Amount is selected, enter the corresponding amount in the field to the right of the Dollar Amount option. For example, if the deduction is $200 per paycheck, enter $200.00.
This check box displays when the Allow Direct Deposit option is selected in the PAY: Defaults window and enabled after direct deposit information has been entered.
Select the Begin Direct Deposit check box to enter the employee in the direct deposit program. This check box is cleared by default. When you enter a new employee record, you must saved the record first and then you can select this check box.
If you attempt to clear the check box after direct deposits have begun, a message box displays where you must confirm your intention to cancel before the direct deposit is actually ended.
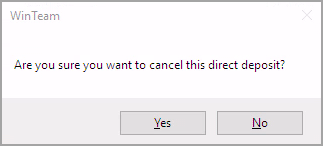
Note: When an inactive employee is set back to active, a message box displays if there is existing direct deposit information for the employee (this does not apply to LOA status employees). The message box contains the option for you to delete the old direct deposit information. If you choose to delete it, the system automatically clears the Begin Direct Deposit check box.
The direct deposit options are available and when the Allow Direct Deposit check box is selected on the Employee Master File Settings tab of the PAY: Defaults window. If the Allow Direct Deposit Third parties checkbox is selected the Direct Deposit 3rd Party and Managed by 3rd Party Start Date fields display. A note displays at the bottom of this section if the employee's direct deposit is managed by a third party. Direct deposit information is read-only and cannot be edited if the employee's pay is managed by a third party.
Note: There is a security feature called Pay Info – Can Override Direct Deposit Third Party under PAY Employee Master File that allows you to edit direct deposit information for employees whose pay is managed by a third party.
Click the Direct Deposit Information button to open the Direct Deposit Information window where you enter the employee's bank account information. After this information has been entered, the Begin Direct Deposit check box is available. Select this check box to enter the employee in the direct deposit program. This check box is cleared by default. When you enter a new employee record, you must saved the record first and then you can select this check box.
If you attempt to clear the Begin Direct Deposit check box after direct deposits have begun, a message box displays where you must confirm your intention to cancel before the direct deposit is actually ended.

Note: When an inactive employee is set back to active, a message box displays if there is existing direct deposit information for the employee (this does not apply to LOA status employees). The message box contains the option for you to delete the old direct deposit information. If you choose to delete it, the system automatically clears the Begin Direct Deposit check box.
If Direct Deposit is managed by a 3rd Party, use the 3rd Party field to enter the name of the 3rd Party in the add/edit list. Enter a Managed by 3rd Party Start Date.
The History icon is available when the Direct Deposit 3rd Party check box is enabled on the Pay Defaults screen. Click the History icon to view the change history of all the 3rd party direct deposit changes.
Click the Direct Deposit Import button to enter the employee's bank account information from a spread sheet file. See Direct Deposit Import for details.
This section only displays for new employee records. Use it to enter the employee's pay information.
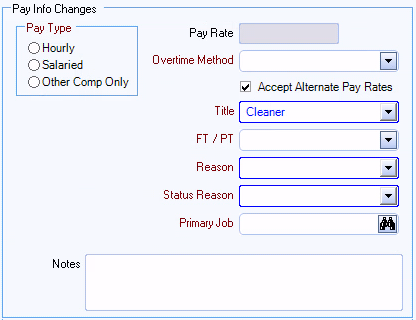
The Pay History Info grid lists each pay change the employee has had. This is based on the information entered into the Pay Info Changes section above. Information is saved into a detailed record each time a change is entered. The data displays in Effective Date order, with the most current record displayed at the top.
If you make a change to a pay record with a future date, that record remains displayed in the Pay Info Changes section of the screen until the Date Effective becomes a current or past date. At that time, the Pay Info Change record will move to the top record in the Pay Info History grid.
WinTeam displays additional fields depending on the Pay Type selected.
If the employee is a salaried employee, multiple salary distributions can be entered by clicking the Multiple Salary Distribution button. If Multiple Salary Distribution has been set up, the Multiple Salary Distribution button displays with bold, maroon text.
Choosing an Hourly Pay Rate will require you to enter an Overtime Method.
Pay Info history records can be added, changed, or deleted unless a User has the following applicable Features selected for the PAY: Employee Master File Screen.
- Pay Info - Cannot Add History
- Pay Info - Cannot Change History
- Pay Info - Cannot Delete History
- Pay Info - Tab Read-Only
Note: The Pay Info History grid does not display for a new employee until you save the new PAY: Employee Master File record.
Enter a date corresponding to this Pay Rate, or use the Date Control to select a date.
Select Hourly, Salaried, or Other Comp (Compensation) Only as the type of pay for this employee. The system displays additional fields depending on the Pay Type selected.
IfHourlyis selected, an Overtime Method must be entered.
IfSalariedis selected, enter the Primary Salary Dept and Primary Hours Type. The Salary Distribution section displays when you select a Pay Type of Salaried.
Use theOther Comp Onlyoption for employees that are paid on a commission-only basis.
This field is enabled for employees with an Hourly Pay Type.
Select the method of overtime for this employee. To set up additional Overtime Methods, use the Overtime Method Wizard on the PAY: Defaults screen. For more information see System Defined Overtime Methods and Creating and Editing Custom Overtime Methods.
Enter the employee's pay rate for Hourly and Salaried Pay Types. You must enter a value in this field that is within the range of the Min and Max Pay Validations on the PAY: Defaults screen.
- For an Hourly Pay Type, enter the pay rate per hour.
- For a Salaried Pay Type, enter the pay rate per pay period.
In US databases, this field is labeled Title–use it to select a title that corresponds to the employee's pay change. Double-click in this field to open the Titles window where you can add and edit titles. Titles can be used to filter employee records in the Employee Master Report.
In Canadian databases, this field is labeled Title/Occupational Level–use it to select an occupational level that corresponds to the employee's pay change. Double-click in this field to open the Titles window where you can add and edit titles. Title/Occupational Levels can be used to filter employee records in the Employee Master Report.
Use the FT/PT list to track whether the employee is Full-Time, Part-Time, a Subcontractor, or Other/Casual. This is a required field.
Subcontractors must be set up as "Subcontractors" in order for the system to know whether or not taxes are calculated during payroll processing. Taxes are not calculated for Subcontractors.
If you are adding a new Employee and select "Subcontractor", a message displays notifying you that tax calculations are not figured for Subcontractor records.
For detailed information on changing from a Subcontractor to a regular Employee (Full Time or Part Time) or changing a regular Employee (Full Time or Part Time) to a Subcontractor, see Paying Subcontractors based on Hours Worked.
Changing from a Subcontractor to a regular Employee (Full Time or Part Time)
If you need to change an existing Employee from Subcontractor to a regular Employee (Full Time or Part Time) you need to create a Status History record of Active on this date in order for the employee to be included on a New Hire Report. This will ensure the current hire date is the date they were hired as an employee.
If you attempt to change an existing Employee record from Subcontractor (one that has a Pay Info History record) to a Full Time or Part Time status on an existing Pay Info History line, WinTeam Displays a warning.
Changing a regular Employee (Full Time or Part Time) to a Subcontractor
If you need to change an existing Employee to a "Subcontractor" you will need to create 2 status history records: one record showing the termination date as of the last date they were an employee and one Active record showing they became a "Subcontractor".
If you attempt to change an existing Employee (Full Time or Part Time) to a Subcontractor on an existing Pay Info History line, WinTeam Displays a warning.
Select the Reason that corresponds to the pay change.
Type or select the Reason for this pay change.
To add a new Reason , double-click in the Reason field, or type a new Reason and pressEnter. TheReasonsadd/edit list displays.
Select thePromotioncheck box if the pay change is a result of a promotion. This check box is NOT selected by default.
This information is used for EEO reporting.
Select the Accept Alternate Pay Rates check box to adjust the employees rate of pay when special Alternate Pay Rates exist. This option applies to Hourly Pay Types only.
The Hours Categories screen in the Job Costing module contains Alternate Pay Rate information. The system automatically adjusts the Pay Rate for the hours worked on any Job where Alternate Pay Rates exist when you select the Accept Alternate Pay Rates check box.
If a minimum or maximum Alternate Pay rate is specified, and the employees Current Pay Rate is below or above these amounts, the system automatically adjusts the Pay Rate.
If an additional Add On amount per hour is specified, the system automatically adjusts the Pay Rate by this amount.
This check box MUST be selected in order for the Employee to accept pay rates from Rates By Job.
Enter any notes pertaining to this Pay Rate record. If you enter more than one line of text, the system automatically wraps the information. To start a new line or paragraph, press Ctrl + Enter.
These Notes display in the footer area for ease of viewing.
The Other Info tab is used to enter vacation, holiday, and sick time eligibility, I-9 Type and Expiration Date, employee availability, and eHub Settings.
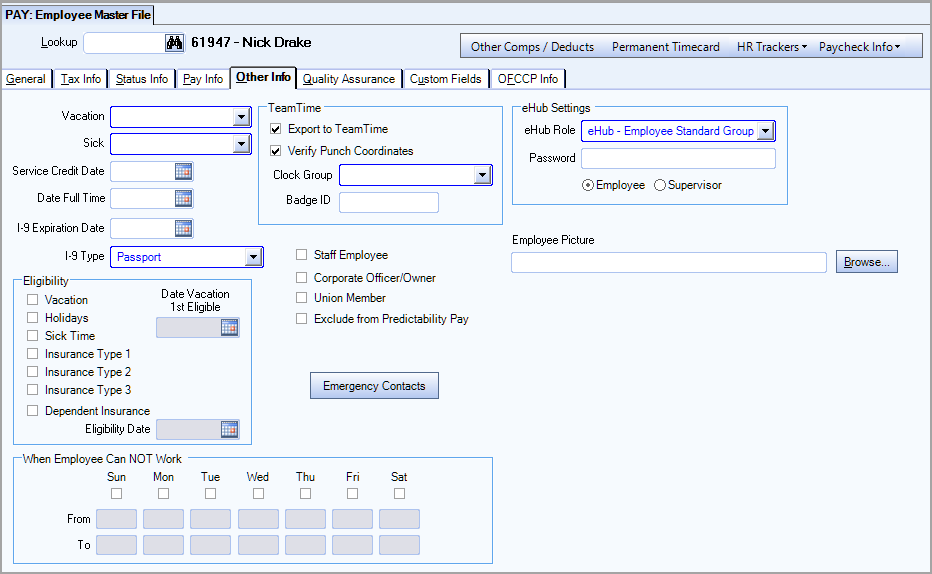
Type or select the Benefit Category that includes the benefits that this employee is eligible to receive. If the employee is not eligible for benefits, leave this field blank.
To add a new Benefit Category, double-click in the Benefit Category field, or type a new Benefit Category and press Enter. The Benefit Categories screen displays.
If your database is setup for two Benefit Categories, they display as the labels. The displayed text comes from the Benefit Category Group 1 and 2 field in PAY: Defaults (Employee Master File Settings tab). These group fields display only when you have the Allow 2 Benefit Categories field selected in the same window.
This setting can be used so that the Benefit Category is a required entry in the Employee Master File (Other Info tab).
| Section | Item | Value |
|---|---|---|
| Payroll | BenefitCategoryRequired | Yes |
The Benefit Category selected here displays on the Employee Time Off Planner in the Benefit Details grid for the selected employee.
Enter the effective date for establishing the employees seniority. The employees Current Hire Date (on the General tab) may not reflect the original service date. For example, when a new contract is awarded, the Current Hire Date may reflect the start date of the contract. Type the Service Credit Date, or use the Date Control to select a date.
Note: You can enable the Payroll | ServiceCreditDateRequired | Yes custom setting to make this field required.
Enter the date the employee began full-time employment or will begin full- time employment. The date cannot be prior to the Hire Date on the Employee Master File (General tab) screen.
Type the Date Full Time, or use the Date Control to select a date. If the employee does not work full time, leave this field blank.
This setting can be used to replace the Date Full Time label in the Employee Master File (Other Info tab) screen with the value entered with this setting. The Employee Master File Report will also be changed to replace the Date Full Time label with the value entered for the Custom Setting.
| Section | Item | Value |
|---|---|---|
| Payroll | DateFullTime | FMLA Credit Date |
Enter the expiration date of the employees I-9 employment eligibility documentation, if applicable. This is normally the date the employees work authorization expires.
Type the I-9 Expiration Date, or use the Date Control to select a date.
Type or select the I-9 Type to designate the type of employment eligibility documentation supplied by the employee. This field is necessary when the documentation has an expiration date that must be reverified and updated.
To add a new I-9 Type, double-click in the I-9 Type field, or type a new I-9 Type and press Enter. The I-9 Types add/edit list displays.
The Eligibility area is used to select which benefits the employee is eligible to receive, and are used primarily for informational and tracking purposes.
Vacation
Select the Vacation check box if the employee is eligible for vacation hours. If you select the Vacation check box, the Date Vacation 1st Eligible field displays.
Date Vacation 1st Eligible
Enter the first day the employee is eligible for vacation. The information in this field defaults to the Date First Eligible field on the Employee Time Off Planner.
A Custom Setting can be used to require the Date Vacation First Eligible field to be entered whenever Vacation is checked in the Eligibility area of this screen. Using this Custom Setting will also select the Vacation Eligibility check box when adding a new employee.
| Section | Item | Value |
|---|---|---|
| Payroll | VacDateFirstEligibleRequired | Yes |
Holidays
Select this option if the employee is eligible for holiday leave. This is useful for tracking eligibility in cases where an employee is not eligible for Holidays prior to having worked for more than a certain period of service.
Sick Time
Select this option if the employee is eligible for sick time.
Insurance Types 1, 2, and 3
Select these options if the employee is eligible for the insurance benefits offered by the corresponding insurance plans.
If you selected to use the Employee Master File to determine Health Insurance Eligibility for Child Support reporting (in PAY: Defaults), select one of these Insurance Types to identify employee's eligible for Health Insurance for Child Support Reporting.
Dependent Insurance
Select theDependent Insurancecheck box if dependent health insurance is available. If this check box is selected, you are also required to enter the Eligibility Date (date the employee is eligible for the dependent health insurance).
The Employee Master (New Hire) Report will include this information on the report for all states.
When creating electronic files, this information comes through only on the NY electronic file. More states are scheduled to follow.
Note: While this seems to only be relevant to companies with employees in New York, it should serve as a reminder to other employers in other states to check to see what benefits reporting requirements may have been implemented as states react to health care reform. While this NY requirement was not made as a specific reaction to health care reform, it does start the process for governmental agencies to be able to track who has coverage, who is providing it and who might later but subject to penalties.
Use this area to identify when an employee can work or cannot work. The type of information to enter depends on the selection made on the PAY: Defaults (Employee Master File Settings tab), Availability Options area of the screen.
When Employee Can Work
If this description displays, the days and hours selected signify the days and times that the employee is available to work.
Days–Select the check box under each day the employee can work.
From and To–The system activates these fields for the Days selected. Enter the start time and end time this employee is available for work. Enter in military time.
When Employee Can NOT Work
If this description displays, the days and hours selected signify the days and times that the employee is unable to work.
Days–Select the check box under each day the employee cannot work.
From and To–The system activates these fields for the Days selected. Enter the begin time and end time this employee is unavailable for work. Enter in military time.
This option is selected by default when adding a new employee record IF the Export to TeamTime check box is selected on the PAY: Defaults (Employee Master File Settings tab).
When the Export to TeamTime check box is selected it enables this employees information to download to the TeamTime machine. if you are using any type of telephone timekeeping software, including Team's TeamTime system, you will want to select this option.
Employee records with the Export to TeamTime check box selected are counted in the TeamTime License Counts. See SYS: License Management for information on monitoring license counts and statuses, updating roles, and removing permissions.
Verify Punch Coordinates
This check box turns on the use of the Verify Punch Coordinates Action Item for the displayed employee.
The Export to TeamTime check box needs to be selected for this field to display.
Clock Group
Type or select the Clock Group.
Double-click in the Clock Group field, or type a new Clock Group and press Enter. The Clock Groups add/edit list displays.
Badge ID
Enter the employee's badge identification number.
Select this check box to categorize the employee as a non-supervisor–for example, someone who works as office staff. This is an informational field only, and you may use it in whatever manner is necessary for your company.
Select this check box to indicate the employee is considered a Corporate Officer/Owner, so they are reported correctly where the corporate officer designation is required. This check box is used for reporting purposes only, is cleared by default, and is not required.
The following files include the corporate officer/owner information:
- ADP Quarterly Tax File
- Employee Import API
- New MexicoUnemployment Compensation Tax electronic file
- MarylandUnemployment Compensation Tax electronic file
- HR Employee Master report (grid view export only) CorporateOfficerOwner is in the Field Chooser and is available when the report format is Detail–it is not included by default
Select this check box to indicate this employee is a union member.
Select this check box to indicate this employee works from home.
Note: This field is currently only used for reporting Ohio city taxes to RITA and on the ADP Tax Filing Quarter Report.
Use this field to select the primary work county for employees that work in West Virginia. If the user selects a county in this field, the county is set in the ADP Quarter File and the WV UC Electronic File. Otherwise, the existing logic is used to determine the county.
Select this check box to exclude an employee from the Predictability Pay feature. This check box is cleared by default and its setting is not included in rollover.
This setting overrides the predictability pay setting at the job level. If the job is set for predictability pay, but the employee is set to be excluded from it, the system will suppress predictability pay warning messages for the employee, and the employee will not display on the Predictability Pay Review and Edit window.
Click this button to open the PAY: Employee Emergency Contacts window where you can enter information for people to inform if there is an emergency involving the employee.
eHub Settings display only if your company is licensed for eHub. Employees must have an eHub Role and Password set up in the WinTeam Employee Master File (Other Info tab), in order to log in to eHub. If an employee attempts to log in to the eHub with an invalid or non existent role and/or password, a message displays stating that an account has not been setup.
eHub Role
Select the eHub Role to assign to the employee. The eHub Role is used to identify the screens and features the employee will have available on eHub.
If a New Hire Default Role was set up in the eHub Setup screen, it defaults here.
The Roles available in the list are based on the eHub Security Group Roles. Double-click to open the SYS: Security Group screen.
WinTeam will use all employee records (active or inactive) with a Default Role assigned as a count in the license setup.
When an employee becomes inactive, the eHub Role changes immediately in the Employee Master File to the setting in eHub Setup. WinTeam does not look at the Date Effective to determine when the employee becomes inactive. If employee has a future inactive date, WinTeam immediately updates the eHub Role when the status is changed.
When updating or assigning an eHub role to an employee, WinTeam validates your license count.
When you are getting close to the Supervisor or Employee License Count limit, a message displays informing you that are using ‘X’ of ‘Y’ licenses. You can proceed by pressing the OK button.
When you exceed the Supervisor or Employee License Count, a message displays letting you know that you have exceeded your License Count and to contact your System Administrator. You can proceed even if you have exceeded License Counts.
After 2/1/2012, when you exceed either the Supervisor or Employee License Count, a message displays saying you have exceeded your Supervisor/Base EE License Count and to contact your system administrator. Changes cannot be saved.
These warnings allow you time to “clean up” their licensing issues and reexamine roles.
For more information seeSYS: License Management.
Password
Use the Password field to identify the password used in the portal. This field is masked.
The minimum required characters eHub passwords is set in the Password Settings section on the ESS tab of the SYS eHub Setup window. The default minimum number of characters allowed in a password is 8.
The maximum number of characters allowed in a password is 64. An error message displays if password greater than 64 characters is entered.
The Lighthouse Applications field is used with the WinTeam/Lighthouse integration. This field displays when the Lighthouse Integration field is selected in the System Defaults window. This integration transfers WinTeam employee information, to Lighthouse by adding new users. Ongoing, any WinTeam employee information changes sync with the Lighthouse user to keep it updated. To use this feature, set the appropriate selections in the this field. Multiple applications can be applied to one employee using this field.
Use the Employee Picture screen to attach a picture to the Employee Master File. It is a good idea to store all photos in the same folder. Enter the file location of this employees picture. If you do not know the path, click the Browse button to display system folders and locate the picture file.
The quality of the picture depends on the resolution of your monitor and the quality and type of file from which the picture was generated. If the picture is larger than the available space in the Picture Frame, the system resizes the picture. To minimize image distortion, resize the picture using an image editing software program. The maximum picture space is 199 X 254 pixels.
The Quality Assurance tab is read-only, except for the Publish ESS and Publish CSS check boxes. All Checkpoint information related to the selected employee displays here.
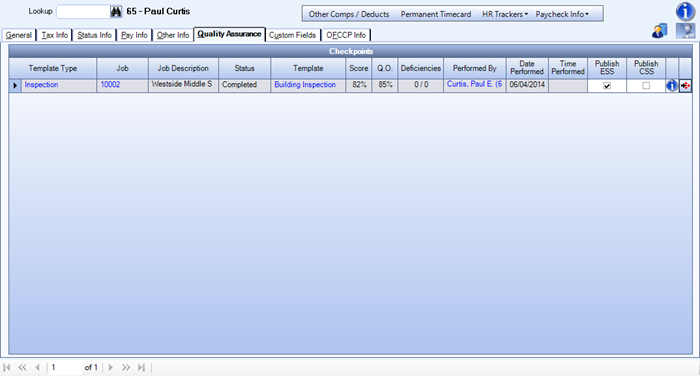
Selecting this check box will publish the Checkpoint results to the ESS eHub portal.
Note: This option is selected by default in the Quality Assurance Checkpoints screen.
Selecting this check box will publish the Checkpoint results to the CSS eHub portal.
Custom Fields can be included on the Employee Master File Report by selecting the Include Custom Fields check box. This tab allows you to set up fields for your own use. You may choose to use any or all. Each field may be customized to feature a drop-down list, text, numeric or date. You can define up to 26 Custom Fields. For more information, see Using Custom Fields.
Note: Custom fields 1-12 and 14-26 accept a maximum of 70 characters. Custom field 13 accepts a maximum of 110 characters.
This example shows several fields in use. The first four fields are set up as Drop Down Lists; the fifth field, Dr License #, is set up as a Text field; and the sixth field is set up as a Date field. The Captions displayed with bold and maroon fonts are set up as required fields.
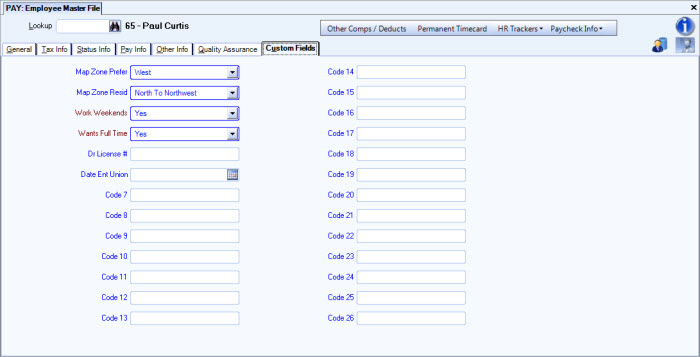
The Caption displays the description of the Custom Field as created on the Custom Field Set Up screen. Red Captions are required entries. View the Caption descriptions to determine the information to enter in the corresponding field.
Note: When you double-click on the Caption, WinTeam displays the Custom Field Set Up screen.
Use this tab to capture information for the Office of Federal Contract Compliance Programs (OFCCP) and other sensitive employee information.
If an administrator with the proper security permissions has selected the Cannot View Sensitive Fields security feature in System Security, it is possible you will not see the Employee Master File OFCCP tab. This tab may be hidden to protect sensitive employee information. If this tab not visible, it will remain so when using the Rollover button to create a new Employee Master File.
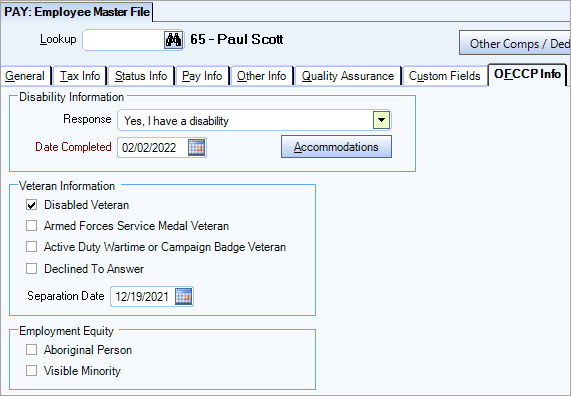
Response
The Disability Information area is used to classify disability status. The drop-down allows you to select one of three responses: Yes, I have a disability; No, I don't have a disability; I don't wish to answer. Upon selection, a required Date Completed Field will display.
Accommodations
Click to open the Disability Accommodations Diary where you may track accommodations being made for an employee with disabilities, to help ensure your company is following its Affirmative Action Plan (AAP). Double-click in the Type field to open a standard Add/Edit List. If you have the proper permission to view this information, you may also be able to run a Disability Accommodations report from the Human Resources Diary Report.
If an administrator with the proper security permissions has selected the Cannot View Sensitive Fields security feature in System Security, it is possible you will not have access to the Disability Accommodations Diary. This diary is separate from the Employee Master File and may be hidden to protect sensitive employee information.
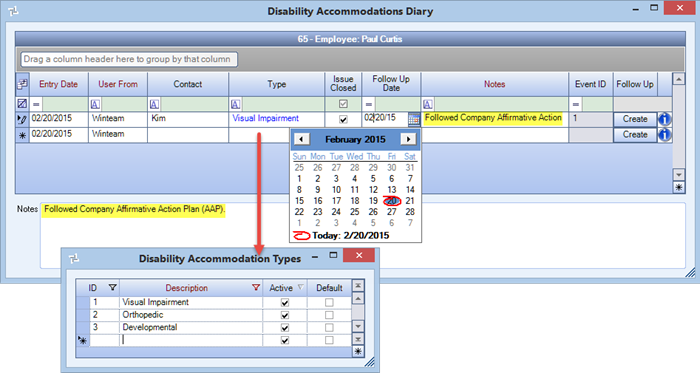
The Veteran Information area is used to classify information relating to veterans. This information is used to prepare the EEO/Vets Report.
Select the class the veteran falls under:
- Disabled Veteran - This class of veteran means a veteran of the U.S. military, ground, naval or air service who is entitled to compensation (or who but for the receipt of military retired pay would be entitled to compensation) under laws administered by the Department of Veterans' Affairs for a disability or (ii) a person who was discharged or released from active duty because of a service-connected disability.
- Armed Forces Service Medal Veteran - Veterans who, while serving on active duty in the Armed Forces, participated in a United States military operation for which an Armed Forces service medal was awarded pursuant to Executive Order 12985.
- Active Duty Wartime or Campaign Badge Veteran - This class of veteran served on active duty in the U.S. military, ground, naval or air service during a war or in a campaign or expedition for which a campaign badge has been authorized.
- Recently Separated Veteran - Any Veteran during the three-year period beginning on the date of such veteran’s discharge or release from active duty in the U.S. military, ground, naval, or air service. WinTeam calculates three years from the date entered in the Separation Date field below.
Separation Date
Enter the date the employee was discharged or released from the service. WinTeam calculates three years from the date entered for the protected Recently Separated Veteran class.
This section only displays on Canadian databases. It contains check boxes which are used to capture Employment Equity Occupational Groups information. These check boxes are cleared by default on all new records and when a record is rolled over. They are included in the advanced filter.
- Aboriginal Person
- Visible Minority
Related Information
| Section | Item | Value | Module and Purpose |
|---|---|---|---|
| Addresses | UseZipsForCityState | Yes |
This setting automatically fills in the City and State (City and Province) fields when entering a Zip Code. It also removes the City and State fields from the tab stop order. |
| Addresses | TabCityState | Yes | This setting will leave the City and State fields (City and Province) in the tab stop order when the Zip Code Custom Setting is in place. |
For more information see Auto Populating City and State Fields.
| Section | Item | Value | Module and Purpose |
|---|---|---|---|
| DocLink | ApplicantImport | Yes | This setting displays the DocLink Import button on the Employee Master File (General Info tab). Provided you are licensed for DocLink, you can connect to the FileBound Applications Project, select a record marked "Ready for Hire", and then import information to the new Employee Master File record. |
| EmpRollover | ExtraInfo | True | This setting excludes the Custom Fields when performing a rollover. This setting also rolls over extra information that is not normally rolled over including Employee Name, Address, and Pay Rate fields. This is not something most companies would ever use. |
| EmpRollover | HideAddNew | Yes | This setting will disable the Add New button on the Pay Info tab of existing employees for User that do not have Admin rights. |
| EmpRollover | HidePayInfo | Yes | This setting will cause the Pay Info tab to not display when performing an Employer rollover for User who do not have Admin rights. |
| Payroll | BackDatePayInfo | # |
This setting applies to the Effective Date in Employee Pay Rate Creator also. # is number of backdate days.The ability for a User to override the date restriction is set up in the following manner:
|
| Payroll | BackDateStatus | # | Employee Master File (Status Info tab) This setting restricts the ability to add a new record to the status Info tab for more than x days in the past. # is number of backdate days. The ability for a User to override the date restriction is set up in the following manner:
|
| Payroll | BenefitCategoryDescription | Vacation Category | This setting allows you to change the name of the Benefit Category field label to be whatever your company would like it to be (i.e. Vacation Category). The value can be labeled whatever you want it to be. |
| Payroll | BenefitCategoryRequired | Yes | This setting can be used so that the Benefit Category is a required entry in the Employee Master File (Other Info tab). |
| Payroll | DateFullTime | FMLA Credit Date | This setting will replace the Date Full time label in the Employee Master File (Other Info tab) screen with the value entered with this setting. The Employee Master File Report will also be changed to replace the Date Full Time label with the value entered for the Custom Setting. If this setting is used, the system will not check to see if this date is greater than the hire date. Tool tips display for approximately 35 seconds. |
| Payroll | DisableTaxWithholding | Yes | Employee Master File (Tax Info) This setting locks Additional Withholding fields on the Employee Master File (Tax Info tab). This will lock Additional Withholding fields for Local fields. |
| Payroll | VacDateFirstElibibleRequired | Yes | Employee Master File (Other Info tab) This setting requires the Date Vacation First Eligible field to be entered whenever Vacation is checked in the Eligibility area of this screen. Using this setting will also select the Vacation Eligibility check box when adding a new employee. |
| Payroll | ValidateSSN | Yes | This setting displays a social security validation popup when entering a social security number on a new employee record. After entering the social security number the first time, the system will then blank out the Social Security Number field forcing the User to renter the Social Security Number from the source document. |
| EmpRollover | ExtraInfo | True | This setting excludes the Custom Fields when performing a rollover. This setting also rolls over extra information that is not normally rolled over including Employee Name, Address, and Pay Rate fields. This is not something most companies would ever use. |
| EmpRollover | HideAddNew | Yes | This setting will disable the Add New button on the Pay Info tab of existing employees for User that do not have Admin rights. |
| EmpRollover | HidePayInfo | Yes | This setting will cause the Pay Info tab to not display when performing an Employer rollover for User who do not have Admin rights. |
| Payroll | BackDatePayInfo | # |
This setting applies to the Effective Date in Employee Pay Rate Creator also. # is number of backdate days.The ability for a User to override the date restriction is set up in the following manner:
|
| Payroll | BackDateStatus | # | Employee Master File (Status Info tab) This setting restricts the ability to add a new record to the status Info tab for more than x days in the past. # is number of backdate days. The ability for a User to override the date restriction is set up in the following manner:
|
| Payroll | BenefitCategoryDescription | Vacation Category | This setting allows you to change the name of the Benefit Category field label to be whatever your company would like it to be (i.e. Vacation Category). The value can be labeled whatever you want it to be. |
| Payroll | BenefitCategoryRequired | Yes | This setting can be used so that the Benefit Category is a required entry in the Employee Master File (Other Info tab). |
| Payroll | DateFullTime | FMLA Credit Date | This setting will replace the Date Full time label in the Employee Master File (Other Info tab) screen with the value entered with this setting. The Employee Master File Report will also be changed to replace the Date Full Time label with the value entered for the Custom Setting. If this setting is used, the system will not check to see if this date is greater than the hire date. |
| Payroll | DisableTaxWithholding | Yes | Employee Master File (Tax Info) This setting locks Additional Withholding fields on the Employee Master File (Tax Info tab). This will lock Additional Withholding fields for Local fields. |
| Payroll | RequireEmail | True | PAY: Employee Master File This setting makes the email address field a required entry. |
| Payroll | VacDateFirstEligibleRequired | Yes | Employee Master File (Other Info tab) This setting requires the Date Vacation First Eligible field to be entered whenever Vacation is checked in the Eligibility area of this screen. Using this setting will also select the Vacation Eligibility check box when adding a new employee. |
| Payroll | ValidateSSN | Yes | This setting displays a social security validation popup when entering a social security number on a new employee record. After entering the social security number the first time, the system will then blank out the Social Security Number field forcing the User to renter the Social Security Number from the source document. |
The PAY Employee Master File Screen has its own Security Group, PAY Employee Master File.
The PAY Employee Master File Screen is part of the PAY ALL Security Group.
In addition to the form security, Pay Security levels are set up for each user of the system who has access to Payroll.
- If a user is not set up with Pay Security levels, the system does not allow the user to have access to any information in the Employee Master File. In addition, the user will have very little access to information in other areas of Payroll.
- On the other hand, if a user is set up with Pay Security levels, the system limits the information that this user can add, change, or view within the Employee Master File screen and other areas of Payroll based on the level assigned. For detailed information see Pay Security on the User Security screen.
If you want to reduce or downgrade a users security, you will need to create a Custom Security Group that removes Features, since, by default, a user with rights to the Employee Master File can perform many Features.
- Cannot View Sensitive Fields (Birth Date, Gender, Ethnicity fields on General Tab; OFCCP Tab)
- Custom Fields - Tab Read-Only
- General - Cannot Add New Employee
- General - Cannot Change Company
- General - Cannot Change Eligible for Rehire
- General - Cannot Change Employee Name
- General - Cannot Change Employee Number
- General - Cannot Change Employee Type
- General - Cannot Change Security Level
- General - Cannot Change SSN
- General - Tab Read-Only
- OFCCP - Tab Read-Only
- Other Info - Cannot Change eHub Role/Password
- Other Info - Tab Read-Only
- Pay Info - Cannot Add History
- Pay Info - Cannot Change History
- Pay Info - Cannot Delete History
- Pay Info - Tab Read-Only
- Status Info - Cannot Add History
- Status Info - Cannot Change History
- Status Info - Cannot Delete History
- Status Info - Tab Read-Only
- Tax Info - Tab Read-Only
For more information see Learning about Security Groups.
Rolling Over an Employee Master File record
Manage Licensing for eHub and TeamTime

