Overview
You access the Job Master File from the Job Costing Menu. WinTeam uses Jobs throughout the system. Job Costing is the foundation on which the system is built. For an overview of areas in WinTeam linked in some way to Job Costing and/or to the Job Master File, see the Job Flow Chart.
Key Functionality
Click the Advanced filter button to create or edit a filter for finding and/or sorting specific records. You can also select a Saved filter. Click the Apply Filter/Sort button to apply any filter or sort criteria you created. Click the Remove Filter/Sort button to remove a filter or sort, if one is currently applied. For more information see Advanced Filtering.
The Diary enables you to keep notes concerning issues or to track using Follow Up Dates. Record any interaction you want to remember—such as a phone conversation or a handwritten letter you mailed or received. For more information see Diaries.
Click the Diary button to open the Job Diary screen.
Rollover
Click the Rollover button to display the Job Rollover screen.
You can select to include the Holiday List, Job Requirements, Contacts, Budgets, or only the most recent Budget when rolling over the Job.
For more information, see Job Rollover.
Lookup
The Lookup field can be used with numbers or names, or both.
If you enter an Job Number and the number matches an existing record the record is displayed.
If you enter a Description and the Description matches an existing record Description, a list displays. You can then select the record you want to use.

To search for a record in a list, select the Quick Lookup button ![]() .
.
To search for a record in a list with the focus set to the Number/ID field, press F4. To search for a record in a list, with the focus set to the Description/Name field, press F5.
Since you are on a master file screen, you can press the shortcut key ALT + L to place your cursor in the Lookup field.
For more information see Using Quick Lookups or Lookup Jobs.
Hover over the Change Information icon to see User Added, Date Added, User Changed and Date Changed information. WinTeam records the logon name of the user entering or changing this record. The Date Added is the original date this record was entered into the system. The Date Changed is the date the record was last changed. Right-click on the Change Info icon to filter for records added or changed by a specific user or date.
When you hover over the User Changed or Date Changed filters, you can:
- Filter By Selection - Filters for all records that match your current records field value.
- Filter by Exclusion - Excludes from your filter all records that match your current records field value.
- Filter For - Filters based on the text/value you enter.
- Sort Ascending - If you already have a filter applied, the Sort Ascending command is available. Also used to include all records in the filter and sort in ascending order based on the current records field value.
- Sort Descending - If you already have a filter applied, the Sort Descending command is available. Also used to include all records in the filter and sort in descending order based on the current records field value.
The General tab is used to enter general information pertaining to individual Jobs in WinTeam. The Job Name and Address entered on the Job Master File (General tab) screen appear on corresponding Work Tickets and Customer Invoices (as the Service Location). The Job Phone Number and Contact information entered on the Job Master File (General tab) screen also appear on corresponding Work Tickets. You can access Work Schedules directly from this tab. Job specific Action Items can be submitted and reviewed.
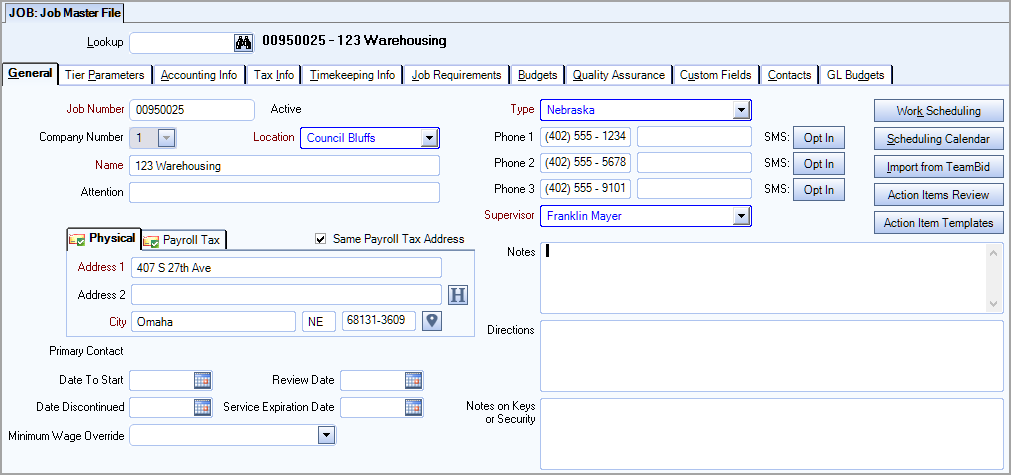
Enter a Job Number to create a new Job record. Type a Job Number in this field, or use the Lookup to locate an existing Job. When creating a new Job record, you can enter the Customer Number as the Job Number. This simplifies invoicing and posting cash receipts.
The Job Number field will only validate if the Job Number already exists. The Job Number field will not validate the Job Description in this field. Validation is done on the Job Number or Job Description only when using the Lookup Job (in the header).
When an existing Job Number with an Inactive status is entered, the system displays a message prompting you to confirm that you want to select it.
To allow for alphanumeric Job Numbers, you will need to go to Job Defaults and select the check box "Allow New Alphanumeric Jobs." An existing alphanumeric Job Number can be changed to another alphanumeric Job Number regardless of whether this check box is selected.
In order to change a Job Number, you must have rights to the JOB Job Master File screen with the Can Change Master Number feature selected.
The job's current status of either Active or Inactive displays to the right of the Job Number field. This status is controlled by the date you enter in the Date Discontinued field.
- If this date is today or before, the system changes the job status from Active to Inactive
- If this date is after today, the system maintains the job's Active status
Note: A system service automatically runs every day at 2 am and 2 pm to check the Date Discontinued of the job.
You may be prompted to clear all the budgets for the job effective as of the date discontinued. If you select yes, any budgets for the job will be deleted.
You may be prompted to inactivate any applicable work tickets. If you select yes, any work tickets after the date discontinued will be inactivated. If the work tickets are recurring, the Date Discontinued for the job replaces the End Date of the work ticket on the Scheduling tab of the Scheduling tab window.
This is a required field visible only for clients who are licensed for more than one company. Use the Company field to indicate the Company to which this Job belongs. Only the Companies to which the logged on User has rights will display in this list.
Note: Once a Company Number is assigned to a Job it cannot be changed, as doing so would create an out of balance situation in the General Ledger. If you have set up a Job with an incorrect Company number, you can delete the Job record if it has not been used in a record within your database. Or, if this Job already has posted activity, you should create a new Job for the correct company and make the incorrect Job inactive.
This required field is visible only for clients who are licensed for more than one location. Use the Location field to select the Location to which this Job belongs. Double-click in this field to access the Location Setup screen.
Note: Only the Locations to which the logged on User has rights will display in this list.
Enter a description that identifies this Job.
The Attention field is used to enter information, such as the name of a person or department.
Note: You can use the ARInvoices | ShowJobAttention | Yes custom setting to add the information from this field to the Service Location on AR invoices.
Use the Address field to enter the physical location of the Job, including the street number and street name.
Use the second address line if the address information exceeds the first line, or to enter additional information, such as a suite number.
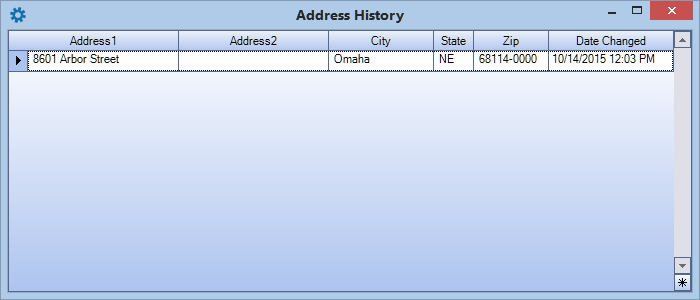
Click the History button to open the Address History screen. Here you can review and validate historical changes for both mailing and tax addresses. The system tracks five address fields and the date(s) changed and lists in descending order.
Use the City field to enter the city for the billing address of the customer.
Use the State field to enter the two-digit abbreviation for the state or province for the customer’s mailing address. You can use the Zip Code Custom Setting to populate this field.
Use the Zip field to enter the ZIP/postal code of the customer's address. After you type the first number, a dash (-) displays for the entry of the four-digit extension. If the first character you type is an alpha character, the system changes the format to a Postal Code for Canadian addresses.
Click to link to Google Maps to quickly view maps and get directions. The link generates a map centered on the address you have entered in WinTeam. For more information see Using Google Mapping.
This button  displays when the latitude and longitude was used to validate the address. Click the Address Override button to display the Latitude Longitude Override window. This window displays the Latitude, Longitude, Location Code, Municipality ID and School ID. See this link for additional information on address override.
If a Primary Contact has been designated in the Contacts tab, the Salutation, First Name, and Last Name display here in blue text.
You can double-click on the contact information to open the Contact record.
Enter or select the Job Type. The Job Type lets you group similar types of Jobs for reporting and Timekeeping purposes.To add a new Job Type, double-click in the Job Type field, or type a new Job Type and press Enter. The Job Types add/edit list displays.
Use the Phone 1 field to enter a primary contact phone number for the Job. Use the Phone 2 field to enter an alternate contact phone number for the Job. Use the Phone 3 field to enter an additional alternate phone number for the Job.
You must enter the area code for all phone numbers, including local phone numbers. To specify the type of phone number, type the Phone Description to the right of the Phone field. (Example: Office, Fax, or Janitor Cell.)
Use the Phone Description field to identify the corresponding Phone field.
Click the Opt In button to initiate the process to set up the phone number to receive periodic check and missed clock-in reminder SMS messages from WinTeam.

Click Yes in the message box to send a message to the phone number.
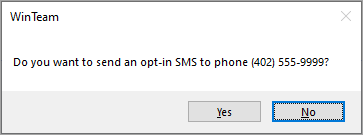
The employee must reply YES to this message to complete the opt in process.
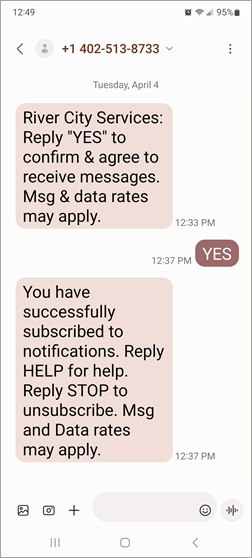
The status displays as Pending before the employee responds and changes to Opted In after the employee's response is received.


The employee must reply STOP to opt out of text messaging.
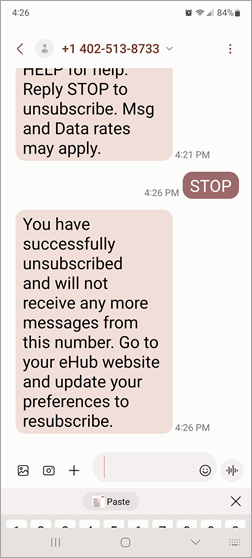
The status displays as Opted Out after the employee responds. You must manually clear the phone number and add it again if you want to reactivate the Opt In button.

Enter or select a Supervisor to assign to this Job. To add a new Supervisor, double-click in the Supervisor field, or type a new Supervisor and press Enter. The Supervisor add/edit list displays.
Note: The Supervisor add/edit list used in the Job Master File is the same add/edit list used in the Employee Master File, with the exception of the ability to set a default Supervisor.
Enter the first day that employees will work at this Job site. Type the date in MMDDYY format, or use the Date Control to select a date. The system begins budgeting daily hours for this Job on this date for the following reports:
Use the Date Discontinued field to enter the first day that the job is inactive. Type the date in MMDDYY format, or use the Date Control to select a date.
When you enter the Date Discontinued, the system displays a message asking whether you want to clear all budgets associated with this Job as of the Date Discontinued. Select Yes to delete all of the budget records as of the specified Date Discontinued. Select No to retain the budget records for this Job.
If you select Yes, the system stops budgeting daily hours for this Job from the Date Discontinued. Once you enter a Discontinued Date, you are required to enter a Discontinued Reason.
Tip: You can enable the Jobs | AutoEndBudgetsAndSchedules | Yes custom setting to automatically inactivate daily budgets and related work schedules when a job is changed from active to inactive.
The job's current status of either Active or Inactive displays to the right of the Job Number field. This status is controlled by the date you enter in the Date Discontinued field.
- If this date is today or before, the system changes the job status from Active to Inactive
- If this date is after today, the system maintains the job's Active status
Note: A system service automatically runs every day at 2 am and 2 pm to check the Date Discontinued of the job.
The Discontinued Reason is used to define why a Job is discontinued. This field displays after you enter a Date Discontinued.Type or select the Discontinued Reason. To add a new Discontinued Reason, double-click in the Discontinued Reason field, or type a new Discontinued Reason and press Enter. The Discontinue Reasons add/edit list displays.
Enter an anniversary date to review this Job. To view all Jobs that are due for a review, run a Job File Report using a specified Review Date Range.
The Service Expiration Date can be used to filter the Job File Report. This field is independent from the Discontinue Date and Review Date. The Service Expiration Date can be used for any purpose you require.
Example: This date field could be used for Jobs that are seasonal (like state fairs, football games, etc.) where they recur each year, but only for a limited time. The Job isn’t discontinued, but the service is temporarily discontinued.
Use this field to apply a custom minimum wage type to the job. This rate will override any federal, state, county, or city minimum wage rate. See Minimum Wage Compliance for details.
Use the Notes field to enter any Notes pertaining to this Job. These notes will display in the information window on eHub Mobile with eHub security feature Show Notes.
Use the Directions field to enter directions to the Job location. The system displays this information in the Ticket Notes field on the Schedules screen, and prints it on Work Tickets and Itineraries for this Job.
Note: If you import information from TeamBid into the Job Master File record, the Directions field will populate with the direction information from the Building Setup screen.
Use this field to enter notes on building security and/or locating the keys for the building. Users with the Show Notes on Keys or Security eHub security feature can see these notes when viewing job information in eHub web and mobile. These notes also display in the Job File Report. If the LaserInvoice | SpecialMessage | True custom setting is enabled, these notes display AR Invoices.
This field does not have a character limit. The entire content of the notes display in eHub web and mobile. The display of the notes on AR Invoices and in the Job File Report is limited to the first 250 characters.
Click (or press ALT + K) to go directly to WS: Schedules. This makes it easier to set up Work Scheduling items without closing the Job Master File record.
If you are on an existing Job record, the system asks if you want to add a new Work Scheduling record for it. If you click No, the Work Scheduling screen opens to a new record. This is the default. If you click Yes, the Work Scheduling screen opens and the Job Number field populates with the Job you are currently viewing.
Click (or press ALT + S) to open the WS: Calendar filtered for the current Job.
Click (or press ALT + I) to import Building information from TeamBid.
Click to open the Action Items Review screen for the selected Job.
Click to open the Templates By Job screen.
The Tier Parameters tab is used to categorize Jobs. Tier Descriptions are set up in the System Defaults file. The system uses Tier Parameters to sort Jobs for a number of different management reports. You can use Tier Parameters to define areas of responsibility for each Job, targeting detailed information. For example, in the Job File Report, you might choose to print only those Jobs that belong to one description in Tier One. In the Job Cost Report, you might choose to print all Jobs that share the same descriptions in several or all Tiers.
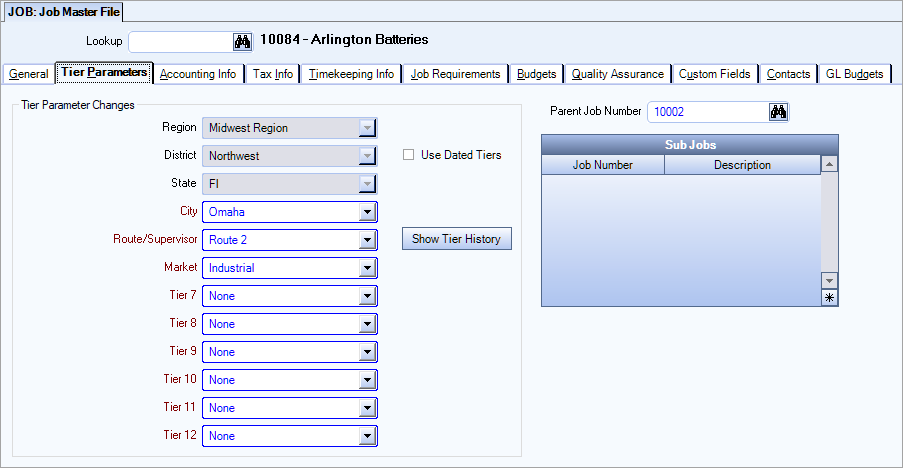
You can specify the hierarchical relation between Tiers in order to improve data entry accuracy, allowing more accurate Job classification, and enabling more accurate reporting and financials. See Tier Hierarchy Relationships for more information
View the Tier Captions to determine the information to enter in the corresponding field. There are twelve possible captions, which are set up and maintained on the SYS: Defaults and Tier Parameters screen.
Select or view the description corresponding to each Tier Caption. To add a new Description, double-click in the Description field, or type a new Description and press Enter. The Tier Descriptions add/edit list displays.
The Dated Tiers option enables the system to track all changes made to Tiers and auto populates the Tier History screen with the effective date you specified. You can modify the effective date on the Tier History screen, if needed.
The Use Dated Tiers check box determines whether or not the system will look at the Tier History of changes that have occurred to this Job when printing a Tiered Based report. If this check box is not selected, Tiered Based reports will always use the current tier parameter set up. If this check box is selected, the system uses the tier history to separate the Job's activity so that it prints with the proper tier on the report based on the Effective Up To date.
The Effective Up To date is when that tier description ends—it starts the day after the previous description. In following example, the most current description is effective from 2/1/2022 thru 5/31/2022.

If the Use Dated Tiers check box is NOT selected, the report uses the Job's current Tier Parameters when determining what Tier the activity should be reported under. Dated Tiers are not used in Billable Ticket Review, WS: Calendar, Post Watch, AR: Invoice Review, or HR: Compliance Quick Entry.
Note: The on screen Job Cost Analysis does not look at dated tiers.
The following custom setting is available. This setting restricts Date Tiers to being entered to the first day of the month on the JMF. In Tier History new and edited rows are limited to the last day of the month. Existing rows do not need to be updated to the last day of the month on Show Tier History.
|
Section |
Item |
Vaule |
|---|---|---|
|
Jobs |
RestrictTiersToFirstDay |
Yes |
Click the Show Tier History button (or press ALT + S) to display the Tier History screen. This screen is a running list of all Tier changes entered in the system for this Job provided you have selected to Use Dated Tiers or have manually added information to the Tier History screen.
Use the Parent Job Number field to view or select a primary Job related to this Job, if applicable. The Parent Job and Sub Job fields allow you to group related Jobs, which is useful for the Job Cost Report.
Type the Job Number in this field, or use the Lookup to locate a Job record.
When you define a Parent Job Number, the system lists the current Job as a Sub Job on the Tier Parameters screen of the Parent Job.
Example: You select Job 2000 as the Parent Job Number on the Tier Parameters screen of Job 2001. When you view the Tier Parameters screen for Job 2000, Job 2001 displays in the Sub Job list.
Note: The Parent Job Number cannot be the same as the current Job Number.
Use the Sub Jobs area to view Jobs related to this Job. Entries display here when this Job is designated as the Parent Job Number on a related Jobs Tier Parameters screen. Note: Sub Jobs cannot have Sub Jobs.
Example: You select Job 2000 as the Parent Job Number on the Tier Parameters screen of Job 2001. When you view the Tier Parameters screen for Job 2000, Job 2001 displays in the Sub Job list.
When you run a Job Cost Report, an option to Group by Parent Job # is available. If you select the option, the system rolls Sub Job activity into the Job Cost Report for the Parent Job #. If you do not select the option, the system prints each Job separately.
Note: The Parent Job Number cannot be the same as the current Job Number.
The Accounting Info tab is used to enter information pertaining to taxes, financial calculations, resale methods, and Work Scheduling defaults. You can also specify a different set of Invoice Information (Company Name, Company Address, Logo, or Billing Remittance) than what is indicated for the Job's Company on this tab. Additional Invoice Information can be added to invoices when using the Framed by Job Invoice Format.
Changing your tax settings in the Job Master File will update your tax settings for all future invoices created. This includes invoices created and setup through Invoice Entry, Recurring Invoices, and Bill Codes by Job.
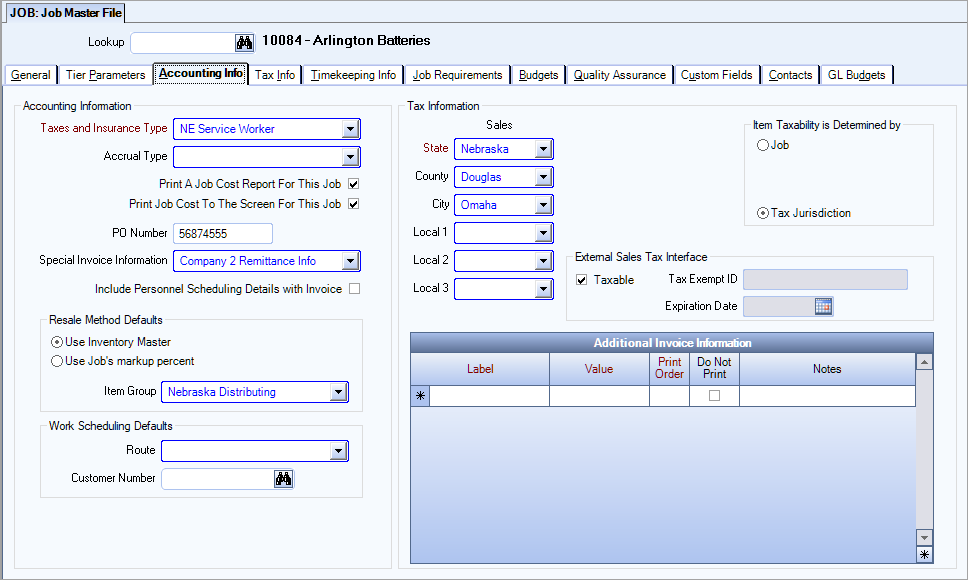
The Taxes and Insurance Type is used to view or select the combined Payroll Tax rate the system uses to calculate this Job's estimated portion of Employers FICA, Federal Unemployment Tax, State Unemployment Tax, Workers Compensation, and Liability Insurance. Type or select the applicable Taxes and Insurance Type for this Job.
To add a new Tax and Insurance Type, double-click in the Taxes and Insurance Type field, or type a new Taxes and Insurance Type and press Enter. The JOB: Tax and Insurance Allocation by Job Program displays provided you have the proper security. In order to access this screen you must have the JOB Taxes and Insurance Group assigned to you.
The system uses this tax rate to calculate taxes on the actual labor dollars when posting Payroll to the General Ledger and to calculate the budgeted tax and insurance dollars for each Daily Labor Budget.
The system stores the estimated actual Taxes and Insurance amounts in the Labor Distribution Details screen. The amounts are memo entries (which are not posted to the General Ledger) for use in Job Costing, and in running Profit and Loss statements by Job. One way to access the Labor Distribution Details screen is by drilling down from any Labor Distribution Journal (LDJ) posting in the General Ledger Journal Update Log.
Note: If you modify the Taxes and Insurance Type percentages after the Budget Details are populated (Budget History shows Posted - Not Editable), the changes are reflected only if you create a new Budget Details record or use the Daily Budget Adjustments screen.
Use the Accrual Type field to select the type of accrual to process. If the Payroll cycle does not end at the same time as the Fiscal Period, it may be necessary to perform a Labor Accrual for this Job. Type or select the applicable Accrual Type for this Job.To add a new Accrual Type, double-click in the Accrual Type field, or type a new Accrual Type and press Enter. The Accrual Types add/edit list displays.
Select the Print A Job Cost Report For This Job check box to include this Job in the Job Cost Report.
If the Job later becomes inactive, you may wish to clear this check box so zero amounts do not print on reports. For more information, see Making a Job Inactive.
Select the Print Job Cost Info To The Screen For This Job check box to view this Job through the On Screen Job Cost option on the Job Costing screen.
If the Job later becomes inactive, you may wish to clear this check box so zero amounts do not print on reports. For more information, see Making a Job Inactive.
Use the PO Number field to enter the Job's default Purchase Order Number.
During Invoice Entry (or Recurring Invoice Entry), the Purchase Order Number entered here defaults to the Invoice.
Use the Special Invoice Information field to assign specific Invoice Information to this Job. If you need to specify a different set of Invoice Information (Company Name, Company Address, Logo, or Billing Remittance) than what is indicated for the Job's Company, you may indicate that here.
By creating a new Invoice Information record, you can also indicate a template specific to the Job. If Special Invoice Information is used in the Job Master File it will override the default settings in the AR: Invoice Information Setup screen.
Select an existing Invoice Information record, or double-click in this field to display the Invoice Information Setup screen.
Select so that the Paper with Remittance and Paper without Remittance invoice formats will include the special invoice backup sheet showing all of the Personnel Scheduling details.
The PS Detail Cell information will print on a separate detail sheet along with all Other Billing data.
This will also be done on the Reminder Notices formats and Canadian Invoice formats.
See Examples in AR: Invoice Processing.
| Section | Item | Value | Description |
|---|---|---|---|
| LaserInvoice | ExcludePSDetail | True | This setting determines whether to print ANY PS Detail pages. If this setting exists, no invoice will have this included regardless of whether the Job is set up to Include Personnel Scheduling Details with Invoice. This might be used on those cases where people are starting to get set up to print PS Details but aren’t quite ready to turn on. |
 The Canadian Invoice’s Personnel Scheduling back up sheet prints the In and Out times using Military time (24 hour clock).
Use the Resale Method Defaults area to define pricing calculations for inventory items resold and billed to this Job.
Item Group pricing takes precedence over all other pricing. If an Item Group is not selected, then the system looks for special pricing using the Job's markup percent. Lastly, the system looks in the Item Master File for resale pricing.
Use Inventory Master
Select the Use Inventory Master check box to use the pricing system set up in the Item Master File record to price products sold to this Job.
For products sold to a customer outside of the normal usage for the Job, the system uses the pricing available for each product in the Inventory Master screen. You may set up Special Pricing for this Job in the Inventory Master screen on a per product basis, but no overall markup will be established.
Use Job's Markup Percent
Select the Use Jobs Markup Percent option if this Job is set up to use a fixed percentage markup. This markup percentage overrides the normal resale price on the Inventory Master screen.
When you select this option, a second field displays for entering the percentage markup to apply to all products.
Percent
The field displays only when the Use Job's Markup Percent option is selected.
Use the Percent field to enter the percentage markup to apply to all products, regardless of the resale price(s) set up in individual Inventory records.
Item Group
Select an Item Group if you wish to use Item Group pricing for this Job.
Type or select the applicable Item Group for this Job.To add a new Item Group, double-click in the Item Group field, or type a new Item Group and press Enter. The Item Group Setup screen displays.
Route
Select the Route to define the normal route for scheduling this Job. The system uses this Route as the default whenever a new Work Schedule is set up for the Job. You may modify this field during the scheduling process.
Double-click in this field to open the Routes screen.
Customer Number
Select the Customer Number to define the normal Customer Number to bill this Job through Work Scheduling, or use the Lookup feature to locate the Customer record. The system uses this Customer Number as the default whenever a new Work Schedule is set up for the Job. You may modify this field during the scheduling process.
You can double-click in this field to open the Customer Master File. If a Customer Number exists in this field, the customer record will open. If the Customer Number field is blank, a new Customer Master File record will open.
This check box is visible if you use Avalara. When selected, the Primary Service Location set on the invoice is used instead of the job address as the Ship To (Destination) address. The Ship From (Origination) address may also be set to the Primary Service Location if there is no address setup on the Location assigned to the job. See External Sales Tax Interface Implementation Guide for additional information
This field is visible when this Custom Setting is in place.
| Section | Item | Value |
|---|---|---|
| Jobs | InvoiceDistACB | Yes |
This setting enables the Invoice Distribution add/edit list, adds an Invoice Distribution Type field to the Job Master File (Accounting Info tab), and allows you to filter by Invoice Distribution Types when Printing/Processing Invoices, Updating PS Schedules to AR, and Updating Invoices to the General Ledger. All Invoice Distribution settings will then be determined from the Job Master File. The Delivery Option field (Customer Master File) will be disabled. In addition, you can include the Invoice Distribution Type on the Bill Codes By Job Report.
Type or select the Invoice Distribution Type for this Job.
If the Invoice Distribution Type is not marked as 'Active' it does not display in the list. However, inactive Invoice Distribution Types will remain in the add/edit list.
To add a new Invoice Distribution Type, double-click in the Invoice Distribution Type field, or type a new Invoice Distribution Type and press Enter. The Invoice Distribution Types add/edit list displays.
The Tax Information Sales fields are used to calculate the State, County, and City sales taxes for this Job during A/R Invoice entry.
The system displays three fields for this option:
The labels for “State”, “County” and “City” come from the Descriptions on the Government Type ID’s 1, 2 and 3.
State
Defaults to the state entered on the Job Master File (General tab) screen.
If the default State is incorrect, select the applicable State for this Job.
You can double-click in the State field to display the Sales and Use Tax Setup screen.County
Use the County Sales Tax field if this Job requires county sales tax. Select the applicable County for this Job.To add a new County Sales Tax, double-click in the State field to display the Sales and Use Tax Setup screen.
If you are required to file county sales tax reports (for either/both taxable and non-taxable sales), set up each affected Job with the applicable County Sales Tax Code. The system determines which county to report for the invoice and shows this information on the Sales Tax Report.
City
Use the City Sales Tax field if this Job requires city sales tax. Select the applicable City for this Job.To add a new City Sales Tax, double-click in the City field to display the Sales and Use Tax Setup screen.
If you are required to file city sales tax reports (for either/both taxable and non-taxable sales), set up each affected Job with the applicable City Sales Tax Code. The system determines which city to report for the invoice and shows this information on the Sales Tax Report.
If you leave a County or City Sales Tax field blank, the system creates a line item on the AR REP: Sales Tax, but the amount displays under the non-taxable column.
Example: In this example, the City Sales Tax on the Job Master File Accounting Info tab is left blank.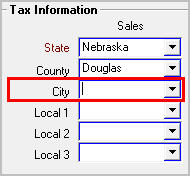
The AR Rep: Sales Tax will show the blank line to correspond with the City entry (which is blank), and then the amount displays under the Non Taxable column.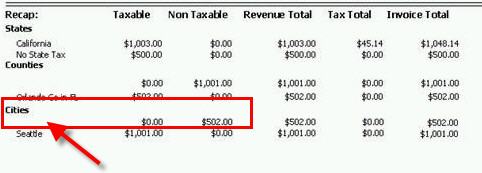
The State Code filter can be used if you populate the State Code in the PAY: Taxes screen. The State Code field is for information purposes only. See Using the State Code Filter to Limit the Localities for more information.
Note: The State Code field does not reference the Sales tax.
If the State Code filter is populated, the County and City boxes will display only the associated government types.
If the State Code filter is left blank, the County and City boxes will display all counties in the Payroll County drop down and all cities in the Payroll City drop down. In this case you are not limiting the display to a certain state.
Note: If you change the selection to a State Code filter on an existing Job record, it will remove the existing Local code from the Local field.
Sales Tax Normally Apply
Use the Sales Tax Normally Apply check boxes to specify whether taxes are calculated on billable services and/or products.
Select the option to which sales tax normally applies for this Job. You may select one, both, or neither of these options. If you select an option, sales tax automatically calculates when you bill for this Job.
Services
Select the Services option to charge sales tax on items created as Service items in the Inventory Master screen and billed through A/R.
Products
Select the Products option to charge sales tax on items created as Product items in the Inventory Master screen and billed through A/R.
Select to calculate sales tax by Tax Jurisdiction.
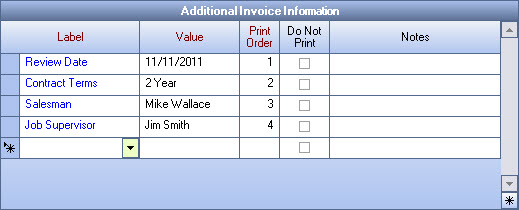
The Additional Invoice Information grid can be used with the Framed by Job Invoice Form Type (Framed by Job Invoice Form Type is selected in AR: Defaults) to setup information used in the header area of the invoice.
The information entered here displays in the header area of the invoice. You can add as much information here as needed, but the invoice header displays only up to 8 lines of information. The Print Order determines the first eight lines to print.
Label
Type or select the Label you want to display on the invoice. A maximum of 15 characters can be entered.
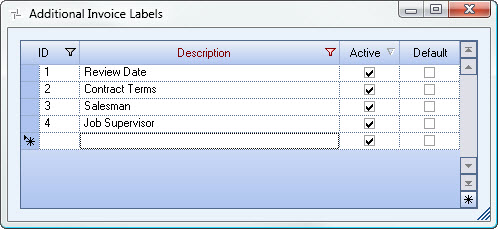
To add a new Additional Invoice Label, double-click in the Label field, or type a new Additional Invoice Label and press Enter. The Additional Invoice Labels add/edit list displays.
Value
Enter the Value to display on the invoice. This field displays after the Label field in the header section of the invoice. A maximum of 50 characters can be entered.
Print Order
Enter a number (up to 255) to determine the order the Labels and Value display in the header section of the invoice.
For more information see Using the Framed by Job Invoice Format on the Learning Center.
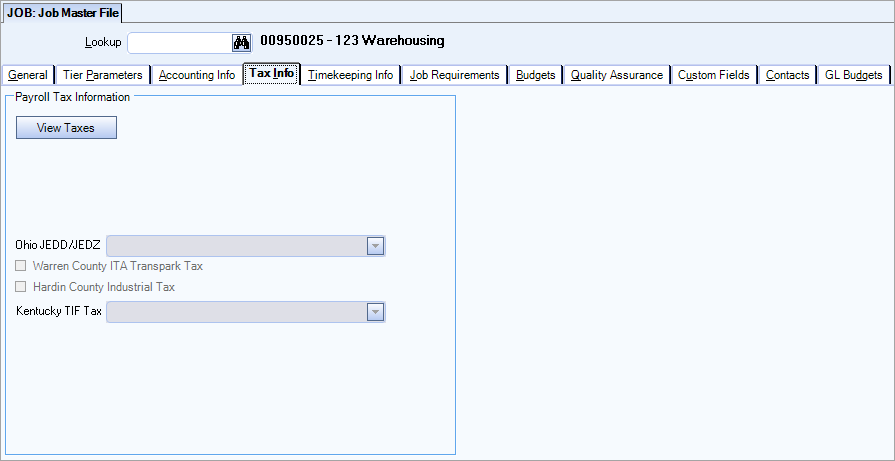
The Tax Info tab is used with payroll tax automation. The information populated on this tab is carried over from the Tax Information section of the Accounting Info tab. Continue to use the Accounting Info tab to enter information until you migrate to the updated tax engine.
Hardin County Industrial Tax
This is an industrial tax that is only applicable to specific areas in Hardin county. Currently, there is no way to identify the exact locations, so this tax must be manually assigned instead of automatically assigned based on the address/location code.
This check box is only applicable to jobs in the state of Kentucky. When it is selected, the tax is calculated regardless of whether it is within the designated jurisdictional area.
The Timekeeping Info tab is used to set up Timekeeping records for this Job, such as Hours Category, Timesheet Type, Holiday Budgets, Day Divide Options, Lunch Parameters, and TeamTime exports. TeamTime Job Attributes can also be accessed from this tab.
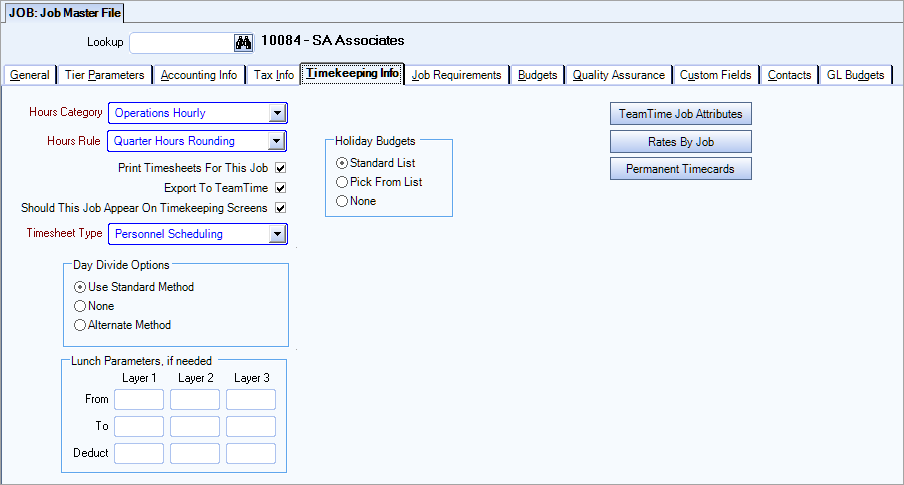
Select the Hours Category for this Job. The Hours Category determines the Hours Descriptions and Hours Types that the system makes available for Timekeeping, Budgeting, Personnel, and Work Scheduling pertaining to this Job. For Contract Jobs there is typically one general Hours Category used.
To add a new Hours Category, double-click in the Hours Category field, or type a new Hours Category and press Enter. The Hours Categories add/edit list displays.
The Hours Rule field is an add/edit list. Click the drop down and select the appropriate option for the job. Double click on the field to open the Hours Rule window.
Select the Print Timesheets For This Job check box to enable printing of Timesheets from the Payroll Reports screen.
Select the Export To TeamTime check box if you are using ANY form of telephone timekeeping software, including the TeamTime system.
Select the Should This Job Appear On Timekeeping Screens check box to make this Job available for selection on the Timesheet Entry screen in Payroll.
The Timesheet Type is used to define the type of Timesheet associated with this Job. The system uses Timesheet Types to group related Jobs for selection and display during Timekeeping entry.
Type or select the Timesheet Type for this Job.To add a new Timesheet Type, double-click in the Timesheet Type field, or type a new Timesheet Type and press Enter. The Timesheet Types add/edit list displays.
Use the Day Divide options to determine how to allocate hours for day divides. The default option is Use Standard Method.
Use Standard Method
Select this option to use the Day Divide Option selected in PAY: Defaults for this Job.
None
Select this option to credit all hours worked to the date the shift starts.
Alternate Method
Select this option for those special Jobs where a day divide differs from the Standard Method. If you select this option, the system displays a second field for entering the Start Time of the day divide.
Enter the number of hours to deduct for lunches, based upon the number of hours worked. The system automatically deducts lunch breaks during Timesheet entry based on the Lunch Parameters entered in this field. You can define up to 3 different hours worked ranges, one in each Layer. The system does not deduct time for lunch when these fields are blank.
The system uses the Lunch Parameters defined in the Job Master File, regardless of whether lunch hours were entered via TeamTime. Sometimes this will result in a benefit to the company, and sometimes as a benefit to the employee.
If any data is entered into the Lunch parameters, all three values are required. For example, if a value is entered in Deduct field, the From and To fields are required.
The Layer 1 To value and Layer 2 From value CAN be the same value.
Layer 1 is equal to and Layer 2 is greater than.
From
Enter the minimum number of hours employees must work to be eligible for lunch. You cannot enter a 0.
A message displays after an incorrect From value is entered in the Lunch Parameters. The message reads “Please enter a number from 1 to 24”.
To
Enter the maximum number of hours employees can work to be eligible for lunch.
Deduct
Enter the amount of time to deduct from employees hours for lunch. Employees that work within From and To range receive this time deduction from their total hours worked for the shift.
Note: For the second and third Layers, the From time must be greater than the To time of the previous layer.
WinTeam also looks at the Hours Rule setting on the job to determine whether to round hours by quarters or hundredths.
Quarter rounding
Using this example of lunch parameters and the default is set to round by quarter hours.
If the employee works 7 hour and 7 minutes, .5 hours are deducted for lunch.
If the employee works 7 hour and 8 minutes, 1.0 hours are deducted for lunch.
If the employee works 10 hour and 7 minutes, 1.0 hours are deducted for lunch.
If the employee works 10 hour and 8 minutes, 1.5 hours are deducted for lunch.
Hundredths rounding
If the employee works 7 hour and 0 minutes, .5 hours are deducted for lunch
If the employee works 7 hour and 1 minutes, 1.0 hours are deducted for lunch.
If the employee works 10 hour and 7 minutes, 1.0 hours are deducted for lunch.
If the employee works 10 hour and 8 minutes, 1.5 hours are deducted for lunch.
When your hours are equal to the To value in Layer 1, the Layer 1 Deduction is used.
When your hours are greater than the From value in Layer 2, the Layer 2 Deduction is used.
The Lighthouse Application field is used with the WinTeam/Lighthouse integration. This field displays when the Lighthouse Integration field is selected in the System Defaults window. This integration transfers WinTeam job information, to Lighthouse by adding new locations. Ongoing, any WinTeam job information changes sync with the Lighthouse location to keep it updated. To use this feature, set the appropriate selection in this field. Only one application can be chosen for each job. Use this link for details on this integration.
Use the Holiday Budgets area to select the holidays to recognize in the calculated budget. The default option is Standard List.
Standard List
Select this option for the system to use the holidays set up on the JOB: Defaults screen.
Pick From List
Select this option if you want to choose specific holidays to include in the budgets. The system displays a list for selecting the holidays.
None
Select this option to budget no holidays for this Job.
Note: Changes made to this list are only effective for budgets records that have not been calculated. Therefore, if you are making a change to a Job that does not have budgets to recalculate, and you want the Budget Details to reflect this change, you must create and run the Daily Budget Adjustments program for a single day (holiday). WinTeam will recalculate and include these holiday changes in the budget records.
Click the TeamTime Job Attributes button to open the TeamTime Job Attributes screen.
Click the Rates By Job button to open the Rates By Job screen.
Click the Permanent Timecards button to open the Permanent Timecards screen.
The Job Requirements tab is used to set up Compliance Tracking items that are specific to the Job. You may add Compliance Tracking Groups, individual Compliance Tracking items, or import Compliance Tracking items from another Job (certain limitations apply for importing).
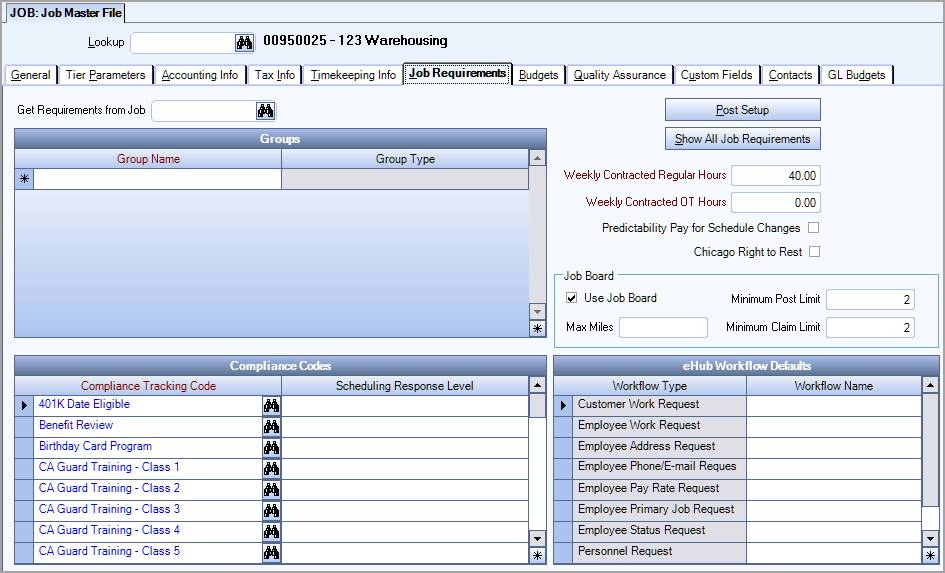
Use the Get Requirements from Job field to enter a Job Number from which you want to import Job Requirements. Type the Job Number in this field, or use the Lookup feature to locate an existing Job Number.
- In order to import requirements for this Job, NO existing requirements for this Job (they would display in the Groups grid or the Compliance Codes grid) should exist. You must delete existing requirements for this Job before importing additional requirements.
- If the Job Number you enter for importing Requirements does not have requirements set up (either Groups or Codes), you will receive a message stating that requirements do not exist for the Job.
If there are no existing requirements for this Job (the Job you are importing into) and the Job Number entered for importing requirements from does have requirements set up, then the system imports both the Groups and Codes from the Job Number you entered.
Group Name
Use the Group Name field to select the Compliance Tracking Group to assign to this Job. The system uses Compliance Tracking Groups to combine a set of Compliance Tracking Codes.
They can be used for specific contracts, and/or regional (state requirements).
Double-click in this field to display the Compliance Tracking Group Setup screen.
Group Type
Displays the Compliance Tracking Group Type for the selected Group Name as defined in the Compliance Tracking Group Setup screen.
Group Types are used to classify and manage Groups (Compliance).
Use the Compliance Codes grid to add a Compliance Tracking Code to this Job.
Compliance Tracking Code
Select the Compliance Tracking Codes, or use the Lookup to locate an existing Compliance Tracking Code you want to assign to this Job.
To add a new Compliance Tracking Code or view an existing code, double-click in the Compliance Tracking Code field to display the Compliance Tracking Codes screen.
Scheduling Response Level
Select the Scheduling Response Level appropriate for this Job. You may choose to ignore or override this Response Level for the Post.
To add a new Response Level or view an existing Response Level, double-click in the Response Level field to display the Scheduling Response Level screen.
A Response Level is NOT required at the Job level.
Select the appropriate Workflow Name for each of the Workflow Types that you want to use for this job. Workflow names need to have the Available in eHub Workflow Defaults check box selected in the Workflow Setup window for them to display in this list.
Click the Post Setup button to open the PS: Post Setup screen. Accessing the Post Setup screen from the Job Master File allows you to enter the Post for this Job and the Post Requirements, without having to specify the actual schedule.
Click the Show All Job Requirements button (or press ALT + S) to open the Lookup Compliance Codes screen.
Use this field to enter weekly contracted regular hours. This field gives a guideline for contracted hours. There is no functionality associated with this field, but it does display on the PS Schedules screen and on the Scheduling Activity Report. You can use this option on the Scheduling activity report to filter for those jobs that meet that criteria.
It is possible to be warned when schedules exceed the Weekly Contracted Regular and OT Hours, see PS: Defaults.
Use this field to enter weekly contracted OT hours. This field gives a guideline for contracted hours. There is no functionality associated with this field, but it does display on the PS Schedules screen and on the Scheduling Activity Report. You can use this option on the Scheduling activity report to filter for those jobs that meet that criteria.
It is possible to be warned when scheduling exceeds the Weekly Contracted Regular and OT Hours, see PS: Defaults.
Select this check box to enable the functionality that allows you to comply with the city of Chicago's ordinance that covered employees are given advance notice of their work schedule, and predictability pay for any shift change within defined time frames. Hover over this check box to see a tool tip summary of predictability pay. See Chicago Fair Workweek Ordinance for details.
Select this check box to enable the functionality that allows you to comply with the city of Chicago's ordinance that covered employees right to rest by declining work hours less than ten hours after the end of the previous day’s shift. See Chicago Fair Workweek Ordinance for details.
These fields are used to enter default settings that are used in the self-scheduling feature which allows your employees to claim open shifts, post shifts for others to claim, or swap shifts with other employees all within the eHub mobile and web apps.
Use Job Board
This check box is selected by default for all jobs. When selected, the job displays in the job board for employees to post, claim, or swap. If you clear this check box, the job does not display in the job board and cannot be posted, claimed, or swapped.
Max Miles
Enter the maximum number of miles that are acceptable between the job and the employee. The system compares the job address and the employee's address and displays any shifts on the Job Board that are within this mile range.
Minimum Post Limit
Enter the minimum number of hours before the start of a shift that employees can post a shift. The default value for this field is 2 hours. You can change the value to any whole number between 0 and 24. If you set the value to 0, then a shift can be posted up until its start time. An error message displays if you attempt to enter a number outside of this range, enter a decimal value, or enter characters other than numbers.
Example: If the value is 2, and the shift starts at 8:00, an employee could post the shift at 6:00 or earlier, but could not post the shift after 6:00.
Minimum Claim Limit
Enter the minimum number of hours before the start of a shift that employees can claim a shift. The default value for this field is 2 hours. You can change the value to any whole number between 0 and 24. If you set the value to 0, then a shift can be claimed up until its start time. An error message displays if you attempt to enter a number outside of this range, enter a decimal value, or enter characters other than numbers.
Example: If the value is 2, and the shift starts at 8:00, an employee could claim the shift at 6:00 or earlier, but could not claim the shift after 6:00.
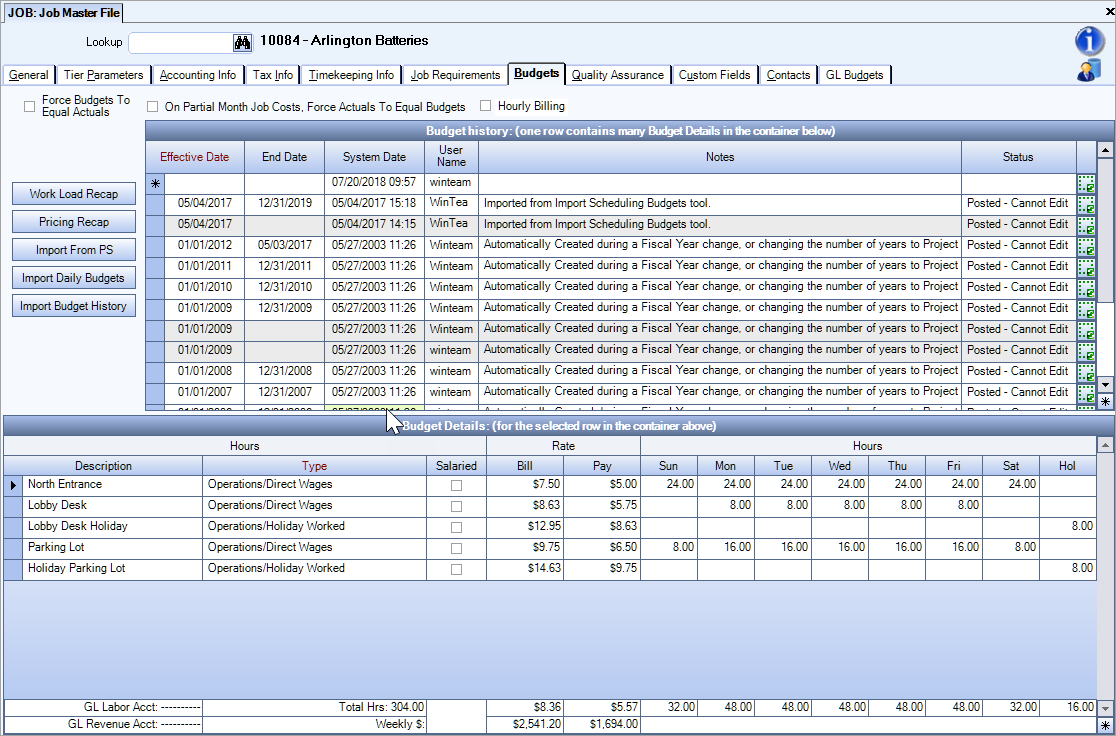
The Budgets tab is used to enter budget information for this Job. A budget history is available. The Rollover Budget button allows you to copy budgets and assign a new effective date. The Budget Details section contains detailed budget information for each of the budget records selected. The Work Load Recap screen and the Pricing Recap screen can be accessed from the Budgets tab.
Future budgets that are outside the range of existing fiscal years will be calculated when the corresponding fiscal year becomes active. If you create a budget that calculates into the next year, and that year has yet to be created in fiscal year setup, the system will calculate to the end of the current fiscal year.
Note: If a Job Budget is calculated out two years, and the next fiscal year setup is deleted, the next time the budget is calculated, only the current fiscal year will be calculated.
A gap could occur if a job is discontinued and the user chooses to delete the remaining budgets after the discontinue date. If the job is reactivated, a new budget can be created with an effective date later than the job's discontinue date. This will end up with a gap starting from the original discontinue date and any new budget's Effective Date. It may appear on screen to the user that there is no gap because the last budget when the job is discontinued has an end date 1 day before the effective date of any new budgets.
The Budgets tab has special security to prevent users from editing or adding budgets. A User can be assigned to a security group JOB Budgets Read-Only that gives them rights to view budgets without being able to add, edit, or clear budgets.
A User can belong to the SYS ALL security group and the JOB Budgets Read Only security group, and they still are not able to edit budgets. Adding the JOB Budgets Read-Only group to a User's security or a Custom Group allows only for viewing of the Budgets tab.
Note: When exiting the Budgets tab, you are prompted with a message to calculate the budgets for the job. You will not be allowed to exit the Budgets tab until the budgets for the job have been calculated.
A User that has JOB Budgets Read-Only does not receive a warning message when discontinuing a Job, and Budgets cannot be cleared.
Use the Force Budgets To Equal Actual check box to calculate the budgets so that they equal the actual activity for this Job when you run a Job Cost Report or On Screen Job Cost Report.
Note: Normally, you will NOT select this check box. You may want to select this option if a new Job starts in the middle of the month or if you terminate a Job mid-month.
If you select this option, the system displays two additional fields for entering the actual hours From and To dates to which the system should force budgets to equal.
From: Type the From date in MMDDYY format, or use the Date Control to select a date.
To: Type the To date in MMDDYY format, or use the Date Control to select a date.
This check box only displays when the JOBS | AllowHourly | Yes custom setting is enabled. It is used to indicate if the job is considered hourly billing for the eHub Hours Budget Comparison report. By default, all jobs are considered fixed fee unless this check box is selected. When it is selected, the over budget hours display in green and the under budget hours display in red in the eHub Hours Budget Comparison report.
This option, along with the Frc field in the Report Details area of the Formatting of Job Cost Report screen, lets you force the actual dollars of particular accounts to equal what is set up for the budget. This is necessary to run a Job Cost Report for a partial month.
Note: The line items checked in the Frc field in the Report Details area of the Formatting of Job Cost Report screen are affected by this option. The system calculates budgets by multiplying the budgeted amount from the G/L Budget area for this Job and Account by the appropriate percentage from the Job Defaults screen. The system uses this dollar amount on the Job Cost Report for both Actual and Budget.
When called from the Job Master File screen, the Job Number is passed in and the levels are set to Building, Version, Area, and Task.
If you have an existing Job pulled up, the recap screen will pass the Job Number to the Job Number field on the recap screen. If there is an existing Work Load set up, the details will display in the recap grid. If there are no details set up, the grid will have no details to display.
If you click the Work Load Recap button and have not specified a Job Number, the recap screen will load without the Job Number. You can then enter a Job Number or use the Find Feature to locate a Job. If there is a Work Load currently set up for Job (Job Number set up in the Building Setup screen) the Work Load details display.
If you have more than one Prospect that contains Buildings who are set up for the Job Number entered, only the first Prospect will load.
Click the Pricing Recap button to display the Pricing Recap screen.
When called from the Job Master File screen, the Job Number is passed in and the level is set to Version.
If you have an existing Job pulled up, the recap screen will pass the Job Number to the Job Number field on the recap screen. If there is an existing Bid set up, the details will display in the recap grid. If there are no details set up, the grid will have no details to display.
If you click the Pricing Recap button and have not specified a Job Number, the recap screen will load without the Job Number. You can then enter a Job Number or use the Lookup to locate a Job. If there is a Bid currently set up for Job (Job Number set up in the Building Setup screen) the Pricing details display.
If you have more than one Prospect that contains Buildings who are set up for the Job Number entered, only the first Prospect will load.
Clicking this button enables you to create a budget importing information from the Personnel Scheduling Master. You can edit the data after it is imported before recalculating and saving. This is useful for tying together pay/bill details from Post Setup and Bill Codes by Job in a single location, without having to re-enter the same information in Personnel Scheduling and Job Master File.
Note: You will need to run Validate Schedules option before using the Import PS Budget button, otherwise budgets may not correctly reflect your Master Schedule.
This setting allows Budget History records to be imported from an xls spreadsheet. If there are multiple lines within the spreadsheet for the same Job and Effective date, one Budget History record is created with the appropriate budget details.
| Section | Item | Value |
|---|---|---|
| Jobs | ImportBudgetHistory | Yes |
Format is: JobNumber,Effective Date, Notes, Description, HoursTypeID, HoursSun, HoursMon,HoursTues, HoursWed, HoursThu, HoursFri, HoursSat, HoursHoliday, PayRate, BillRate, ForSalariedEmployee.
ForSalariedEmployee. Enter 1 for Yes and 0 for No.
Tip: You can use the following template for importing your .xls file. Right click and choose "Save As..." (or "Save Target as...") to download the sample .xls file.
Note: If you are importing multiple years of budget information, separate the import files by year to ensure you only import one year at a time.
The Import Daily Budgets button displays when this Custom Setting is in place.
| Section | Item | Value |
|---|---|---|
| Jobs | ImportDailyBudgets | Yes |
This setting allows for existing Daily Budget details (this is different than Budget History details) to be overwritten by Daily Budget details from an excel spreadsheet. The Daily Budgets must already exist for the Job in order to be overwritten.
Important: When you override information in the daily budget, the changes do not display on the budget window—then changes are made in the detail grid behind the scenes and will reflect on reports.
Format is: Job, Date, HoursDescription, HoursTypeID, PayRate, Hours
Note: You can use the attached template for importing your xls file. Right click and choose "Save As..." (or "Save Target as...") to download the sample .xls file.
The Budget History grid is used to create budget history records for this Job. It also displays any existing records, in order of Date Effective. WinTeam displays details for a currently selected budget history record in the Budget Details area at the bottom of the screen.
WinTeam automatically calculates Daily Budgets for a new budget history record when:
- When a Job is rolled over
- When a Budget History record is rolled over
- When a new Budget history record is added
This message will display: "This action will force the budgets for this job to be calculated. Do you want to continue?"
Yes - The Budget is created and Status is Posted - Cannot Edit.
No - You cannot leave the Budgets tab until you select Yes. The above message will continue to display until you select Yes or escape and remove all budget information.
Effective Date
Use the Effective Date to enter or view the beginning date for this budget history record. The system lists records in ascending order, with the most current record at the top of the list.
End Date
Dates appearing in this field are automatically generated by the system when a later budget is created. The end date is not editable by the user.
The End Date may vary based on this logic:
- Job is discontinued. The end date will be the last date the Job had hours associated in the Budget Details grid.
- Job is rolled over from existing Budget History. The end date will be the last day of the current fiscal year or the following fiscal year, depending on the selection of the Number of Fiscal Years to Project in the Future for Job Budgeting in Job Defaults.
- Previous Budget history record. The end date will be 1 day less than the New Effective Date for the rolled over record.
System Date
View the date the budget record was created. You cannot modify this information.
User Name
View the logon name of the user who created this budget record. You cannot modify this information.
Notes
Use the Notes field to enter any notes pertaining to this budget record. The system will automatically record auditable information in this field.
Status Message
View the status of a budget history record that the system has calculated Daily Budgets for. The system automatically generates the Posted Cannot Edit message. You cannot modify this information.
Rollover Budget
Click the Rollover Budget icon to copy the Budget Details of the currently selected budget record to a new budget record. WinTeam displays a new budget history record, with the current date displayed in the Date Effective field. You may change the Date Effective and Budget Details, if necessary.
A budget history record is not created when budgets have been extended for another fiscal cycle (year-end rollover).
The Budget Details grid contains the budgeted hours and rate for the employees who work at this Job. The system uses this information in the Job Cost report and the On Screen Job Cost Report.
Description
Use the Description field to view or select from the available Hours Descriptions for this Job's Hours Category.
Click the down arrow to the right of the field to view a list of the valid Hours Descriptions.
The system uses this Description in Timekeeping, Budgeting, and Personnel Scheduling pertaining to this Job. The field can contain information specific only to this Job, such as Restroom Cleaner, Day Porter, Utility Cleaner, etc.
Note: This Job's Hours Category is designated in the Timekeeping Information screen. Hours Descriptions and Hours Types are set up in the Hours Categories screen.
Hours Type
View the Hours Type associated with the selected Description, which is set up in the Hours Categories screen. Hours Descriptions and Hours Types may be changed if needed, but are normally left as defaulted.
Click the arrow to the right of the field to view a list of the valid Hours Types for the Hours Category for this Job.
Salaried
Select the Salaried check box if the Description is for a salaried employee. Check this box only if you want the system to show these salaried hours and labor dollars in both the Actual and Budgeted areas of the Hours Budget Comparison Report. It will also add to the Actuals on the Job Cost Analysis Report.
Bill Rate
Use the Bill Rate field to view or enter the billable rate if this Job is billed by the hour. The Hours Type must have an Hourly Bill Revenue # associated in order to add a Bill Rate.
Pay Rate
Use the Pay Rate field to view or enter the rate for the system to use for this position in the Job Cost Report and On Screen Job Cost, which calculate the Daily Budgets for this Job. The system displays an average of the Pay Rates below this column.
Hours
Use the Hours field to view or enter the total estimated hours for each workday for this position. For example, if four people work 8 hours every Monday, enter 32 in the Hours field in the Mon column. The system displays total accumulated hours for each day near the bottom of the Budget Details area.
G/L Labor Account
View the General Ledger labor account based on the Hours Type selected. You cannot modify this field.
G/L Revenue Account
View the General Ledger revenue account based on the Hours Type selected. You cannot modify this field.
Tot Hrs
View the total labor hours budgeted for this Job. The system uses the Total Hours multiplied by the Average Pay Rate to compute the Weekly $ amount.
Weekly Dollars
View the total labor cost in the Weekly $ field. The total is calculated using the Average Pay Rate multiplied by the Total Hours.
The Quality Assurance tab is used to view available templates and Checkpoints for the Job. It also provides a summary view of QA data for the Job. The QA tab includes a feature that can be used to assign an eHub QA Group for the Job, which allows members of the QA Group to complete Checkpoints for the Job.
An e-mail notification can be sent automatically alerting an e-mail recipient after a Checkpoint has been marked as Completed. The notifications contain links to view the Checkpoint details and Deficiencies. Area-level items are included in the notification's attached PDF.
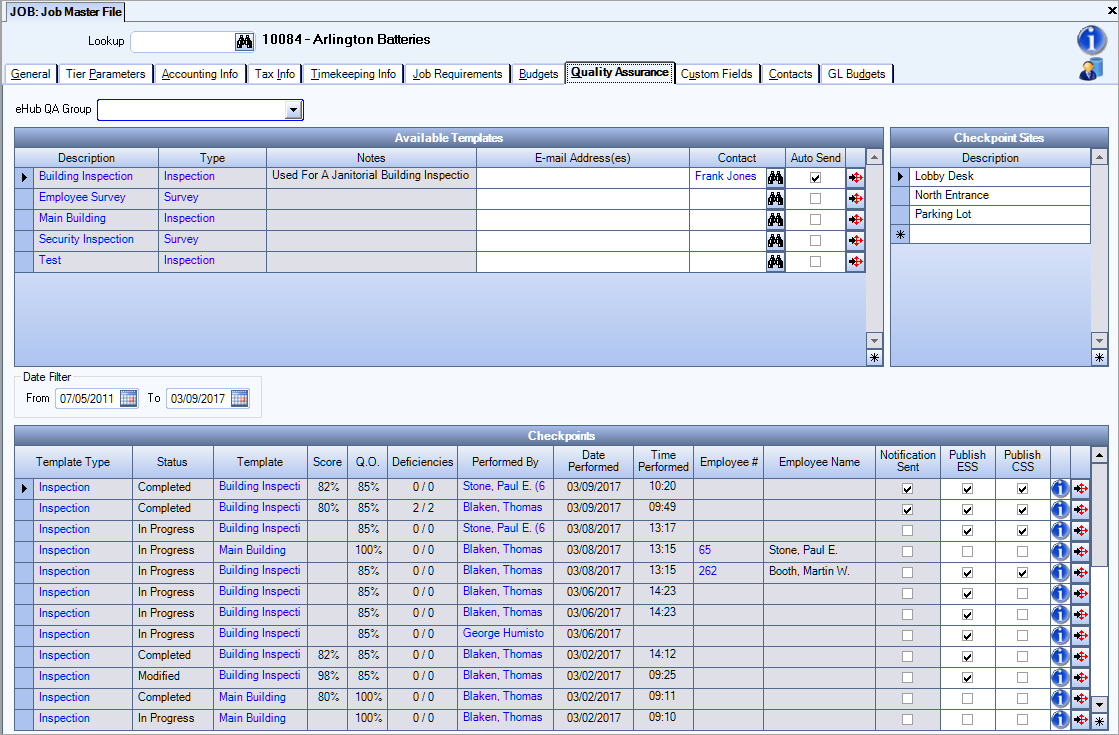
The Available Templates grid displays all the templates that are available for this Job. The availability is based on the Jobs selected on the Checkpoint Templates. The Description, Type, and Notes columns are read-only.
The Type field populates based on the Type associated with the Checkpoint Template. Double-click in the Description cell to display the Checkpoint Template. Double-click in the Type cell to open the Template Types add/edit list.
The E-mail Address(es), Contact, and Auto Send columns support functionality to send a notification after a Checkpoint has been Completed. The E-mail Address(es) field is intended for recipients other than those displayed in the Contact field. The Contact field automatically populates with the Contacts from the Job Master File.
The Auto Send check box enables/disables automatic e-mail notification of completed Checkpoints.
Detail button
Click the Detail button on the end of the row to open a new Checkpoint for this Job.
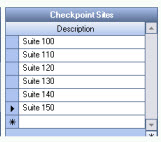
This will be used for clients for large office buildings who need to quickly associate a Checkpoint with a specific area of a building. A Checkpoint Site can be added to a Checkpoint. They cannot be added to a Template.
The Checkpoint Site displays on the QA: Checkpoints screen and is available from the Site list. If a Site is set up here (Job Master File), and a Checkpoint is created in eHub (Web or Mobile), the Site is required in eHub.
This information then becomes available:
The Checkpoint Review can be filtered by Sites.
The Sites column can be added to the QA Deficiency Review using the Field Chooser.
The Checkpoint Results Report can be filtered and grouped by Sites.
The Checkpoints grid defaults to filter for 30 days from the current date.
Checkpoints for this Job display in the grid.
Double-click in the Template Type cell to open the Template Types add/edit list.
Double-click in the Templates cell to open the Checkpoint Template used to create the Checkpoint.
Double click in the Performed By cell to open the applicable Employee Master File record or Contact Record.
Click the Detail button to open the Checkpoint record.
You can use the Custom Fields tab to set up fields for your own use. You may choose to use none of the custom fields or all of the fields. You may customize each field to have a Drop Down list, Text entry, Numeric or Date field. You may have up to 39 Custom Fields within the Job Master File.
You can use the Job File Report to print all Custom Fields used with a Job record.
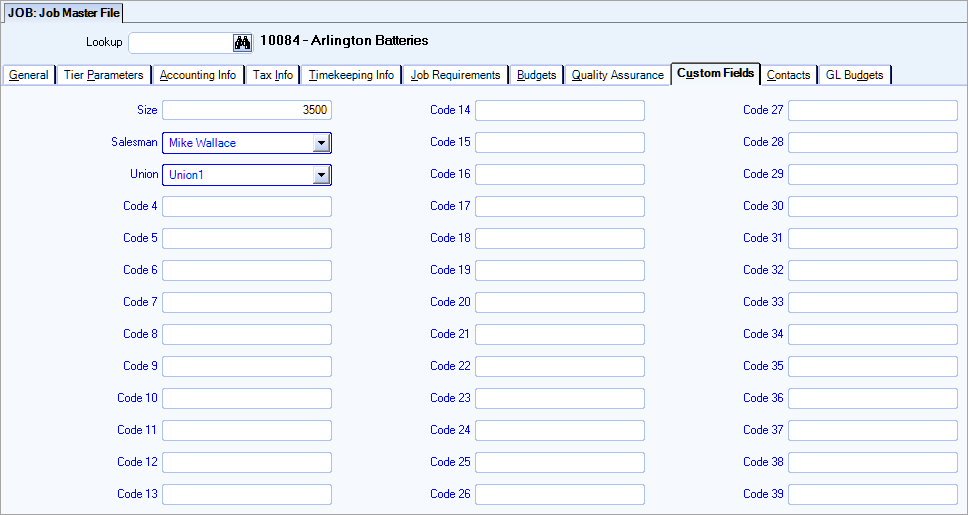
Any Custom Field from the Job Master File setup as a Drop Down List is available as a Tier selection when running any tiered report. For more information see WT: Custom Fields and Using Tier Templates.
Note: To optimize performance on this screen, the 39 custom fields now reside in a table named tblJB_JOBS_Extension (formerly tblJB_JOBS). Queries you had developed for CreaTeam, Query Scheduler or any other reporting tool that reads these fields should to be remapped to the new table.
Example: A query that referenced the UserCode(L or T) fields in tblJB_Jobs should now reference the tblJB_JOBS_Extension table. These tables are joined by JobNumber.
Example: A query that referenced tblJB_JOBS_UserCodeX should now reference the tblJB_JOBS_Extension_UserCodeX. The join should also go through tblJB_JOBS_Extension (tblJB_JOBS_Extension_UserCode1).
This linked spreadsheet compares the old Job Master File custom fields to the new. Please share this information with your query administrator to prevent errors on existing reports that are using these fields. For any questions or for assistance with this, please contact TEAM Client Services by phone at 800-500-4499 or by email at supportstaff@teamsoftware.com.
The Contacts tab is used to enter Contact information for the Job. A Job can have one or multiple Contacts. One Contact can be designated as the Primary Contact for each Job. The Primary Contact information displays on the General tab of the Job Master File record. For more information, see Adding Contacts to a Master File Record or Creating Contacts.

Click (or press ALT + S) to open the Contacts screen.
Select the Primary check box to mark the selected Contact as the Primary Contact for this Job.
Once you select a Primary Contact, that Contact displays on the Job Master File (General tab).
Contact
Enter a Contact Name, or use the Quick Lookup to locate a Contact.
Role
Select a Role for the Contact. The Role can change based on where it is used. A Role should not be confused with the Title of a contact, but rather it is more the “purpose” of a contact.
Example: For our Job Master File Contacts, the Primary Contact that you have identified is more than likely going to be the one that you would contact for billing and accounts receivable type questions. In that sense, you may want to just set up a Contact Role called “Billing Contact” or “Collections”. As the Contacts area evolves in WinTeam, the Contact Role will be used in differing areas to identify the Roles of the contact record you want included on a particular report, for instance.
Double-click in the Contact Role field to display the Contact Roles add/edit list.
Enter an e-mail address for the Contact. If you have entered an e-mail address in the Contact Setup screen it will populate here.
Business
Enter a phone number for this contact.
For more information see Adding Contacts to a Master File Record or Creating Contacts.
Click the GL Budgets tab (or press ALT + D) to open the GL Budgets screen for this Job.
The GL Budgets tab is used to display the budgets set up for this Job through the General Ledger Budgets screen. From this screen, you may enter Budgets for each Job.
Related Information
The JB Job Master File screen has its own Security Group, JOB Job Master File. The following security features are available for this screen:
- Accounting Info - Tab Read-Only
- Budgets - Tab Read-Only
- Can Change Master Number
- Contacts - Tab Read-Only
- Custom Fields - Tab Read-Only
- General - Tab Read-Only
- Job Requirements - Tab Read-Only
- Quality Assurance - Tab Read-Only
- Read-Only - For more information see Learning about Read-Only Security
- Tier Parameters - Tab Read-Only
- Timekeeping Info - Tab Read-Only
The JB Job Master File screen is part of the JOB ALL Security Group (no features selected).
The JB Job Master File screen with the Can Change Master Number feature selected, is part of the SYS All Security Group.
In order to access the Taxes and Insurance screen from the Accounting Info tab you must have the JOB Taxes and Insurance Security Group assigned to you.
The Budgets tab has special security to prevent users from editing or adding budgets.
A User can be assigned to a security group JOB Budgets Read-Only that gives them rights to view budgets without being able to edit or clear budgets.
A User can belong to the SYS ALL Security Group and the JOB Budgets Read Only security group, and they still are not able to edit budgets. By adding the JOB Budgets Read-Only group to a User's security or a Custom Group, allows only for viewing the Budgets tab.
A User that has JOB Budgets Read-Only does not receive the warning message when discontinuing a Job, and Budgets cannot be cleared.
Note: Even if the Budgets Tab and Job Requirements Tab are selected as Read-Only, you are still able to add new records.
Tip: To access all tabs on the Job Master File screen a User needs permissions for the JOB Job Master File and GL Budgets Security Groups.
Tip: For more information see Security Groups Overview and Security Groups By Module.
| Section | Item | Value | Module and Purpose |
|---|---|---|---|
| Addresses | UseZipsForCityState | Yes |
This setting automatically fills in the City and State (City and Province) fields when entering a Zip Code. It also removes the City and State fields from the tab stop order. |
| Addresses | TabCityState | Yes | This setting will leave the City and State fields (City and Province) in the tab stop order when the Zip Code Custom Setting is in place. |
For more information see Auto Populating City and State Fields.
| Section | Item | Value | Module and Purpose |
|---|---|---|---|
| GLUpdate | AutoPostTime | 10 | This setting determines how many seconds the system will wait when a General Ledger update is taking place before it will commit the update. The default is 8 seconds. |
| Jobs | ImportBudgetHistory | Yes | This setting allows for Budget History records to be imported from an excel spreadsheet. If there are multiple lines within the spreadsheet for the same Job and Effective date, one Budget History record is created with the appropriate budget details. |
| Jobs | ImportDailyBudgets | Yes |
This setting allows for importing daily budgets in a csv format. This allows you to specify hours for each day instead on one day worked. |
| Jobs | InvoiceDistACB | Yes |
This setting enables the Invoice Distribution Types add/edit list. and disables the Delivery Option in the AR: Customer Master File. It can be accessed from the Job Master File (Accounting Info tab). The AR: Invoice Print, AR: Update to GL, and PS Update to AR programs can specify the Invoice Distribution Type criteria when processing. |
| Jobs | RequireAddress | Yes | This setting can be used to require Job Address1, City, State, and Zip Code. |
| Jobs | RequireSalesTax | Yes | This setting makes the Sales Tax City and County fields required entries on the Job Master File. |
|
Jobs |
RestrictTiersToFirstDay |
Yes |
This setting restricts Date Tiers to being entered to the first day of the month on the JMF. In Tier History new and edited rows are limited to the last day of the month. Existing rows do not need to be updated to the last day of the month on Show Tier History. |
| LaserInvoice | ExcludePSDetail | True | This setting determines whether to print ANY PS Detail pages. If this setting exists, no invoice will have this included regardless of whether the Job is set up to Include Personnel Scheduling Details with Invoice. This might be used on those cases where people are starting to get set up to print PS Details but aren’t quite ready to turn on. |
| LaserInvoice | SpecialMessage | True | This setting can be used to pull the message from the Notes for Keys and Security field to print on AR Invoices. If there is no information in this field, the message on the Invoice Print screen prints on the invoices. |

