Overview
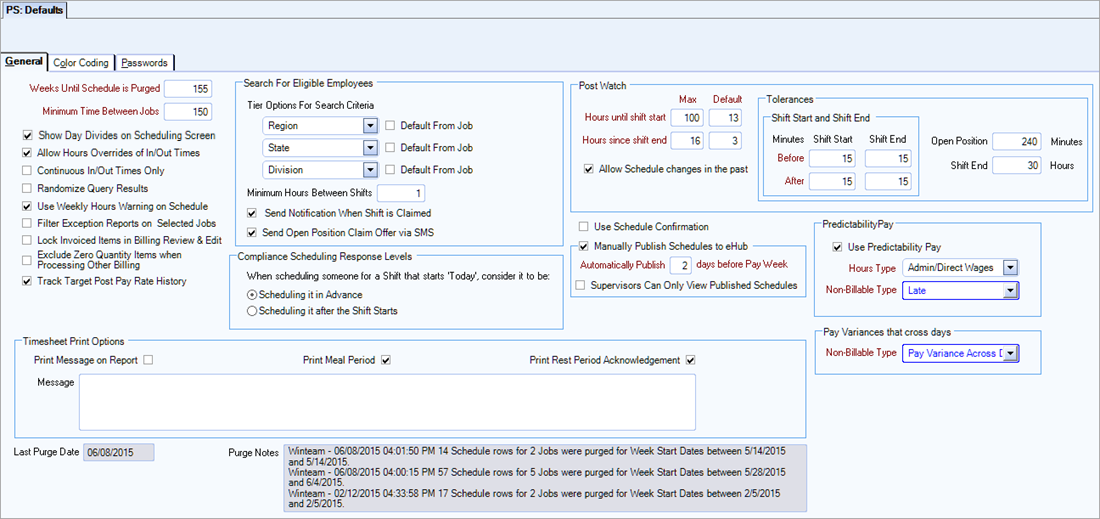
You can use the PS: Defaults window to assign default selections for the Personnel Scheduling module in WinTeam. The PS Defaults window has three tabs:
General Tab

Use the Weeks Until Schedule is Purged field to enter the number of previous weeks you want the system to store working (or weekly) schedules. Number of weeks cannot be greater than 32767.
When you purge PS Schedules, you can select to purge using this setting. For more information see PS Purge Schedules.
When you perform a PS Rollover (for more than one Job), the system uses this field to determine if any outdated schedules exist for weeks that should already be purged and displays a message stating the how much time has passed since your last purge. When you do decide to purge your schedules, you can access the PS Purge Schedules screen from the PS Options menu.
When you perform a PS Rollover, the system uses the number entered in this field to determine if any outdated schedules exist and displays a message that allows you to purge them. For more information see PS Rollover.
The system also uses this field to color code Schedules. When you are looking at PS Schedules and the screen is gray in color, it indicates that the schedules are from previous weeks, based on the number of weeks in this field.
Use the Minimum Time Between Jobs field to enter the minimum number of minutes to allow between scheduled shifts for an employee. As schedules are set up, the system uses this number of minutes to determine if any scheduling conflicts exist. If an employee is scheduled to work more than one shift within the number of minutes entered in this field, the system shows time conflicts on the Schedule Conflicts screen. You have the option to continue scheduling this employee even if there are conflicts. You may also run a Conflicting Shifts Report to display this information.
Select this check box to enable a check box on the Schedules screen called "Show Dividing Shifts".
If this check box is selected, the 'Include Dividing Shifts" check box is available on the Scheduling Report (Matrix by Job, Job Schedules, and Employee Schedule).
For more information, see Understanding Day Divide in Personnel Scheduling.
Select this check box to allow hours overrides of In and Out times on Schedules (Detail Cell Information screen and the Post Watch - Confirm Changes screen). Allowing overrides means the total hours do not have to equal the difference between the In and Out times. Typically, this is used during Daylight Saving week.
Select this check box to allow only consecutive In/Out Times in cell details.
If this check box is selected and the Detail Cell Information screen has multiple records, the system will verify that all records that have both an In and Out times are continuous in nature.
If there are multiple records, then the Out Time of one record must match the In Time of another record and/or the In Time of one record must match the Out Time of another record
WinTeam does take into account Day Divides and the Next Day flag when checking for continuous in and out times.
If one or more records are not continuous, you will receive a message to adjust your time so that there are no time gaps.
This check is not performed if the cell has already been updated by the PS Wizard.
Select this check box to compare the total hours scheduled against the sum of the Contracted Weekly Hours and Contracted OT Hours from the Job Master File (Job Requirements tab).
A warning icon displays if any hours are added that will cause the scheduled hours to exceed the Contracted Weekly and OT Hours sum. This is a warning only, it does not prevent you from exceeding the hours.
This check box automatically sets the Job Filter in the Exceptions pane of the PS Schedules window.
Select this check box to lock down Invoices on the Billing Review and Edit screen. If this is selected, invoiced items will be disabled once they are updated to AR Invoices.
Select this check box to exclude any $0 Other Billing Charges from being printed on an AR Invoice.
Tip: You may wish to select this option if you have Other Billing items that vary from month to month, with some months having $0.
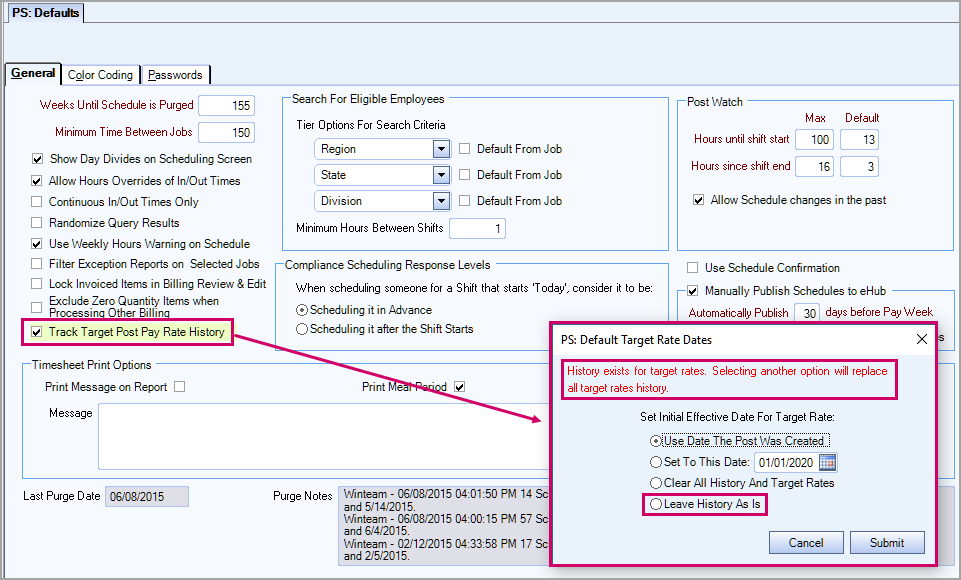
Select this check box to enable the features that allow you to set an effective date for target post pay rate and track its history. This check box is cleared by default. When you select this check box, a pop up displays where you can enter the initial effective date. There are three security features which allow you to limit access to the target post pay rate features.
Use Date The Post Was Created—Different initial effective dates are used for each post.
Set To This Date—The same initial effective date is used for all target rates.
Clear All History And Target Rates—All history is deleted including all existing target post pay rates.
Leave History As Is—This option only displays when the track target post pay rate history feature has been disabled and then re-enabled. Select it to retain all of the target rate history. If you select any of the other options when re-enabling then all of the target rate history will be replaced. See the re-enabled view screen shot below.
Initial View

Re-enabled View

After target post pay rate history is enabled, a tab called Target Post Pay Rates displays in the PS Post Setup window that contains a history grid where you can enter multiple effective dates and rates.
Tier Options
You can define up to three tiers to select from the Search for Eligible Employees screen.
Default from Job
Select this check box to have the tier entry automatically fill in based upon the tier parameters in the JOB: Job Master File.
Minimum Hours Between Shifts
Select the minimum number of hours to have between shifts. If an Employee has worked a shift within the minimum number of hours, they will be shown as having availability conflicts.
Send Notification When Shift is Claimed
If this check box is selected and the employee(s) claims a shift, they will receive a text confirmation.
Send Open Position Claim Offer via SMS
When this check is selected and the employee accepts the shift, we send a claim notification to the employee who offered the shift via SMS text messaging to their mobile device.
This area is used to tell the system how to respond when someone schedules an out-of-compliance employee for a shift that starts that day.
Example: If today's date is 07/28/07, and the Scheduler schedules an employee on the PS Schedules screen for 07/28/07, this setting determines if the system should consider that to be "Scheduling in Advance" or "Scheduling After the Shift Started".
The Post Watch section can be used to set maximum and default values for viewing Schedules in Post Watch.
Hours until shift start - Max
This value is the highest value you can change the Show Shifts: Starting within __ hours to on the Post Watch window.
Hours until shift start - Default
This value defaults to the Show Shifts: Starting within __ hours field on the Post Watch window. If the shift starts within the hours listed it will display in the table below.
Hours since shift end - Max
This value is the highest value you can change the Show Shifts: Ending in last __ hours to on the Post Watch window.
Hours since shift end - Default
This value default to the Ending in last __ hours field on the Post Watch window. If the shift ended within the hours listed it will display in the table below.
Allow Schedule changes in the past
If this check box is selected, you can assign or insert shift that occurred in the past, directly from the Post Watch window.
Tolerances
Shift Start and Shift End
These tolerances are used when updating TeamTime to Personnel Scheduling. After you click the Auto Accept button in the Update Schedules from TeamTime window, the system accepts any TeamTime records that it matches using the tolerances set here. WinTeam considers a TeamTime record matched to the Schedule record if both the In Time and the Out Time are within the tolerances.
Open Position
This tolerance is used in the Post Watch window to determine when an open position needs attention by the dispatcher. Enter a value between 0 and 1200 minutes. This is not a required field, but is highly recommended.
Shift End
This tolerance prevents a post watch controller from clocking an employee in or out of a shift for the number of hours entered after the scheduled shift end time. Enter a value between 0 and 96 hours. The system uses a default of 72 hours for this tolerance if a value is not entered in this field.
When this check box is selected, employees can confirm their shifts on eHub.
Manually Publish Shedules to eHub
When this check box is selected, you control when to publish/display your working schedules in eHub. Once this option is selected, the Automatically Publish _ days before Pay Week setting is enabled and required. See PS: Publish for information on how to manually publish your schedules.
Automatically Publish _ days before Pay Week
This setting is used as a preventative measure to ensure schedules are available to employees prior to the start of a pay week. Enter in the number of days, from 1-30, before the start of the pay week for the system to automatically publish the employee schedules in eHub.
Supervisors Can Only View Published Schedules
When this check box is selected, supervisors can only view schedules if they are published. If this option is not selected, supervisors can view the schedules while employees with eHub employee licenses cannot. This allows supervisors to assist schedulers in filling open positions in eHub before the schedules are published to the employees.
The options in this section are to configure predictability pay which is functionality in WinTeam that allows you to comply with the city of Chicago's ordinance that covered employees are given advance notice of their work schedule, and predictability pay for any shift change within defined time frames. See Chicago Fair Workweek Ordinance for details.
Select the Use Predictability Pay check box to enable the calculation of predictability pay.
When you calculate predictability pay, you must select an Hours Type from the first list and a Non-Billable Type from the second list. The hours types are maintained in the SYS: Hours Types Defaults window and the non-billable type drop down list is user-configurable so you can add and edit these types by double-clicking in the field.
Use the Non-Billable Type field to assign a non-billable type to pay times that cross a day divide when the PS Wizard is run.
Example: The schedule is 16:00-00:00 and the employee works 16:00-01:00, since you can't bill the customer for the extra hour, the non-billable type is automatically assigned.
Print Message on Report
If the Print Message on Reports check box is selected, the Message will print on the PS Timesheet By Job Report. In addition, if this is checked, the Message field will be required.
If the Print Message on Reports check is NOT selected, no message will print.
Type a message that you would like to display on the bottom of each of the PS Timesheet By Job report. This is to serve as some sort of acknowledgment statement that the employee understands they are acknowledging by signing the timesheet. An example could be, "By signing this timesheet, I affirm this is an accurate record of the hours I worked during this pay period.". This message could also reflect any other information you want the employee to affirm. For instance, "Unless I noted a discrepancy on my timesheet, I further acknowledge that I was relieved of all duties during each of my meal periods."
WinTeam can store up to a 900 character message and this will print on the report as long as it can print within the 5 lines allowed for the message.
Print Meal Period
Select the Print Meal Period check box to print a Meal Period column on the PS Timesheet By Job report. This allows you to enter the Employee Time Out/In for their meal period.
Print Rest Period Acknowledgment
Select the Print Rest Period Acknowledgment check box to print a Rest Period Acknowledgment check box on the PS Timesheet By Job report.
Message
Type a message you would like to display on the bottom of each PS Timesheet By Job page.
WinTeam can store up to a 900 character message and this will print on the report as long as it can print within the 5 lines allowed for the message.
Color Coding Tab
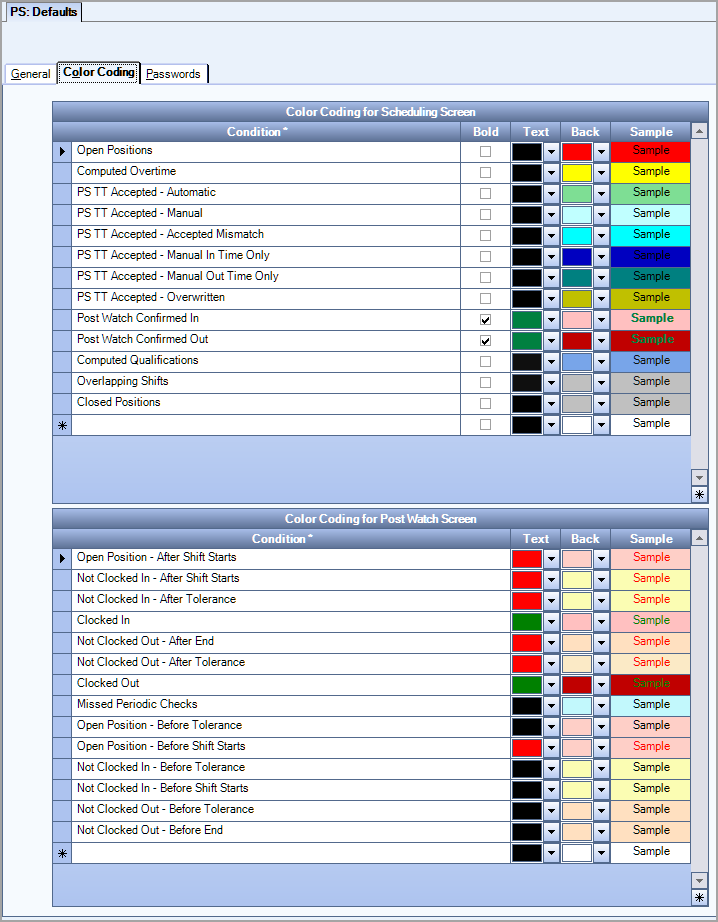
Here you can set up color preferences to display for special conditions when viewing PS Schedules and the Post Watch screen. These color codes will affect the entire database, they cannot be setup differently for each user. For more information, see Using Color Coding in PS Schedules.
Note: Required Fields are noted with an asterisk.

The Condition List is a fixed list hard coded in WinTeam. Some Conditions have been assigned a priority so that if a cell has more than one condition, the condition with the highest priority takes precedence. Conditions are listed in highest priority order.
Example: An employee is scheduled in cell that puts him in to an Overtime Condition and the employee does not meet the qualification of the post. Since the Overtime Condition has priority, the cell is color coded with the Overtime Condition color.
Example: An employee is scheduled in cell that puts him conflict with another shift and the employee does not meet the qualification of the post. Since the Qualifications Condition has priority, the cell is color coded with the Qualifications Condition color.
The Text color defaults to 0 (black). The Back color is used to fill the inside of the frame.
Note: The Text color and Back color cannot be the same.
Passwords Tab
Use this tab to require and assign passwords when an employee is assigned to a shift that creates overtime, is assigned to a shift that conflicts with another shift to which the employee is already assigned, or is assigned to a shift that the employee does not have the necessary requirements.

If you select the Conflicts check box, you can also select to require the password ONLY when scheduling in advance.
You must have the Override Security Screen Features selected for the PS Schedules and PS Detail Cell Information screens and the correct password in order to override compliance, overtime, conflicts and post pay rate passwords when scheduling.
- Override Compliance Password (PS Schedules)
- Override Conflicts Password (PS Schedules)
- Override Overtime Password (PS Schedules)
- Override Post Pay Rate Password (PS Schedules AND PS Detail Cell Information)
Security
The PS: Defaults screen does not have its own Security Group.
The PS Defaults screen is part of the SYS Defaults / Setup ALL Security Group.
This screen has the Read-Only Feature. For more information see Learning about Read-Only Security.
For more information see Learning about Security Groups.
