Overview
Permanent Timecards are accessed from the Employee Master File and from the Job Master File (Timekeeping tab).
The Permanent Timecard can be used to enter timesheets for those employees who routinely work the same schedules. Once a timecard has been created, you can import the timecard into the Timekeeping entry screen by clicking on the Get Permanent Timecard button on the Timekeeping window.
On the TimeKeeping Selection Option Screen, the Get Permanent Timecard button is enabled/disabled based upon the security permissions. The Import Permanent Timecard First check box is disabled if the user has a security level of 0. Any other level can still use the check box.You can only select employees with security levels equal to or less than their own.
The ability to override Hours is controlled in PAY: Defaults. Negative Hours can be entered. Permanent timecards show rounding hours for both hundredths and quarterly, based on the Job Master File setting.
Important: Permanent Timecard import logic is based on job access, not employee access. This means that it is possible to import timecards from employees you may not have access to review, because you have access to that particular job.

Key Functionality
Select to Show All, Show Hours, or Show Totals.
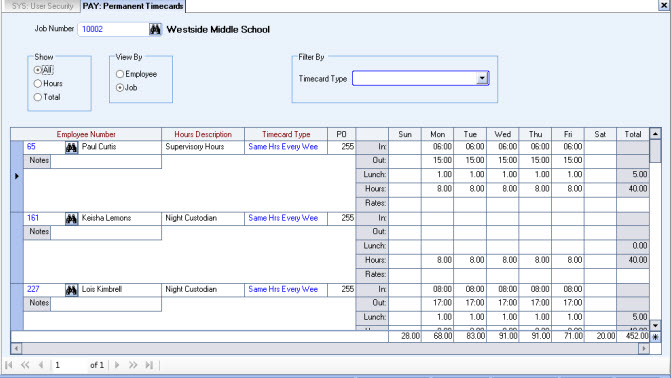
- Show All displays all PTCs for the selected Employee or Job (depends on the View By Employee or Job).
- Each record is shown individually.
- Show Hours displays all PTCS for the selected Employee or Job with one row per Permanent Timecard record. Day cells can be edited, but Totals cannot.
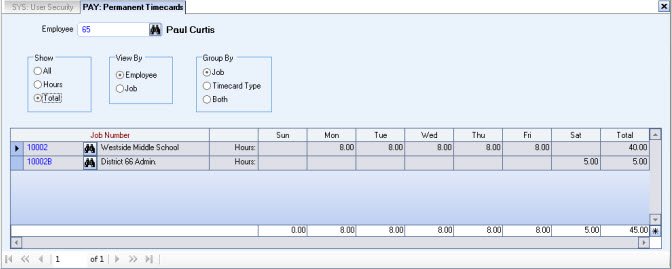
- Show Totals displays all Hours Totals in read-only mode.
Select to view by Employee or Job.
This option group is available when the Show is Total.
If the View is by Employee you can Group By Job, Timecard Type, or Both.
If the View is by Job you can Group By Employee, Timecard Type, or Both.
Timecard Type
Select to filter by Timecard Type.
Double-click to open the Timecard Types add/edit list.
Job Number and Description
Enter a Job Number in this field, or use the Lookup to locate the Job Number.
Hours Description
Select the Hours Description for the Permanent Timecard.
The system defaults the Hours Description based on the default Hours Category in the Job Master File (Timekeeping Info tab) screen. You can type or select a different Hours Description.
Note: If an Hours Descriptions is tied to an invalid Hours Type (this can happen when the Hours Category of a Job has been changed) the column next to the Hours Description displays with an asterisk.
The system will update the permanent timecard and this invalid Hours Description/Category detail record will be paid according to the former Hours Category detail setup information.
Timecard Type
Select the Timecard Type.
You may enter more than one Timecard Type for each employee. You would use this feature if an employee works at more than one Job.
When entering timesheets you may choose to enter In, Out, and Lunch times for each day, or you can enter just the total Hours worked each day for the selected Job.
Type or select the employee’s Timecard Type.
To add a new Timecard Type, double-click in the Timecard Type field, or type a new Timecard Type and press Enter. The Timecard Types add/edit list displays.
Print Order
The Print Order field is used to specify the order to print Jobs on the Permanent Timecards. The default value is 255. If this number is not changed, each item will display in the order it was entered on the screen.
To change the order, use a number less than 255.
For more information, see Changing the Print/Invoice Order.
Timesheet
The Timesheet area defines the work hours for each day of the week for the selected Job.
When entering Timesheets you can enter In, Out, and Lunch times for each work day, or you can enter just the total Hours worked each day.
In
Enter the start times for each work day of the selected Job.
Type the In time using a 24-hour clock. For example, enter 17:00 for 5:00 p.m.
If you choose to enter the total Hours per day, you can configure the timecard to bypass the In fields. To do this, double-click the In label. The system changes the label color to green and skips these fields during entry. To reverse the bypass option, double-click the In label again.
Note: If you enter more than one timecard, WinTeam checks for overlapping times in the In and Out fields. If overlapping times exist, the system displays a message, and the days that contain overlapping times display in pink typeface.
Out
Use the Out fields to specify the end times for each work day of the selected Job.
Type the Out time using a 24-hour clock. For example, enter 17:00 for 5:00 p.m.
If you choose to enter the total Hours per day, you can configure the timecard to bypass the Out fields. To do this, double-click the Out label. The system changes the label color to green and skips these fields during entry. To reverse the bypass option, double-click the Out label again.
Note: If you enter more than one timecard, the system checks for overlapping times in the In and Out fields. If overlapping times exist, the system displays a message, and the days that contain overlapping times display in pink typeface.
Lunch
Enter the time allotted for lunch each work day of the selected Job.
Type the time for Lunch in decimal form. For example, enter .50 for a 30-minute lunch.
If you choose to enter the total Hours per day, you can configure the timecard to bypass the Lunch fields. To do this, double-click the Lunch label. The system changes the label color to green and skips these fields during entry. To reverse the bypass option, double-click the Lunch label again.
Hours
Enter the total hours for each day for the selected Job in decimal form.
Example: 7 hours and 15 minutes should be entered as 7.25.
The system automatically calculates the Hours based on the entries made in the In, Out, and Lunch fields.
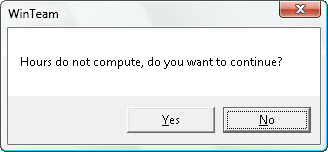
Hours can be edited and not forced to match the in/out/lunch calculation if Hours Override is 'Allow' or 'Allow with Warning' in PAY: Defaults. If Allow with Warning is the selected option, then the following warning message displays:

If the Hours Override Setting is 'Do Not Allow', the Hours cells display grayed out, meaning they cannot be overwritten.
To configure this timecard to bypass the Hours fields, double-click the Hours label. The system changes the label color to green and skips these fields during entry. To reverse the bypass option, double-click the Hours label again.
Negative Hours can be entered.
Rates
Enter a special rate of pay for the hours worked at the selected Job for this employee.
Note: This entry overrides all other existing pay rates for this employee.
Notes
Enter any notes pertaining to this Permanent Timecard record. If you enter more than one line of information, the system automatically wraps the lines of information for you. To start a new line or paragraph, press Ctrl + Enter.
Total Hours
View the Total Hours per day and for the week for all Jobs entered on this Permanent Timecard.
You can use the Total Hours to verify that the employee is assigned the correct number of hours.
Example:
Totals when Viewing by Employee (Read-only)
Viewing By Job
Example:
Show All when Viewing by Job
Example:
Hours when Viewing by Job
Employee Number and Name
Enter a Employee Number in this field, or use the Lookup to locate the Employee Number.
Hours Description
Select the Hours Description for the Permanent Timecard.
The system defaults the Hours Description based on the default Hours Category in the Job Master File (Timekeeping Info tab) screen. You can type or select a different Hours Description.
Timecard Type
Select the Timecard Type.
You may enter more than one Timecard Type for each employee. You would use this feature if an employee works at more than one Job.
When entering timesheets you may choose to enter In, Out, and Lunch times for each day, or you can enter just the total Hours worked each day for the selected Job.
Type or select the employee’s Timecard Type.
To add a new Timecard Type, double-click in the Timecard Type field, or type a new Timecard Type and press Enter. The Timecard Types add/edit list displays.
Print Order
The Print Order field is used to specify the order to print Jobs on the Permanent Timecards. The default value is 255. If this number is not changed, each item will display in the order it was entered on the screen.
To change the order, use a number less than 255.
For more information, see Changing the Print/Invoice Order.
Timesheet
The Timesheet area defines the work hours for each day of the week for the selected Job.
When entering Timesheets you can enter In, Out, and Lunch times for each work day, or you can enter just the total Hours worked each day.
In
Enter the start times for each work day of the selected Job.
Type the In time using a 24-hour clock. For example, enter 17:00 for 5:00 p.m.
If you choose to enter the total Hours per day, you can configure the timecard to bypass the In fields. To do this, double-click the In label. The system changes the label color to green and skips these fields during entry. To reverse the bypass option, double-click the In label again.
Note: If you enter more than one timecard, the system checks for overlapping times in the In and Out fields. If overlapping times exist, the system displays a message, and the days that contain overlapping times display in pink typeface.
Out
Use the Out fields to specify the end times for each work day of the selected Job.
Type the Out time using a 24-hour clock. For example, enter 17:00 for 5:00 p.m.
If you choose to enter the total Hours per day, you can configure the timecard to bypass the Out fields. To do this, double-click the Out label. The system changes the label color to green and skips these fields during entry. To reverse the bypass option, double-click the Out label again.
Note: If you enter more than one timecard, the system checks for overlapping times in the In and Out fields. If overlapping times exist, the system displays a message, and the days that contain overlapping times display in pink typeface.
Lunch
Enter the time allotted for lunch each work day of the selected Job.
Type the time for Lunch in decimal form. For example, enter .50 for a 30-minute lunch.
If you choose to enter the total Hours per day, you can configure the timecard to bypass the Lunch fields. To do this, double-click the Lunch label. The system changes the label color to green and skips these fields during entry. To reverse the bypass option, double-click the Lunch label again.
Hours
Enter the total hours for each day for the selected Job in decimal form. For example, 7 hours and 15 minutes should be entered as 7.25.
The system automatically calculates the Hours based on the entries made in the In, Out, and Lunch fields.
Hours can be edited and not forced to match the in/out/lunch calculation if Hours Override is 'Allow' or 'Allow with Warning' in PAY: Defaults. If Allow with Warning is the selected option, then the following warning message displays:

If the Hours Override Setting is 'Do Not Allow', the Hours cells display grayed out, meaning they cannot be overwritten.
To configure this timecard to bypass the Hours fields, double-click the Hours label. The system changes the label color to green and skips these fields during entry. To reverse the bypass option, double-click the Hours label again.
Negative Hours can be entered.
Rates
Enter a special rate of pay for the hours worked at the selected Job for this employee.
Note: This entry overrides all other existing pay rates for this employee.
Notes
Enter any notes pertaining to this Permanent Timecard record. If you enter more than one line of information, the system automatically wraps the lines of information for you. To start a new line or paragraph, press Ctrl + Enter.
Example:
Totals when Viewing by Job (Read-only)
Custom Settings
| Section | Item | Value | Purpose |
|---|---|---|---|
| PermTimeCard | AllowUnlimitedHours | Yes | This setting will overwrite the 24-hour limit. |
| Payroll | PTCHolidayUpdate | Yes | Timekeeping Selection Options This setting will show a special frame on the Timekeeping Selection Options screen. There, you can specify which days are special holidays. When you import Permanent Timecards into Timekeeping, it will determine if your hire date is more than 90 days ago, or (<more than 30 days ago> and <more than 30 hours in your PTC>). If so, it will assign a special Hours Type (Category Detail) to your Timekeeping record, as the PTC is imported. |
| Payroll | PTCHolidayUpdateMinimumDays | XX (number of days) |
This setting works in conjunction with the PTCHolidayUpdate setting. The variable takes away from the 90 day hire date. Example: If an employee is hired on 10/01 and the holiday is 10/10, the employee will get paid for the holiday if the Value is 9 or less. |
Security
The PAY Permanent Timecards screen has its own Security Group, PAY Permanent Timecards.
The PAY Permanent Timecards screen is part of the PAY ALL Security Group.
This screen has the Read-Only Feature. For more information see Learning about Read-Only Security.
