Overview
Use Payroll Defaults to set up Timekeeping and Overtime options, Employee Master File Settings, Payroll Check Properties, messages for reports, and other Payroll related information.
Payroll Defaults are also used to enable the Tax Allocation Program (available for Enterprise customers or those who have purchased the Tax Allocation Program separately). The Tax Allocation Program is used to allocate labor related costs down to the Job level. For more information, see Allocating Payroll Taxes and Insurance.
The PAY: Defaults screen has five tabs.
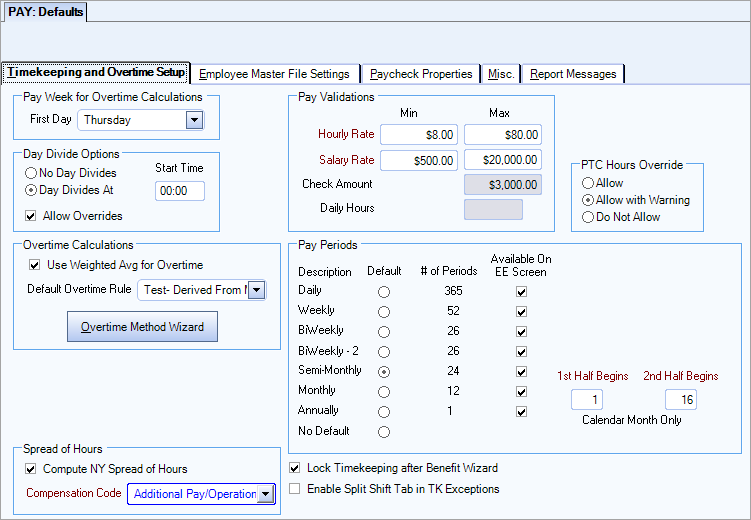
Use the Pay Week for Overtime Calculations area to select the beginning day of your company’s pay week. WinTeam uses the day that you select for calculating overtime within the Payroll and Personnel Scheduling modules.
During check processing, WinTeam uses the First Day field to determine and calculate overtime.
In addition, the system uses the First Day field to determine how the days of the week display in the Personnel Scheduling Post Set Up screen and Schedules screen. The Personnel Scheduling Overtime Warning Report and the Payroll Wage Report By Job also refer to the First Day field.
Note: It is generally bad practice to change the First Day of the Pay Week, as it can create a number of problems. If you need the make a change in order to run a batch for a Job that has a different pay week, see Creating a Batch for a Job with a Different First Day of Pay Week.
WinTeam does not allow the First day of the pay week to change if there are Personnel Scheduling Job Posts set up. Issues will result in Schedules if changes are made, and the following message displays: "There are Personnel Schedules set up for at least one Post. You cannot change your pay week. Call TEAM for assistance."
If, for some reason, it is necessary to change your company Pay Week, see Changing Pay Week when using Personnel Scheduling. This is something you should try to avoid unless absolutely necessary since it will cause you to have to set up your entire Weekly Schedules and Job Shift information within each post again.
Use the Day Divide Options area to specify how you want the system to handle day divides. After you select a Day Divide Option, the system displays (or hides) other fields on the Payroll Defaults screen.
Note: The selection made here will be considered the "Standard" day divide option of this database. When setting up Jobs, the default day divide option will always be to "Use Standard Method". It can be changed for a Job if necessary.
No Day Divides
Allocate all hours to the day the shift started.
Example: If an employee's shift runs from 23:00 to 07:00 hours the next morning, the system allocates all hours to the day on which the shift began. The system will not divide the hours between the two days.
Day Divides Defined
Allocate hours to the two days that a shift covers. In addition, you must enter the Start Time for your company’s workday and decide whether to Allow Overrides.
Start Time
Displays when you select the Day Divides Defined option. Use the Start Time field to enter the time that your company’s workday begins. For any shift that crosses the Start Time, the system allocates hours worked to each of the two days.
Example: If an employee's shift runs from 23:00 to 07:00 hours and the Start Time for your company’s workday is 0:00 (midnight), the system allocates 1 hour to the first day and 7 hours to the second day.
| Start Time | Shift Start | Shift End | Hours Day 1 | Hours Day 2 |
|---|---|---|---|---|
| 00:00 | 22:00 | 06:00 | 2 | 6 |
| 07:00 | 22:00 | 06:00 | 8 | 0 |
| 07:00 | 00:00 | 08:00 | 7 | 1 |
Allow Overrides
Displays when you select the Day Divides Defined option.
Use the Allow Overrides option to display a warning when you enter an In/Out pair on the Timekeeping entry screen that results in a day divide. If you do not select Allow Overrides, the system creates the day divide without displaying a warning.
Use the Overtime Calculations area to define how the system should determine employees’ overtime pay.
Use Weighted Avg for OT
Use the Use Weighted Avg for OT option to calculate overtime with the weighted average method. With this method, when multiple pay rates exist in a pay week for an employee, the system calculates a "weighted average" rate for the week. The system uses the weighted average pay rate to calculate the extra 50% owed, or in the case of double time, to calculate the extra 100% owed.
For more information, see Calculating Overtime Rates Using Weighted Averages.
Default Overtime Rule
Use the Default Overtime Rule field to select a default Overtime Method for the PAY: Master File (Pay Info tab) screen. This default setting displays when you create a new employee.
Type or select the Overtime Method.
To create a custom Overtime Method or view an existing Custom Overtime Method, click the Overtime Method Wizard button.
For more information see System Defined Overtime Methods.
See example of Calculating Overtime for a Semi-Monthly Hourly Employee using OT Method 1.
Overtime Method Wizard button
Click the Overtime Method Wizard button (or press ALT +O) to display a dialog box where you can create a new Custom Overtime Method or edit an existing Custom Overtime Method. If you select New, the system prompts you for a system-defined method to use as a basis for the new custom method. To view a list of existing WinTeam Overtime Methods see List of System Defined Overtime Methods.
For more information see Creating and Editing Custom Overtime Methods.
The system uses the Pay Validations area to verify all Pay Rates (hourly and salaried) entered in the PAY: Master File (Pay Info) screen.
When you add a new employee or change an existing employee’s Pay Rate, the system verifies that the amount is within the appropriate Pay Validations range. The system also uses the Pay Validations in the Hours Categories screen when entering Alternate Pay Rates. If you attempt to enter a Pay Rate that is not within the Pay Validations range, the system displays a warning message.
Use the Pay Validations fields to enter the minimum and maximum pay rates for both hourly and salaried employees. Periodically check the ranges to ensure they remain accurate and up-to-date.
Hourly Rate Min. and Max.
Use the Hourly Rate Min. and Max. fields to enter the minimum (lowest) pay rate and the maximum (highest) pay rate that your company allows for hourly employees.
Salary Rate Min. and Max.
Use the Salary Rate Min. and Max. fields to enter the minimum (lowest) salary per pay period and the maximum (highest) salary per pay period that your company allows for salaried employees.
Check Amount
This field is under development.
Daily Hours
This field is under development.
The PTC Hours Override options are used to control the ability to override Hours on the Permanent Timecard.
The system automatically calculates the Hours on the timecard based on the entries made in the In, Out, and Lunch fields .
Hours can be edited and not forced to match the in/out/lunch calculation if Hours Override is Allow or Allow with Warning. If Allow with Warning is the selected option, then the following warning message displays: "Hours do not compute, do you want to continue?"
If the Hours Override Setting is Do Not Allow, the Hours cells display grayed out, meaning they cannot be overwritten.
Use the Pay Periods area to define the normal pay frequencies used for payroll by your company. In most companies, employees are paid according to the same pay frequency. However, companies may use two or more pay frequencies for processing payroll.
Description
View the Description for each of the possible pay frequencies, from most to least frequent. You cannot modify these descriptions.
Default
Use the Default options to select one pay Description as the default for the Frequency field when entering new employees on the PAY: Master File screen.
Example: If 80% of your company’s employees are paid Semi-Monthly, select the Default option for Semi-Monthly. When you create a new employee, the Frequency field will display the Default selected. You can change the default if it does not apply to a new employee.
Note: When using the Prorate Salary Calculator on a 'New Hire', the Pay Frequency indicated here defaults to the Prorate Salary Calculator. Once the Employee record is saved, the calendar will change to be based on the Employee’s Pay Frequency.
# of Periods
View the total number of pay periods that exist in one year for the corresponding frequency in the # of Periods field. You cannot modify this number.
Example: Weekly payroll is processed 52 times a year, and Semi-Monthly payroll is processed 24 times a year.
Available On EE Screen
Use the Available On EE Screen options to select the Pay Period Descriptions to display on the PAY: Master File screen. The selected Pay Periods display in the drop down list for the Frequency field on the PAY: Master File screen.
Begins
Displays if you select the Available On EE Screen option for Weekly, Biweekly, or Biweekly-2.
The default is the First Day field from the Pay Week for Overtime Calculations area.
1st Half Begins
Displays if you select the Available On EE Screen option for Semi-Monthly. Enter the first day of the first Semi-Monthly pay period of the month.
Example: If the first pay period runs from the 1st through the 15th of the month, enter 1.
2nd Half Begins
Displays if you select the Available On EE Screen option for Semi-Monthly.
Enter the first day of the second Semi-Monthly pay period of the month.
Example: If the second pay period runs from the 16th through the last day of the month, enter 16.
No Default
When you select this option there is no pay frequency selected by default for new employees and you must manually select a Frequency for each employee on the General tab of the Employee Master File before you can close or save the employee record.
When the Lock Timekeeping after Benefit Wizard checkbox is selected, hours in the PAY: Timekeeping window are locked after a Human Resources Accrual or Usage Benefit Wizard has been run. To modify the timekeeping hours you must delete the Human Resources batch, modify the timekeeping hours, and process a new batch for the same date range.
When the Enable Split Shift Exceptions checkbox is selected, an Exceptions filter for Split Shifts displays in the PAY: Timekeeping window when the View is By Employee. See WinTeam - Split Shifts for details.
This section is used to comply with the state of New York's requirement that any shift or combination of shifts exceeding ten hours from the start of the first shift to the end of the last shift within a day is subject to a penalty. The penalty is extra pay the employer must pay to the employee. See New York Spread of Hours for details.
Note: A compensation selected here cannot be used as a Nondiscretionary Bonus Compensation.

Select which method you want the system to use to assign Employee Numbers to new employees added to the PAY:Master File screen. After you select the appropriate method, the system displays (or hides) other fields and options in the Employee Numbers area.
Select this option to use the number entered in the Social Security # field on the Employee Master File screen as the Employee # for new employees.
Use Ending Digits of SSN
Displays if you select Use Social Security Numbers. Select this option to define a specific number of ending digits of the Social Security # to use as the Employee #.
Number of Digits
Displays if you select the Use Ending Digits of SSN option.
Use the Number of Digits field to indicate the number of ending digits of the Social Security # the system should use for the Employee # field.
Example: If you enter ‘3’ in the Number of Digits field, the system assigns Employee #’s using the last three digits of the employee’s Social Security #. A Social Security # of 506-98-1234 results in an Employee # of 234.
Duplicate Emp # Resolution Options
Displays if you select the Use Ending Digits of SSN option.
The system uses this field to ensure that the system assigns unique Employee #’s.
- Create ONE additional digit, and increment if needed
Select this option to add the number ‘1’ to the beginning of an Employee # that already exists, and increment as needed.
Example: Using the above example, if Employee # ‘234’ already exists, the system adds ‘1’ to the front to calculate a new employee # of ‘1234’. If Employee # ‘1234’ already exists, the system increments the ‘1’ to a ‘2’ to calculate a new Employee # of ‘2234’, and so on, until the Employee # is unique.
- Use more digits of the SSN until unique
Select this option to add more digits (one at a time) from the Social Security # field, until the Employee # is unique.
Example: Using the above example, if Employee # ‘234’ already exists, the system adds ‘8’ to the front of it to calculate a new Employee # of ‘8234’. If Employee # ‘8234’ already exists, the system adds the next digit of the employee’s Social Security # ‘9’ to the front of it to calculate a new
Employee # of ‘98234’, and so on, until the employee # is unique.
Select this option to cause the system to automatically assign a unique number in the Employee # field on the PAY: Master File screen when entering a new employee.
For more information, see Assigning Employees Numbers to Multiple Databases.
Allow Overrides
Displays if you select the Computer Assign option.
Select the Allow Overrides option to overwrite an existing Employee Number.
Last Used
Displays if you select the Computer Assign option.
Use the Last Used field to display the last Employee # assigned by the system. The system increments the Employee # for the next new employee based on this number. If you want the system to increment from a different number, you can modify the value in the Last Used field.
Beginning
Use the Beginning field to enter the lowest acceptable number for an Employee # in the Employee Master File screen. If you enter an Employee # that is less than this Beginning number, the system displays an error message that states "The Employee Number must be between (Beginning #) and (Ending #)."
Ending
Displays if you select the Computer Assign option. Use the Ending field to enter the highest acceptable number for an Employee # in the Employee Master File screen. If you enter a number that is greater than this Ending number, the system displays an error message that states "The Employee Number must be between (Beginning #) and (Ending #)."
Select this check box to require unique Social Security Numbers to be used for each employee.
If this check box is selected and you enter a Social Security Number that already exists in the system, the following message displays: "This Social Security Number already exists for another Employee. Are you sure you want to create a duplicate number?"
If this check box is cleared, you can enter zeros for unknown SSNs, or enter TIN numbers into the SSN field.
Click this button to open the PAY Defaults Gender grid, where you can manage available gender options for reports, windows, modules, APIs, etc. If desired, you can enable the Nonbinary option or disable the Unknown option. The Male and Female options are enabled by default and cannot be disabled. Abbreviations are also displayed for each gender option on this grid.
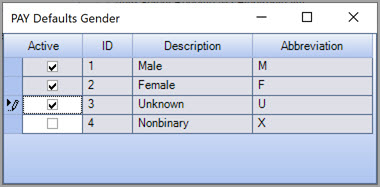
When editing the Pay Defaults Gender grid and selecting or deselecting the Active check box for Unknown or Nonbinary, the following warning message is displayed:

After reading the message carefully, click Continue to confirm changes or Cancel to cancel the changes made.
Use the Employee Availability Option area to designate whether the days and times on the PAY: Master File (Other Info) screen represent when an employee can work or can NOT work.
The system uses the Employee Availability Option information in Personnel Scheduling. If you click the Query button in the Personnel Scheduling screen , the system filters the employee availability information and does not include employees whose hours interfere with the queried shift(s).
Note: Do not change this option after employees have been entered on the PAY: Master File screen because the system retains the days and times previously entered.
Times entered represent when an employee can work
Select this option to cause the days and times on the Other Information screen for an employee to represent "When Employee Can Work."
Times entered represent when an employee can NOT work
Select this option to cause the days and times on the Other Information screen for an employee to represent "When Employee Can NOT Work."
Use to require information in the I-9 Expiration Date and I-9 Type fields on the Employee Master File (Other Info) screen when adding a new employee.
Select to keep a history of Primary Job Site Numbers along with other Pay Info History.
If this check box is selected, the Primary Job Number is required to be entered on the PAY: Master File (Pay Info tab). The Primary Job Site field on the PAY: Master File (General tab) then becomes read-only.
If this is NOT selected, the Primary Job Site field on the PAY: Master File (General tab) is required, although no Primary Job Number history is maintained.
Use this option if your company participates in a direct deposit program for employees. You may set up the participating employee information on the Pay Info tab of the Employee Master File window. The Allow Direct Deposit Third Parties check box is available if there is a third party managing the direct deposit function. Selecting this check box, displays the Direct Deposit 3rd Party and Managed by 3rd Party Start Date fields on Pay Info tab of the Employee Master File.
Select the Export to TeamTime check box to default this setting to new Employee Master File records. This will ensure, for those clients using TeamTime, that each employee is automatically set up for TeamTime.
Select this check box to default the selection of the Receive W2 Electronically check box on the Employee Master File, Tax Info tab, when a new Employee is created.
Select this check box to allow you to assign two HR benefit category groups to employees. When this field is selected, the Benefit Category Group 1 and 2 fields display, and are required.
Enter the appropriate label text for the benefit category groups. These fields display when the Allow 2 Benefit Categories field is selected.
Select this check box to make the Partial Employee Import functionality available in the Employee Master File window. When this functionality is available, there is an import icon in the top right corner of the Employee Master File window (under the change information icon) which users click to open a dialog box used to import partial employee records. The import dialog box contains a grid of the employees who can be imported. Employees must be imported one at a time. You select an employee from this grid and the basic employee information such as name, address, and telephone number is populated into the fields in the Employee Master File window. After you import the basic employee information, you can make manual additions, edits, or deletions before you save the new record. You must complete all required fields in the Employee Master File record before it can be saved. You open the dialog box again to select the next record to import.
Important: This check box is used when converting from the original tax engine to the updated tax engine. After you are licensed for the updated tax engine, it no longer affects any system processes (selected or cleared), but it still displays on the window.
Select this check box to update the values on the Tax Info tab with the values entered onto the Payroll Taxes tab of the Employee Master File. If it is not selected, then the Tax Info tab values are not updated when the fields on the Payroll Taxes tab are updated. This could cause the information on the tabs to be different. This check box is selected by default and only displays when payroll tax automation implementation has begun.
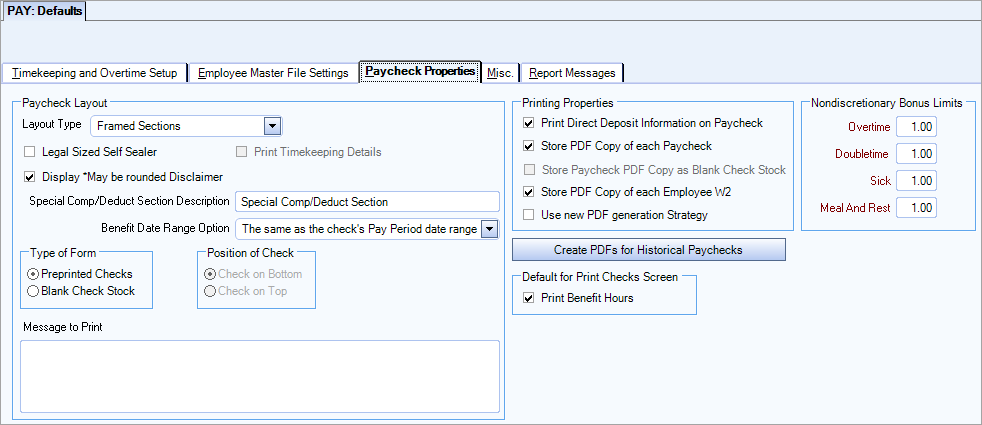
Use the Paycheck Layout area to select the format you wish to use when printing Payroll checks.
Layout Type
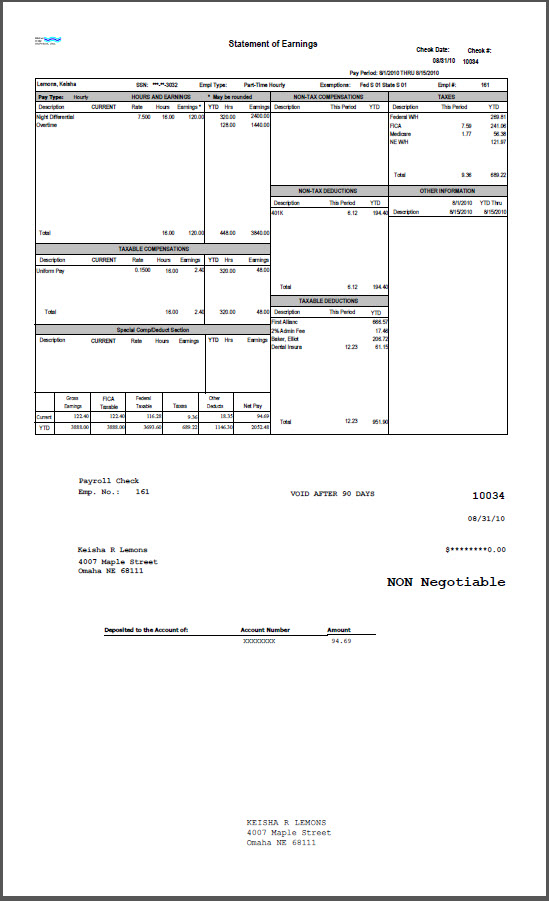
Select the layout type for your paychecks. You can choose from Standard, Framed Sections, and Legal Size Self Sealer.
Standard
This is the normal paycheck layout.
USA databases: When you select the Standard Layout Type, can select the Type of Form. Preprinted Checks will position the check on the bottom of the paycheck form. If you select Blank Check Stock you can choose to position the Check ‘on top’ or ‘on bottom’ of the paycheck form. The default selection is “Check on Bottom”.
Canadian databases: When you select the Standard Layout Type, you can choose to position the Check ‘on top’ or ‘on bottom’ of the paycheck form. The default selection is “Check on Bottom”.
Standard checks
- Can include Timekeeping Details
- Can use either Preprinted Checks or Blank Check Stock
Note: In order to use Blank check stock, you must be using MICR for the Check # to appear on the check stub. For more information see Setting Up WinTeam to Print on Blank Check Stock.
- If Preprinted Checks are used, the check will print on the bottom (after the stub).
- If Blank Check Stock is used, you can choose to print the check on the top of the form or print the check on the bottom of the form.
- CANADIAN Databases Only - An option group displays when using the Standard Layout Type, allowing you to choose whether to position the Check ‘on top’ or ‘on bottom’ of the Paycheck form. The default selection is “Check on Bottom”.
Standard format paystubs show Total Hours Worked for that paycheck. This is required for the state of California.

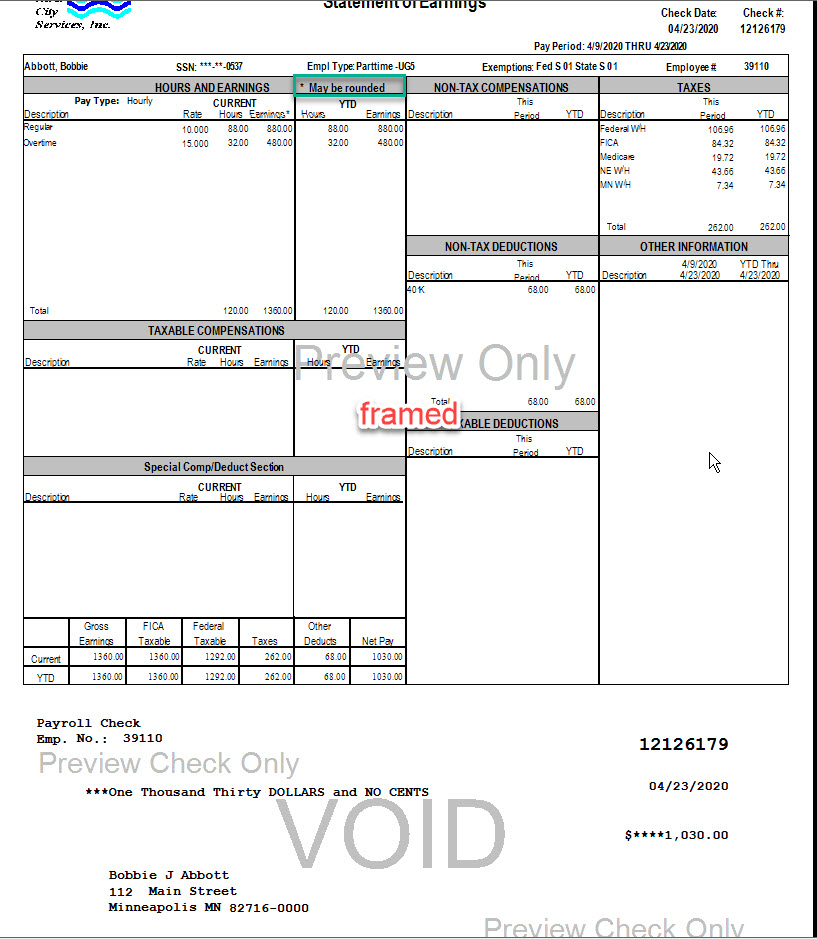
Framed Sections
- Can use the Special Comp/Deduct Description
- Can choose your Benefit Date Range option
- Are automatically set up to print on Preprinted Checks and the check will print on the bottom (after the stub)
- Can print in French
- Can be legal size by selecting the Legal Size Self Sealer check box
For more information, see Using the Framed Sections Layout.
This layout includes weekly hours subtotals.

Legal Size Self Sealer
Select this layout to print only Non Direct Deposit check forms using a self sealed format. The Stub can print on the top or bottom of the check form.
Legal Size Self Sealer
- Can include Timekeeping Details
- Can include Timekeeping Details on Direct Deposit checks with the following Custom Setting in place

- Are automatically set up to print on Preprinted Checks, but you may print the check on the top or bottom of the stub
Use this setting to enable Direct Deposit checks to also print on the legal size form when the Paycheck Report Layout is Legal Size Self Sealer.
With this Custom Setting in place AND using the Paycheck Report Layout Legal Size Self Sealer you need only one form: 8 1/2 x 14 for both Non Direct Deposit and Direct Deposit checks.
Without this setting in place AND using the Paycheck Report Layout Legal Size Self Sealer you would need two different sets of forms: Non Direct Deposit checks would print on 8 1/2 x 14 (Legal size) and Direct Deposit checks would print on 8 1/2 x 11 (Letter size)
Custom Setting
| Section | Item | Value |
|---|---|---|
| LaserPRCheck | UseLegalsizeAlways | Yes |
If you are outsourcing payroll see Outsource Payroll Agencies for information on formats available.
Contact a TEAM representative for information on a vendor that can assist you in getting the proper forms.
Legal Size Self Sealer
This check box displays when the Paycheck Layout Type is Framed Sections.

When using the Framed Section Paycheck Layout Type with the Legal Size Self Sealer check box selected, both the Direct Deposit checks and non Direct Deposit checks will print on legal size self sealers.
Note: This is different than the Paycheck Layout Type Legal Size Self Sealer.
Print Timekeeping Details
The Print Timekeeping Details check box is available if the Layout Type is Standard or Legal Size Self Sealer.
Select the Print Timekeeping Details check box to print details on the paycheck. Timekeeping Details include dates, Job Locations, Pay Rate, OT Rate, In and Out times, Regular Hours, OT hours and Exempt Hours.
The Standard layout with the Timekeeping Details check box selected does not include printing the Hours Type on the paycheck. In order to print the Hours Type with the Timekeeping Details on paychecks, you will need to add this Custom Setting.
| Section | Item | Value |
|---|---|---|
| LaserPRCheck | PrintHoursType | Yes |
This Custom Setting excludes the In or Out times on the paycheck stub when selecting to include Timekeeping Details (PAY: Defaults (Paycheck Properties tab).
| Section | Item | Value |
|---|---|---|
| LaserPRCheck | ExcludeInOutTimes | Yes |
This setting is valid for any paycheck format that allows you to “Print Timekeeping Details”. This includes all USA and Canadian check formats except Framed Sections. This also includes the additional addendum that is appended to the paycheck PDF when there are more timekeeping details than what will fit on the payroll check. For more information see Custom Setting: Excluding In and Out Times. For more information see Custom Settings and List of Custom Settings.
Display *May be rounded Disclaimer
Use this check box to show or hide the statement about possible rounding that appears on framed section paychecks. This check box is selected by default—if you clear it, the statement (and asterisk) do not appear on paychecks.
Special Comp/Deduct Section Description
Use this field to label a section of the Framed layout (bottom left frame). The Description entered here is how the section will be labeled.
Note: This field is currently only applicable to compensations. Functionality for deductions will be added at a later date.
Only those Compensations that have a Special Print Order that is not null will print in this special Comp/Ded section. For more information, see Setting Up Special Compensation and Deduction Codes.
If a description is not entered in this field, then this frame is labeled Important Message. Any special comp that would have printed in this section, if the special comp/ded description had been set up (determined by whether or not there is a print order set up with the compensation or deduction code), will print in the ‘normal’ compensation/deduction sections of the check stub.
Benefit Date Range Option
Use this field to define the information used to default the date range on Paychecks. There are two options:
- The same as the check's Pay Period date range - This is the default selection. Use this option if you always pay benefits the same date range as the Pay Period date range.
- Use Pay period prior to the Check's pay period - Use this option if you are always a pay period behind on Benefits. If this layout is selected, the Print Checks screen has the Print Benefits check box automatically selected, and the Benefit Cut Off Date is not available.
Type of Form
You can select either Preprinted Checks or Blank Check Stock when the Layout Type is either the Framed Sections or Standard.
Note: Vertical and horizontal adjustments cannot be made on Blank Check Stock checks. However, you can make MICR adjustments.
Payroll and Accounts Payable Check Specifications and Dimensions
Position of Check
Select Check on Bottom to print the check on the lower portion of the page and the stub information on the upper potion of the page. Select Check on Top for the reverse. The default setting is Check on Bottom. The exact layout depends on which Layout Type is selected.
Message to Print
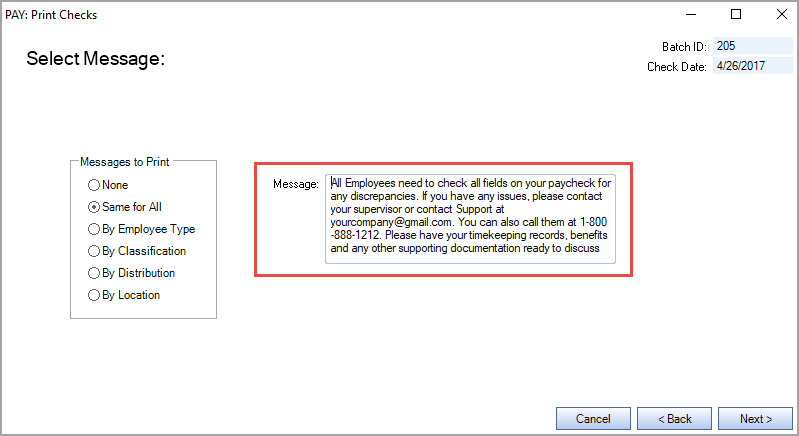
Use this field if you want to include the same text in the message box on every check that prints. This message is used on any format that includes a message. In the Select Message pane of the Print Checks window, this message is automatically populated when the Same for All option is selected. The message does not display when the By Employee Type, By Classification, By Distribution, or By Location options are selected.
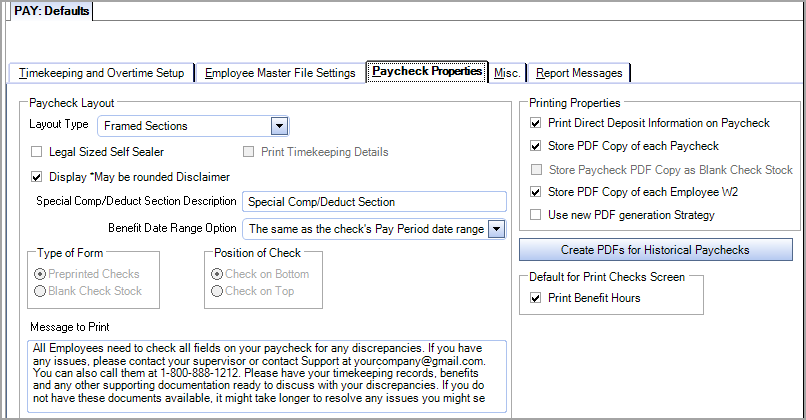
Print Direct Deposit Check Information on Paycheck
Select the Print Direct Deposit Check Information on Paycheck option to print employee Direct Deposit Information on the check portion. Whatever information is set up in the Direct Deposit Information screen of the employee at the time the check was printed is included in the details. Any changes made after the paychecks have been printed will not be considered unless the check is printed again (through Reprint process).
Note: This is important to understand since any changes after may affect your NACHA file, but won’t affect what the employee sees on their paycheck.
If the employee has multiple bank accounts that their check is being deposited into, the check will show the accounts affected. The first account shown will be the Primary bank account for the employee. The check can hold information for up to 8 different bank accounts.
For more information see Samples of Direct Deposit Information on Paychecks.
Store PDF Copy of each Paycheck
Select the PDF Store Copy of each Paycheck option to create a pdf of each paycheck as part of the Print Checks routine. The Paycheck Layout Type is used as the format for the pdf.
Using this option gives you access to a PDF of each employee paycheck. It is readily available if requested by an employee or an agency who needs copies of past paycheck information.
More importantly, it gives those companies using eHub a way for employees to "help themselves" to copies of their previous paychecks. It also allows a way to distribute direct deposit checks to employees without having to mail a copy of the direct deposit check to the employee.
For more information see Printing Checks and Storing PDF's.
Store Paycheck PDF Copy as Blank Check Stock
Select this check box to include either a company logo or address to the PDF copy of the check that employees can download from eHub. See Adding a Check Logo or Address to PDF Checks for details about how to use this feature.
Store PDF Copy of each Employee W2
Select the PDF Store Copy of each Employee W2 check box to store a pdf of each W2 when the Employee W2 Report is run. When selected, all employees will have their W2’s stored electronically.
When the Employee W2 Report is run, a PDF copy of the W2 will be available for review from the Employee W2 Summary (PDF tab). The W2 Instructions are also available to view.
PDF's created in WinTeam are available to view in eHub.
If the Custom Setting (LaserW2; Preprinted; Yes) is being used, the PDF button on the Employee W2 Report options screen is not available since it would not make sense to create a pdf of a preprinted form.
Use new PDF generation Strategy
This check box displays when the Payroll | AzurePDFGeneration | Yes custom setting is enabled. When this check box is selected, the PDFs of paychecks that are exported and printed by ADP are stored in Azure. It only affects the storage location and has no effect on the paycheck process.
This button is visible when the Store PDF Copy of each Paycheck check box is selected.
Select to open the PAY: Print Checks screen (with Recreate PDFs selected).
Customers who are going to use the PDF feature may also want to PDF previously posted Paycheck batches.
For more information see Creating PDF's of Historical Paychecks.
Print Benefit Hours
Select the Print Benefit Hours option to set a default for the Print Benefit Hours check box on the Print Checks screen.
- If your current paycheck format is Framed Sections, this check box will be selected by default on the PAY: Defaults screen for you. You can deselect it in this case if you do not want it to default as checked on the Print Checks screen.
- If you do not want to print Benefit Hours on paychecks, then clear this check box.
Use this setting to hide the Hours Accumulated column of the benefits information for the Preprinted & Preprinted with Timekeeping and the Formless & Formless with Timekeeping paycheck layout formats.
| Section | Item | Value |
|---|---|---|
| LaserPRCheck | HideHoursAccumulated | Yes |
For more information see Creating PDF's of Historical Paychecks.
This section is used to enter the default limits to use when filtering for nondiscretionary bonus additional amounts in the Nondiscretionary Bonus Compensation Report.These limits are also used in the message that displays after a check has been calculated that this equal to or greater than the limit amount.
Tip: See Nondiscretionary Bonus Compensations Overview for more information.
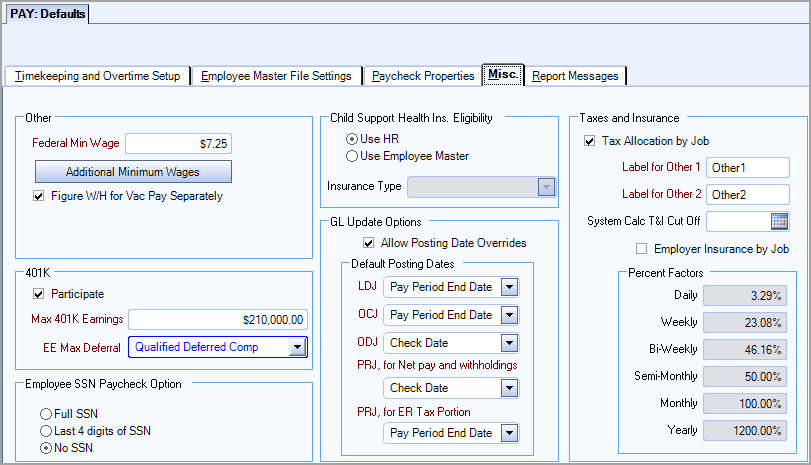
Federal Min Wage
Enter the federal minimum wage value.
Additional Minimum Wages
Click this button to open the PAY Minimum Wage table where you can enter all of the minimum wage values you use. For details about managing multiple minimum wage values, see Minimum Wage Compliance.
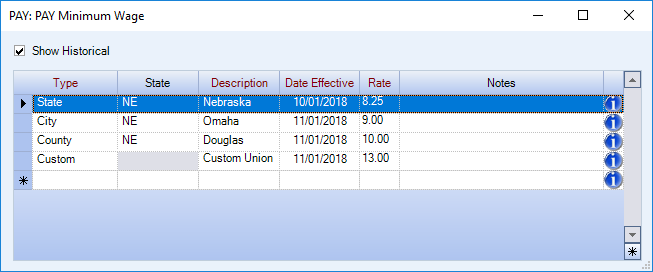
Figure W/H for Vac Pay Separately
Use the Figure W/H for Vac Pay Separately option to calculate Federal withholdings on vacation earnings separately from all other earnings. By calculating withholdings separately for vacation and all other earnings, the system deducts a smaller withholding amount than when vacation and all other earnings are combined.
When you select this option, the system first calculates the Federal withholding for all other earnings (if any) and then calculates the Federal withholding on vacation earnings. This is convenient for companies that include vacation pay on employee’s regular paychecks.
Password for Reprinting Payroll Checks
This option has been replaced with PAY Print Checks screen security feature Can Reprint.
Use the 401K area to define your company’s 401K plan parameters.
Participate
Use the Participate option to indicate that your company participates in a 401K Plan. If you select this option, the system displays the 401K Plan option group on the PAY: Master File (Other Info) screen.
Max 401K Earnings
Displays if Participate is selected. Use the Max 401K Earnings field to enter the maximum amount of earnings per year for the 401K Plan.
The employee's 401K earnings will stop accumulating when this maximum is reached. The 401K contribution (deferral amount), however, will continue to be deducted and will accumulate up to the maximum deferral amount indicated in the EE Max Deferral $ field.
EE Max Deferral
Double click in this field to open the Retirement Groups add/edit list. The maximum deferral amount is automatically added to the Qualified Deferred Comp retirement group, and is defaulted as the limit for 401K in Payroll Defaults. You can change the retirement group used in Payroll Defaults for simple 401K. The scenario in which this would be most helpful would be if you already have a limit previously set up in the retirement groups list for use on other deductions, and that same limit is the one that should apply to your simple 401K set up in Payroll Defaults. If you have an employee with multiple retirement contributions, they can now share the same limit from this list, both contributions will count toward that limit, and when reached be discontinued. This makes it easier to track, and less likely to exceed federal contribution limits.
Note: The same Retirement Groups add/edit list opens from both the Other Deduction Codes and Payroll Defaults windows. This allows you to use the same set of limits to help you stay in compliance with federal contribution limits. You can access this list from either window to make changes or additions.
Select whether to print the full SSN, the last 4-digits of the SSN, or no SSN on paycheck stubs. The default selection is Full SSN. If your company does not want to print the full SSN, then change this option accordingly. This applies to all 4 of the Paycheck Layouts.
Use this option group to select how the system will determine Health Insurance Eligibility for Child Support reporting.
Use HR to have the system use the eligibility determination made in the Benefit Set Up screen.
Use Employee Master File to have the system use the Employee Master File Insurance type fields (Type 1, 2, 3). If you select this option, you will need to choose Insurance Type 1, Insurance Type 2, or Insurance Type 3.
For more information, see Using FIPS for Child Support Related Items.
Allow Posting Date Overrides
Select the Allow Posting Date Overrides check box in order to modify the journal posting dates when updating to the General Ledger.
Default Posting Dates
Select the basis for defaulting posting dates when updating to the General Ledger. Your options are to base the posting dates on Pay Period End Date or the Check Date.
The defaults are
- LDJ - (Labor Distribution Journal) - This updates GL Labor accounts (Wages, Salary, Overtime, Vacation, Holiday, Sick, etc.) and is defaulted to update on the Pay Period End Date.
- OCJ - (Other Compensations Journal) - Updates Other Compensations (Back Pay, Bonuses, Commissions, Car Allowance, Mileage Reimbursements, Severance, Uniform Pay, etc.) and is defaulted to update on the Pay Period End Date.
- ODJ - Other Deductions Journal) - Updates Other Deductions accounts (Garnishments, Child Support, Insurance, Savings, Union Dues, etc.) and is defaulted to update on the Check Date.
- PRJ, for Net pay and withholdings - (Payroll Journal for net pay and withholdings) - Updates the GL payroll tax accounts (Federal, FICA, Medicare, State Taxes, etc) and is defaulted to update on the Check Date.
- PRJ, for ER Tax portion - (Payroll Journal for employer tax portion) - Updates the employer tax portion of taxes and is defaulted to update on the Pay Period End Date.
Your selections will carry over to the Journals area of the Payroll General Ledger Update screen. You may modify the posting dates on the General Ledger Update screen only if you have selected the Allow Posting Date Overrides check box.
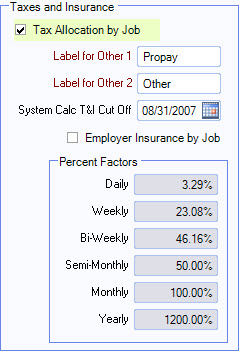
Tax Allocation by Job
This check box displays only if you have the Enterprise version. The Tax Allocation by Job feature is used to allocate labor related costs down to the Job level. For more information, see Allocating Payroll Taxes and Insurance.
If this option is selected, the System Calc T&I Cut Off date will not be looked at.
Label for Other 1
This field is used for any other Employer cost that is a percentage of labor. This could be used to allocate a general overhead such as a payroll processing fee, on a job by job basis.
The Label for Other 1 entered here displays on the Taxes and Insurance screen
Label for Other 2
This field is used for any other Employer cost that is a percentage of labor. This could be used to allocate a general overhead, on a job by job basis.
The Label for Other 2 entered here displays on the Taxes and Insurance screen.
System Calc T & I Cut Off
Enter a cutoff date to pick up System Calculated Taxes and Insurance for computing the system calculated actual tax and insurance dollars.
This field is only looked at for Job Costing and Financials, if the option for Tax Allocation by Job is selected. Those Users who are using the Tax Allocation program more than likely did not start using it at the start of a fiscal year. Without this option, the taxes and insurance are incomplete on Job and other tiered reports. The company report would be accurate since you had to create an adjusting journal entry (if you were not using the Tax Allocation program) to "book" the employer's portion of taxes and insurance.
Enter the last date you want the system to look at for computing the system calculated actual tax and insurance dollars. This information is stored in every labor posting in the General Ledger. Whether or not is used or not on reports, depends upon what is entered here. If no date is entered, the system will not use any system calculated tax and insurance dollars.
For more information, see Understanding the System Calculated Taxes and Insurance Cut Off Date.
Employer Insurance by Job
Select this check box to enable the ability to view historical Employee and Employer Insurance Costs based on paychecks that have already been processed.
If this check box is selected, the Employer Insurance Cost Allocation Report Type is available in the HR Report: Benefit Insurance/Other Analysis report options.
This check box also affects the Taxes and Insurance Type (tax allocation) table used when Allocating Payroll Taxes and Insurance. When it is selected, a column labeled Emp. Ins. is added to the table which allows employer expenses for health insurance to be allocated at the job level. This is helpful when the Insurance Benefits module is being used and there are employer costs associated with benefits. WinTeam uses the following logic for this:
- Adds an Insurance column to the Tax Allocation Journal.
- Verifies the benefits are marked for allocation employer costs.
- Identifies all Default Deduction IDs that are tied to all benefit plan options.
- Identifies the insurance benefits assigned to the employee where the Allocate Employer Costs check box is selected for the benefit.
- Determines if there are employer costs associated with the benefit and if the employee had the deduction for this check associated with the benefit plan option.
- Calculates the insurance tax portion by multiplying the total employer insurance costs by the paycheck frequency percent factor. This factor is dependent on how the insurance company bills the employer which is typically monthly. The wages that print on the Tax Allocation Journal are for regular wages and do not include overtime or doubletime wages.
- If the General Ledger numbers have been entered in the JOB Taxes and Insurance window, then the calculated insurance employer costs post to each applicable job.

Key Functionality
Print Message
Select the Print Message check box to default this selection on the Timekeeping By Employee report option screen.
Employee Message
Enter a message for the employee that will print on the Timekeeping By Employee Report. This message will print only when selected to Page Break by Employee (on the report option screen). The message allows up to 1500 characters. The Timesheet Message prints in a Tahoma 8pt font by default.
Note: If you need to make the font or font size any different than the Tahoma 8 pt font used by WinTeam, you will need to copy your message to Word and then change the font to something that will fit your message, and then copy/paste into message area.
Print Employee Message
Select the Print Employee Message check box to default this selection on the Timesheet report option screen.
Employee Message
Enter a message for the employee that will print on the Timesheet Report. The message allows up to 1500 characters.
The Timesheet Message prints in a Tahoma 8pt font by default.
Note: If you need to make the font or font size any different than the Tahoma 8 pt font used by WinTeam, you will need to copy your message to Word and then change the font to something that will fit your message, and then copy/paste into message area.
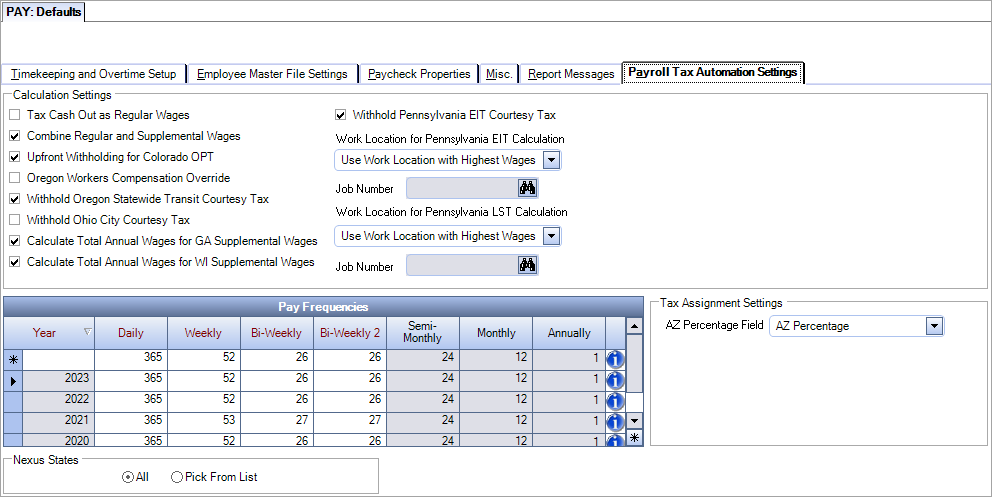
This tab is only available in phase 2/3 of implementing the updated tax engine and when you are licensed for the updated tax engine. See Payroll Defaults with Payroll Tax Automation for details.
