Overview
The Timekeeping Report can be used to review timekeeping hours for a specified date range. This report is intended to be used with a date range matching a pay period in order to get the proper calculated results.
Tip: It is a good idea to verify timekeeping hours before printing paychecks.
The Overtime Indicator Flag (O) will print next to any Hours records where the Overtime Indicator flag is used. The Overtime Indicator Flag signifies that if overtime develops that overtime will be assigned to these hours first.
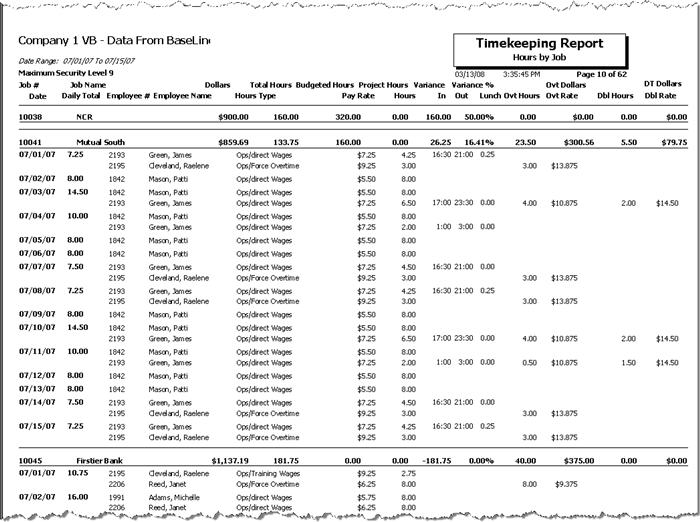
When the Report Type is Detail and the Print Paid Overtime check box is selected, the Timekeeping Report prints in landscape mode to accommodate additional column headers. The information on Paid Overtime and double-time records is not based on Timekeeping records, but included only when payroll has been processed and a batch is created.
If the Report Type is Grouped Details, the report will group by Hours Type. If the Show Pay Rates check box is also selected, the report will group first by Pay Rate, then by Hours Type for both the Hours By Job and the Hours By Employee Reports.
Key Functionality
Select a report template from the list, or type a description and Save your settings to create a report template for later reuse. You may also select and Delete report templates from the list. See WT: Report Criteria Templates for more information.
Note: You must have Can Manage Report Criteria Templates checked in User Security for the Save/Delete functionality.
Type a description to name the report. This description prints above the Report Title.
You can select from a list of pre-defined date ranges, or input the specific dates for which you want to filter the report.
When the Figure Overtime check box is selected, you can enter a date range up to 370 days (instead of the default maximum of 31 days).
When you enter a date range greater than 31 days, a message box displays to remind you the report may run slowly, and suggest the use of filters to reduce the size of the report.

If you enter a date range greater than 370 days, a message box displays to remind you the maximum date range is 370 days.

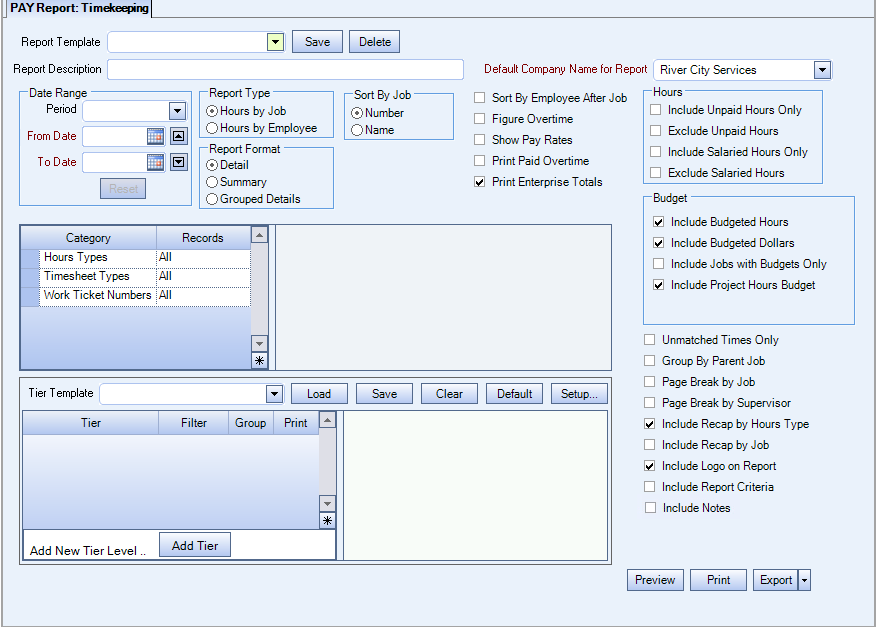
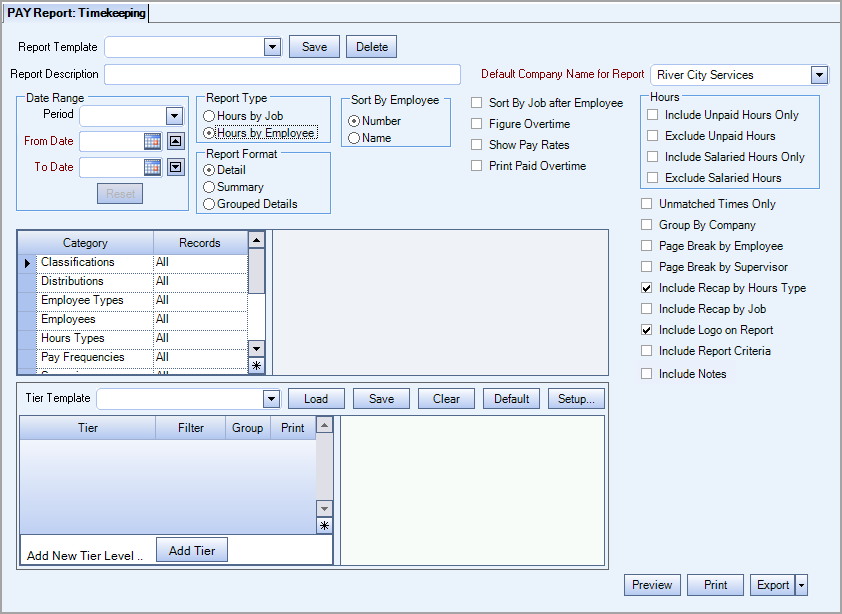
Use the Type of Report option to select the information to display on the report based on either Hours by Job or Hours by Employee.
If you select Hours by Job, you can include Budgeted Hours, Project Hours, Grouping by Parent Job # and Sorting by Employee after Job. You may also filter the report data by Job Types, Supervisors, Timesheet Types, and Hours Types.
If you select Hours by Employee, you may filter by Employee Types, Supervisors, Distributions, Classifications, Pay Frequencies, and Hours Types. You can also select to Sort by Job after Employee.
Use the Sort By option to sort report data by Job Number or Name.
Use the Sort By option to sort report data by Employee Number or Name.
Use the Report Format option group to choose the level of detail for the report.
Select the Grouped Details check box to suppress the printing of the daily details that would normally print, and instead group all of the details by Hours Type underneath each individual Job (if running the Timekeeping Report by Job) or underneath each individual Employee (if running a Timekeeping Report by Employee).
If the Report Type is Grouped Details, the report will group by Hours Type. If the Show Pay Rates check box is also selected, the report will group first by Pay Rate, then by Hours Type for both the Hours By Job and the Hours By Employee Reports.
This option displays only if the Print Paid Overtime option is NOT selected.
Select the Figure Overtime check box to include OT on the report.
Note: The system cannot calculate rates for salaried employees until those hours have been paid. If hours have not yet been paid, it will make all salaried rates $0 when the Figure Overtime check box is selected.
If this check box is selected:
- The Print Paid Overtime check box is not available
- Only 16 days can be entered for the Date Range
- OT Dollars display in the recap section
- OT Hours
The OT Premium dollars are included in the Dollars total (in the header and footer) provided the Figure Regular Dollars check box is also selected.
Show Pay Rates is not available for the Summary Report.
Select the Show Pay Rates check box to show pay rates on the report.
Pay Rates are not included in the recap section.
If this check box is selected the Figure Regular Dollars is available for selection.
For salaried employees - You can print the Pay Rate stored in the “Use This Rate” field for a salaried employee if the timekeeping record includes a rate, and you select the Figure Overtime and Show Pay Rates check boxes. If you also select the “Figure Regular Dollars” check box the labor calculation uses that rate for the timekeeping record.
If there is no pay rate entered in the timekeeping record’s “Use This Rate” field, then the pay rate does not print on the report, the field remains "blank,’ and labor dollars are not figured for that row. See Timekeeping Report (Hours by Employee) for a salary person.
This option displays only if the Figure Overtime option is NOT selected.
Select this option to have WinTeam read paid timekeeping records and include overtime or double-time hours on the report.
You can also select to show pay rates with this option selected. If both of these options are selected the report shows overtime hours, overtime rates, double-time hours, and double-time rates.
If the Print Paid Overtime option is selected the report prints in landscape mode.
The Sort By Employee after Job check box is available if the Type of Report is Hours by Job.
Select the Sort By Employee after Job check box to sort the report criteria by Job Number, and then by each Employee.
An additional Sort By Employee option group then displays in order to select the sort order for Employees, by either Employee Name or Number.
The Sort By Job after Employee check box is available if the Type of Report is Hours by Employee.
Select the Sort By Job after Employee check box to sort the report criteria by Employee, and then by each Job.
An additional Sort By Job option group then displays in order to select the sort order for Jobs, by either Job Name or Number.
Classifications
Use the Classifications category to select the Classifications to include on the report.
Select All to include all Classifications.
Select Pick to define specific Classifications for the report. When you select Pick, the Classifications list displays. Select the check box next to each Classification to include on the report.
Dates
This report is intended to be used with a date range matching a pay period in order to get the proper calculated results.
If the Figure Overtime check box is selected, the date range cannot exceed 16 days.
Use the Dates category to select the date range to include on the report.
Type the beginning date in the From field and the ending date in the To field.
Distributions
Use the Distributions category to select the Distribution to include.
Select All to include all Distribution types.
Select Pick to define specific Distribution to include. When you select Pick, the Check Distributions add edit list displays. Select the check box next to each Check Distribution to include.
Employee Types
Use the Employee Types category to select the Employee Types to include.
Select All to include all Employee Types.
Select Pick to define specific Employee Types. When you select Pick, the Employee Types list displays. Select the check box next to each Employee Type to include.
Employees
Use the Employees category to select the Employees to include on the report.
Select All to include all Employees on the report.
Select Range to define a range of Employees for the report. Type the beginning Employee Number in the From field and the ending Employee Number in the To field.
Select Create to define your own list of Employees. When you select Create, a small grid displays to the right. Enter the Employee Numbers you want to include in the list, or use the Lookup to locate the Employee Numbers.
Select Exclude to identify records that should not be included. When you select Exclude, a small grid displays to the right. Enter the Employee Numbers you want to exclude in the list, or use the Lookup to locate the Employee Numbers.
Hours Types
Use the Hours Types category to select the Hours Types to include on the report.
Select All to include all Hours Types.
Select Pick to define specific Hours Types for the report. When you select Pick, the Hours Type list displays. Select the check box next to each Hours Type to include on the report.
Pay Frequencies
Select the Pay Frequencies to include on the report.
Select All to include all records, regardless of Pay Frequencies.
Select Pick to define specific Pay Frequencies for the report. When you select Pick, the Pay Frequencies list displays. Select the check box next to each Pay Frequency to include on the report.
Supervisors
Use the Supervisors category to filter the report by Supervisors.
Select All to include all Supervisors.
Select Pick to select the Supervisor(s) to include.
Ticket Numbers
Use the Ticket Numbers category to select the Ticket Numbers to include on the report.
Select All to include all Tickets.
Select Range to define a range of Ticket Numbers for the report. Type the beginning Ticket Number in the From field and the ending Ticket Number in the To field.
Work Ticket Numbers are included on the following report types and report formats:
- Hours by Job (Detail)
- Hours by Job (Grouped Details)
- Hours by Employee (Detail)
Companies
The Company Pick option filters for AR Invoice and Payment records. The Companies category is available for Clients using the Multi-Company feature.
Select the Companies to include on the report.
Select All to include all companies on the report.
Select Pick to define specific Companies for the report. When you select Pick, the Companies list displays. Select the check box next to each Company to include on the report.
Note: When running reports using the Company Category/Record Pick and the company name exceeds the maximum number of characters, WinTeam will truncate the name.
Locations
The Locations category is available for Clients using the Multi-Location feature.
Use the Locations category to select the Locations to include on the report.
Select All to include all Locations on the report.
Select Pick to define specific Locations for the report. When you select Pick, the Locations list displays. Select the check box next to each Location to include on the report.
Use the Tier Template to define and save customized settings for a report. To use an existing template, select the template from the list and click Load.
To create a new template, you can load an existing template, make the necessary modifications, click Save, and define a new template name in the Save As dialog box. Alternatively, you can start with a blank template by clicking the Clear button.
To modify an existing template, load the template, make the necessary modifications, and then click Save. The name of the existing template display in the Save As dialog box. Click OK.
For more information see Using Tier Templates and Using Tier Parameters.
Select the Unmatched Times Only check box to limit the report to include only those records where Shift Times are used and either the check in or check out record is missing. This option actually creates an exception report that you may use to correct timekeeping records.
Select this option to include only those hour records that have not been paid (not part of an existing check record). This is useful when you want to see if hours were entered after the payroll batch was created.
Select this check box to include only salaried hours on the report.
Select this check box to include only salaried hours on the report.
This option is available to users who have more than one company, but is not selected by default. If selected, the default company prints on the Grand Total Page and the Report Criteria page. All other pages print the applicable company name. If not selected, the default company prints on every page of the report.
The Print Enterprise Totals check box is available to users who have more than one company, and may be selected to print enterprise totals on the report. This check box is selected by default.
If this is not selected, the report prints only the tiered reports that are marked for printing.
The Group By Parent Job check box is available if the Type of Report is Hours by Job.
Select the Group By Parent Job check box to group the timekeeping records by parent Job Number.
The Page Break by Employee option is available if the Type of Report is Hours by Employee and if Page Break by Supervisor is NOT selected.
Select the Page Break by Employee check box to total the hours for each Employee and create a page break between Employees.
When this option is selected, you can also select the Include Employee Message check box.
If the Print Message check box was selected in PAY: Defaults, the Include Employee Message check box is selected here.
The Page Break by Job option is available if the Type of Report is Hours by Job and if Page Break by Supervisor is NOT selected.
Select the Page Break by Job check box to total the hours for each Job and create a page break between Jobs.
The Page Break by Job option cannot be used with Page Break by Job or Page Break by Employee.
Select the Page Break by Supervisor check box to total the hours for each supervisor and create a page break between supervisors.
The Include Budgeted Hours check box is available if the Type of Report is Hours by Job. It is selected by default.
Select the Include Budgeted Hours check box to include budgeted hours on the report.
If this check box is selected, the Include Budgeted Dollars check box is available and selected; the Include Jobs with Budgets Only check box is available for selection; and the Include Project Hours Budget check box is available.
The Include Project Hours Budget check box is available if Include Budgeted Hrs is selected AND the Type of Report is Hours by Job.
Select the Include Project Hours Budget check box to include the total amount of project hours completed for the dates specified.
If the Print Message check box was selected in PAY: Defaults, the Include Employee Message check box is selected hereby default.
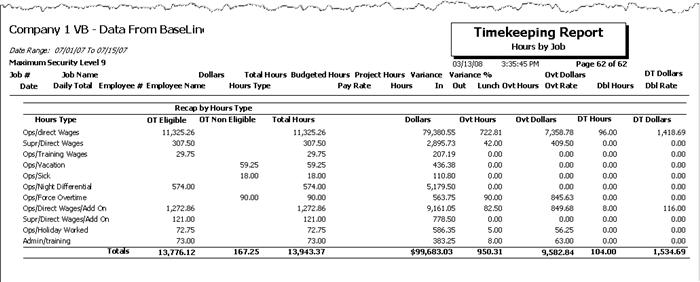
Select the Include Recap by Hours Type check box to include a summary of total hours for each Hours Type at the end of the report.
Select the Include Recap By Job check box to include a Recap at the end of the report by Job, showing Hours Type breakdown, the number of employees included in that breakdown, along with whether the hours were OT Eligible or OT Non Eligible.
Select this check box to print the company logo on the report. It is selected or cleared by default based on the option selected in SYS:Defaults. However, you can modify the setting on each report.
Select this check box to include a list of the report options selected for the report. The Report Criteria page includes any ranges specified and each Category/Record selection made for the report. This check box is cleared selected by default.
The Include Notes option is available with the Detail Report Format. When selected a line with the most recent history notes displays below the Timekeeping record.
Preview
Click the Preview button (or use the shortcut key, ALT + V) to view the report before printing.
Click the Print button (or press ALT + P) to send the report to your default printer.
Export
Click the Export button (or press ALT + X) to export the report to a specified format. Reports may be exported to Adobe Acrobat (PDF), Excel, Comma-Separated Values (CSV), Grid View and E-mail (available for premise-based clients only).
Report Examples
This report example had the Print Paid Overtime check box and the Show Pay Rates check box selected.

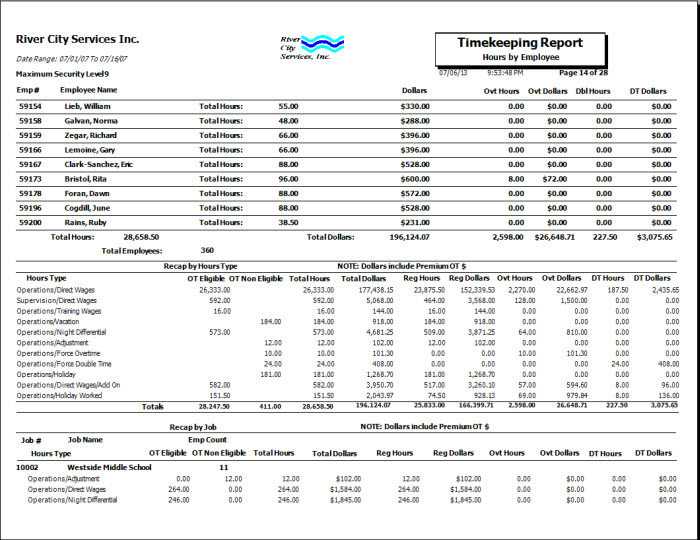
This example had the Figure Overtime, Show Pay Rates, Figure Regular Dollars, and Show Recap by Hours Type check boxes selected.

You can include a Salaried employee's Dollar amount and Pay Rate if a rate was entered in the "Use this Rate" (in Timekeeping entry) and the Figure Overtime and Figure Regular Dollars check boxes are selected on the report.
To print the Pay Rate stored in the “Use This Rate” field for a salaried employee when the timekeeping record includes a rate, select the Figure Overtime and Show Pay Rates check boxes. If you also select the “Figure Regular Dollars” check box the labor calculation uses that rate for the timekeeping record.
If there is no pay rate entered in the timekeeping record’s “Use This Rate” field, then the pay rate does not print on the report, the field remains "blank,’ and labor dollars are not figured for that row.

This example had the Include Budgeted Hrs and Include Budgeted Dollars options selected.

Security
The PAY Report Timekeeping screen has its own Security Group, PS Report Scheduling Activity Report
The PAY Report Timekeeping screen is part of the PAY Reports All Hours Security Group (no features selected).
Tip: For more information see Security Groups Overview and Security Groups By Module.
Custom Settings
| Section | Item | Value | Purpose |
|---|---|---|---|
| TKReport | UseWeightedAvg | Yes | This setting allows for weighted averaging for overtime and double-time hours and dollars in both the detail and recap sections. |

