Overview
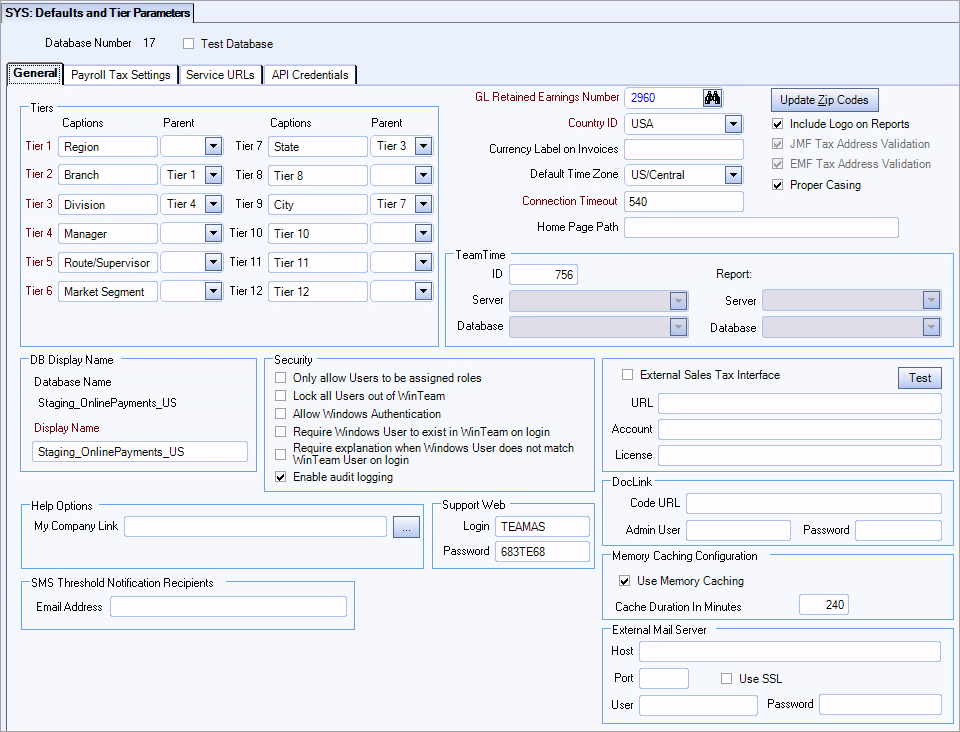
You access the System Defaults screen from the System - Setup Menu. You use the System Defaults and Tier Parameter screen to set general system default information.

Key Functionality
Displays the client ID used by TeamTime.
Use the Country ID field to select the country your company resides in. This will dictate how various tax reporting formats are prepared. In addition, if your Country ID is set to Canada, various Affordable Care Act features throughout the system will not be displayed/available.
eHub, TEAM's web-based customer and employee self-service solution, uses this Country ID to determine the language format. eHub supports both USA and Canadian English language formats. The following items display in the Canadian format:
- Date US format > Canadian Format
- Zip Code US format > Canadian Format
- Zip Code verbiage > Postal Code
- State verbiage > Province
- Social Security Number US format > Canadian Format
- Social Security Number verbiage > Social Insurance Number
- W2 verbiage > T4
- FICA verbiage > CPP
Note: Paycheck and Invoice .pdf files generated within WinTeam, and any customer-generated content that appears on the dashboard, are excluded from language formatting.
Use this field to enter a three-character currency code to display in the total lines on printed Accounts Receivable invoices. This field is blank by default.
Enter the General Ledger Number to use for Retained Earnings purposes. The number must already exist in the General Ledger Chart of Accounts screen before you can enter it in this field.
During the Year End Rollover process, the system updates the balance of the income and expense (company net profit/loss) for the fiscal year completed into the Retained Earnings account. When the Year End Rollover process is complete, all income and expense accounts will begin the new year with a zero balance.
You can enter the GL Retained Earnings Number directly in this field, or use the Quick Lookup to locate the GL Number.
Hover over the Change Information icon to see User Changed and Date Changed information. WinTeam records the logon name of the user changing this record. The Date Changed is the date the record was last changed. You can right-click on the Change Info icon to filter for records changed by a specific user or date.
When you hover over the User Changed or Date Changed filters, you can then choose to
- Filter By Selection - Filters for all records that match your current records field value.
- Filter by Exclusion - Excludes from your filter all records that match your current records field value.
- Filter For - Filters based on the text/value you enter.
- Sort Ascending - If you already have a filter applied, the Sort Ascending command is available. Also used to include all records in the filter and sort in ascending order based on the current records field value.
- Sort Descending - If you already have a filter applied, the Sort Descending command is available. Also used to include all records in the filter and sort in descending order based on the current records field value.
General Tab

Use the Tiers area to enter descriptions for each Tier Level. The system displays this description on various report options screens that include a Tier Parameters section.
You can set up Parent/Child relationships between Tier Levels by selecting a Parent Tier Level from the Parent drop down. For more information, see Tier Hierarchy Relationships.
Tiers 1 - 6 are required entries.
For more information, see Using Tier Parameters.
Use the Default Time Zone to select the time zone to use when the TeamTime machine and a Job site are in different zones.
Select this check box to indicate a database as being a test database. Any screen that has been moved over to WinTeam 5.0 will have an "orange" background instead of our standard "blue" background. This will make it obvious which database you are in. This information is saved immediately to the Team License file.
Normally, you will leave this check box cleared. It is used primarily by larger companies who have a database that they uses for test purposes.
The Connection Timeout is used to assist with possible connection timeouts when running queries. The default value is 300 (seconds). You may increase this amount if you are experiencing timeouts when running lengthy queries.
Important: You must add the logo on the Company Defaults screen before it can be printed on any reports or invoices.
Select this check box to automatically select the Include Logo on Report check box on all the individual report options screens by default. When this check box is selected, the logo prints on all reports and invoices.
Clear this check box to automatically clear the Include Logo on Report check box on all the individual report options screens by default. When this check box is cleared, the logo does not print on any reports or invoices.
Tip: You can always select or clear the check box on an individual report screen regardless of this default setting that affects all the reports.
Use the Home Page Path to specify a path for the html file to replace the 'body' of the WinTeam Home Page.
Team ships a ‘default’ screen (this is located on each user’s machine). You may put special “Notes for the Day”, or “Instructions for the Day”, then create an html page (using Word – save as HTML, or a similar tool), save it to a common shared directory (such as the T drive), and then define the path in the Home Page Path field.
Click to update the Zip Codes/Postal Codes data. An Internet connection is made to TEAM's server to gather the new data.
Select to have this option selected by default on report options screens.
When this check box is selected it displays the Payroll Tax address on the Job Master File, General tab. This allows the address to be validated for payroll tax automation. See Job and Employee Master File Address Validation for additional information. Once the updated payroll tax automation is turned on this check box cannot be cleared.
When this check box is selected, it allows for the Physical address on the Employee Master File, General tab to be validated for payroll tax automation. See Job and Employee Master File Address Validation for additional information. Once the updated payroll tax automation is turned on this check box cannot be cleared.
Select to have WinTeam automatically capitalize the first word of entries in data fields. When unselected, the fields will maintain casing as it is entered.
Note: When selected, to keep the case as entered, use F11 rather than the Tab key.
Client Server customers need to enter the TeamTime Server and Database name in order to gather data from the TeamTime database server.
This is not applicable for ASP Customers, TEAM makes these changes for you, and the related fields on this screen are disabled (to prevent accidental change).
ID
Displays the Client ID stored in TeamTime.
For client server customers this is typically assigned the value of 1.
ASP Customers - This will match the Client ID, assigned by Team, in our Client Tracking system.
Server
Select the appropriate TeamTime Server.
This list populates with all servers that are connected to your machine.
Database
Select a TeamTime Database from the list.
If the TeamTime Server and Database are not specified, then the following menu items are disabled in the Post Watch screen: Clock In / Out, View TeamTime Actuals, and TeamTime Exception Review.
Report Server
Select the Report Server.
This list populates with all servers that are connected to your machine.
Report Database
Select the report database name. Only the databases applicable to the server display in the list.
Displays the name of the database you are currently working on. When you enter a Display Name the system checks the Team License file to ensure the Display Name does not already exist. You cannot have duplicate Display Names for multiple databases.
The default DB Display Name is based on the database name that was originally given when the database was first set up. You may modify the database name here. Whatever name exists in this field is the same you will see when you are logged into WinTeam. The actual database remains as originally named. This is just changing the Display Name, not the actual database name.
Only Allow Users to be Assigned Roles
Select this check box to allow only Security Groups set up as Roles to be used in the system.
Leave this check box cleared if you want the ability to assign Users to regular Security Groups and Security Groups defined as Roles.
If this check box is selected, the User Setup screen will list only those custom groups that are indicated as "Roles" (Group is considers a Role check box is selected).
For more information see Using Security Roles.
Lock all users out of WinTeam
Select this check box to lock all Users (with the exception of those Users who have SYS ALL rights) out of WinTeam.
Note: User must have SYS ALL security in order to select this option.
Allow Windows Authentication
Windows Authentication allows users to login to WinTeam using their WinTeam login information, Windows login information, or a combination of both. This check box is not selected by default.
Select the Allow Windows Authentication check box to select the method of authentication to use when logging in to WinTeam.
WinTeam does not attempt to validate the WinTeam password when using Windows authentication.
If this check box is selected, the Login Settings page will display an Authentication Method column.
Require Windows User to exist in WinTeam on login
This check box is not selected by default.
Require explanation when Windows User does not match WinTeam User on login
This check box is not selected by default.
Enable Audit Logging
Select this check box to enable the auditing and logging feature.
Use the Support Web fields to store your company Login and Password for access to TEAM's Updates Web site.
The Login and Password were issued with the WinTeam program. If you are unable to access using the Login and Password, contact TEAM Client Services by phone at 800-500-4499 or by email at supportstaff@teamsoftware.com.
The Lighthouse Integration check box only displays when you have added the SYS | Lighthouseintegration | True custom setting. When this check box is selected it displays Lighthouse Application fields on the Employee Master File and Job Master File. Use this link for details on this integration.
A Company may maintain specific procedures and processes in their own Help file.
The company.chm file should be stored on a local drive in the same folder as your WinTeamHost.exe file.
Once a valid path is listed in the My Company Link field, the F1 Company Help check box displays
These settings control how DocLink documents are imported to WinTeam and are entered by a TEAM engineer when DocLink is initially set up.
Do not change these settings. Modifying the settings in System Defaults will result in the inability to import documents to WinTeam.
Code URL - Your FileBound domain.
Admin User - The DocLink administrator's user name.
Admin Password - The DocLink administrator's password.
Select the Use Memory Caching check box to cache the information that loads in the drop down lists, and the pay and bill calculator values in the PS Schedules window. This also caches the information that loads in the drop down lists in the Employee Master File and Job Master File windows. When this information is cached, it reduces the time it takes for these windows to reload during a session.
In the Cache Duration In Minutes field, enter the number of minutes for the system to hold the cache values. After that time passes and the data is re-used, the system automatically re-pulls and caches the values and resets the timeout. For optimal performance, we recommend setting the cache to 10 minutes.
Note: If you manually refresh these windows, all of the information will completely reload and the system will re-cache and re-start the duration timer.
If you are a SaaS client you can use these fields to setup an external email server for AR invoices. You must provide the required information for your server—this information is not provided by TEAM.
- Host field can contain 250 characters
- User field can contain 100 characters
- Password field can contain 100 characters
Important: These fields only apply to AR Invoices for SaaS clients
Notification emails are sent to the addresses in this field when total SMS usage reaches 75% and 100% of the threshold set for a database. The messages provide slightly different information depending on whether overages are enabled or disabled. A weekly report is also sent so clients can track the number of texts used and remaining.
Multiple email addresses can be entered separated by a semicolon.
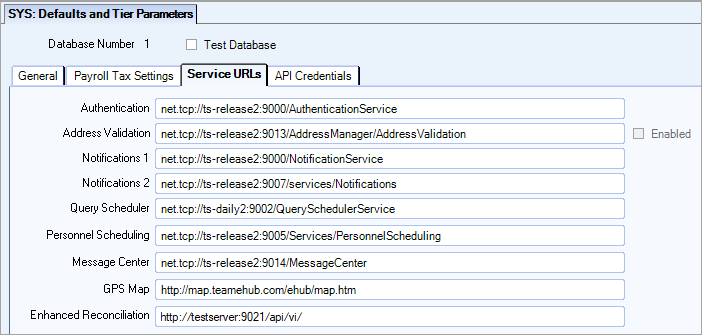
Service URLs Tab
The Service URLs are used for distribution of e-mail, notifications, and results.
Notifications 1 is reserved for the service URL for Action Items.
Notifications 2 is reserved for eHub Mobile in-app notifications using Open Position Claim.
Enhanced Reconciliation is used in the prior day punch automation that is part of the Enhanced Reconciliation feature.

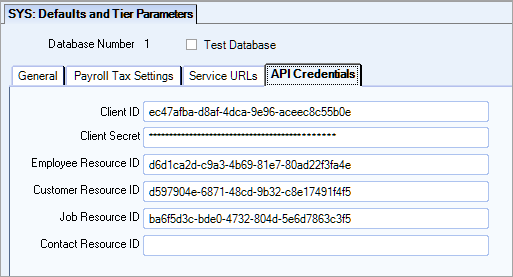
API Credentials Tab
The API credentials must be completed if you are using an Application Program Interface (API) to exchange information between WinTeam and an outside system.
The Client ID, Client Secret, Contact Resource ID and Payroll Resource ID fields are used with the updated payroll tax automation processing.
For details about populating these fields, email your TEAM Account Manager directly, or at accountmanagers@teamsoftware.com.

Custom Settings
| Section | Item | Value | Module and Purpose |
|---|---|---|---|
| Addresses | UseZipsForCityState | Yes |
This setting automatically fills in the City and State (City and Province) fields when entering a Zip Code. It also removes the City and State fields from the tab stop order. |
| Addresses | TabCityState | Yes | This setting will leave the City and State fields (City and Province) in the tab stop order when the Zip Code Custom Setting is in place. |
For more information see Auto Populating City and State Fields.
This setting will remove the Menu map icon from the WinTeam toolbar and Menu maps will no longer be available.

For more information see Custom Settings and List of Custom Settings.
Security
The SYS Defaults and Tier Parameters does not have its own Security Group.
The SYS Defaults and Tier Parameter screen is part of the SYS Defaults / Setup ALL Security Group.
This screen has the Read-Only Feature. For more information see Learning about Read-Only Security.
Tip: For more information see Security Groups Overview and Security Groups By Module.

