Overview
You can use the Invoice Processing screen to print Invoices, email PDF invoices and links to invoices in eHub, and create export files for third party processors. WinTeam ensures that Revenue Total plus Tax equals the Invoice total. The AR: Invoice Processing screen can be accessed from the AR: Accounts Receivable Menu. Default invoice processing information affecting other Accounts Receivable areas of the system are set up in AR: Defaults.
You can use the SYS: Invoice Information Setup screen to define and store multiple billing remittance options per company, including Company and Logo information, which may be used at the Job level, to use when printing invoices.
If you are using the Invoice Form Type Paper with Remittance, you can specify remittance information to use when printing the invoice. If you have multiple companies, you can specify different remittance information for each company.
If you need to specify a different set of Invoice Information (Company Name, Company Address, Logo, or Billing Remittance) than what is indicated for the Job's Company, you may indicate that within the Job Master File Accounting Info tab. A Special Invoice Information field is used to support multiple sets of Company, Logo, and Invoice information at the Job level. To process invoices with the Distribution set to the Job level, see Invoice Distribution Types.
There are additional options for clients who create invoices from Personnel Scheduling:
- You may use a Custom Setting to print an additional line item on the invoice which shows Total Hours. For more information, see Including Total Hours on AR Invoices.
- You may group invoice items by Additional Tier Descriptions. For more information, see Grouping PS Invoice Details by Additional Tier Description.
- You may include separate detail pages showing the Detail Cell Information to support each Invoice detail line item, which is setup in the Job Master File Accounting Info tab by selecting the Include Personnel Scheduling Details with Invoice check box.
Key Functionality
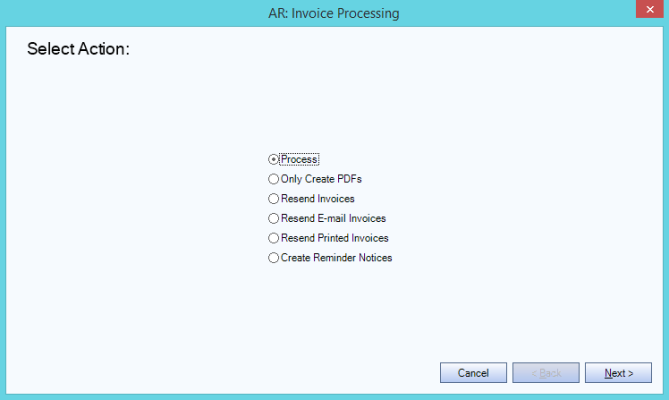
Process
Only Create PDFs
Resend Invoices–Select this action when you need to resend invoices that did not send correctly, or that did not finish processing. When this check box is selected, only invoices that have been sent are available for resending.
Resend Email Invoices
Resend Printed Invoices
Create Reminder Notices–If this option is selected, an additional Category (Invoice Dates) displays in the Category/Records area. If this option is selected, the system allows for the entry of a Reminder Message to include on the invoices. When sending Reminder Notices using either the Paper with Remittance or Paper without Remittance, you will see "Reminder Notice" in the header. There is also a Payments Applied section on the notice. The summary area lists Total Payments and Amount Due. When sending Reminder Notices with Remittance, the remittance includes the Original Amount of the Invoice and Total Payments applied to the invoice.
Reminder Notice with Remittance:
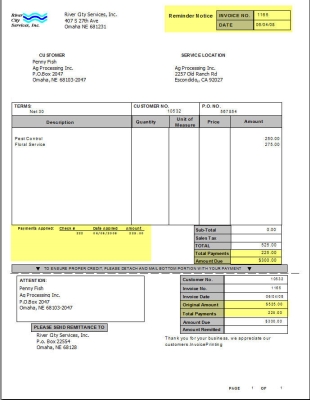
Reminder Notice without Remittance:

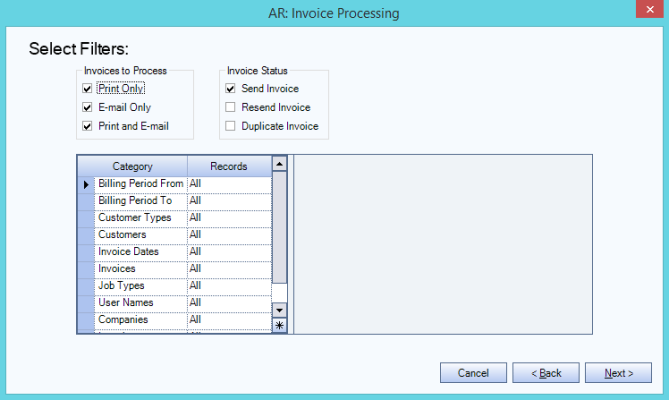
Invoices to Process
Print Only
E-mail Only
Print and E-mail
Invoice Status
Use the options under Invoice Status to select which invoices to print based on the Status of the invoice. If the Customer Master File is set up to Do Not Send Invoices (the Do Not Send Invoices check box is cleared), but the actual Invoice Status is set up to send, the invoice will get sent. The system looks at the invoice status, not the Customer.
Send–This selection defaults upon entry of the Invoice Printing screen. This option includes invoices for sending that have a Send Invoice status.
Resend–This option includes any invoices that have been modified after having been processed initially. The invoices to send are those with a Needs Resent status on the invoice. If an invoice is marked for resending, the system will delete the existing PDF and recreate it.
Duplicate–Once an invoice has an Invoice Sent status, it can be changed to Duplicate Invoice' Duplicate invoices when sent, will have the word Duplicate on them.
Category/Records
Filters
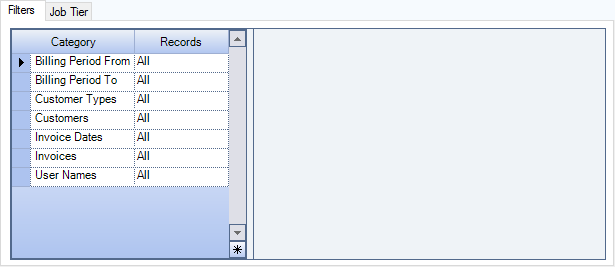
Billing Period From–Filter invoices for a specific billing period. Select All or enter a Date Range.
Billing Period To–Filter invoices for a specific billing period. Select All or enter a Date Range.
Companies–This category is available to users who have more than one company. Use the Companies category to select the companies for which to print invoices. Select All to include all companies. Select Pick From List to define specific companies. When you select Pick From List, the Companies list displays. Select the check box next to each Company for which to print invoices.
Customer Types–Use the Customer Types category to select the Customer Types for which to print invoices. Select All to include all Customer Types for which to print invoices. Select Pick From List to define specific Customer Types to print invoices for. When you select Pick From List, the Customer Types list displays. Select the check box next to each Customer Type for which to print invoice.
Customers–Use the Customers category to select the Customers for which to print invoices. Select All to include all Customers on the report. Select Range to define a range of Customer Numbers for which to print invoices. When you select Range, the Customer Number range fields display. Type the beginning Customer Number in the From field and the ending Customer Number in the To field. Select Pick From List to define specific Customers for which to print invoices. When you select Pick From List, the Customer list displays. Select the check box next to each Customer to print invoices for.
Distribution Types–This Category displays if you are using the Invoice List ACB Custom Setting in place. Use the Distribution Type category to filter the records processed by Invoice Distribution Type. Select All to include all records, regardless of the Invoice Distribution Type. Select Pick to define specific Invoice Distribution Types to print/update.
Invoice Dates–Use the Invoice Dates category to filter the invoices to print by invoice dates. Select All to include all invoices regardless of the invoice date. Select Date Range to define a range of invoice dates for printing. When you select Date Range, the date range fields display. Type the beginning date in the From field and the ending date in the To field, or use the Date Control to select a date.
Invoices–Use the Invoices Category to define the range of the invoice numbers to print. Leave the Invoice field blank to print all invoices. Type the beginning Invoice Number in the From field, and type the ending invoice number in the To field.
User Names–Use the User Names category to select the invoices to print based on who entered the records. This allows users to print their own work without printing the work of others. Select All to print invoices for all users. Select Pick From List to define specific users name for printing invoices.
Job Tier
You can filter using tier template functionality. See Using Tier Templates for more information.
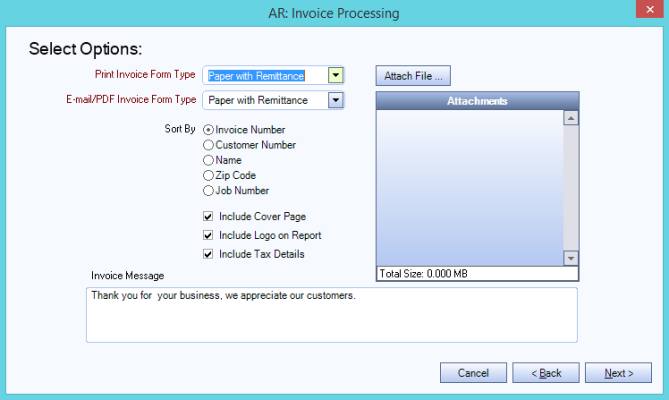
Print Invoice Form Type
Preprinted–Use this form type if you have preprinted forms that have the boxes, etc. printed on them.
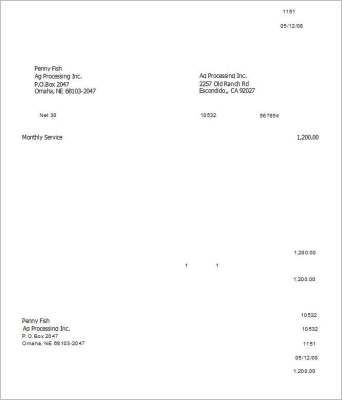
Paper with Remittance–This invoice form type looks similar to the Preprinted form, including the remittance information, but does not require an actual preprinted invoice form to be used. This format can print a total of 30 lines per invoice form. In order to print the remittance, the form can only contain up to 15 printed lines so if necessary, multiple pages will be printed, and the last page will contain the remittance stub. You can use the Number of Detail Lines Custom Setting to alter the number of lines to print.
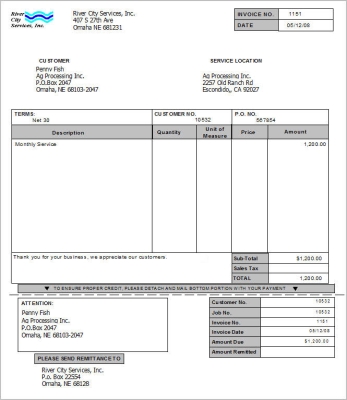
Paper without Remittance–This invoice form type looks identical to the Paper with Remittance Invoice Form Type, but does not include the remittance area of the invoice. This allows additional lines to print since the Remittance Stub is not being printed. A total of 30 lines will print on each invoice form. You may add the Laser Invoice Custom Setting to alter the number of lines to print.
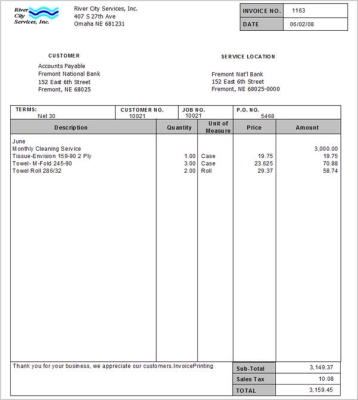
Paper without Remittance Invoice using Canadian Date Format–
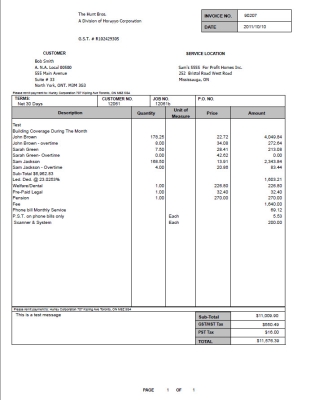
Example of Paper without Remittance Invoice with PS Details–This is a more simplistic example where the Invoice was not created showing daily details. Notice the headers match up to each invoice detail line.
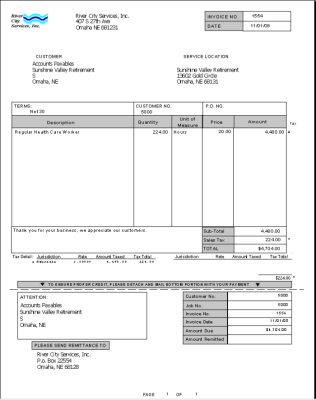
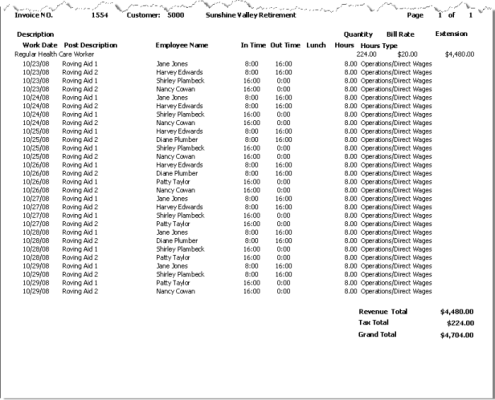
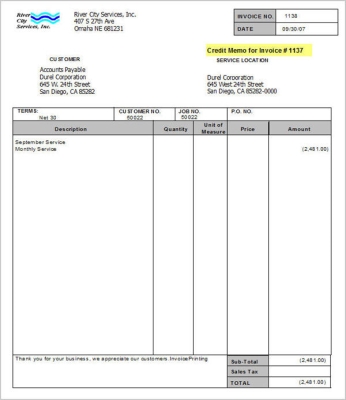
Example of a Credit Memo
Framed by Job–This Form Type includes many options to customize the invoice, including the ability to group by Jobs. It is a bit more graphical than our other Form Types and each Job that is billed on the Invoice is separated by a shaded header box. The Job header information contains the Service Location, Customer Number, Billing Period (as specified when the invoice is created), Job Name, Job Address, Job City, Job State, and Job Zip. The header can also display up to 8 lines of information from the Job Master File (Accounting Info tab), Additional Invoice Information grid.
Sort By
Select to sort the invoices by Invoice Number, Customer Number, Name, Zip Code, or by Job Number.
Include Cover Page–Select this check box to display the e-mail message with the invoice when previewing.
Include Logo on Report–This option is not available for Preprinted Invoices. Select the this check box to include the company logo on paper invoices. You can use the Large Logo Custom Setting if you want the company logo to be larger on the Paper without Remittance invoice and the Paper with Remittance invoice. For more information see Custom Settings and List of Custom Settings.
Include Tax Details–This option is not available for Preprinted Invoices. Select this check box to include tax details on the invoices. The default selection for this check box is set up in AR: Defaults. However, you can modify it on this screen. For multi-page invoices, the Tax Detail will display on the last page. The highlighted areas display the tax details that are included when this check box is selected. The Tax column on the right side of the Amount field holds alphabet characters (beginning with "a'), incremented for each Tax Jurisdiction that applies to the individual line item on the invoice. The alphabetic characters are then referenced in the Tax Details area. Each Jurisdiction, Tax Rate, and total tax is then summed from each line item where the tax jurisdiction applied. The invoice can print up to 26 lines of tax code information.

Attach File
Click the Attach File button to include an attachment to e-mailed invoices. Including an attachment will e-mail it to all Customers who are included in the batch and setup in the Customer Master File to receive their invoices through e-mail with the Delivery Method of E-mail PDF. Total size of file/s attached must be less that 8MB.
Invoice Message
The Invoice Message area displays when you select one of the following from the Invoice Status: Invoices Not Yet Sent, Invoices Marked for Resending, or Invoices Marked for Duplicate. The message defaults from the AR: Defaults screen, although you may modify it on this screen. Changes made to this screen do not effect the default setting in AR: Defaults. The Invoice Message applies only to Paper with Remittance and Paper without Remittance invoices (not preprinted).
Use the Invoice Message to enter a message to include on the invoices. You can enter up to 255 characters. If the Lock invoice message on Print Invoices screen check box in AR: Defaults was selected (by any User), the Invoice Message will be grayed out, meaning that it is not available for editing.
When processing is complete, the Invoice Processing Summary displays total record counts, amounts, and recipient counts for Invoices and Credit Memos for all Delivery Options.

Preview–Click to view invoices before printing.
Print/Process–Click to send the invoices to your default printer and prepare PDFs for emailing. Print output differs across printers, so it is possible that the standard number of lines will not print as expected, for example, 15 lines for Preprinted and Paper with Remittance; 30 lines for Paper without Remittance; up to 42 characters for invoice descriptions (39 if using all capital letters) per line will print. Multiple Custom Settings exist to help you control print output. Multi-page invoices will print with a continuation comment and Page X of X in the footer.
Export
The Export function was designed to work within batch Invoice Processing, not single Invoice Entry. Only invoices flagged to Export in the Job Master File are included in the export file. When checked, the export will run when the invoices are processed. The invoices that are processed are exported based on the Job Master File Invoice Distribution. When using the Invoice Distribution Custom Setting, if the recipients Tab is edited with any contact information during invoice processing, that information will override the Contacts set up in Job Master File.

