(ESTI) Implementation Guide
The External Sales Tax Interface must also be configured to connect to AvaTax, Avalara’s sales tax calculation engine. Avalara AvaTax automatically calculates sales tax for an invoice based on taxing jurisdictions and tax codes assigned to each item/service. Prior to configuring WinTeam, you must first have an Avalara AvaTax account (either a Sandbox or Pro version account) and know the following information:
Account Number
License Key
API URL
Company Code(s)
Once you have the required information, contact TEAM Client Services by phone at 800-500-4499 or by email at supportstaff@teamsoftware.com to get your system licensed for Avalara AvaTax. Now, it’s time to Configure WinTeam.

External Sales Tax Interface – Leave unselected until configuration is complete. Once selected, all existing WinTeam sales tax calculations are stopped and ESTI is used.
URL – To test with an Avalara Sandbox, set to: https://development.avalara.net. To test with an Avalara account, set to: https://avatax.avalara.net.
Account – Set to your ESTI Account Number
License – Set to your ESTI License Key
A Test button is available to test your Account/License configuration.
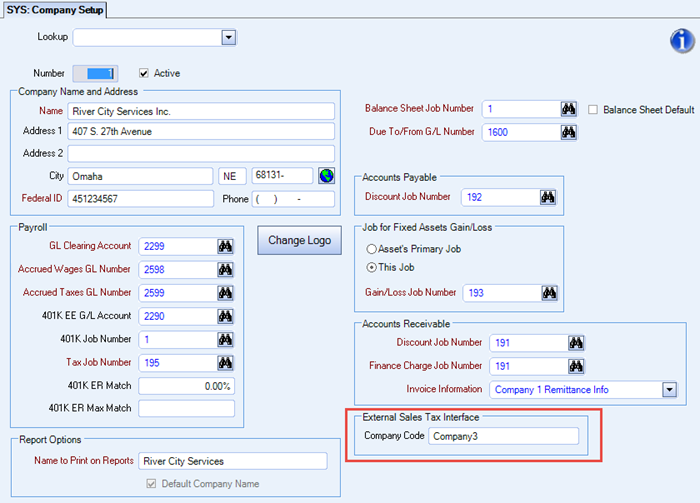
Company Code – Set to the Company Code from the ESTI. This is required to send invoices to the ESTI for processing.
Note: If you only created one company in the ESTI, but have multiple companies setup in WinTeam, ensure that you have set all companies to the same value.
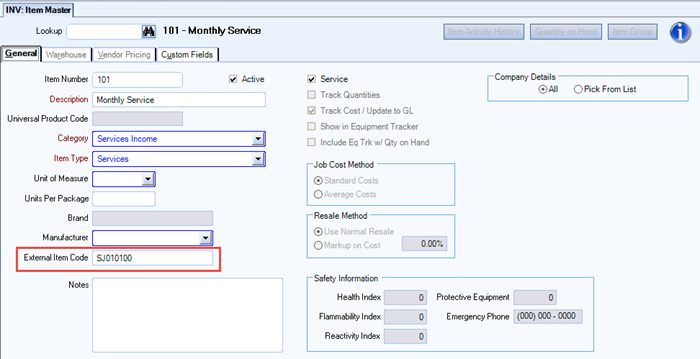
External Item Code – Set to the corresponding ESTI Tax Code. (This is a required field for Avalara to compute sales tax.) This Code determines whether the item is taxable or not within the determined jurisdiction.
Default tax codes include: Products=P0000000, Services=S0000000, Digital Goods=D0000000, Non-Taxable=NT, Freight=FR0000000, Other=O0000000
(A full listing of Avalara default tax codes can be found on their AdminConsole or in their online help files. Download the Pro Tooklit.)
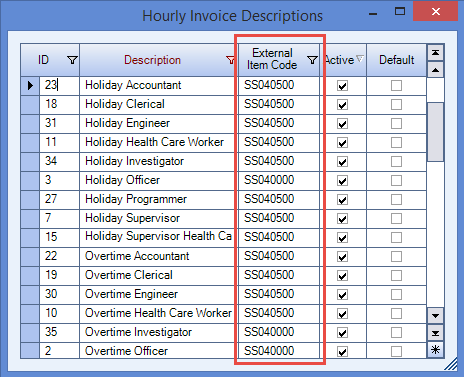
External Item Code – Set to the corresponding corresponding ESTI Tax Code. (This is a required field for Avalara to compute sales tax.)

External Item Code – Set to the corresponding corresponding ESTI Tax Code. (This is a required field for Avalara to compute sales tax.)
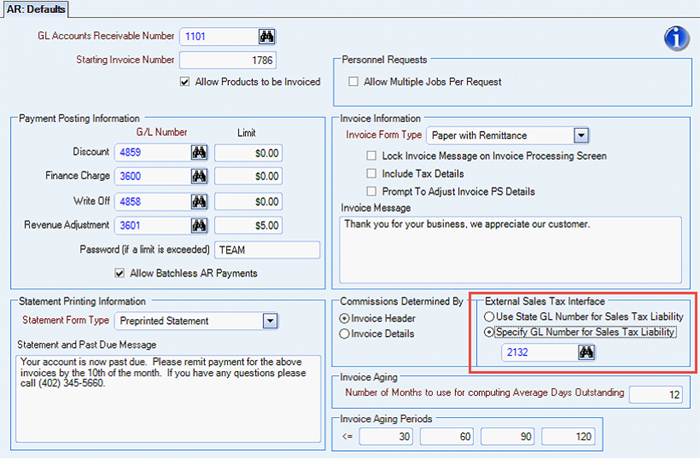
External Sales Tax Interface – Select one of the following:
Use State GL Number for Sales Tax Liability – Select this option to use the GL Number specified on the state Sales and Use Tax Setup record when automatically creating a new record for a City, County or Local jurisdiction. This should be used if sales tax is separated out by state.
Specify GL Number for Sales Tax Liability – Select this option to specify the GL number to use when automatically creating a new Sales and Use Tax Setup record. This should be used if all sales tax should be assigned to a single GL Number.

External Tax Code – Set for each existing record. This is a combination of values returned from Avalara - <Region><JurisCode><JurisType>
i.e. OH39State
Note: It is required that you have a record configured for each state that you have Nexus in. Without the state configured; the City, County and Local jurisdictions cannot be automatically created by the system.
Once the SYS: Defaults - External Sales Tax Interface checkbox is selected, the ‘Current’, ‘Previous’ and the ‘What is Taxable?’ sections are hidden/disabled, as they are no longer used. All rates and taxability are determined by the ESTI.
When a new record is automatically created, notes are added to the Notes field.
Your system is now configured to use the ESTI to connect to AvaTax for sales tax calculations.
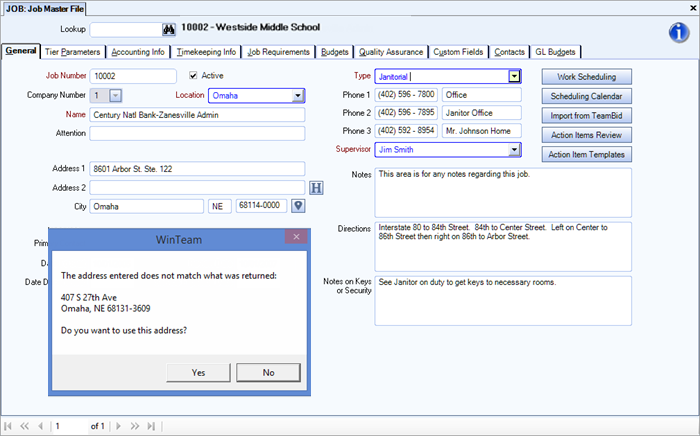
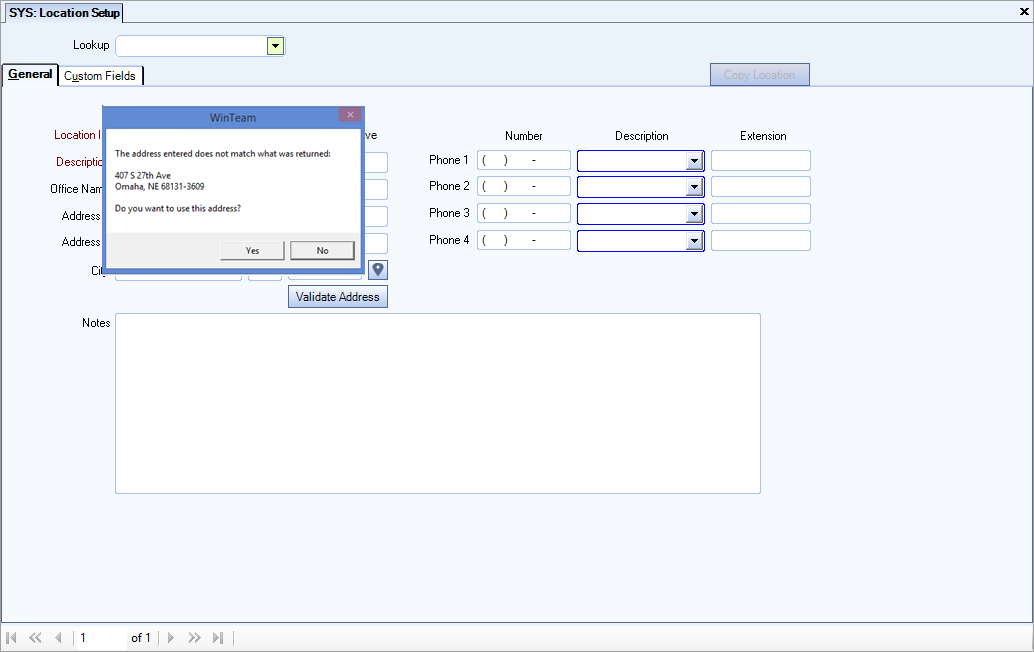
Prior to using the External Sales Tax Interface (ESTI), you should validate your addresses. This validation is available on the Job Master File, Warehouse Location add/edit list, Location Setup and the Primary Service Location on Invoice Entry. Validating addresses is recommended so that AvaTax is able to accurately determine the taxing jurisdictions. On the Job Master File the address validation is run when a record is saved. On the other available screens, the validation is available by clicking the Validate Address button.
Job Master File:
Warehouse Locations Add/Edit list (if resale products):

Primary Service Location on Invoice Entry:

Location Setup:
 Ship Ship From/Ship To Address Logic
Note: Addresses used to calculate taxes are set based on the item/detail level.
Ship From: This is the Origination address. It is set to one of the following addresses:
- The address assigned to the warehouse for the item. Used only for Unbilled Resale/Work Tickets (if warehouse address is setup).
- The address configured for the Location assigned to the item’s job (if the address is setup).
- The address assigned to the item’s Job.
- The Primary Service Location address on the Invoice Used if the Location address is not configured AND the ‘Use Primary Location Service for Sales Tax’ checkbox on the Job Master File > Accounting Info tab is selected for the item’s job.
This is not used by most states, as they tax based on Destination. However, there are a few states that do tax based on Origination.
- Arizona
- Illinois
- Missouri
- New Mexico
- Ohio
- Pennsylvania
- Tennessee
- Utah
- Virginia
There are also states that do a mix of both Origination and Destination (this can apply to both products and services):
- Texas
- California
Ship To: This is the Destination address. It is set to one of the following addresses:
- The address assigned to the item’s job.
- The Primary Service Location address assigned to the invoice. Used if the ‘Use Primary Service Location for Sales Tax’ checkbox on the Job Master File Accounting Info tab is selected for the item’s job.
To allow you to set taxability at the job level, new settings have been added to the Job Master File. This configuration is only available when Avalara is licensed and the ESTI is turned on.
On the JOB: Job Master File, you can now mark a Job as Taxable or not.
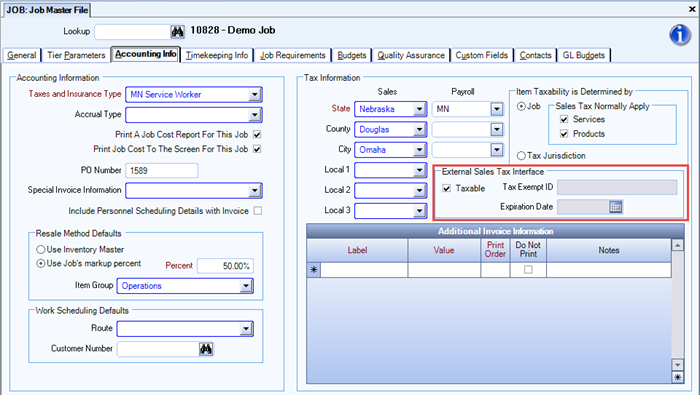
Taxable – Checked by default. However, if the Job should be tax exempt, they can uncheck this field.
Note: There is currently no security around the Taxable field.
Tax Exempt ID – If Taxable field is unchecked, then this field is required. This value is sent to Avalara.
Expiration Date – If Taxable field is unchecked, then this field is required. This value is not sent to the ESTI, but can be seen on the Job File Report (if Print Tax Information check box is selected).
Even if the Customer entered on the Invoice is Taxable, any item sold or service performed can be exempt from tax if set accordingly.
Once the SYS: Defaults - External Sales Tax Interface checkbox is selected, all of the fields under Sales and within Item Taxability is Determined by are hidden/disabled. All rates and taxability are determined by the ESTI.
Note: The following custom setting will not be enforced when Avalara is licensed and turned on: Jobs - RequireSalesTax - Yes (makes County and City fields required).
External Item Code - Must be set to the corresponding ESTI Tax Code. (This is a required field for Avalara to compute sales tax.)
Once you are ready to start using the ESTI, go to the SYS: Defaults and Tier Parameters screen and check the External Sales Tax Interface check box.
- This will turn OFF all sales tax calculations performed by WinTeam.
- Will hide/disable fields on the various screens (noted in the configuration section).
- Make new External Sales Tax Processing screen available (based on User Security).
- All future invoices will be sent to AvaTax using the ESTI to calculation sales tax prior to being able to Print/Process Invoices.
Flow Overview
- Create invoice
- Compute Taxes
- Print/Process Invoices
- Post invoices to GL
- Commit Invoices (must perform prior to the 10th of the month for the previous month’s invoices)
Invoice Entry
Update Recurring to File
Update Scheduling to AR Invoice
Invoice Entry (single invoice)
External Sales Tax Processing (range of invoices)
Invoice Entry (single invoice)
Invoice Processing (range of invoices)
Update to GL
External Sales Tax Processing
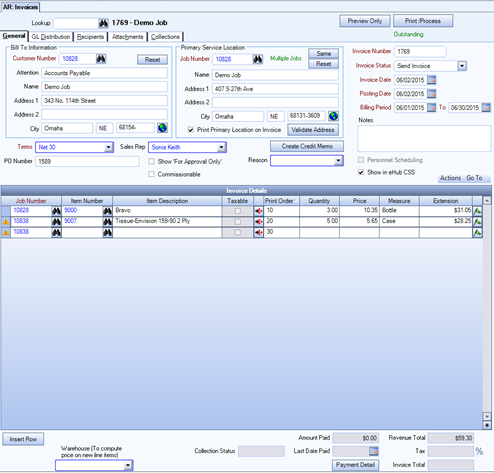
Invoice Header
Primary Service Location – Validate Address button is available (if enabled).
Note: This address is only used as the Destination address if there is no or an incomplete address configured at the detail line item for the entered Job Number.
Invoice Number – This cannot be edited once the invoice has been sent to the External Sales Tax System.
Posting Date – This is the date sent to the External Sales Tax System to be used in the sales tax calculations.
Note: When a CM is created, we send the Posting Date of the original invoice so that the sales tax is calculated on the CM using the same date as the original invoice in case the jurisdictions or rates have changed.
Invoice Details
A warning icon is displayed to the left of the Job Number if there is no/incomplete address configured on the Job Master File.
The Taxable checkbox is disabled and remains unchecked until the invoice is sent for sales tax calculations.
The Invoice Tax Details drill-down screen is blank until the invoice is sent for sales tax calculations (same as the Tax Summary screen).
The Tax and Invoice Total fields in the footer will remain blank until the invoice is send for sales tax calculations.
Note: These fields are cleared anytime the invoice is edited after tax has been calculated.
Hover over the % icon to display the Sales Tax Information. This displays the following information:
Date Tax Processed – The date and time the invoice was sent to the External Sales Tax system for tax calculation.
Date Tax Committed – The date and time the invoice was sent to the External Sales Tax system and committed.
External Tax Status – The current tax status for the Invoice:
Not Processed – Invoice has not yet been sent to the External Sales Tax system.
Processed – Invoice has been sent to the External Sales Tax system and taxes calculated.
Edited, needs Reprocessed - Invoice has been sent to the External Sales Tax system and taxes calculated, but was then edited. Needs to be resent for recalculation of taxes.
Processed, Not Sent - Invoice will not be sent to Avalara. This is used for any $0 invoices.
Committed – Invoice has been committed to the External Sales Tax system. Edits are no longer allowed to the invoice.
Tax System Notes– Details on the actions performed.
Compute Taxes
After creating the invoice there are several ways to compute/recompute taxes:
Preview Only – If the External Tax Status=Not Processed, the invoice is first sent to the External Sales Tax system for tax calculation and then displayed to the user.
Print/Process – If the External Tax Status=Not Processed, the invoice is first sent to the External Sales Tax system for tax calculation and then printed.
Actions > Compute Taxes (if External Tax Status=Not Processed) or Reset All Taxes (if External Tax Status=Processed or Edited, needs Reprocessed).
Go to the External Sales Tax Processing screen (see details below)
After taxes have been computed, all sales tax information is stored and displayed on the screen.

The Taxable checkbox is checked/unchecked based on whether or not the item is determined to be taxable.
The Invoice Tax Details drill-down screen displays the sales tax information (same as Tax Summary screen):

The Tax and Invoice Total fields display the new values.
The Sales Tax Information window is updated with the new information:
If there are any WinTeam issues while calculating sales tax, an error grid is displayed.

Possible WinTeam errors (invoice won’t even be sent to the External Sales Tax system):
No External Item Code
Invalid Primary Service Location Address Configuration
Invalid Warehouse Location Address Configuration
Note: The invoice will not be sent to AvaTax.
If the ESTI cannot process the invoice for any reason, the system displays an error message. Error messages include, but are not limited to:
Company not found. Verify the CompanyCode.
Unable to determine the taxing jurisdictions.
Document was posted, but is out of balance. (The invoice was Committed on the ESTI side, but either the TotalAmount or TotalTax did not match WinTeam's. The Invoice on the WinTeam side is not updated and requires manual updating with the appropriate ESTI tool (for example, Avalara AdminConsole).
MaxCount limit exceeded. Please use filters to limit the result set. (For example, Avalara limits the number of detail line items to 1000. If an invoice had more than that, it would have to be broken out into two invoices.)
The External Sales Tax Processing screen is used to both compute taxes for the selected invoices and Commit the invoices to AvaTax using the ESTI. You must have security permissions for this screen.
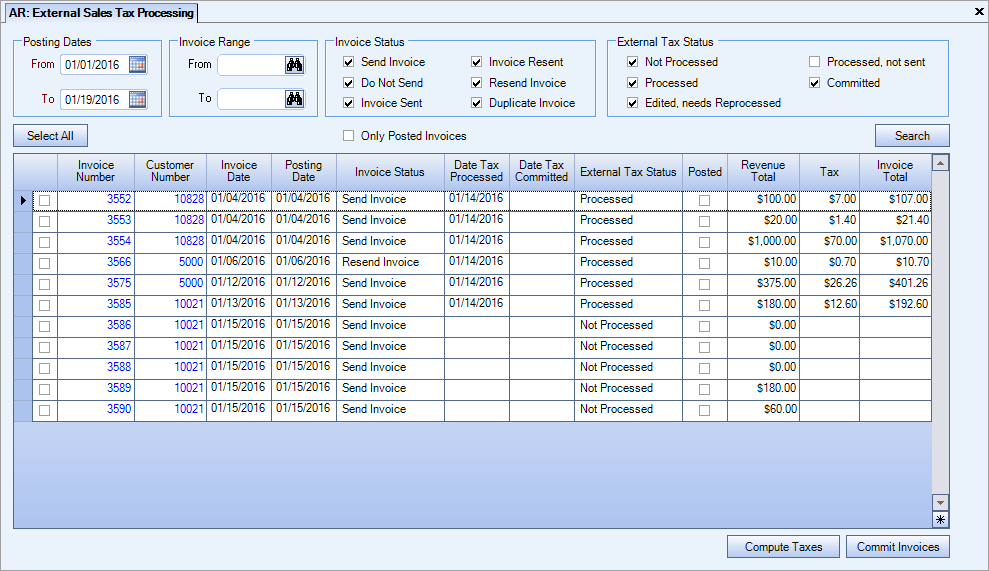
Features:
Can Commit Invoices – If selected, the user is able to commit processed invoices to AvaTax. This step is required to allow Avalara to remit taxes.
Note: This button is controlled by a screen security feature.
Can Compute Taxes – If selected, the user is able to send invoices to AvaTax using the ESTI to compute sales tax.
Note: This button is controlled by a screen security feature.
Posting Dates – The From and To dates are required. The From date is defaulted to the first day of the current month and To date is defaulted to the current day.
Invoice Status – The print/process status of the invoice. All statuses are selected by default
External Tax Status – The sales tax process status of the invoice. All statuses are selected by default.
Not Processed – Invoice has not yet been sent to AvaTax using the ESTI.
Processed – Invoice has been sent to AvaTax using the ESTI and taxes calculated.
Edited, needs Reprocessed - Invoice has been sent to AvaTax using the ESTI and taxes calculated, but was then edited. Needs to be resent for recalculation of taxes.
Processed, not sent - Invoice will not be sent to Avalara. This is used for any $0 invoices.
Committed – Invoice has been committed to AvaTax using the ESTI. Edits are no longer allowed to the invoice.
Only Posted Invoices – Select the check box to only display those invoices that have been posted to the GL. Not selected by default.
The screen can only be accessed from the left side menu (it is not included in the AR Menu Map since it is a licensable feature).
No invoices are returned when opening the screen. The Compute Taxes and Commit Invoices buttons are not available until a search is performed.
The Select All button will select all displayed invoices.
Committed invoices are grayed out and cannot be selected.
Checks are performed prior to computing taxes or committing invoices. Warning or error messages are displayed based on the External Tax Status or Invoice Status of the selected invoices.
Invoice Processing – A check is performed prior to printing/processing invoices. If any of the selected invoices have an External Tax Status = Not Processed or Edited, Needs Reprocessed, the following message is displayed and processing is stopped:
Invoice Review (display changes only) – If External Tax Status = Not Processed or Edited, Needs Reprocessed, then the Invoice Total and Remaining Due fields will be blank and none of the tax information is displayed (must select the Taxes checkbox under Show in Grid). Tax fields include: Tax Jurisdiction, Taxable, Tax, Tax Code ID, Tax Rate and Taxable Amount. The new following new fields were also added to the Field Chooser: Date Tax Processed, Date Tax Committed, External Tax Status and External Item Code (Invoice Details checkbox must be selected).
Recurring Invoices – The Taxable column is hidden (do not know taxability of item until sent to External Sales Tax System). The Compute Taxes button was also removed.
Update Recurring to File – Sales tax calculations are not performed with this process. The invoices are created/updated the same as if they were entered through AR: Invoice Entry. External Tax Process=Not Processed.
Update Scheduling to AR Invoice – Sales tax calculations are not performed with this process. The invoices are created/updated the same as if they were entered through AR: Invoice Entry. External Tax Process=Not Processed.
Update to GL – If taxes have not been calculated or require recalculation (External Tax Status=Not Processed or Edited, Needs Reprocessed), related invoices are added to an Unable to Post report and are not updated.
Reports – If any selected invoices have an External Tax Status = Not Processed or Edited, Needs Reprocessed, the following reports are still printed, and the system displays a warning message. For example:
Customer Activities Report (Amount and Balance Due columns may be inaccurate as the tax will not be included for these invoices.)
Invoice Aging Report (Any of the columns may be inaccurate as the tax will not be included for these invoices.)
Invoice Register Report (The Tax Total and Invoice Total columns will display an * for those invoices that have not yet had taxes calculated.)
Sales Tax Report (The Taxable, NonTaxable and Tax columns will display an * for those invoices that have not yet had taxes calculated.)
Statements and Past Due Notices(Prior to printing statements/past due notices, the system stops processing invoices that require tax re-/calculations.
GL > Journal Update Log – If ANY of the invoices being unposted HAVE been Committed to the ESTI (External Tax Status=Committed), the system displays a new message warning that invoices can still be unposted, but any that have an External Tax Status=Committed cannot be edited.
A Sales Tax Only Credit Memo can be created when the original Invoice was created and processed for a Customer that was marked as taxable and should not have been. It allows you to only credit back the sales tax charged. This should only be used, however, when tax was incorrectly charged for all details on the invoice. If tax was correctly charged for some details on the invoice, then you should go through the normal procedures of creating a credit memo for the entire invoice and reissuing a new invoice. See steps below on how to correct Customer/Job tax exemption.
- Open the original invoice from Invoice Entry
- Click Create Credit Memo
- On the AR: Credit Memo Reason screen, select a Reason and check the Sales Tax Only check box (Note: This option is only available if there was at least 1 taxable item on the original invoice.) Click OK.
- A Credit Memo is created. All items and Invoice Tax Details from the original invoice are carried over. The Quantity and Extension fields are set to 0.00 and no edits are allowed to the Invoice Details grid. If you have an invoice with multiple jobs, detail lines can be deleted for any jobs that should still be taxed.
- Compute Tax - the Tax on the Credit Memo should match Tax on the original invoice
- The exemption status of the customer and job are ignored on these types of Credit Memos. If tax was charged originally, the full tax amount will be credited back.
If a customer was incorrectly marked as taxable:
- Prior to applying payment, create a Credit Memo and copy of the original Invoice to modify and reissue
- Compute taxes on the Credit Memo - this should be an exact match to the original invoice (with incorrect sales tax)
- Print/Process the invoice
- Edit the Customer Master File, marking the customer as tax exempt and entering their Tax Exempt ID
- Compute taxes on the reissued invoice - taxes are not calculated because the Customer was marked as tax exempt
- Continue with normal processing. The same steps can be used when the Customer is marked as tax exempt and should not have been or if the Job was incorrectly marked as either taxable or tax exempt.
To give users access to the AR: External Sales Tax Processing screen you will need to create a new Security Group and assign the AR External Sales Tax Processing screen to the group. This screen has two Features: Can Commit Invoices (if selected, users can commit invoices to the ESTI) and Can Compute Taxes (if selected, users can send invoices to the ESTI to be processed). If neither feature is selected, then the user has read-only access.
