Overview
The Employee W-2 report is used to view employee W-2 information, print W-2 forms and prepare electronic files. The various taxes display along with the Gross Earnings, Taxable Income, and Taxes withheld.
Note: There is a difference in the Family Leave and Medical Leave total amounts between the Paid Family/Medical (PFM) and Employee W-2 reports because the PFM report contains both the employee and employer amounts combined, and the W-2 report contains only the employee amount.
If you want to outsource the actual printing of the W2's to ADP, see Processing the ADP W-2 Print File.
Subcontractor Checks are excluded from this report.
Each output type has different options available for selection.
You do not need to purchase W-2 forms. (You will, of course, need to order W-2 Envelopes for these W-2's.) When you print W-2 Laser Forms, the form and details will print automatically. You can also select to Include W-2 Instructions when printing laser forms. For those clients who want to print on preprinted forms, you will need to add a Custom Setting (see below).
Key Functionality
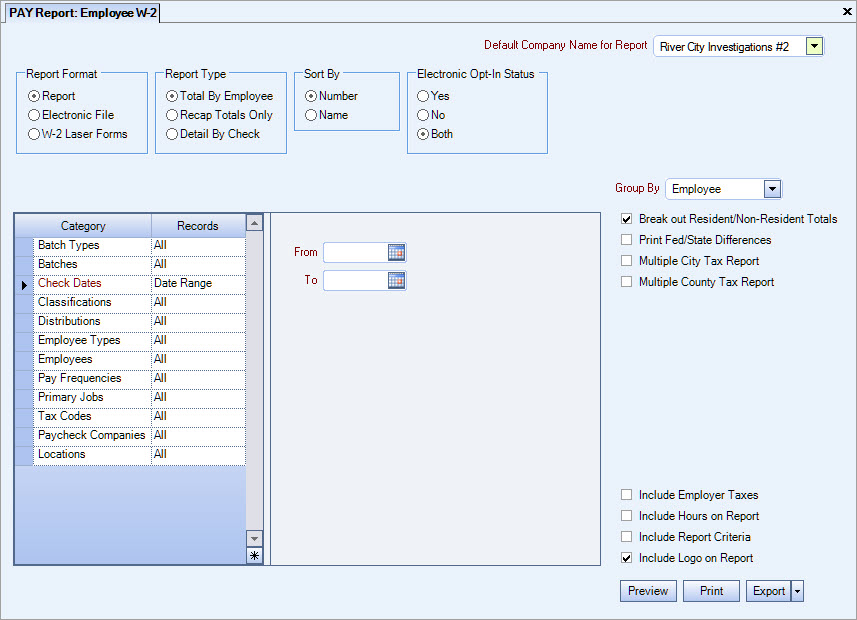
Select a display or export method for the W-2 information.
- Click Report to print a standard report.
- Click Electronic File to create a file for submission to the federal, state, or local taxing authority. When you click Electronic File, the Transmitter Information screen displays. If you do not enter a Taxpayer ID Number for City, County/School Districts, Disability, State, or State UC (on the Payroll, Taxes screen) your electronic files will not contain any records.
- Click W-2 Laser Forms to print the report to W-2 Forms using a laser printer. When you click W-2 Laser Forms, the 'Employees to Include' and 'Include W-2 Instructions' check boxes display. When this option is selected the Group MD Counties with State of MD check box is automatically selected.
Important: For security reasons, TEAM cannot upload files to states on your behalf. You must upload the file to the state’s website using your user name and password. Contact the state directly if you need assistance, or if you encounter an error during the upload process (after you inform TEAM about the error). To help avoid upload errors, be sure to review your account numbers and make sure they don’t contain any hyphens or negative amounts before filing.
Note: This option also prints T4 or T4A laser forms for Canadian customers. If a Roth 401(k) is being reported on an employee's W2, the Retirement Plan check box will also be marked as checked.
The PDF button is also available if the Store PDF Copy of the W2 check box is selected on the Paycheck Properties tab Paycheck Properties tab. For more information about PDF copies of W2's see Creating PDFs of Employee W2's.
The Report Type options are available if the selected Output Type is Report.
Use the Report Type option to select a display method for the report.
- Click Total By Employee to print each employee separately.
- Click Recap Totals Only to print the totals for each tax. No detail employee information will display.
- Click Detail By Check to print the tax information for each employee and each check issued for the selected check date range. Employee totals will also display.
The Sort By options available here will vary based on the selected Output Type. The Number and Name options are available on each of the Output Types. The Dist Code and Zip Code are available if the Output Type is W-2 Laser Forms.
Use the Sort By option to sort report data by Number, Name, District Code, Zip Code, or Primary Job.
- Click Number to sort report data by Number.
- Click Name to sort report data by Name.
- Click Dist Code to sort report data by Distribution Code.
- Click Zip Code to sort report data by ZIP Code.
- Click Primary Job to sort the report data by Primary Job. The sort by for Primary Job is available when the Output Type is W-2 Laser Forms.
The Electronic Opt-In Status is used to filter those records that are to be distributed electronically or by hard copy.
When running the Employee W2 Laser Forms and Yes is selected for the Electronics Opt-In Status
- employees who have the Receive W2 Electronic File check box selected (have opted in) in the Employee Master File (Pay Info tab), will have their W2 available in eHub.
- employees who do not have the Receive W2 Electronic File check box selected (have opted out) in the Employee Master File (Pay Info tab), will not have their W2 available in eHub.
When running the Employee W2 Laser Forms and No is selected for the Electronics Opt-In Status
- employees who do not have the Receive W2 Electronic File check box selected (have opted out) in the Employee Master File (Pay Info tab), will not have their W2 available in eHub.
When running the Employee W2 Laser Forms and Both is selected for the Electronics Opt-In Status, then all W2's will be available in eHub, regardless of the setting in the Employee Master File.
The Electronic File option group is available if the selected Output Type is Electronic File.
- Click SSA to create a file for federal reporting.
- Click State to select a State. The available selections are created in the Tax Tables defaults area.
- Click Local to select a City. The available selections are created in the Tax Tables defaults area.
Multiple cities can be combined on the Electronic File by changing the W2 Description of the codes you want to combine. This is useful for companies who are filing to one tax collector for all of their PSD codes.
When you are creating an electronic file for a state and the No Records Found for Selected Criteria message box displays, it is because the W-2 Description for the tax code in the PAY Taxes window is not the two character abbreviation for the state.
There may be requirements for the W-2 Description for non-state jurisdictions (city, county, school districts, etc.) which allow the electronic format to be recognized. See the Year End Guide for more information about requirements, W-2 processing, and electronic file creation.
This Employees to Include option group is available if the selected Output Type is W-2 Laser Forms.
Use the Employees to Include option to select the employees to include on the report.
- Click Active to include only active employees on the report.
- Click Inactive to include only inactive employees on the report.
- Click Both to include both active and inactive employees on the report.
Employees
Use the Employees category to select the Employees to include on the report.
Select All to include all Employees on the report.
Select Range to define a range of Employees for the report. Type the beginning Employee Number in the From field and the ending Employee Number in the To field.
Select Create to define your own list of Employees. When you select Create, a small grid displays to the right. Enter the Employee Numbers you want to include in the list, or use the Lookup to locate the Employee Numbers.
Select Exclude to identify records that should not be included. When you select Exclude, a small grid displays to the right. Enter the Employee Numbers you want to exclude in the list, or use the Lookup to locate the Employee Numbers.
Pay Frequencies
Select the Pay Frequencies to include on the report.
If using the Pick from List option, the system determines the check records to include by the Employee's current Pay Frequency set up in the Employee Master File. The only exception is when running the report for Format: Report and Report Type: Detail by Check.
Note: When running the report for Format: Report and Report Type: Detail by Check and limiting the pay frequency using the Pay Frequencies category, the system will look at the pay frequency of the batch instead of the Employee's current pay frequency. All Batch Types have a Pay Frequency defined except for Void and Tax Adjustment Batches. For Void and Tax Adjustment batches, the current pay frequency of the Employee (as indicated in the Employee Master File) will determine whether the void or tax adjustment record is included.
Primary Jobs
Select to filter the report by Primary Jobs.
Select All to include all Primary Jobs.
Select Range to define a range of Primary Jobs for the report. When you select Range, the range fields display. Type the beginning Primary Job Number in the From field and the ending Primary Job Number in the To field.
Tax Codes
The Tax Codes category is available when the Output Type is Report or W-2 Laser Forms.
Use the Tax Codes category to filter for employees who have used this tax code during the specified Check Date Range. WinTeam will look for all employees with that specific Tax Code, but will print all tax information on the W2 for the selected employees (not just the selected Tax Code information).
Tax Codes are defined within Payroll Tax Tables.
Select All to include all Tax Codes.
Select Pick From List to define the specific Tax Codes for the report. When you select Pick From List, a list of Tax Codes display. Select the check box next to each Tax Code for WinTeam to find the selected employees who use the Tax Code.
Paycheck Companies
This category is available to users who have more than one company.
Use the Paycheck Companies category to select the Paycheck Companies to include.
Select All to include all Paycheck Companies.
Select Pick to define specific Paycheck Companies. When you select Pick, the Paycheck Companies list displays. Select the check box next to each Paycheck company to include.
Locations
The Locations category is available for Clients using the Multi-Location feature.
Use the Locations category to select the Locations to include on the report.
Select All to include all Locations on the report.
Select Pick to define specific Locations for the report. When you select Pick, the Locations list displays. Select the check box next to each Location to include on the report.
The Group By option is available only if the Output Type is Report.
You can choose to group the report data by Employee, Classification, Distribution, Employee Type or Pay Frequency. Using the Group By option provides Group Totals and page breaks when printing the report.
The Break out Resident/Non-Resident Totals check box is selected by default.
This ensures that resident and non-resident totals (for employee, company and grand totals) display on separate lines on the report.
To combine the totals, clear this check box.
The Print Fed/State Differences check box is available if the selected Output Type is Report.
Use the Print Fed/State Differences check box to list the employees whose federal earnings do not equal their state earnings. This difference may arise when there is some Other Compensation or Deduction that does not apply to both federal and state taxes.
Note: For PTA clients, employees who live in states where the state income tax rate is 0% will now display 0 for Taxable Earnings. There will only be Gross Earnings.
The Multiple City Tax Report check box is available when the Output Type is Report. Use this option to alleviate duplicate W-2 forms for employees who work in and are taxed by multiple cities. Employees may use this form to supplement their W-2's.
When the Multiple City Tax Report check box is selected, an additional check box called Exclude YTD Information displays where you can exclude year-to-date information. This check box is cleared by default. When it is selected, the yearly (YTD) columns on the city report are suppressed and only the quarterly-to-date (QTD) information shows. If left cleared, the city report show both the YTD and QTD information.
The Group By City check box is available if you selected the Multiple City Tax Report check box.
Select the Group by City check box to group the results by city.
The Exclude YTD Information check box is available if you selected the Multiple City Tax Report check box.
It is used to indicate whether or not to Exclude YTD information. This is not selected by default. If selected, it suppresses the printing of the YTD columns on the City report and only shows the Quarterly time period. If left unchecked, the city reports will show as normal with both QTD and YTD information.
If you are required to do so (unless reporting magnetically), you may print a County Tax Report, that provides a separate report for each county. The information provided on this report includes Employee Name and Address information, Tax Percentage being withheld, Social Security #, Wages and Tax information for both Quarter-To-Date and Year-To-Date. To print this report you must select both the Multiple County Tax File Report AND the Group By County check box.
The Group By City check box is available if you selected the Multiple County Tax Report check box.
Select the Group by County check box to group the results by county.
This check box is available only when running the W-2 Laser Forms.
This check box is available to users who have more than one company.
The Employee W-2 Report and Magnetic Media Report are always grouped by Company (if applicable).
Select the Group By Company check box to group the report criteria by company. When running W-2 Laser Forms, if you choose to Group by Company all of the Company #1 W2's will print out first in the sort Order you choose, followed by the next Company, and then the next Company. If you do not Group by Company when running the W-2 Laser Forms, then the W2's will sort in your normal Sort Order that you have chosen (Companies intermixed).
This check box is available if the selected Output Type is W-2 Laser Forms.
Use to combine all Ohio city wages and taxes and print as one, using the Local Description of Multi. Ohio cities are those with a State Code of OH and a Government Type of City.
If you do not use this feature, a separate W-2 prints for each Ohio city with activity. If you do use this feature, you must provide a separate report showing all city activity for the year so the employee has the necessary tax filing information.
The Group MD Counties with State of MD check box defaults as selected (checked) if the selected Output Type is Employee W-2.
Select the Group MD Counties with State of MD check box to group Maryland Counties with the State of Maryland on the report.
This option displays only if the Output Type is Report.
Select the Include Employer Taxes check box to include the employer tax totals at the end of the report.
The Include Hours on Report option is available when the selected Output Type is Report.
Use the option to include the Hours this Period and Year to Date (YTD) hours for each check, employee, or Grand Total on the report.
The Print W-2 Instructions check box is available if the selected Output Type is W-2 Laser Forms.
Select to Include W-2 Instructions on back of form when printing laser forms.
The W-2 Instructions that are required to print on the employee’s W-2 will print as a second page. If you are duplexing, this means that it will print on the back side of the W-2.
For those companies, who for whatever reason, are not going to duplex and instead will be stuffing the Instructions manually into every envelope, you can turn off this feature for printing the instructions.
To turn off this feature, clear the 'Print W-2 Instructions' check box on the Employee W-2 Report option screen when printing W-2 Laser Forms. This check box is selected by default.
Example: You are required by law to include the instructions with the Employee's W-2.
Select the Show Report Criteria check box to include a list of the report options selected for this report. The Report Criteria page includes any ranges specified and each Category/Record selection made for the report. This check box is cleared by default.
Select the Show Logo on Report check box to print the company logo on the report. This check box is selected by default.
This button is available only if you selected Electronic File as the Output Type, running the Laser form for Canada, have a Custom Setting for Puerto Rico, or have a Custom Setting for LaserW2,
Click this button to display the Transmitter Information screen, and enter information requested by the federal, state, or local taxing authority that is needed for transferring electronic data.
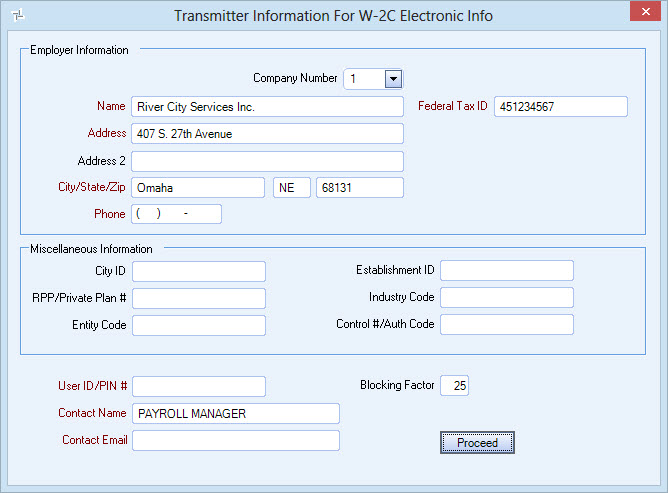
WinTeam defaults PAYROLL MANAGER to the Contact Name field, but it can be overwritten for each file being processed. The government (both US and Canada) require a Contact E-mail Address for each electronic file.
Contact information is added to the end of the RE record: Phone number, email address, name. Technically, these fields are not required, but we did add them to each of the applicable file formats. This affected the following formats: SSA, State formats that follow Federal, Local formats that follow federal, Puerto Rico Format (since it too follows the federal format), W2C format.
This button displays when the Output Type is W-2 Laser Forms and the Store PDF Copy of the W2 check box is selected on the PAY: Defaults (Paycheck Properties tab).
If any of the following Custom Settings are in place, the PDF button on the Employee W2 Report when choosing Output Type: W-2 Laser Forms, is not shown even if the Pay Defaults is set up to Store PDFs.
| Section | Item | Value |
|---|---|---|
| LaserW2 | Preprinted | Yes |
| PayWagesW2 | EEW2LaserSSE | Yes |
| CANADA | T4A | Yes |
| LaserW2 | State | PuertoRico |
Click the PDF button to store a copy of the W2 in PDF format. For more information about PDF copies of W2's see Creating PDFs of Employee W2's.
When creating pdf copies of the Laser W2 for Canadian databases, you will see a check box on the Transmitter Information screen to Print Employer Copy Only.

Print Employer Copy Only
For Canada Customers the Company Federal ID Number should print only on the Employer Copy.
Select this check box to print the Federal ID Number on Box 54 of the T4 on the Employer Copy only.
This button displays when the Output Type is W-2 Laser Forms and the Store PDF Copy of the W2 check box is not selected on the PAY: Defaults Paycheck Properties tab. The Save button allows the user to save (archive) the W-2 information.
Click the Preview button (or use the shortcut key, ALT + V) to view before printing.
Click (or press ALT + P) to send the report to your default printer.
Click the Close button to return to the Payroll Reports menu.
For Canada Customers the Company Federal ID Number should print only on the Employer Copy.
Select this check box to print the Federal ID Number on Box 54 of the T4 on the Employer Copy only.
Note for Canadian Customers - The Total Federal Compensation amount is the Gross Earnings amount.
If a Tax Code with a Description that contains the words Union and Dues, it is included in Box 44. Withholding is also included.
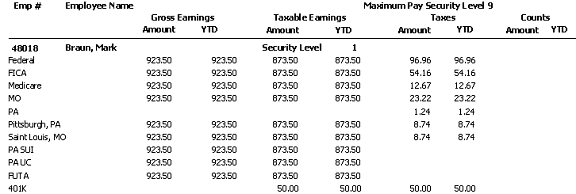
The Special W2 Description called Benefits is available from the Special Tax Codes drop down of the Year End Reporting section of the Other Compensation and Other Deduction Codes screen.
Any Compensation or Deduction code activity for the year using the Benefits description will be added together and shown on the T4 in Box 40.
For example, Employee A has the following:
Compensation – Car Allowance $400
Deduction – company RRSP $200
Both are used to compute total for Box 40. Total on T4 is $600.
NOTE FOR ALASKA UC
The Alaska UC Disability tax code can print on the Employee W2. This is not required but can be printed if the employer so chooses. As long as the Tax Code’s Description begins with “Alas” and is set up to print on the employee W2, it will print. The W2 Description can be anything. It is the tax code description that must start with “Alas” (Alaska UC).
401K Options
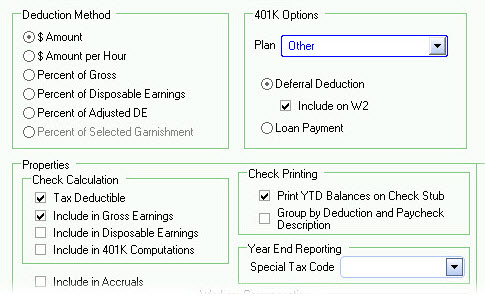
The 401K deferred amount prints under the Taxable Earnings/Taxes on this report.
The 401K line includes 401K deferral activity that came from an Other Deduction Code set up as a Deferral Deduction 401K deferred amount under the Taxable Earnings/Taxes column.
Report will display CPP instead of FICA.
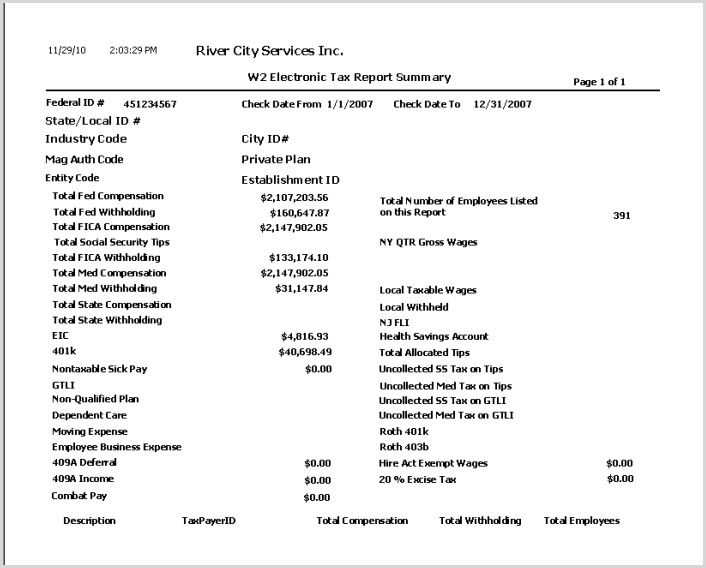
You may print the Summary report prior to printing the actual W-2's.

If Jr. or Sr. is in the last part of the employee's last name field, it will print in the Suffix column of the Employee W-2. Box E is now separated from the employee's Last Name. The period is not included on the W-2.
The W-2 will print the NJ FLI portion of the NJ Disability tax in box 14.

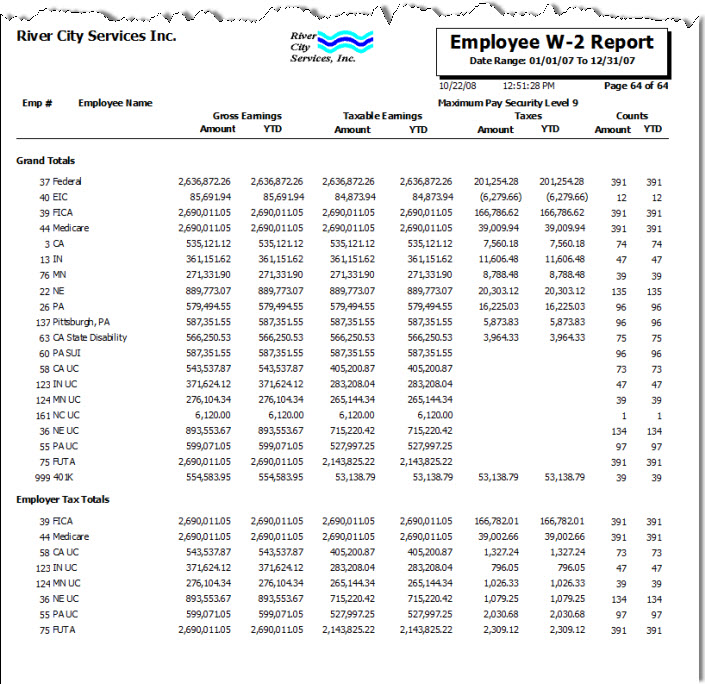
During payroll processing, all records will be considered to be a 'Resident' except in the case of a City or County/School District. If the local tax coming through is not a tax code that is in the Employee Master File (Tax Info) screen (Local 1, 2 or 3), then the record will be considered 'Non-resident'. If the Local tax code exists in the Employee Master File, the Resident check box will be checked by default. If it does not exist in the employee’s Tax Info screen (Local Tax Codes 1 thru 3), then it will remain unchecked. However, the default may be modified.
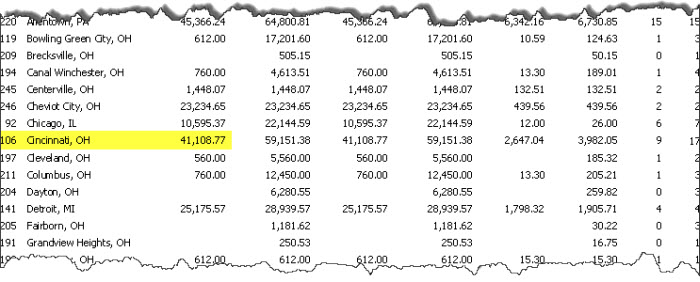
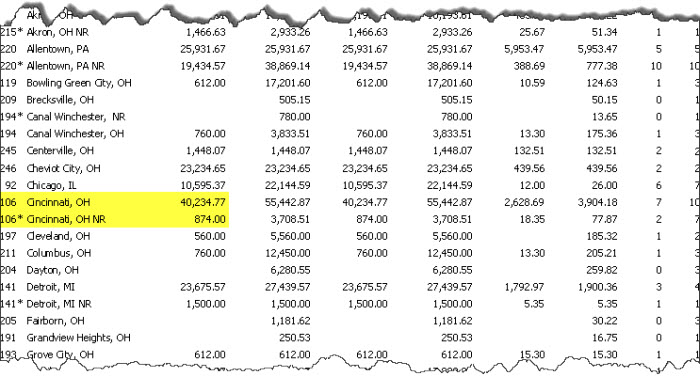
Employee totals, Company totals, and the Grand totals display the non-resident earnings and taxes on a separate line item on the report. These items show NR after the locality name. Due to descriptions being lengthy and possibly preventing the NR from printing after the local tax code description, the non-resident line items will also show an asterisk (*) in front of the description.
The summary page for the T4s includes Employment Insurance. This is based on Taxes to have EI or EM in the formula reference code for this disability tax code and Include in W2 checked.
The T4 will automatically include the tax amounts and add to union dues if the tax code is setup as SEIU Dues.
The 3PSP totals are displayed separately from the a Federal, FUTA, FICA, Medicare, State, etc. Codes and are not combined with the normal entries on the report. On the Laser W2 Forms they are added into the appropriate fields of the Employee W2 form so that they are combined with the "normal" tax entity. This will only happen if you are using the Formula Reference code of a 3PSP code for storing the ID of the tax code you want it to combine with. If this is not filled in, then it will not be combined.
Companies who do business in Pennsylvania are required to send Monthly reports to the proper agency showing the current month’s earnings and withholdings for each PSD code. The Electronic reporting file includes only current information, not year-to-date totals.
When creating the electronic file, WinTeam will look at the Formula Reference Code of the City Tax Code to know whether the Locality you are creating an Electronic file for is a PSD Code. If the Formula Reference Code starts with PSD, then the electronic file will include only the current earnings and withholdings (based on your date range entered), not year-to-date information.
Multiple cities can be combined on the Electronic File by changing the W2 Description of the codes you want to combine. This is useful for companies who are filing to one tax collector for all of their PSD codes.
For more information see Handling Pennsylvania Tax Act 32 in WinTeam.
Related Information
Adjust Taxes on W-2's, W-2C's, and Tax Reports
Create and Send an ADP Tax Report
Prepare Electronic File for Canada


