Overview
Use the Timekeeping screen to view, add and edit Timekeeping records by Job or Employee. You can also view Exceptions, Recap By Employee, Recap By Hours Description, and Other Info.
Timekeeping records can come from the following sources:
- Permanent Timecards
- Manual Entry
- Day Divides
- Personnel Scheduling
- TeamTime
- Cash Outs
- Void Checks
- eHub
- Work Tickets

Key Functionality
Numerous commands and shortcuts are available to locate information and help you work more efficiently. Use these shortcuts while an hours cell in the Timekeeping grid is selected.
O – Flag OT
C – Copy data (hours, InTime, OutTime, Lunch, FlagOT, Special Pay Rate, Pay Rate) from current cell
V – Paste data (hours, InTime, OutTime, Lunch, FlagOT, Special Pay Rate, Pay Rate) into current cell
S – Go to InTime on Other Info
P – Go to Rate on Other Info
T – Go to Ticket Number on Other Info
I – Displays info if cell has been paid/posted
Ctrl + C - Copy hours only
Ctrl + V - Paste hours only
Select to view Timekeeping records by Job or Employee.
Click the lookup button to open the Lookup Jobs window where you can search for a job. You can also make entries directly in the Job Number field to search for a job; enter letters to search by job description or numbers to search by job number.
Double-click in the Job Number field to open either the Job Information window or the Job Master File window, depending on your security settings.
Enter or use the Lookup to search for an Employee Number.
Double-clicking in the Employee Number field will display either the Employee Information screen or the Employee Master File, depending on your security settings.
This field is only available for View By Job. You can display Timekeeping records by Tier Templates to view records for multiple jobs. The records will display in ascending order according to the job number.
Enter a starting date to view Timekeeping records. The ending date will default to two weeks after the starting date. You can change the end date to less than two weeks, but you cannot select more than two weeks.
Select the Show Flags check box to display flags.
You can apply flags to hour by clicking in the hours cell in the Timekeeping grid and using the following methods:
- Paid - Press the I letter key to flag hours as paid.
- Special Pay Rate - Press Pletter key or click the Rate field in the Other Info tab to enter a special pay rate.
- Absence - Double-click in the hours field to open the Employee Absence Tracker.
- Flagged Overtime - Press the Oletter key to flag the hours as Overtime.
Refer to the legend for color codes for individual flags.
Use the Permanent Timecard button to import permanent timecards into Timekeeping.

Click to view a legend of color codes for Flags. If the Show Flags check box is selected, any records with flags will display the applicable color. These colors are hard-coded and cannot be changed.
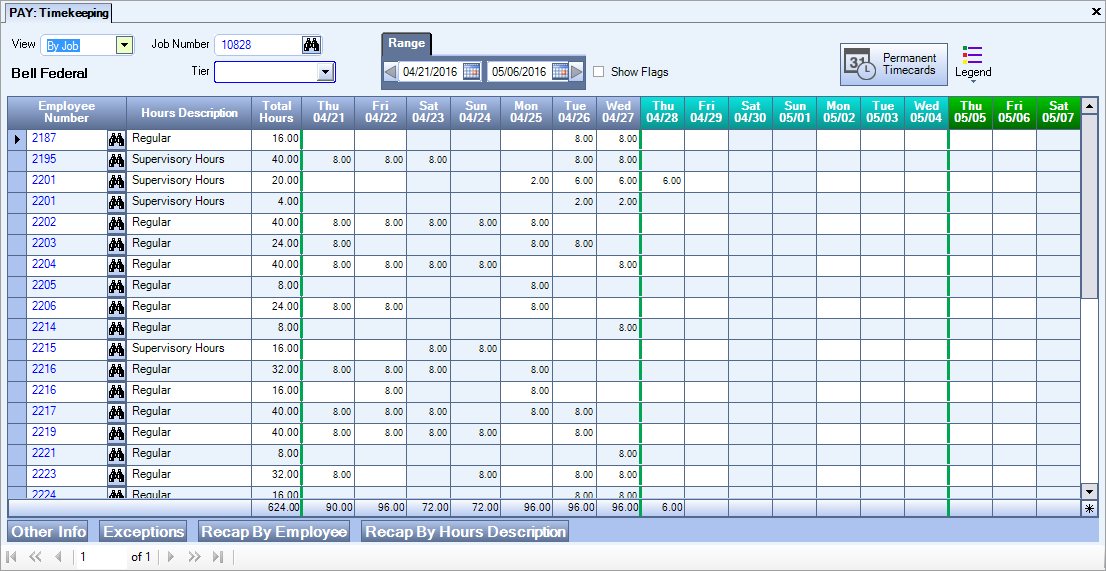
The Timekeeping grid displays the number of hours for each Employee/Job for each day in the specified date range. The grid will always display the specified date range (up to two weeks) plus the day immediately after the specified end date. The start of a new pay week is indicated by a solid green line.
Note: An employee must be active on the date for which hours are being entered. The system will not allow you to save an entry if the employee was inactive or they are a new hire on that date.
Double-clicking in the Employee/Job Number field will display either the Employee/Job Information screen or the Job/Employee Master File, depending on your security settings.
Displays the default Hours Description as set up in JOB: Hours Categories for the selected Employee or Job, but you may modify it.
The Hours Cell displays the number of hours recorded for that Job/Employee. If the Show Flags check box is selected, the cell will also display color codes for flags. Double click in a cell to open the Employee Absence Tracker.
Note: If you have just run the Usage Benefit Wizard, you will want to refresh the Timekeeping screen to ensure the locked cells have been updated. To refresh the screen, select File, then Refresh Cache from the menu.
Tip: To prevent negative benefit hours from occurring, (such as sick or vacation) when you are entering human resource benefit hours, double click the Employee Number to display the Employee Information window to review the Employee Benefit Summary. This enables you to view the benefit hours to ensure there are enough hours prior to entering it.

The Exceptions Panel lists these exceptions:
Note: The Exceptions panel does not display when accessing Timekeeping from PAY: Review Checks.
No hours Entered- Displays any Jobs or Employees that do not have hours for the selected date range.
Hours Limit - Enter an Hours Limit by day or date range to display Jobs or Employees that have exceeded that hours limit for the selected date range.
Empty In/Out Times - Displays Jobs or Employees that have at least one timekeeping record that has an In time with no Out time, or an Out time with no In time during the selected date range.
Inactive But Has Hours - Displays any Job or Employee that is marked as Inactive in the Job/Employee Master File for at least one day during the selected date range. Note that the system counts the day after an employee is made inactive as the first inactive day.
In the case of an employee rehire, they will show as Inactive But Has Hours if they happened to be inactive and then active within the period you are looking at, even if the hours were worked on days when they were active.
Flagged OT - Select an hours cell and press the O key to designate those hours as Flagged Overtime. Hours can also be marked as Flagged Overtime in PS: Schedules.
Negative Hours - Displays any Job or Employee that have negative Total Hours for the selected date range.
Overlapping Time - Displays Employees whose in/out times overlap on any day within the date range specified.
Minimum Wage - Displays Employees who are being paid below the minimum wage rate within the date range specified. Users can only see employee information for employees whose security level is less than or equal to their own. If the Minimum Wage Filter is applied on the Payroll Review and Edit screen (Review Checks), the user can use the Wages drill down and be taken to the Timekeeping screen. In this instance the Exceptions Grid for Minimum Wage will be expanded and no other Grid tabs will show. The All Jobs, Filtered Jobs and Selected Job radio buttons will be hidden. This tab contains the following information:
Employee Number–Double click to access the Employee Master File window
Employee Name
Job Number–Double click to access the Job Master File window
Job Name
Work Date
In time
Out time
Lunch
Hours
Rate Source–Double click to access the source of the pay rate for the job (unless it is a manual override)
Pay Rate–The pay rate for the job
Minimum Wage Rate–The minimum wage rate being used from the PAY Minimum Wage table in Payroll Defaults.
Split Shift – This tab displays when the Enable Split Shift Tab in TK Exceptions is selected on the Timekeeping and Overtime Setup tab of the PAY: Defaults window and the . the View in Timekeeping is by Employee. See WinTeam - Split Shifts for details.
Note: You cannot enter hours for an Employee or Job after an inactive date. Once an Employee or Job is made inactive, you can only enter hours if you reactivate the Employee or job and only for the days the Employee or job is active. If an Employee or Job has hours and the inactive date is backdated, you must manually remove the hours logged after the inactive date.
- An employee has hours on days 1 and 2 and then becomes inactive on day 3. This employee will be in the exceptions grid on the Inactive But Has Hours tab.
- An employee has hours on days 1–10 and then is inactivated on day 7. This employee will be in the exceptions grid on the Inactive But Has Hours tab and you would need to manually remove the hours for days 8–10 from the timekeeping record.
- A job is made inactive on day 7. You would need to manually remove any Employee hours for that job that were entered before the job was inactivated.
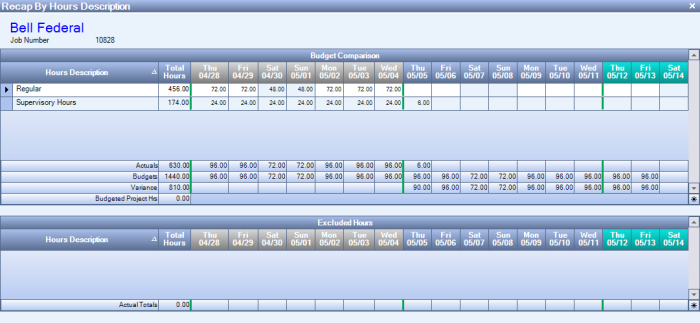
Use the Recap By Hours panel to view a summary of hours for the selected Job(s) during the specified date range. The total number of hours worked is compared to the budgeted hours and the variance is displayed.

Whether or not the Hours are included in the Budget Comparison or Excluded Hours grid depends on how the Hours Types are entered in SYS: Hours Types Defaults. If the Are these hours to be compared against budgeted hours on certain reports? check box is selected, the hours for that hours type will be included in the Budget Comparison grid. Otherwise, the hours will be included in the Excluded Hours grid.
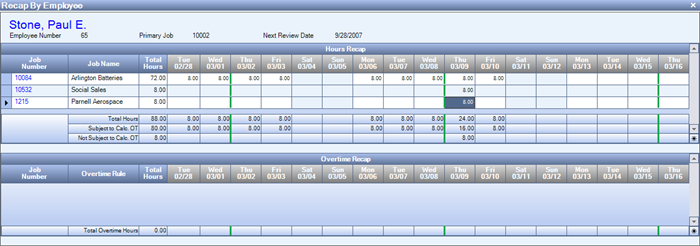
Use the Recap By Employee Panel to view a summary of hours for the selected Employee(s).

Hours Recap Grid
The Hours Recap grid will display the Timekeeping hours for the specified date range, including the Total Hours, hours Subject to Calc. OT and hours Not Subject to Calc OT.
Overtime Recap Grid
The Overtime Recap grid will display any hours that have been calculated as overtime, including the Total Overtime Hours.
Use the Other Info Panel to view Clock In/Out, Pay and Work Ticket information for the selected cell, or to change In/Out times, Lunch hours and the Pay Rate. The change history also displays in a separate grid.
Note: You can only add time to an approved work ticket if you have the Can Unapprove Work Tickets security feature. If you do not have this security feature and attempt to add time to an approved work ticket, a message box displays advising you to contact an administrator. See Lock Approved Work Tickets for details.
Click the Rate Source link to access the source of the pay rate for the job.

Rate
You can enter a special pay rate. If the Show Flags check box is selected, a flag for special pay rate will display.
Hours Adjustment Tracker
Click the Hours Adjustment Tracker button to open the PAY: Hours Adjustment Tracker screen. This screen is used to document the reason for any changes to hours.
![]()
Flag OT
The Flag OT check box will be selected for any records marked as Flagged Overtime. Records can be marked in Timekeeping by selecting the cell and pressing the O key.
History
The History section displays changes to timekeeping records from the following sources:
- Permanent Timecards
- Manual Entry
- Day Divides
- Personnel Scheduling
- Someone overwrote the rate in Personnel Scheduling before it was updated to timekeeping.
- The calculated rate was a Job Rate and it was based on a Post and/or Shift
- TeamTime
- Cash Outs
- PAY Update - Void Checks
- eHub
- TK Import
- Daylight Saving Update
- Payroll - Create Batch
- Payroll - Recalculate Batch
- Payroll - Delete Batch
- Payroll - Create Void Batch
- Paycheck Review and Edit

You can change the Hours Description (Hours Type) for an individual record. This will create a new row in the Timekeeping grid.
If you are using Day Divides, hours that occur after the Day Divide Start Time set up in PAY: Defaults will display on a separate line in the Timekeeping grid.
Tip: Use the field chooser to show or hide columns in the History grid. Your field chooser selections are not saved between sessions.
