Overview
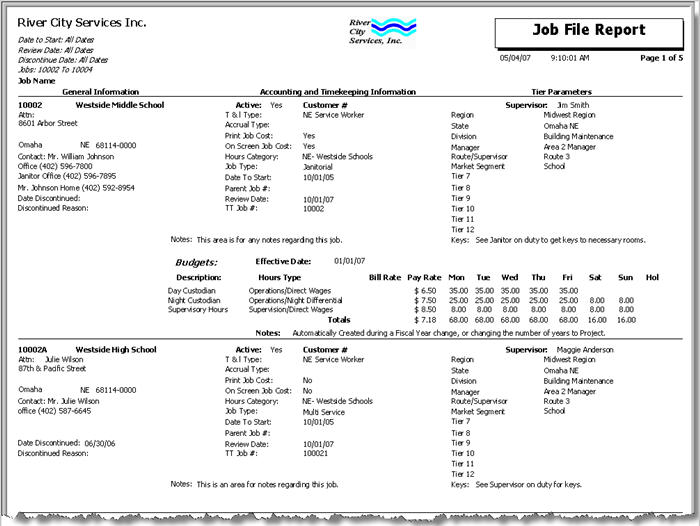
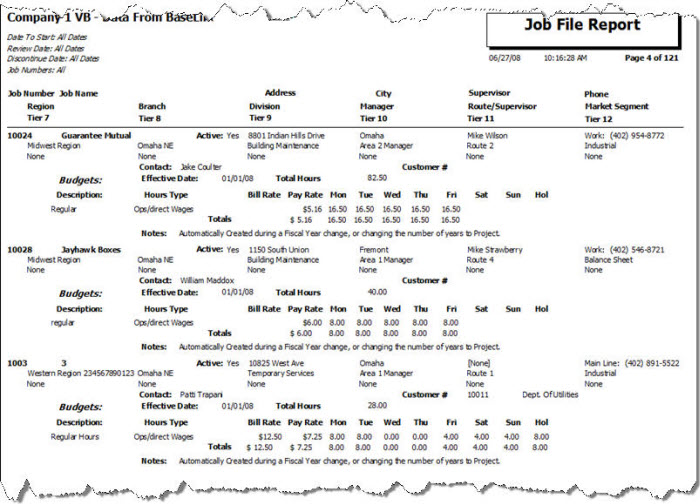
You can use the Job File Report to review all information contained in the Job Master File, including as a reference to all the Job Numbers in your WinTeam system. You may also print a TeamTime Report from here, which lists all information on the TeamTime Job Attributes screen. You may filter the report by Start Dates, Review Dates, Discontinued Dates, and Service Expiration Dates. You may include active or inactive Jobs, or both. The report may be sorted by Job Name or Job Number.
You may run this report as a detail report (including Tax Information) or a summary report with the Job Number, Name and Tier Parameters only. You may also include budgets on this report. If you choose to Show Budgets, the system uses the current budget for the report.
This report has Mail Merge functionality in order to export specific fields for creating mailing labels.

The Diary Report can be accessed from the JOB Reports menu.
Key Functionality
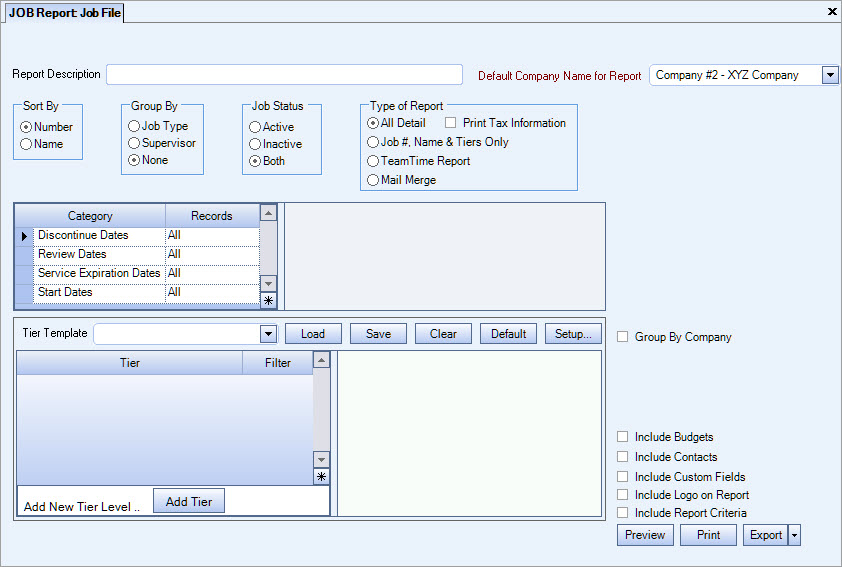
Type a description to name the report. This description prints above the Report Title.
The Default Company Name for Report is populated from the Company Setup screen. The list contains all companies for which you have security permissions to view. If you have permission for only one company, that will be the only one displayed in the list. If you have permissions to multiple companies, the list will display those companies PLUS the default reporting company.
When discernible, WinTeam will print the appropriate company name and logo on each page; otherwise the Default Company Name will print. That is, if a Company level is included in the tiered section and is displayed in the tiered information at the bottom of the page, then that company's Report Name and Logo (if selected) prints on that page.
If there is not a Company identified in the tier area of the page, then the Default Company Name for Reports is used. The default Company Name and Logo is also used for the Total Enterprise report. For more information see Learning about WinTeam Reports.
Use the Sort By option to sort report data by Job Number or Job Name.
Click Number to sort report data by Job Number.
Click Name to sort report data by Job Name.
Select to group report data by Job Type, Supervisor, or None.
Click Job Type to sort report data by job type.
Click Supervisor to sort report data by supervisor.
Click None to sort report data by other report criteria (Job Name or Number).
Select to filter report data by Job Status.
Click Active to include only active Jobs on the report.
Click Inactive to include only inactive Jobs on the report.
Click Both to include both active and inactive Jobs on the report.
Use the Type of Report option to select the type of report.
Click All Detail to include general job information, accounting and timekeeping information, and tier parameters on the report. If you select All Detail, you may also select to include Tax Information.
Print Tax Information
This check box is available only if you selected All Detail for the report type.
If you select this check box, you will need to use legal size paper to print the report. An additional section, Tax Information, is included on the report which includes the following fields on the report:
- Location Description
- Sales State
- Sales County
- Sales City
- Payroll State
- Payroll County
- Payroll City
- Sales Tax Services
- Sales Tax Products
- Holiday Method
- Timesheet Type
Click Job #, Name & Tiers Only to show only the Job number, name and tiers on the report.
Click TeamTime to list all TeleTeam Job Attributes from the Job Master File. Additional options display to Show Absenteeism Schedules and Show Caller ID Numbers.
Note: If you export the report to grid view, it contains a CallerIDNumbers field. If a job has more than one CallerID assigned to it in the TeamTime Job Attributes tab, they are separated by a semicolon.
Click Mail Merge to export specific fields for creating mailing labels. The following fields will export in the order listed:
Job Number, Title, Contact Salutation, First Name, Last Name, Name (Job Name), Attention, Address 1, Address 2, City, State, Zip.
Start Dates
Use the Start Dates category to select the Start Dates to include on the report. Select All to include all Start Dates. Select Range to define a range of Start Dates for the report. When you select Range, the range fields display. Type the beginning date in the From field and the ending date in the To field.
Review Dates
Use the Review Dates category to select the Review Dates to include on the report. Select All to include all Review Dates. Select Range to define a range of Review Dates for the report. When you select Range, the range fields display. Type the beginning date in the From field and the ending date in the To field.
Discontinue Dates
Use the Discontinue Dates category to select the Discontinue Dates to include on the report. Select All to include all Discontinue Dates. Select Range to define a range of Discontinue Dates for the report. When you select Range, the range fields display. Type the beginning date in the From field and the ending date in the To field.
Service Expiration Dates
Use the Service Expiration category to filter the report using the Service Expiration Date. Select All to include all Dates. Select Range to define a range of Service Expiration Dates for the report. When you select Range, the range fields display. Type the beginning date in the From field and the ending date in the To field.
Use the Tier Template to define and save customized settings for a report. To use an existing template, select the template from the list and click Load.
To create a new template, you can load an existing template, make the necessary modifications, click Save, and define a new template name in the Save As dialog box. Alternatively, you can start with a blank template by clicking the Clear button.
To modify an existing template, load the template, make the necessary modifications, and then click Save. The name of the existing template display in the Save As dialog box. Click OK.
For more information see Using Tier Templates and Using Tier Parameters.
This option is available to users who have more than one company, but is not selected by default. If selected, the default company prints on the Grand Total Page and the Report Criteria page. All other pages print the applicable company name. If not selected, the default company prints on every page of the report.
Select the Include Budgets check box to include budgets on the report.
The system uses the current budget when running and choosing to show Budgets on this report. If a budget has a future date (a date greater than the system date, which is normally "today's date) it is ignored when the report prints UNLESS the future budget record is the only budget record for the Job.
Select to include Contact information on the report.
Select the Include Custom Fields check box to include the Custom Fields on the report. Only the Custom Fields that are used will display on the report. You could print all 39 Custom Fields, if used.
This check box is not selected by default.
Select this check box to print the company logo on the report. It is selected or cleared by default based on the option selected in SYS:Defaults. However, you can modify the setting on each report.
Select this check box to include a list of the report options selected for the report. The Report Criteria page includes any ranges specified and each Category/Record selection made for the report. This check box is cleared selected by default.
Preview
Click the Preview button (or use the shortcut key, ALT + V) to view the report before printing.
Click the Print button (or press ALT + P) to send the report to your default printer.
Export
Click the Export button (or press ALT + X) to export the report to a specified format. Reports may be exported to Adobe Acrobat (PDF), Excel, Comma-Separated Values (CSV), Grid View and E-mail (available for premise-based clients only).


