Overview
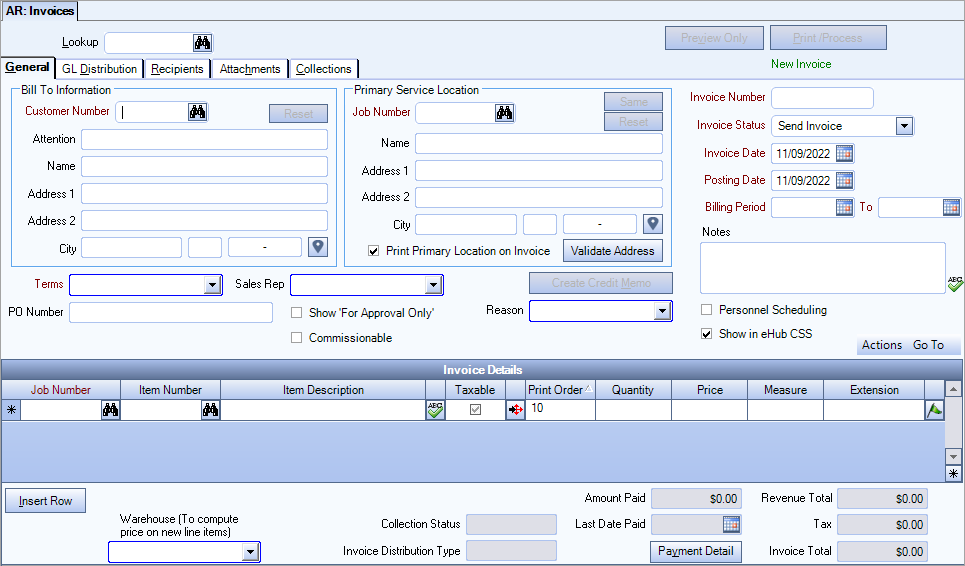
On the Accounts Receivable Invoice Entry screen, you can bill non-recurring items like work orders, perform additional billing for recurring customers, issue credit memos, and track inventory resale. You can also review and edit invoices created through Update Recurring Invoices and Updates Schedules to file.
Enter actual ticket data manually, or link and select transactions from other modules: Timekeeping for labor hours, Inventory (resale and usage) for the cost of materials, Accounts Payable for other direct costs and Personnel Scheduling for additional fees.
After creating an invoice, you can process the invoice directly from this screen, provided you have the proper security to Process Invoices. Security can be set to only allow someone security to reprocess previously processed invoices and not allow processing of an invoice for the first time.
The AR: Invoices screen contains four tabs: General, GL Distribution, Recipients, and Attachments. Each of these tabs can be accessed using keyboard shortcuts.
The Rollover button in the toolbar is functional. For more information, see Rolling Over AR Invoices.
If you have invoices you want to import from a *.CSV file, see Importing AR Invoices.
Click the Advanced filter button ![]() to create or edit a filter for finding and/or sorting specific records. You can also select a Saved filter. Click the Apply Filter/Sort button to apply any filter or sort criteria you created. Click the Remove Filter/Sort button to remove a filter or sort, if one is currently applied. For more information see Advanced Filtering.
to create or edit a filter for finding and/or sorting specific records. You can also select a Saved filter. Click the Apply Filter/Sort button to apply any filter or sort criteria you created. Click the Remove Filter/Sort button to remove a filter or sort, if one is currently applied. For more information see Advanced Filtering.
You may rollover an existing Invoice by using the Rollover button ![]() from the toolbar.
from the toolbar.
This allows you to easily create an invoice that is very similar to an existing invoice. It also allows you to replace an existing Invoice with a new Invoice (in this case, you should make sure that a credit was already issued).
You can rollover (copy) one Invoice to a new Invoice, with the exception of Balance Posting Invoices (those invoices entered through the Customer Balances screen).
When invoices are created through the Rollover when the posting date of invoice is in a closed period, special rules are used.
If the Posting Date on the original invoice is not in the valid data entry range then we compare the last valid date for data entry to current date. If the last valid date for data entry is less than current date then we default the last valid date to Posting date, otherwise we default current date to Posting date.
Valid dates for data entry can be found in the SYS: Fiscal Year Setup screen.
For more information, see Rolling Over AR Invoices.
The Lookup field enables you to filter for specific AR Invoice records.
If you enter an Invoice Number and the number matches an existing record, the record is displayed.
To search for a record in a list, select the Quick Lookup button ![]() .
.
To search for a record in a list with the focus set to the Number/ID field, press F4.
To search for a record in a list with the focus set to the Description field, press F5.
For more information see Using Quick Lookups or Lookup AR Invoices.
The Preview Only function is used to review exactly what the invoice will look like and also what the e-mail message will look like if the invoice is set up to be e-mailed. No processing occurs.
The Print/Process button is enabled if the Invoice Status is "Send Invoice" and you belong to the AR Print Invoices Security group.
The ONLY time the Print/Process button is disabled is when the Customer Master File Delivery Option is DO NOT SEND.
The Reprint /Reprocess button is enabled if the Invoice Status is 'Invoice Sent', 'Resend Invoice', or 'Duplicate Invoice', provided the User belongs to the AR Print Invoices or AR Invoices Reprint Only Security Groups.
Click the Print/Process button (or Reprint/Process depending on the status of the invoice) to process the invoice.
Normally when using the Print/Process from the AR Invoice Entry screen, the system processes and prints the invoice to your default printer. To include the ability of redirecting the invoice to a different printer, you can set up a Custom Setting that displays the Invoice Processing Summary screen before printing. A Preview button is available on the Summary screen which allows you to change your default printer.
| Section | Item | Value |
|---|---|---|
| ARInvoices | ShowSummary | Yes |
Once the invoice is printed (if applicable), the system continues to process the invoice. A message displays to confirm that you are ready to update the status of the process invoices.
When you click Yes, the system updates the status of the invoice to 'Invoice Sent' and displays the new E-mail Invoice Review screen (if e-mail was generated for the invoice).
If you selected to Print Tax Details in AR: Defaults, Tax Details will display on the invoice.
Recurring Invoice
Indicates if this invoice is recurring.
Recipients Edited Status
Displayed if changes have been made to the original Recipients grid Recipients Edited.
Status
The invoice status displays in green text. It will display either New Invoice, Paid, Partial Paid or Outstanding.
Posted Status
To view the GL Log# with which the transaction was posted and/or speed the process of un-posting and/or reprinting GL entries, the GL: Journal Update Log screen may be accessed by double-clicking a record's blue Posted status.
Hover over the Change Information icon to see User Added, Date Added, User Changed and Date Changed information. WinTeam records the logon name of the user entering or changing this record. The Date Added is the original date this record was entered into the system. The Date Changed is the date the record was last changed. Right-click on the Change Info icon to filter for records added or changed by a specific user or date.
When you hover over the User Changed or Date Changed filters, you can:
- Filter By Selection - Filters for all records that match your current records field value.
- Filter by Exclusion - Excludes from your filter all records that match your current records field value.
- Filter For - Filters based on the text/value you enter.
- Sort Ascending - If you already have a filter applied, the Sort Ascending command is available. Also used to include all records in the filter and sort in ascending order based on the current records field value.
- Sort Descending - If you already have a filter applied, the Sort Descending command is available. Also used to include all records in the filter and sort in descending order based on the current records field value.
In order for a user to import invoices, a user must belong to the SYS ALL Security Group or you will need to create a custom security group adding AR Invoices as a screen, with the Import Feature selected.
You must be on a new record in order to import invoices. Records cannot be imported into an existing invoice. If you are not on a new record, but you have the proper security, the Import button is disabled.
For detailed information see Importing AR Invoices.
Reset All Taxes
If this invoice has been posted, this command is unavailable.
Click Reset All Taxes to recalculate taxes for all Detail lines in this invoice.
It will recompute Jurisdictions, Taxability rules, Taxability rates, and then update the Taxable Amount, Non-Taxable Amount and Tax fields.
Renumber Print Order
Click Renumber Print Order to clear the current print order values and then renumber in increments of 10 based on the order listed in the Invoice Details grid.
When you renumber, the first record in the grid is set to 10, and each successive row will increment by 10.
This is a good way to evenly space your Print Order numbers in the grid.
You cannot renumber the Print Order if the Invoice Details have been filtered in the grid.
The Go To menu options change depending on if this is a Personnel Scheduling invoice or not (Personnel Scheduling check box is selected).
- Click Personnel Scheduling to open the PS Billing Review and Edit screen
- Tax Summary
Click Tax Summary to open the Tax Summary screen.
The Tax Summary displays tax information by Jurisdiction. - Click Unbilled Personnel Scheduling to open the Unbilled Personnel Scheduling screen.
The Unbilled Personnel Scheduling screen is used to import details into AR: Invoices.
You cannot import Unbilled Personnel Scheduling records if the invoice has been posted or partially paid or paid in full.
- Inventory Resale
Click Inventory Resale to display the Sold/Usage screen. From this screen, you can enter inventory to be resold to the customer that is currently being invoiced. It may also be used to view an existing document. - Tax Summary
- Unbilled Resale
Click Unbilled Resale to display the Unbilled Resale screen.
This screen displays all documents from Inventory Resale that have not been invoiced through Accounts Receivable. The screen displays the Reference ID, Job Number and Description, Customer Number, and Document Date. It also allows for the selection of specific inventory documents to be imported into an Invoice. Only items that HAVE NOT been invoiced will display. - Unbilled Work Tickets
Click Unbilled Work Tickets to display the Unbilled Work Tickets screen. The Unbilled Work Tickets screen shows billable work tickets that have not been invoiced. If you select to import a Work Ticket, the billing information is added to the invoice under Invoice Details.
The system will assign the print orders in increments of 10 based on the highest print order of any existing invoice details.
Click Tax Summary to open the Tax Summary screen.
The Tax Summary displays tax information by Jurisdiction.
If a Purchase Order Number exists on the Usage/Resale record, it will be imported.
If a Purchase Order Number already exists with the Invoice, the Usage/Resale record's purchase order number WILL overwrite any existing Purchase Order number that is set up with the Invoice.
The system will assign the print orders in increments of 10 based on the highest print order of any existing invoice details.
- Work Scheduling
Click Work Scheduling to open the WS: Schedules screen. From this screen, you can enter billable work orders, which can then be billed through AR: Invoices.
The details under Bill To Information come from the Customer Master File. You can change any of the fields for the current invoice, but to make a permanent change, use the Customer Master File.
Customer
Use the Customer Number field to enter the customer's number.
Type the Customer Number in this field, or use the Quick Lookup to locate the customer's record.
For more information see Using Quick Lookups or Lookup Customers.
Reset
Click the Reset button to restore the original information from the Customer Master File.
Attn
The Attn field contains the text entered in the Attention field on the Customer Master File describing who should receive the invoice. You can change this information for an invoice; however, modifications to this field apply only to this record and do not affect the Customer Master File.
Name
The Name field contains the text entered in the Name field from the Customer Master File. You can change this information for an invoice; however, modifications to this field will this particular invoice only.
Address 1 and Address 2
The Address 1 field contains the text entered in the Address field from the Customer Master File. The Address 2 field contains any additional address information entered in the second part of the Address field from the Customer Master File.You can change this information for an invoice; however, modifications to this field affect this particular invoice only.
City, State, and Zip
The City, State, and Zip field contains the text from the Customer Master File. You can change this information for an invoice; however, modifications to this field affect this particular invoice only.
You can use the Zip Code Custom Setting to populate City and State fields
For more information see Auto Populating City and State Fields.
Google Map button
Click to link to Google Maps to quickly view maps and get directions. The link generates a map centered on the address you have entered in WinTeam. For more information see Using Google Mapping.
Same
Click the Same button to copy the name and address from Bill To Information to the Service Location. This affects the active invoice only and will not change information in the Customer Master File.
Reset
Click the Reset button to restore information under Service Location if you made changes, but want to revert to the original information.
Job Number
The Job Number field will default to the first Job Number listed in the Default Job Number for Invoice Entry area of the Customer Master File.
If you want to change the Job Number, type the Job Number in this field, or use the Lookup to locate the Job Number.
If you change the Primary Service Location Job Number on an existing invoice, the system will recalculate the taxes based on the new Job Number.
Name
The Name field contains the text entered in the Name field from the Job Master File, unless you have clicked the Same button, which populates the name and address information from the Bill To Information. This affects the active invoice only and will not change information in the Customer Master File or the Job Master File.
You can change this information for an invoice; however, modifications to this field will this particular invoice only.
Address 1 and Address 2
The Address 1 field contains the text entered in the Address field from the Job Master File, unless you have clicked the Same button, which populates the name and address information from the Bill To Information. The Address 2 field contains any additional address information entered in the second part of the Address field. This affects the active invoice only and will not change information in the Customer Master File or the Job Master File.
You can change this information for an invoice; however, modifications to this field affect this particular invoice only.
City, State, and Zip
The City, State, and Zip field contains the text from the Job Master File, unless you have clicked the Same button, which populates the name and address information from the Bill To Information. This affects the active invoice only and will not change information in the Customer Master File or the Job Master File.
You can change this information for an invoice; however, modifications to this field affect this particular invoice only.
You can use the Zip Code Custom Setting to populate City and State fields.
To automatically populate the City and State field based on the ZIP Code entered see Auto Populating City and State Fields.
Google Map button
Click to link to Google Maps to quickly view maps and get directions. The link generates a map centered on the address you have entered in WinTeam. For more information see Using Google Mapping.
Print Primary Location on Invoice
This option is selected by default.
Select the Print Primary Location on Invoice check box to print the Job's Primary Location on the Invoice.
If there are multiple Jobs and this check box is NOT selected, "Multiple Service Locations" will print on the invoice in place of the service location information.

Validate Address
Click the Validate Address button to check the address you entered against the address in the USPS database (Melissa Data).
Important: Validating addresses is part of the implementation process for the Updated Tax Engine. See Job and Employee Master File Address Validation for more information.
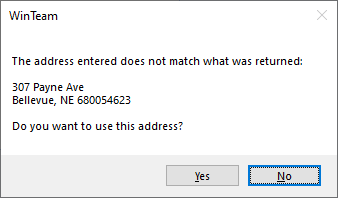
The following message box displays when the system finds a close match to the address you entered–click Yes to accept the system's suggestion or click No to close the message box and adjust the address.
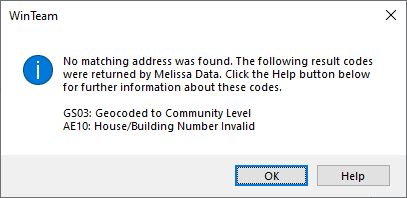
The following message box displays when the system cannot find a match to the address you entered–click OK to close the message box or click Help to see more information about the result codes.
Use the Number field to enter a unique Invoice Number to identify the invoice throughout WinTeam.
If you are entering a new invoice, it is not necessary to enter a number here since the system will assign the next available number based on the Starting Invoice Number in AR: Defaults.
If you are looking up an existing invoice, type an Invoice Number in this field.
If you are on an existing record and you enter an invoice number that matches one already in the system, that invoice record displays.
If you are on an existing record and you enter an invoice number that DOES NOT match one already in the system, the system will display a warning message to confirm this is what you intend to do.
Click Yes if you really are changing the invoice number.
Click Noif you are not trying to change the invoice number.
If you want to lookup an existing invoice, use the Lookup field in the header.
If you want to create a new invoice, use the New button to display a blank AR: Invoices screen.
Use the Invoice Status field to view or change the status of the invoice.
On a new record, the Invoice Status is populated with the associated Delivery Option selection made on the Customer Master File record; however, you can change an invoice status when necessary.
If the Delivery Option is either Print and/or E-mail or E-mail Only, then the Invoice Status is 'Send Invoice'. If the Delivery Option is Do Not Send, then the Invoice Status is 'Do Not Send'.
The Invoice Status can be changed when an invoice is created to "Send Invoice" if needed. If you change the status to "Send Invoice", the system will then require that the invoice be processed before it is posted to the General Ledger. The Invoice Status on the Invoice overrides the Delivery Method from the Customer Master File record.
- Send Invoice
An invoice remains in this status until it has been processed.
Invoices can be printed/processed directly from this screen (if you belong to the AR Print Invoices Security Group) by clicking the Print/Process button - Do Not Send
Use this option if you do not want to print or process an invoice when using Print/Process. This option is available during normal invoice entry.
The Print/Process button is disabled if the Invoice Status is 'Do Not Send'.
Invoice Sent - Once an invoice has been processed, the status changes from Send Invoice to Invoice Sent.
On an existing Invoice that has already been processed, the Invoice Status will be 'Invoice Sent'. You can then choose to 'Resend Invoice' (formerly Reprint) or create a 'Duplicate Invoice'. After processing, the Invoice Status will update to 'Invoice Resent'.
Once an invoice has been processed, the Reprint/Reprocess button is enabled if you belong to the AR Print Invoices or AR Invoices Reprint Only security groups.
Invoice Resent - If an invoice is resent from a Resend Invoice or Duplicate Invoice status, the status updates to Invoice Resent.
The Reprint Invoice button is enabled if you belong to the AR Print Invoices or AR Invoices Reprint Only Security Groups.
Resend Invoice - If the invoice has been processed once and then is modified, the status of the invoice will update to Resend Invoice.
An invoice status changed to Resend Invoice will be reprocessed if the Invoice Status on the Invoice Processing screen is selected for Invoices Marked for Resending.
The Reprint Invoice button is enabled if you belong to the AR Print Invoices or AR Invoices Reprint Only Security Groups.
Duplicate Invoice - After an invoice has been processed once, the Duplicate Invoice status is available. If you select a Duplicate Invoice status, the invoice will reprint a hardcopy with the word Duplicate printed on the Invoice. If you are e-mailing a Duplicate Invoice, the original PDF is sent. The status of the invoice will reset to Invoice Resent.The Reprint Invoice button is enabled if you belong to the AR Print Invoices or AR Invoices Reprint Only Security Groups.
Note: If you make a change to an invoice that has already been sent, if it has not been updated to the General Ledger, it will not post until the invoice is resent.
If you are on an record that has been posted, the Invoice Date field is unavailable.
For a new Invoice, the system defaults today's date.
Use the Invoice Date field to enter the date when the invoice was created.
Type a date in this field, or use the Date Control to select a date.
If you are on a posted record, the Posting Date field is unavailable.
Use the Posting Date to enter the date you want the invoice to post. You can post invoices to a previous date, or to a future date.
Type a date in this field, or use the Date Control to select a date.
For a new Invoice, WinTeam defaults today's date to the posting date.
Note: You can change the Posting Date on an invoice if it has been paid, but not if it has been posted.
If the invoice is created through the Rollover or by using the Create Credit Memo, special rules apply to the Posting Date in a closed period.
- If the Posting Date on the original invoice is not within the valid data entry range, then the last valid date for data entry is compared to the current date.
If the current date is greater than the last valid date of data entry, then last date of data entry defaults to the Posting Date.
These are required fields. The Billing Period From and To dates allow you additional filtering ability when reviewing items on the Invoice Review screen. There, you can indicate a billing period date range to review invoice details for to determine whether you have billed all that should have been billed.
In order to help you with input, there are normal default rules in place that will fill in your billing period dates for you. Typically, the information in these fields will not change unless the invoice you are creating is covering a different billing period than what the system is defaulting. This case would arise in instances where you are creating additional invoices in the current period for a prior fiscal period’s billing.
Example: If you incorrectly billed a customer and need to issue a credit for past service, this is a perfect way to record what date range the service applied to since there is a good possibility that the credit issued will not be created until a later fiscal period. Any time corrections to bills are being made or additional invoices are created for work that was done in a past fiscal period, these are instances where you may want to consider changing these dates.
These dates default differently depending on the screen that the invoice is created from. Invoices can be created manually through the AR: Invoices screen, importing through AR Invoices, using the Update Recurring to File, or Update Schedules to File options.
For new Invoices entered through Invoice Entry directly, the default From and To Dates are based on the Fiscal Period Start and End Date, corresponding to the Posting Date.
When importing AR Invoices, the Billing Period Dates populate if they have been entered in the last two columns of the xls file. If the Billing Period From and To Dates do not exist, the Billing Period Dates are based on the Fiscal Period Start and End Date, corresponding to the Posting Date, the same way manually entered AR Invoices determine the Billing Period.
When updating Recurring Invoices, the Billing Period Dates also default according to the Fiscal Period Start and End dates corresponding to the Posting Date. If the billing period is for a different time frame, you can change it on this screen.
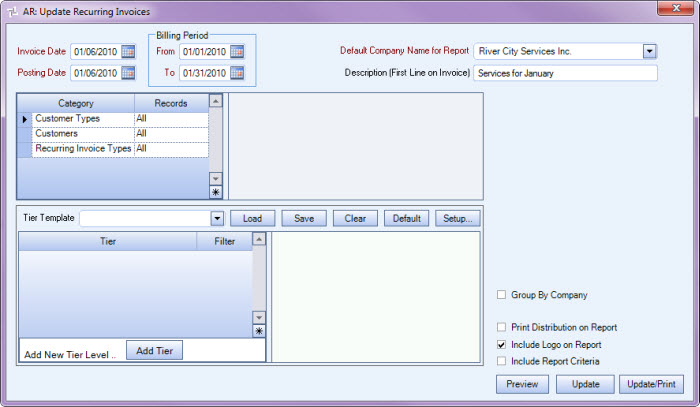
When updating Schedules to File (Personnel Scheduling billing details), the Billing Period From and To Dates will default to the Billing Dates.
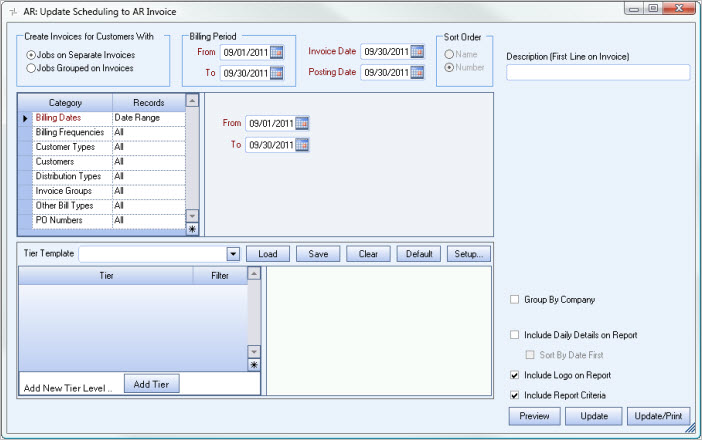
Use the Terms field to define the billing terms for an invoice.
Type or select the Invoice Terms you want to use.
To add a new Term, double-click in the Term field, or type a new Term Type and press Enter.
The Invoice Terms screen add/edit list displays.
Use the PO Number field to enter an invoice's corresponding purchase order number.
Use the Sales Rep field to assign a Sales Representative to a customer.
Type or select the Sales Representative you want to assign to this customer.
To add a new Sales Representative, double-click in the Sales Rep field, or type a new Sales Rep name and press Enter.
The Sales Representatives add/edit list displays.
Select the Show 'For Approval Only' check box to print 'For Approval Only DO NOT PAY' on each invoice processed for this Customer.
This setting defaults to the setting you have made in the Customer Master File.
This check box displays if you selected the Commissions Determined By Invoice Header check box in AR: Defaults.
Select the Commissionable check box to calculate commissions on the entire invoice.
Use the Credit Memo button to create an invoice with details for the total amount of the invoice. The system assigns a new invoice number and each of the details will have a credit balance. You can use the ARInvoices | InvoiceDateOnCreditMemo | Yes custom setting to add the Invoice Date to the Credit Memo.
Note: This option is not available for customers set up with Invoice Allocation.
When invoices are created using the Create Credit Memo, special rules apply to the Posting Date in a closed period. If the Posting Date on the original invoice is not in the valid data entry range then we compare the last valid date for data entry to current date. If the last valid date for data entry is less than current date then we default the last valid date to Posting date, otherwise we default current date to Posting date.
Use the Reason field to specify a Reason for creating the invoice or Credit Memo. The Reason field is not required when creating an invoice, however, it is required when creating a Credit Memo.
Type or select the Reason for creating the invoice or Credit Memo.
To add a new Reason, double-click in the Reason field, or type a new Reason description and press Enter.
The Invoice / Credit Memo Reasons add/edit list displays.
This field displays ONLY if you have linked a rolled over invoice to an existing invoice.
If you clicked "Yes" to create a link with the existing (old) invoice during the rollover process, the Original Invoice # field is visible on the screen with the original invoice number displaying.
For more information, see Rolling Over AR Invoices.
Displays the Invoice being credited for this Credit Memo.
Use the Notes field to enter any notes pertaining to this Customer.
Notes can be entered on AR Invoices at any time, regardless of posted status, or valid dates of data entry.
Use the Personnel Scheduling check box to make the invoice a Personnel Scheduling type invoice. The Invoice Details section is the only area that changes. You will then have the option to pull in Unbilled Personnel Scheduling or go to the Personnel Scheduling Review and Edit screen. You cannot import Unbilled Personnel Scheduling records if the invoice has been posted or partially paid or paid in full.
This columns displays if you are licensed for eHub.
The Show in eHub CSS check box is selected by default.
You can clear this check box any time, even after a record is Posted /Printed.
Use the Job Number field to enter the Job Number.
Type the Job Number in this field, or use the Quick Lookup to locate the Job Master File record.
Double-click in this field to open the Job Master File record.
For more information see Using Quick Lookups or Lookup Jobs.
When importing Unbilled Resale records, the Job of the Unbilled Resale will populate the Job Number in the Invoice Details grid.
When importing Unbilled Personnel Scheduling records, the Job from PS Billing Review and Edit will populate the Job Number in the Invoice Details grid.
When importing Unbilled Work Tickets, the Job Number from the Work Ticket will populate the Job Number in the Invoice Details grid.
When changing the Job Number in the invoice details area of an Invoice for a Personnel Scheduling Job, the system looks at these Job Numbers and bases the GL Distribution off of these Job Numbers.
Use the Item Number field to enter the Inventory Item Number that matches the Service item you want to bill.
To bill for products on this invoice, use the Unbilled Resale button, or if AR: Defaults are setup to "Allow Products to be Invoiced" you can enter product items right into the Item # field, without having to Import from Inventory.
Type the Item Number in this field, or use the Lookup to locate the Item Number.
This field contains the information from the Description field in the Item Master File. You can edit the description for this invoice; changes you make to the description apply only to this invoice and do not change the Item Master File description.
The name of the person who requested this invoice displays in this field when the Include Requested By check box is selected in the Unbilled Work Tickets window. The name comes from the Requested By field in the WS Schedules window or the Requested By field in the Work Ticket details screen from eHub Mobile (on both Android and iOS devices.)
Warning: Do not use Ctrl + Enter in this field to enter a line break. This causes the invoice detail and detail line amount to be misaligned. It may also cause detail lines to be omitted from the printed invoice if the invoice contains multiple pages.
Select the Taxable check box if the invoice item or service is subject to sales tax. If the service or item is not taxable, be sure to clear the check box if necessary.
Items and services are automatically marked taxable on an invoice when the customer is designated as taxable in the Customer Master File and the items and services are designated as taxable in the Job Master File. If either the customer or the invoice item or service are not designated as taxable, the check box is cleared upon entry.
When invoice tax details are modified, the Taxable field on the Invoice Details grid appears with a yellow background so you can easily see line items containing tax alterations. Also, the header on the Invoice Tax Details screen displays Taxes Edited in green text.
Click the Detail button to display the Invoice Tax Details screen.
Use the Print Order field to set the order each detail item will print on the on the Invoice.
For new invoices the print order field defaults by increments of 10 for each detail line item.
If this is a Recurring Invoice, the print order will come through with the print order that was used on the Recurring Invoice.
Use the Quantity field to enter the quantity being billed, if applicable.
Typically, you would enter only up to 2 decimal positions, but if needed, you can enter up to 3 decimals.
Example: If you are billing a Customer for so many hours of service, the Quantity would represent the hours.
If Billable Work Orders are imported into the invoice, the Quantity (if entered) will default from the Work Order.
Note: You do not have to enter a value in the Quantity field. You may enter an Extension without entering a value in the Quantity field. If you enter a Quantity, the system calculates the Extension using Quantity times Price.
The Price field defaults from the Item Master File, if a price has been set. If you import Billable Work Orders the Price (if entered) will default from the Work Order.
Type the price of the item or service in the Price field.
You can change this information for an invoice, however, modifications to this field will affect this particular invoice only.
Note: You do not have to enter a value in the Price field. You may enter an Extension without entering a value in the Price field. If you enter a Price, the system calculates the Extension using Quantity times Price.
If there is a Unit of Measure stored with the Item # being invoiced, it will default here. This information could be coming from the Item Master File or, in the case of Personnel Scheduling, billing items from the Bill Codes by Job file.
If you import Billable Work Orders into the invoice, the Measure defaults from the Work Order.
Type the unit of measure in the Measure field, if one is needed.
Typically, the Measure field is blank when invoicing service items, and filled when invoicing products. You may edit the information in the Measure field for printing invoices. You can change this information for an invoice, however, modifications to this field will affect this particular invoice only.
The Extension field contains the total value of the service being invoiced. For many service items the Quantity and Price fields do not contain a value, and only the value of the service is entered in the Extension field. If you import Billable Work Orders into the invoice, the Extension field information defaults from the Work Order.
If a Quantity and Price are entered, the extension value is computed as follows:
Quantity x Price = Extension
You may enter an extension amount without entering a price or quantity. You may enter a $0.00 amount.
The Backspace key can be used when editing the Extension field.
Calculation displays up to 6 digits after the decimal.
This column displays if you selected the Commissions Determined By Invoice Details check box in AR: Defaults.
Select the Commissionable check box next to each invoice detail line you want to calculate commissions on.
The Detail button displays for PS Invoices. Click the Detail button to display the Scheduling Recap Invoice Details.
Select the Warehouse for the system to use when computing the price for a new line item.
As long as you have selected the Warehouse prior to adding line items to the Invoice Details grid, the system will pull in the resale price. You will not see the Price until you have entered a value in the Quantity field.
This makes it very easy to pull in prices for items from different warehouses.
Each line item can use a different warehouse. Just make sure that you select the Warehouse prior to adding the new line item.
This is a read-only field that displays the current status if the invoice is in the collections process.
Displays the amount paid on this invoice
Displays the last date a payment was made on this invoice.
Click the Payment Details button (or press ALT + Y) to open the Payment Details screen.
The Payment Details screen displays payments made toward the selected invoice. Each payment applied to the selected invoice displays individually with the check number, Check Date, Adjustments, if any, and the Applied Amount. If no payments have been applied to the selected invoice, the screen does not display any entries.
The Revenue Total displays the total of all the extension values for the items entered in the Invoice Details section of the screen. This figure does not include taxes for the items.
Displays the total tax applied to the items entered in the Invoice Details screen.
The Invoice Total displays the sum of the Revenue Total and Tax Total for this invoice.
Use the shortcut key, ALT + D, to display the GL Distribution tab.
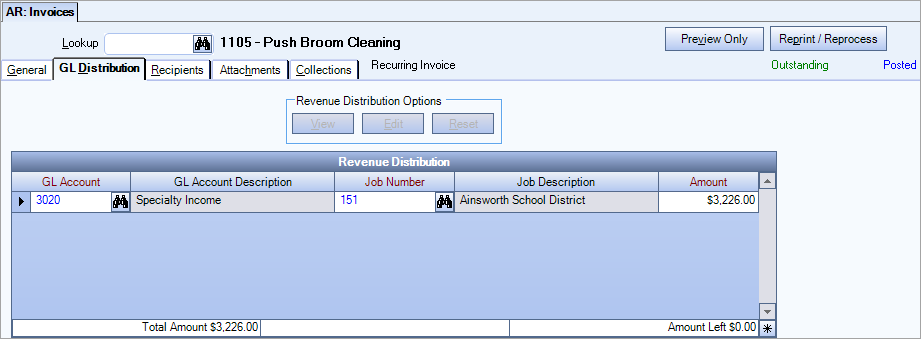
Use the Revenue Distribution grid to enter the General Ledger Account Number you want to distribute the revenue amount to and the Job Number to credit for this distribution. If no edits are made, the distribution will post based on the Job Number(s) of the invoice detail line(s), and the Income Account’s General Ledger number that is set up with the Item number’s Inventory Category. For Personnel Scheduling invoices, the general ledger numbers used will be determined by the Bill Code Category G/L Numbers.
Normally you would not be making any edits to this information unless you wanted the revenue amount to be distributed differently in the General Ledger.
If the invoice has been Posted, the GL Distribution opens in View mode and the Revenue Distribution Options are unavailable.
If the invoice has not been Posted, you can
- click the View button (or press ALT + V) to view the Revenue Distribution
- click the Edit button (or press ALT + E) to edit the Revenue Distribution
If you are in Edit mode, the Reset button becomes available.
You can click the Reset button (or press ALT + R) to clear the grid and restore the default distribution. When resetting the GL Distribution, the Job Number comes from the Invoice Detail line.
To edit the Revenue Distribution, click the Edit button.
To reset the Revenue Distribution to the default settings, click the Reset button.
If your cursor is in the Amount field and you want to distribute the entire Invoice Amount, you can press the space bar and the Invoice Amount will populate the Amount field in the GL Distribution grid.
Warning: On a non-posted invoice, where the GL Distribution has been edited, if you add more items to invoice details grid or import unbilled work tickets, the GL Distribution will not change. You must manually adjust the GL Distribution Revenue Distribution grid to ensure the amount left is equal to zero.
Also, if you reset the Revenue Distribution grid after new records have been added to Invoice Details, the GL Distribution details will reset to the original default and you will lose any manual changes.
Use the shortcut key, ALT + R, to display the Recipients tab.
The Recipients tab displays the Recipients grid and History grid.
This tab includes the ability to edit the recipients for this invoice, resend, print, or view e-mail messages.
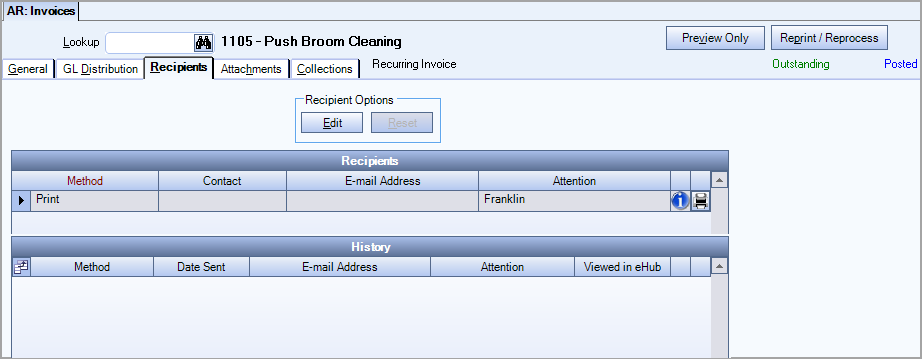
The Recipients grid displays all Recipients setup to receive invoices. This list can be customized for each invoice by adding additional Contacts or E-mail Addresses. The Contact must be setup in the Contact Setup screen to be available in the Contact list.
Note: Adding or Editing information in the Recipients tab will not update the Contact Setup in the Customer Master File.
By default, Parent Customer Contacts will receive all invoices created for sub Customers.
This Custom Setting can be used to exclude Parent Customer Contacts from the sub Customers invoice (in the recipients grid) when processing invoices.
| Section | Item | Value |
|---|---|---|
| ARInvoices | ExcludeParentContacts | Yes |
When using the Invoice Distribution Types Custom Setting, if the recipients Tab is edited with any contact information during invoice processing, that information will override the contacts set up in Job Master File.
The Print icon![]() displays if an invoice has already been processed.
displays if an invoice has already been processed.
Click the icon to resend the invoice to a selected Contact. If you would like to reprint/reprocess the invoice for all Recipients, use the Reprint/Reprocess button located at the top of the screen.
The Invoice Register Report will list the Recipients in this grid when selecting to include Current Recipients.
The History grid displays the Recipients that were sent the invoice, including those using the Print Method.
Mail icon
Click the Main icon![]() to view the E-mail Details sent with the invoice.
to view the E-mail Details sent with the invoice.
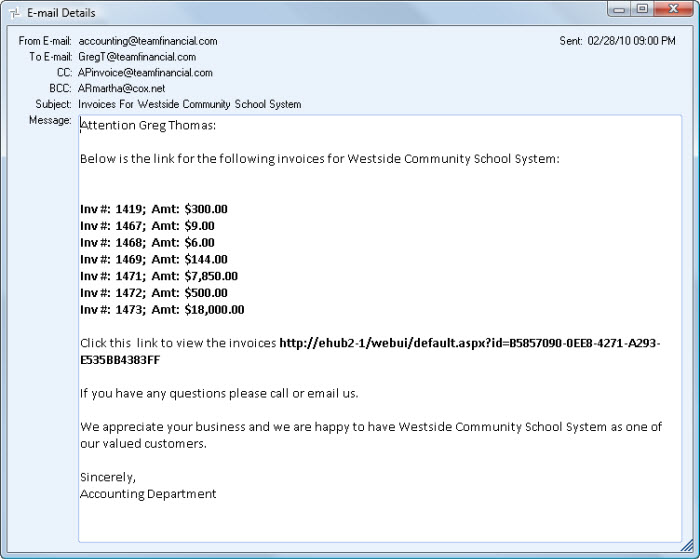
The Invoice Register Report will list the Recipients in this grid when selecting to include History Recipients.
Use the shortcut key, ALT + H, to display Attachments tab.
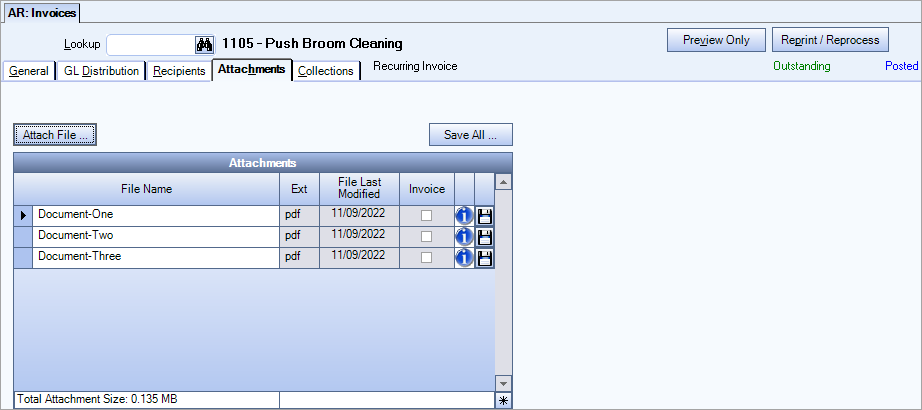
The Attachments tab displays the PDF invoice and is also used to include additional files when e-mailing invoices. This could be a spreadsheet, doc, PDF or image file; basically any file with supporting information.
The AR Report: Invoice Register can include the file name of any attachment associated with an invoice.
Click the Attach File button to open Windows Explorer to locate a file to attach to the invoice.
Click the Save All button to save the PDF of this invoice, along with all other attachments to a location outside of WinTeam.
Files may be attached and stored with the AR: Invoice.
PDF files of Invoices that are processed are stored in this grid, and you will see the Invoice check box selected. The Invoice Number is used as the pdf name. To view the pdf file, click the disk icon on the grid row to display the Save As dialog box. Save the file, and then open with a pdf viewer.
If an invoice is reprinted, the original PDF is deleted and replaced with the new one.
Do Not Send will not process any records. even if the Job Master File says export
The Collections tab is used to mark an invoice for Collections, and to manage and track information pertinent to the collection process. Click the Collections Screen button to assign or reassign to an invoice.

