
Overview
The Customer Master File can be accessed from the Accounts Receivable Menu, INV: Drop Shipment (Customer tab), INV: Requests (Customer tab), and Job Master File (Accounting Info tab).
Use the Customer Master File to set up new customers and maintain current customer information.
The AR: Customer Master File contains three tabs: General, Custom Fields, and Contacts. You can access each of these tabs using keyboard shortcuts.
Information entered in the Invoice Information section defaults to Invoices. This includes Terms, Taxability, Credit Limits, whether to print Past Due Notices and/or Statements, and preferred Delivery Option for this Customer. Also included is the option to mark the invoice 'For Approval Only'. Additional options are available for Personnel Scheduling Invoices.
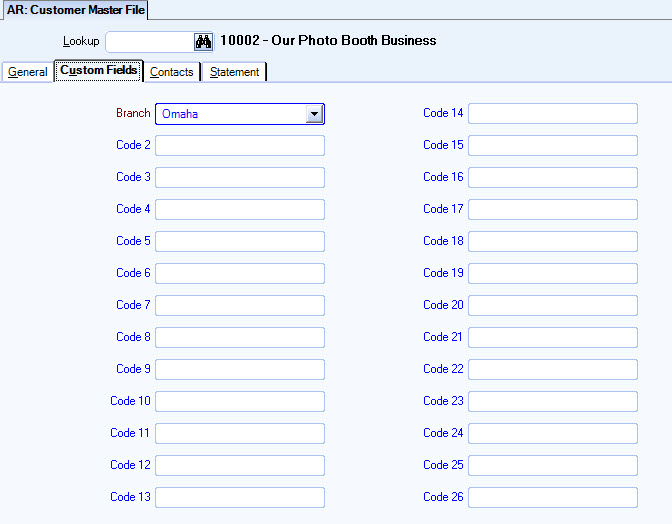
Custom Fields are available for adding up to 26 custom created entry fields.
From the Customer Master File screen there are three detail buttons:
- Customer Details - The Customer Details screen displays customer balances and year to date adjustments.
- Invoice Review - The Invoice Review screen displays detailed invoice and tax information.
- Sales Details - The Sales Details screen displays a graph of the past 12 or 13 periods along with each period's sales.
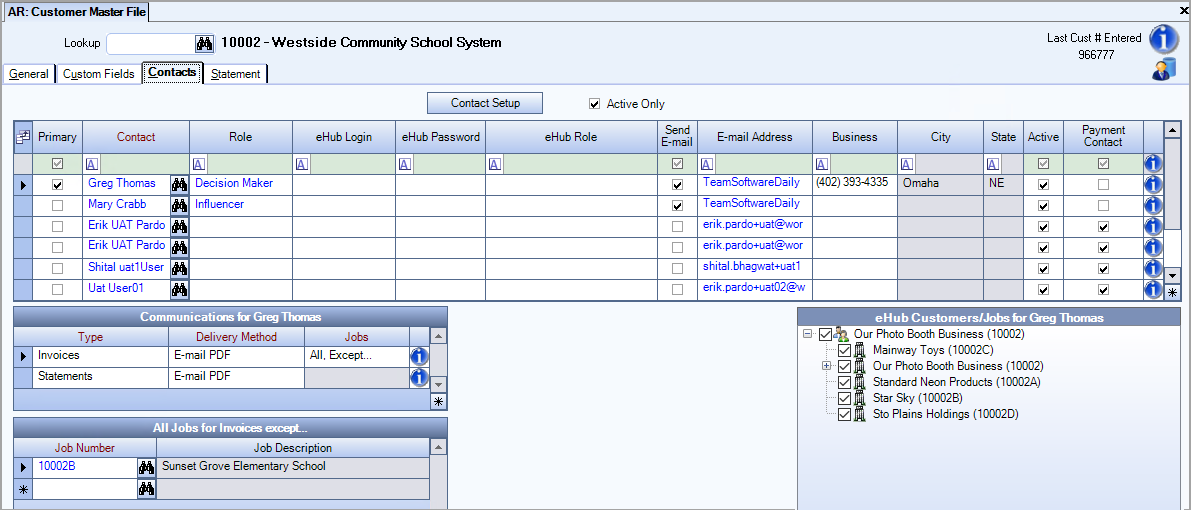
A Customer can have one or multiple Contacts. One Contact can be designated as the Primary Contact for each Customer. The Primary Contact information displays on the General tab of the Customer Master File record. For more information, see Adding Contacts to a Master File Record or Creating Contacts.
The Contacts tab is also used to select the Contacts who will receive invoices via e-mail.
| Section | Item | Value | Module and Purpose |
|---|---|---|---|
| Addresses | UseZipsForCityState | Yes |
This setting automatically fills in the City and State (City and Province) fields when entering a Zip Code. It also removes the City and State fields from the tab stop order. |
| Addresses | TabCityState | Yes | This setting will leave the City and State fields (City and Province) in the tab stop order when the Zip Code Custom Setting is in place. |
For more information see Auto Populating City and State Fields.
To automatically populate the City and State field based on the ZIP Code entered see Auto Populating City and State Fields.
Security
The AR: Customer Master File screen has its own Security Group, AR Customers.
The following security features are available for this screen:
- Can Change Master Number
- Cannot Change eHub Contact Info — Prevents users from changing information in the eHub login, password, and role columns in the customer contacts grid.
- Cannot Change Payment Terms — Prevents users from changing the Terms tab on the General Tab of the Customer Master File.
- Cannot Change Sales Tax Type — Prevents users from changing the Sales Tax Type on the General Tab of the Customer Master File.
- Cannot Change Taxability — Prevents users from editing the Taxability check box on the Customer Master File.
-
This screen has the Read-Only Feature. For more information see Learning about Read-Only Security.
The AR: Customer Master File screen is part of the AR ALL Security Group and no features are selected by default.
The AR: Customer Master File screen is part of the SYS All Security Group and the Can Change Master Number feature is selected by default.
Tip: For more information see Security Groups Overview and Security Groups By Module.
Customer Master File
Key Functionality
Toolbar
Click the Advanced filter button to create or edit a filter for finding and/or sorting specific records. You can also select a Saved filter. Click the Apply Filter/Sort button to apply any filter or sort criteria you created. Click the Remove Filter/Sort button to remove a filter or sort, if one is currently applied. For more information see Advanced Filtering.
The Diary enables you to keep notes concerning issues or to track using Follow Up Dates. Record any interaction you want to remember—such as a phone conversation or a handwritten letter you mailed or received. For more information see Diaries.
Click the Diary button to access the AR Customer Diary screen.
Rollover button
You may use the Rollover button on the toolbar to create a new AR: Customer Master File record.
The following items do NOT get rolled over during this process: Customer Number, Default Job Numbers for Invoice Entry, and Contact Information.
For more information on Rollovers, see Rollover Functionality and Rolling Over a Customer Master File Record.
Lookup
The Customer Lookup field can be used with numbers or names, or both.
If you enter an Customer Number and the number matches an existing record the record is displayed.
If you enter a Description and the Description matches an existing record Description, a list displays. You can then select the record you want to use.
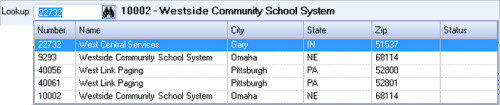
To search for a record in a list, select the Quick Lookup button ![]() .
.
To search for a record in a list with the focus set to the Number/ID field, press F4. To search for a record in a list, with the focus set to the Description/Name field, press F5.
Since you are on a master file screen, you can press the shortcut key ALT + L to place your cursor in the Lookup field.
For more information see Using Quick Lookups or Lookup Customers.
Last Cust # Entered
Displays the Customer Number of the last customer created. You cannot modify this information.
Hover over the Change Information icon to see User Added, Date Added, User Changed and Date Changed information. WinTeam records the logon name of the user entering or changing this record. The Date Added is the original date this record was entered into the system. The Date Changed is the date the record was last changed. Right-click on the Change Info icon to filter for records added or changed by a specific user or date.
When you hover over the User Changed or Date Changed filters, you can:
- Filter By Selection - Filters for all records that match your current records field value.
- Filter by Exclusion - Excludes from your filter all records that match your current records field value.
- Filter For - Filters based on the text/value you enter.
- Sort Ascending - If you already have a filter applied, the Sort Ascending command is available. Also used to include all records in the filter and sort in ascending order based on the current records field value.
- Sort Descending - If you already have a filter applied, the Sort Descending command is available. Also used to include all records in the filter and sort in descending order based on the current records field value.
General tab
Customer Number
Use the Customer Number field to enter a unique Customer Number to identify the customer record. The Customer cannot be longer than 8 characters.
Type the Customer Number in this field, or use the Lookup in the header to locate the Customer Number.
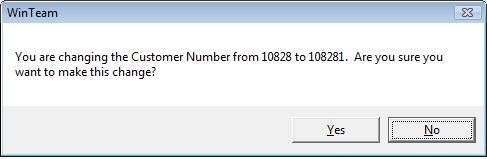
If you are on an existing record and you enter a Customer Number that does not match an existing record, you are prompted to confirm the Customer Number change. Normally, you would not change the Customer Number.
For more information, see Learning about Customer Numbers.
Active
Use the Active check box to activate or inactive the customer. The customer status is active if the check box is selected and inactive when the check box is cleared. For a new Customer Master File record, the system selects Active by default.
Note: If you attempt to use an inactive Customer, the system warns you. You may then proceed to use the inactive Customer at your discretion. In order to maintain referential integrity (historical information), Customer Master File records cannot be deleted from the system. Instead of being deleted, they are set to inactive.
Name
Use the Name field to enter the full name of the customer.
Address 1 and 2
Use the Address field to enter the billing and mailing address of the customer. You may use the second line to enter secondary address information such as a Post Office box, or a Suite number.
City
Use the City field to enter the city for the billing address of the customer.
To automatically populate the City and State field based on the ZIP Code entered see Auto Populating City and State Fields.
State
Use the State field to enter the two-digit abbreviation for the state or province for the customer’s mailing address. You can use the Zip Code Custom Setting to populate this field.
To automatically populate the City and State field based on the ZIP Code entered see Auto Populating City and State Fields.
Zip
Use the Zip field to enter the ZIP/postal code of the customer's address. After you type the first number, a dash (-) displays for the entry of the four-digit extension. If the first character you type is an alpha character, the system changes the format to a Postal Code for Canadian addresses.
To automatically populate the City and State field based on the ZIP Code entered see Auto Populating City and State Fields.
Click to link to Google Maps to quickly view maps and get directions. The link generates a map centered on the address you have entered in WinTeam. For more information see Using Google Mapping.
Primary Contact
If a Primary Contact has been designated in the Contacts tab, the Salutation, First Name, and Last Name display here in blue text.
You can double-click on the contact information to open the Contact record.
Phone
Use the Phone field to enter the phone number for the customer. You must enter the area code for all phone numbers including local phone numbers. After the first three numbers are entered, the system places parentheses around the area code, and then a dash (-) after the first three numbers.
Fax
Use the Fax field to enter the fax number for the customer. You must enter the area code must for all phone numbers including local phone numbers. After the first three numbers are entered, the system places parentheses around the area code, and then a dash (-) after the first three numbers.
Credit Score
Enter a Credit Score. This is intended to hold either a FRISK or DNB score.
Frisk ranges from 1 (worst) to 10 (best).
DNB ranges from 101 (worst) to 607 (best)
The Credit Score can be used as a filter in the Collections screen, the Collections Report, and the Invoice Aging Report.
For more information see Working with AR Collections.
Type
Use the Type field to group similar type customers for sorting and reports.
Type or select the Customer Type you want to use.
To add a new Type, double-click in the Type field, or type a new Customer Type and press Enter.
The Customer Types add/edit list displays.
The Customer Types add/edit list can also be accessed from the Prospect Master File.
For more information, see Learning about Customer Types.
Sales Rep
Use the Sales Representative field to assign a Sales Representative to a customer.
Type or select the Sales Representative you want to assign to this customer.
To add a new Sales Representative, double-click in the Sales Rep field, or type a new Sales Rep and press Enter. The Sales Rep add/edit list displays.
Collector
Select a default Collector to assign for the collection process for this Customer. The list includes only active WinTeam users. If an invoice or group of invoices for this Customer requires attention in collections, WinTeam will assign the designated default Collector for the collections processes.
The Collector can also be assigned or modified on the Invoice.
For more information see Working with AR Collections.
Parent Customer Number
Use the Parent Customer Number field to view or select a primary Customer related to this Customer, if applicable. The Parent Customer field establishes a relationship between the customers.
Most of the AR reports allow you to Group by Parent Customer. Related Customers can also be used to filter for outstanding invoices when creating payment records.
Type the Customer Number in this field, or use the Lookup to locate a Customer record.
Default Workflow Job
When a Job Number is entered into the Default Workflow Job field, the Workflow associated with that Job will become the default workflow for any of the customer’s jobs that do not have a specific Workflow assigned to them.
In eHub, when a user creates a Personnel Request and adds a new Job to the request, the new Job will follow the default workflow from the Job listed in the AR Customer Master File.
Note: If there is not a Default Workflow Job, a Personnel Request containing a new Job will fail.
For more information on adding new jobs, see Creating Personnel Requests in the eHub Helps.
Allow Multiple Jobs Per Personnel Request
This check box is used to indicate whether personnel requests in eHub can contain different jobs at once. The setting you make here is only for this customer. There is also an Allow Multiple Jobs Per Personnel Request check box on the AR Defaults window—you use that check box to set the default for all new customers you add. If the check box is selected in AR Defaults, it will automatically be selected for every customer you add and if it is cleared there, it will be cleared for every customer you add. You can override the default setting for a customer setting here in the Customer Master File.
Note: When this check box is selected, new jobs that do not currently exist in WinTeam can also be added to Personnel Requests in eHub. When it is cleared, only one job is allowed per personnel request and no new jobs can be added.
Notes
Use the Notes field to enter any notes about this customer's record. If you enter more than one line of information, the system automatically wraps the lines of information for you. To start a new line or paragraph, press Enter.
Invoice Information
Attention
Use the Attention field to enter the name of the person or department responsible for billing. This name prints on all invoices, statements and past due notices sent to this customer.
Note: You may change the "Attention" line during invoice entry.
Taxable
Use the Taxable check box to allow this Customer to be taxed.
This check box is selected by default.
If the Customer is tax exempt, clear the check box.
Clearing the Taxable check box then makes the Tax Exempt ID field a required field. Items will not be taxed on invoices for this Customer.
Tax Exempt ID
The Tax Exempt ID is unavailable unless the Taxable check box is cleared. Once the Taxable check box is cleared, the Tax Exempt ID field is a required field.
Use the Tax Exempt ID field to enter the tax exempt number issued by the taxing authority. This field is for informational purposes only. You may enter up to 25 characters.
Print Past Due Notices
Select the Print Past Due Notices check box to enable the system to print past due notices for this Customer.
If you clear the Print Past Due Notices check box, you cannot print Past Due Notices for this Customer.
Note: The system uses the Past Due Days value from the Invoice Terms add/edit list to determine who to print Past Due Notices to. For a new Customer Master File record, the system selects the Print Past Due Notices check box by default.
Print Statements
Select the Print Statements check box to enable the system to print Statements for this Customer. If you clear the Statements check box, you cannot print Statements for this Customer.
Show 'For Approval Only'
Select the Show 'For Approval Only' check box to print 'For Approval Only DO NOT PAY' on each invoice processed for this Customer. The Invoice Entry screen will default to the setting you have selected here. This check box is not selected by default.
Credit Limit
Select the Credit Limit field to enter the credit limit for this Customer. This is the highest account balance this Customer may reach at any given time. If a Customer exceeds this amount, a status message displays on the Customer Details screen in green text that states "Credit Limit Exceeded".
Note: If the Customer does not have a credit limit, leave the Credit Limit $0.00. This will allow unlimited credit to this Customer.
Delivery Option
Select the Delivery Option to indicate how invoices should be delivered to the Customer.
If the Print and/or E-mail option is selected, when an invoice is created, the invoice will print, and if there are Contacts set up and marked as 'Send E-mail', they will be e-mailed as well.
If the E-mail Only option is selected, when an invoice is created, the invoice must be sent by pdf as an attachment or sent with a link to the file in eHub. The Invoice Status will be Send Invoice.
If the Do Not Send option is selected, when an invoice is created, it is not printed, nor sent (by pdf or link). However; the invoice is still processed (ready for updating to the GL and posting it to the Customer's account) and the Invoice Status remains Do Not Send. Select this option only if a hard copy invoice is not needed.
The Invoice Status can be changed when an invoice is created to "Send Invoice" if needed. If you change the status to "Send Invoice", the system will then require that the invoice be processed before it is posted to the General Ledger.
For a new Customer Master File record, the system selects the Print and/or E-mail check box by default. If the Customer Master File has Do Not Send selected and uses the import invoices feature, the invoices that are imported for that Customer will marked as "Do Not Send".
To print a list of Customers including the selected Delivery Option and Delivery Method, run the Customer Master File Report using the Detail Report Format with the Include Contacts check box selected.
To print a list of Customers including the Delivery Method only, run the Customer Master Report using the Summary Report Format with the Include Contacts check box selected.
Note: If this Custom Setting is in place, the Delivery Option is disabled. All Invoice Distributions must be assigned at the Job Level. See Job Master File (Accounting Info tab). For more information see Invoice Distribution Types.
Terms
The Terms field displays if the Print Invoices check box is selected.
Type or select the Invoice Terms to include on the invoice.
To add a new Term, double-click in the Terms field, or type a new Term and press Enter.
The Invoice Terms add/edit list displays.
Entity Use Code
This field displays if you are licensed to use Avalara and is used for taxation purposes. Contact your Avalara representative to understand how to properly setup data using this field.
Sales Tax Options
By Invoice Detail Line Items–Taxes are calculated on each line item and then the line is added to the subtotal. This is the default option.
Important: If you manually edit a line item, it will no longer be considered as part of the maximum tax calculation. Taxes will be distributed to the other line items to equal the total maximum tax.
By Tax Jurisdiction Subtotal–All of the line items (by tax jurisdiction) are added and then taxes are calculated on the subtotal.
Important: When you switch a customer to By Tax Jurisdiction Subtotal, you must reset all of the taxes in every existing invoice that you want switched from line by line to by tax jurisdiction subtotal.
PS Invoice Options
Group Jobs on PS Inv
Select to group invoices by Jobs on the invoices.
Rates
Select to hide and show pay rates and markups on Personnel Scheduling Invoices. The options are:
- Hide Pay Rate and Markup
- Show Pay Rate (default selection for new records)
- Show Pay Rate and Markup
The selection made here displays on the Customer Master File Report when using the Details Report Format.
Import button
Click Import to import Customer Master File information from the Job Master File record or import Customer Master File information from the Prospect record from TeamBid (provided you are licensed for TeamBid).

Recurring Invoices button
Click the Recurring Invoices button to open the Recurring Invoices screen.
If you are on an existing Customer Master File record when you click the Recurring Invoices button, you will see this message:

If you click Yes, a new Recurring Invoice screen displays for entry.
If you click No, the system automatically opens the Lookup Recurring Invoices screen for the customer record. This makes it easy to select the record you want to edit or view.
If you are NOT on an existing Customer Master File record when you click the Recurring Invoices button, the system displays a blank Recurring Invoice screen for you to create.
Sub Customers
This is button is enabled if this is a Parent Customer.
Parent Customers can have sub customers.
Sub Customers can be assigned to a Parent Customer by entering a Parent Customer Number. The Parent Customer field establishes a relationship between the customers.
Aging Report
Click the Aging Report button to display the Invoice Aging Report options. When accessing the report from the Customer Master File, the report is filtered for the selected Customer and the Include Collections Invoices check box is selected by default.
Customer Details button
Click the Customer Details button(or press ALT + D) to display the AR: Customer Details screen.
Invoice Details button
Click the Invoice Review button (or press ALT + I) to display the AR: Invoice Review screen.
If you are on an existing record, it will default the current Customer Number in the filter.
Sales Details button
Click the Sales Details button (or press ALT + S) to display the AR: Sales Details screen.
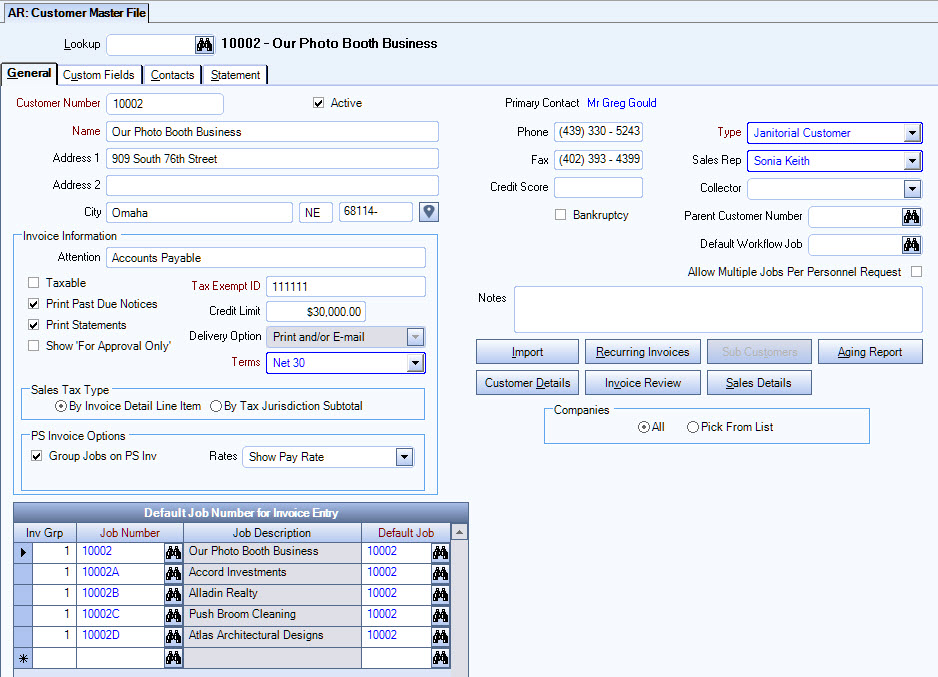
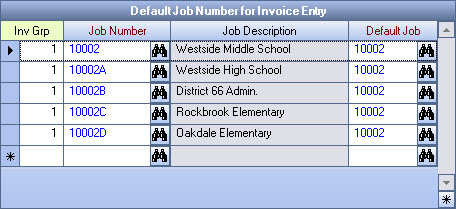
Default Job Numbers for Invoice Entry
This section allows for the entry of Job Numbers to default during Invoice Entry. Adding Job Numbers ties those Job Numbers to this Customer Number. These Job Numbers become available from the Quick Lookup feature under Service Location on the AR: Invoices screen.
Type the Job Number in this field, or use the Quick Lookup feature to locate the Job Number.
After selecting a Job Number, the Description of the Job and the Invoice Group displays. The Invoice Group is used when updating PS Schedules to AR Invoices. This allows you to filter invoices using this Invoice Group number when selecting Jobs Grouped on Invoices on the Update Scheduling to AR Invoices screen. However, if the Always Separate by Job check box is selected in the Post Invoice Groups screen, the Customer Master File settings for the invoice groups in the Default Job Number for Invoice Entry grid will be overwritten.
If invoices are being created for Customers with Jobs Grouped on Invoices, WinTeam will validate during the Update Scheduling to AR Invoice process that the Customer has a Default Job Number set up.
When running the Invoice Aging Report, and if there are no open invoices for a Customer, WinTeam determines one to be printed by following these rules. (Note that this will happen when printing the report for Unapplied Cash Only and could also happen when a Customer does not have open invoices.)
- WinTeam will use the lowest Job from the Default Job Numbers for Invoice Entry.
- If there are no Default Job Numbers for Invoice Entry stored with the Customer Master File, then the Payment Company's Balance Sheet Job Number will be used.
Custom Fields Tab
Custom Fields allow you to set up fields for your own use. You may choose to use any or all. Each field may be customized to feature a drop-down list, text, numeric or date. You can define up to 26 Custom Fields. For more information, see Using Custom Fields.
Custom Fields can be included on the Customer Master File Report by selecting the Include Custom Fields check box.
Contacts Tab
Contact Setup
Click the Contact Setup button to open the Contacts screen.
Active Only
The Active Only check box filters the Contact grid for Active Contacts only. This check box is selected by default when creating a new Customer.
Contact grid
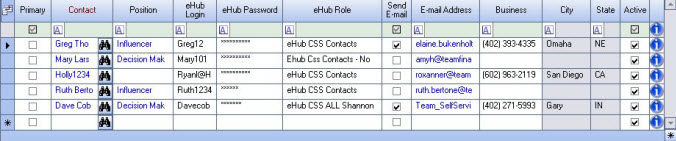
Primary
Select the Primary check box to mark the selected Contact as the Primary Contact for this Customer.
Once you select a Primary Contact, that Contact displays on the Customer Master File (General tab).
Contact
Enter a Contact Name, or use the Lookup to locate a Contact.
Role
Select a Role for the Contact. The Role can change based on where it is used. A Role should not be confused with the Title of a Contact, but rather it is more the “purpose” of a contact.
Double-click in the Position field to open the Contact Roles add/edit list.
Example: For our Customer Master File Contacts, the Primary Contact that you have identified is more than likely going to be the one that you would contact for billing and accounts receivable type questions. In that sense, you may want to just set up a Role called “Billing Contact” or “Collections”. As the Contacts area evolves in WinTeam, the Contact Role will be used in differing areas to identify the Roles of the contact record you want included on a particular report, for instance.
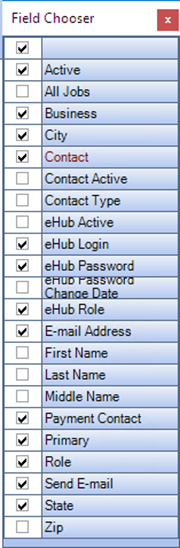
Payment Contact
The Payment Contact column is available in the Field Chooser for customers licensed for Online Payments. This column contains a check box used to indicate the contact can make payments in the Online Payment Portal on invoices for the customer.
eHub fields
The eHub Login, eHub Password, and eHub Role columns display if you are licensed for eHub. When there is data in these columns, the eHub Customers/Jobs for Contact grid displays.
Note: You can restrict users’ ability to edit information in the eHub login, password, and role columns using the Cannot Change eHub Contact Info feature under the AR Customer Master File screen in SYS: Security Groups.
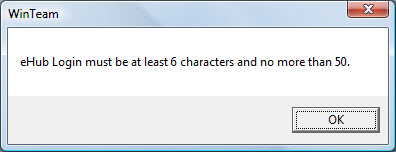
eHub Login
If you enter information in the eHub Login field, you are required to enter information in the eHub Password field.
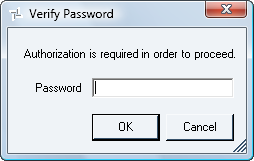
The eHub Login must be at least 6 and no more than 50 characters and must be alpha or alpha-numeric. Numeric-only logins are not acceptable. WinTeam will validate this information and if the eHub Login does not meet the character requirements you will receive this message:
eHub Password
The Password field is used to store the Customer's (and Customer's Clients) Web portal password. Passwords are case sensitive.
Passwords must:
- Contain a minimum of six characters and a maximum of 20 characters
- Contain at least one uppercase letter
- Contain at least one lowercase letter
- Contain at least one number
- Contain at least one special character, such as a symbol
If password requirements are not met, this message displays:

If you enter information in the eHub Password field, you are required to enter information in the eHub Login field.
After you enter in the eHub password, a validation box displays where you are required to reenter the password.
The first time a Customer's Client logs in to eHub, they are required to change their password.
If an eHub user attempts to log in and incorrectly types their password (or username) , they have 5 times to enter it correctly. After 5 tries, they are locked out.
If an incorrect password (or username) is entered this message displays:

For CSS users, after 3 minutes, they will no longer be locked out and can try again (please don't relay this to Customer Clients).
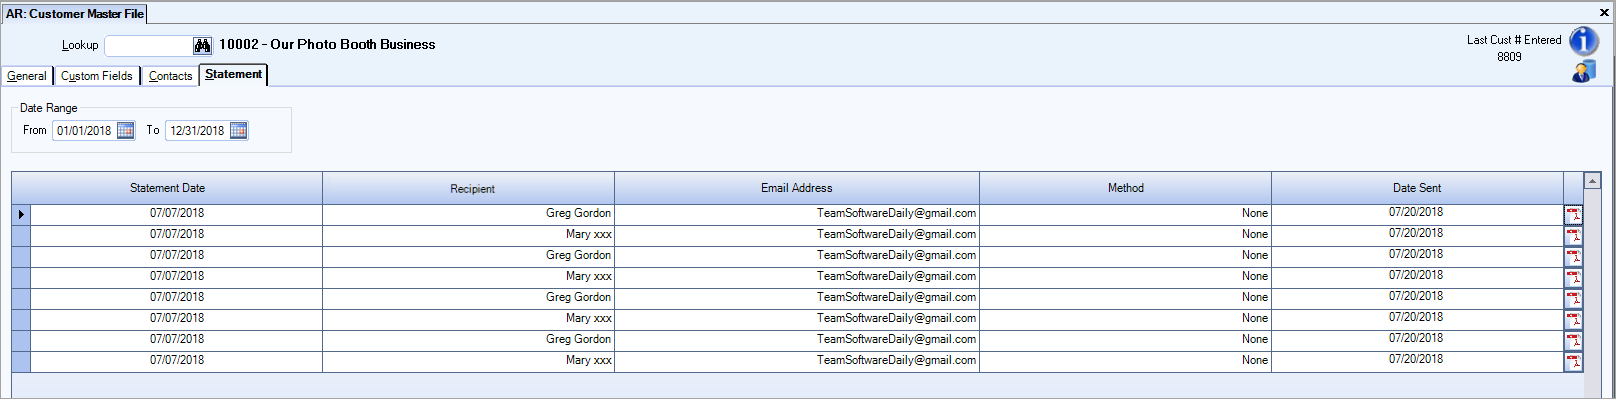
Statement Tab
The Statement tab contains information about the statements that have been sent to the customer. Click the PDF icon at the end of the grid row to view the PDF of the statement that was emailed. See AR: Emailing Statements for information about emailing accounts receivable statements to customers.
WinTeam eHub Administrator
If you receive a call related to an eHub user being locked out, do one of the following:
- Tell the user to try again in 3 minutes
- Or reset the password to a new password.
eHub Role
Users can set up their own Roles for eHub via Security – Group Setup screen.
eHub Roles identify features your Customers have access to on his or her Web portal.
In the Roles list, click the Role of your choice.
An eHub Role can be assigned without designating an eHub Login or eHub Password.
Roles can be setup for eHub through the Security Group screen.
For more information see Creating eHub Roles and eHub Security.
eHub Contacts are unable to log on to eHub if the eHub Role is not assigned to the eHub Contact.
Double-click in eHub Role cell to open the Security Groups screen.
A Customer Contact with an eHub Role assigned (AND is Active), is considered an eHub CSS User in the License Counts.
WinTeam will use all active Customer records with a Role assigned as a count in the license setup.
For more information see SYS: License Management.
When you are getting close to the Customer License Count limit, a message displays informing you that are using ‘X’ of ‘Y’ licenses. You can proceed by pressing the OK button.
When you exceed your Customer License Count, a message displays letting you know that you have exceeded your License Count and to contact your System Administrator. You can proceed even if you have exceeded License Counts.
When you exceed the Customer License Count, a message displays saying you have exceeded your Customer License Count and to contact your system administrator. Changes cannot be saved.
These warnings allow you time to “clean up” their licensing issues and reexamine roles.
When making a Contact inactive (AR: Customer Master File (Contacts tab)), a message displays prompting for confirmation to inactivate the record. If you proceed, the contact no longer displays on the Contacts tab, unless the Active check box is cleared. The Contact can still exist in the grid, but the contact will not have an eHub Role, which disables the user to log into eHub.
Send E-mail
Select the Send E-mail check box to deliver invoices via e-mail.
When this check box is selected, the Communications grid for the selected Contact displays.
E-mail Address
Enter an e-mail address for the Contact. If you have entered an e-mail address in the Contact Setup screen it will populate here.
If an eHub Role is selected, an e-mail address is required to be used with eHub. eHub will launch your e-mail system, initiate a new blank e-mail message, and automatically complete the “To” line for the selected contact.
Business
Enter a Business phone number for the Contact.
If the Contact record has a Business phone number, it will populate here. However, you can overwrite it in the Customer Master File record. Modifying or deleting the phone number from the Customer Master File has no bearing on the Contact record.
Active
Select the check box to make the Contact active. Clear the check box to make the Contact inactive.
Payment Contact
The Payment Contact column contains a check box used to indicate the contact can make customer invoice payments in the Online Payments Portal.
Communications for Customer Contact grid
The Communications grid displays when the Send E-mail check box is selected for a Contact.
The Type field automatically populates with 'Invoices'.
Type
Currently, the only selection here is Invoices.
It will have further functionality in a future release.
Delivery Method
Select the Delivery Method to use when sending for the specified Type.
- If eHub is not being used, only E-mail PDF is available for selection.
- If eHub is being used, only E-mail PDF is available for selection.
- If eHub is being used, select from E-mail PDF or E-mail eHub Link.
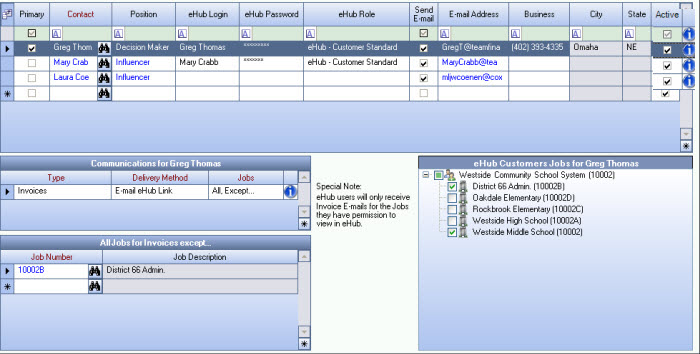
Jobs
eHub Customers/Jobs for Contact grid
This grid displays only if there is data in the eHub fields: eHub Login, eHub Password, and eHub Role.
If the Contact does not have values in the eHub fields, then the tree does not display.
If the Customer Master File Contact has an eHub Role for CSS and the Contact has an Invoice Delivery Method of 'E-mail PDF', invoices can be filtered from the eHub Customer/Job tree when E-mailing PDF copies of AR Invoices. Jobs set up within the eHub Customer/Jobs tree for the selected Contact will include invoices for those Jobs. However, additional Job restrictions or delivery methods can be set up for the Contact.
For details and examples see Understanding eHub Customer/Jobs for Contacts.
The E-mail PDF option displays only if 'Show In eHub CSS' is selected.
When an invoice status is changed to Do Not Send, the Show in eHub CSS check box will automatically clear (no longer be selected). However, the option can still be selected.
Viewing in Invoices in eHub
The eHub tree lists Jobs that this Contact has permission to view in eHub. The Contact could have permissions to view invoices from Customers, Sub Customers, Jobs, and Sub Jobs. If the User does not have permission on the tree to view a Job (check box not selected) then the invoice is not on the invoice list in eHub.
Receiving E-mail eHub link
eHub Users will only receive Invoice E-mail for the Jobs they have permission to view in eHub. If the Job is not included in the Communications grid (Delivery Method of E-mail eHub Link) AND selected in the eHub Customers Jobs for Contact XXX grid, then the invoice will not be delivered via an E-mail eHub Link.
Example: The selected Contact, Greg Thomas, can receive Invoices via an E-mail eHub Link for all Jobs, except Job # 10002B.
Even though Greg has permission to view the invoice in eHub, he cannot be not sent the e-mail, since the Job is excluded from the Communications grid. REMEMBER The Job must be included in the Communications grid AND selected in the eHub Customers Jobs tree in order for the invoice to be delivered via an E-mal eHub Link.
Example:
Related Information
Adding a Contact to a Customer