
Overview
The Invoice Review screen can be accessed from the:
- Customer Master File by clicking the Invoice Review button
- AR Menu by selecting Invoice Review
The Invoice Review screen can be used to view any information regarding Invoices, Invoice Details, Invoice Tax Information, and Collection Information. It is also used to send past due invoices to Collections and to create a PDF batch of invoices.
By using the options in the Show in Grid area, you can include different columns in the grid.
Grid functionality applies to this window. In addition to the standard grid features, this report automatically saves the grid layout when you close the window. The current displayed column headings (from field chooser edits), sort order, and grouping automatically save when you close the window. The saved setting are viewed only by the logged in user. Since there are multiple grids that can display in this window based on the settings in the Show in Grid section, the layouts for each grid are saved separately. You can return to the default layout by selecting Reset Grid Preferences in the right-click menu on each grid.
When a change is made to the filter criteria or Show in Grid options, click Requery to refresh the results in the grid.
When the Invoice Review screen is accessed from an existing Customer Master File record, the Customer Number is automatically applied as a filter.
The Invoice Number and Invoice Date will always display in the grid, regardless of what options you have selected under Show in Grid.
Invoices display in the grid in descending Invoice Number order.
- Press ALT + F to open the File menu
- Press ALT + W to open the Window menu
- Press ALT + H to open Help
- Press ALT + R to Refresh based on filters and Show in Grid
-
Press ALT + S to Select All records in the grid
-
Press ALT + C to Send selected invoices to Collections
-
Press ALT + P to Create a Consolidated PDF of selected invoices
The AR: Invoice Review screen has its own Security Group, AR Invoice Review.
The AR: Invoice Review screen is part of the AR ALL Security Group.
Tip: For more information see Security Groups Overview and Security Groups By Module.
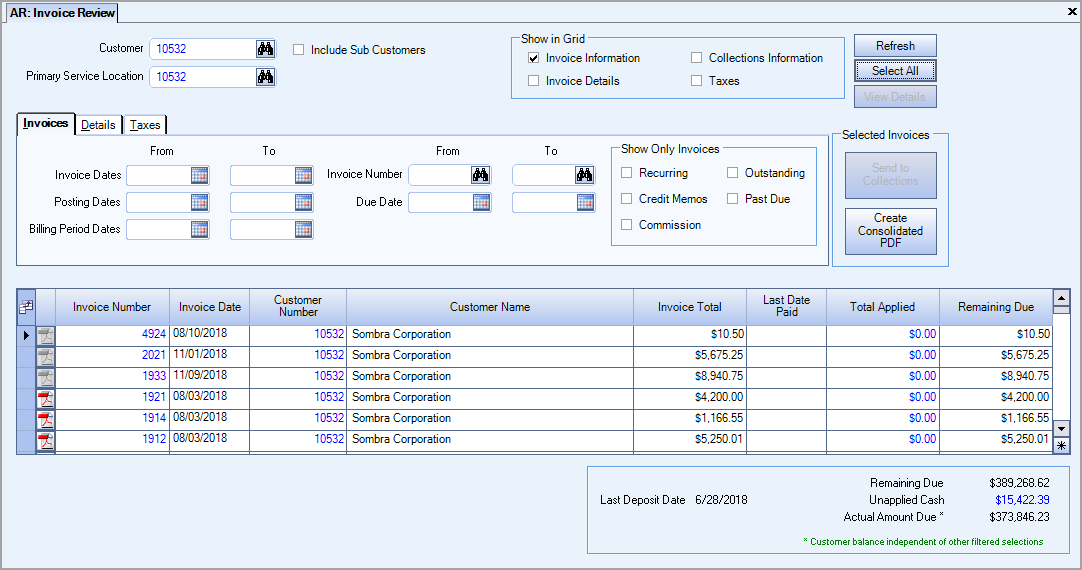
Invoice Review screen
Related Information
- See examples of using the Invoice Review screen
- Work with Collections
- See Accounts Receivable topics
- Go to Accounts Receivable Main Menu
Key Functionality
Customer
Use the Customer field to filter invoices by Customer. If you enter a Customer Number and the number matches an existing record the record displays.
If you type an "i", followed by an invoice number, the system will drop down the Customer Number related to the invoice.
For more information see Using Quick Lookups or Lookup Customers.
Primary Service Location
Use the Primary Service Location field to filter invoices by the Jobs' Primary Service Location.
For more information see Using Quick Lookups or Lookup Jobs.
Show in Grid
Select the Show in Grid options to identify the columns to display in the grid.
The Invoice Number and Invoice Date columns are locked columns. They will always display.
Invoice Information
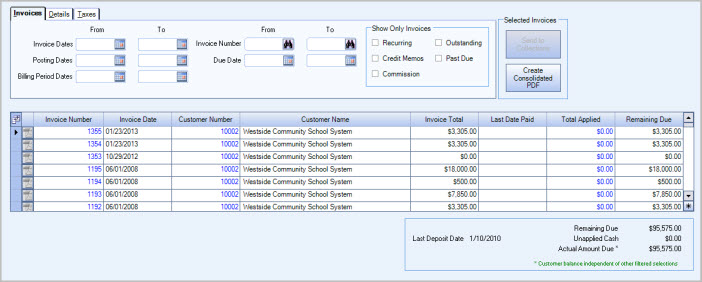
When the Invoice Information check box is selected, WinTeam displays the following columns in the grid: PDF icon, Invoice Number, Invoice Date, Customer Number, Customer Name, Invoice Total, Last Date Paid, Total Applied, and Remaining Due. The Field Chooser can be used to select additional columns.
Use the Invoice filters to narrow the results.
Invoice Details
When the Invoice Details check box is selected, WinTeam displays the following columns in the grid:
Invoice Number, Invoice Date, Job Number, Job Description, Item Number, and Item Description.
Use the Invoice Details filters to narrow your results using detailed invoice information.
Collections Information
The Invoice Information check box must be selected to enable the Collections Information check box.
When the Collections Information check box is selected, WinTeam displays the following columns in the grid: PDF icon, Invoice Number, Invoice Date, Customer Number, Customer Name, Invoice Total, Last Date Paid, Total Applied, Remaining Due, Collection Status, Last Action, and Days Pasts Due.
The Field Chooser in the grid can be used to select additional columns.
Initiated
Flagged for Collections
No Collector Assigned
Dispute Status = blank or Resolved
Remaining Due > 0
Outsourced to = blank
Assigned
Flagged for Collections
Collector is assigned
No CMF Diary entries exist for the invoice
Dispute Status = blank or resolved
Remaining Due > 0
Outsourced to = blank
In Dispute
Flagged for Collections
Collector Assigned
Dispute status = 'In Dispute'
Remaining Due > 0
Outsourced to = blank
Promised
Flagged for Collections
Collector Assigned
CMF Diary Entry exists for the invoice
Type of Collections
Max follow up date is today or in the future
Remaining Due > 0
Dispute Status = blank or resolved
Outsourced to = blank
Lapsed
Flagged for Collections
Collector Assigned
CMF Diary Entry exists for the invoice
Type of Collections
Max follow up date is before today
Note: When a collections diary entry has been made, but no follow up date has been set, the invoice is still considered Lapsed, rather than assigned, since it still meets the spirit of the Lapsed status - some action has been taken, but no 'promised/follow-up date' is present.
Remaining Due > 0
Dispute Status = blank or resolved
Outsourced to = blank
Outsourced
Flagged for Collections
'Outsourced To' is populated
Remaining Due > 0
Note: Outsourced overrides an invoice in a dispute status.
Closed
Flagged for Collections
Remaining Due = 0
Closed date = last paid date
Last Action
Displays date of last communication (based on Customer Master File Diary entries)
Days Past due
Displays the number of days past the Invoice Date plus the number of Term Days) to determine if the invoice is past due.
Taxes
When the Taxes check box is selected, WinTeam displays the following columns in the grid: Invoice Number, Invoice Date, Tax Jurisdiction, and Tax.
The Field Chooser in the grid can be used to select additional columns.
Commissionable
Select Commissionable from the field chooser to display the Commissionable column in the grid. Use this column to quickly identify invoices that need to be included in the Revenue By Sales Rep report.
There is a setting in AR Defaults which allows you to set commissionable at either the invoice header level or the invoice detail level that works in conjunction with this column.
Invoice Details
If Invoice Details is selected in AR Defaults (in the Commissions Determined By section), then the following occurs in the Invoice Review grid:
| If the Invoice Details check box is selected (in the Show in Grid section) |
The Commissionable column can be selected from the field chooser Commissionable data comes from the Commissionable check box in the Invoice Details grid on the General tab of the Invoice Entry window |
| If the Invoice Details check box is not selected | The Commissionable column is not in the field chooser |
Invoice Header
If Invoice Header is selected in AR Defaults (in the Commissions Determined By section), then the following occurs in the Invoice Review grid:
| If the Invoice Details check box is selected (in the Show in Grid section) |
The Commissionable column is not in the field chooser |
| If the Invoice Details check box is not selected |
The Commissionable column can be selected from the field chooser Commissionable data comes from the Commissionable check box in header area of the General tab of the Invoice Entry window |
Refresh button
Whenever a change has been made to the filters or to the Show options, you must click the Refresh button to refresh the grid.
Select All button
Click Select All to select all rows in the grid.
View Details
The View Details button is disabled until you select an invoice in the grid. After you select an invoice, you can click the View Details button to open the Invoice Entry window automatically populated with the details of the selected invoice.
Send to Collections button
The Send to Collections button is enabled when the Collections check box is selected in the header.
Select the invoices that need assigned to the Collections process.
Create Consolidated PDF button
Use the Create Consolidated PDF button to generate a single PDF document that contains multiple invoices. In the grid, select the invoices that you want to include and then click this button. You select an invoice by clicking in the blue area to the far left of the row. In the consolidated PDF, the invoices are in the same order as they displayed in the grid.
Due Date
The Due Date filter looks at the Invoice Date plus the number of Term Days to determine if the invoice is past due.
Show Only Invoices
Recurring Invoices Only
Select the Recurring Invoices Only check box to filter for Recurring Invoices Only.
Credit Memos Only
Select the Credit Memos Only check box to filter for Credit Memos Only.
Commission
The Commission check box displays in the Invoices section if you have Commissions Determined By Invoice Header selected in AR: Defaults.
Select the Commission check box to filter for invoices that are marked (in the Header) as Commissionable.
Outstanding Invoices
Select the Outstanding check box to filter for invoices with a remaining amount not equal to $0.00.
Past Due
Select the Past Due check box to filter for invoices with that have a past due amount.
The Past Due filter looks at the Invoice Date plus the number of Term Days to determine if the invoice is past due.
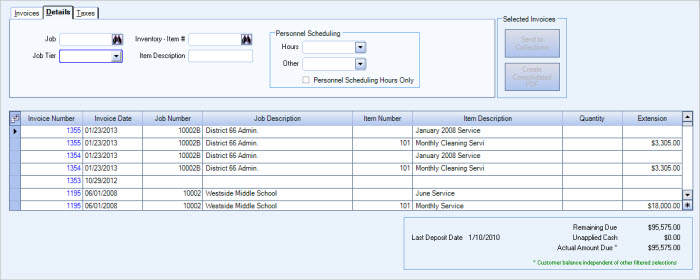
Invoice Details tab
Use the Invoice Details filters to narrow your results.
When the Invoice Details check box is selected, WinTeam displays the following columns in the grid:
Invoice Number, Invoice Date, Job Number, Job Description, Item Number, and Item Description, Quantity, and Extension.
Use the Invoice Details filters to narrow your results using detailed invoice information.
Job Tier
The tier template does NOT look at dated tiers.
Personnel Scheduling
Hours
Use the Hours filter to filter Personnel Scheduling Invoices by Hours.
Other
Use the Hours filter to filter Personnel Scheduling Invoices by Other Billing items.
Personnel Scheduling Hours Only
Select the Personnel Scheduling Hours Only check box to filter results for PS Hours only.
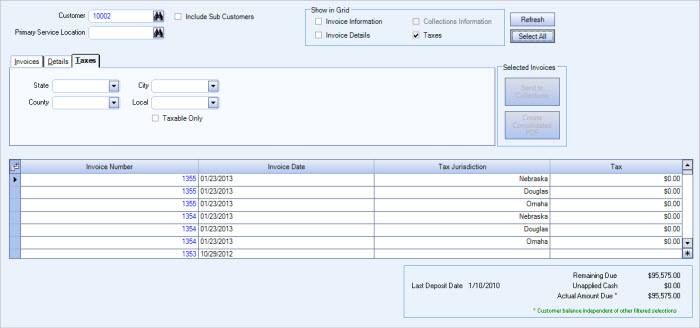
Taxes tab
Use the Tax filters to narrow your results.
When the Taxes check box is selected, WinTeam displays the following columns in the grid:
Invoice Number, Invoice Date, Job Number, Job Description, Item Number, and Item Description.
Use the Tax filters to narrow your results using tax related information.
Grid
Invoice Number
Displays the invoice number.
You can double-click to open the original AR: Invoice.
Invoice Date
Displays the date the invoice was generated.
Customer Number
Displays the Customer Number of the Invoice.
You can double-click to open the Customer Master File record.
Customer Name
Displays the Customer Name.
Invoice Total
Displays total invoice amounts for this customer.
Last Date Paid
Displays the date of the customer's last payment on the invoice.
Total Applied
Displays payments applied to this invoice.
You can double-click on the amount to open the Payment Details screen.
Remaining Due
Displays remaining amount due for the invoice.
Job Number
Displays the Job Number.
Job Name
Displays the Job Name.
Item Number
Displays the Item Number of the invoice line item.
Item Description
Displays the Description of the Item.
Quantity
Displays the Quantity for the invoice line item.
Extension
Displays the total value for the line item.
Tax Jurisdiction
Displays the Tax Jurisdiction.
Taxable
Displays the amount taxed to the line item.
Customer Balance Information

This information displays if there is a Customer Number in the Invoices section.
This section gives you a give overview of the Customers account.
If the Payment Type is EFT, the Last Deposit Date displays the payment date from the details records, not the Header record.
Double-click the Unapplied Cash amount to open the Lookup AR Payments screen.
The totals in this section are independent of the filter criteria.
If Sub Customer is selected
- Unapplied Cash is the total for the Customer and the Sub Customers
- Last Deposit Date is the last deposit date from the Customer or Sub Customers.