
Overview
You may access the Recurring Invoices screen from:
- Accounts Receivable Menu
- the Recurring Invoices button on the Customer Master File
- the Lookup field on AR: Recurring Invoices
Use the Recurring Invoices screen to bill items that have a fixed billing rate (i.e. monthly cleaning service, monthly guard service, monthly carpet service, etc.).
The Rollover button in the toolbar is functional.
The AR: Recurring Invoices screen contains 2 tabs: General and GL Distribution. You can access each of these tabs using keyboard shortcuts.
Recurring Invoices screen

Key Functionality
Toolbar
Rollover
You may rollover an existing Invoice by using the Rollover button from the toolbar.
This allows you to easily create an invoice that is very similar to an existing invoice. It also allows you to replace an existing Invoice with a new Invoice (in this case, you should make sure that a credit was already issued).
You can rollover (copy) one Invoice to a new Invoice, with the exception of Balance Posting Invoices (those invoices entered through the Customer Balances screen).
When invoices are created through the Rollover when the posting date of invoice is in a closed period, special rules are used.
If the Posting Date on the original invoice is not in the valid data entry range then we compare the last valid date for data entry to current date. If the last valid date for data entry is less than current date then we default the last valid date to Posting date, otherwise we default current date to Posting date.
Valid dates for data entry can be found in the SYS: Fiscal Year Setup screen.
For more information, see Rolling Over AR Invoices.
Lookup
The Lookup Recurring Invoices screen enables you to filter for specific AR Recurring Invoice records.
If you are wanting to load multiple records for review, you should use the Lookup screen by selecting the Quick Lookup button.
To set the focus on the Lookup screen to the Customer Number field, press F4.
To set the focus on the Lookup screen to the Customer Description field, press F5.
Since you are on a master file screen, you can press the shortcut key ALT + L to place your cursor in the Lookup field.
Another alternative to using the Lookup screen to find existing records is that you can enter the Customer number or Customer Name in the Lookup field itself and a drop down list will be displayed with all of the records that match that particular number or name.
If you enter a Customer Number in this field, a list of those recurring invoices that are currently set up will drop down for you. Use your arrow keys to select the record you want to load, and then press Tab to display the record.
You can also look up by name. Enter all or a part of the Name of the Customer and tab. The recurring records that are found for customers with a name that begin with the characters you entered will be displayed to you in a drop down list. Use your up and down arrow keys to select the record you want to look at.
For more information see Using Quick Lookups or Lookup AR Recurring Invoices.
ID
Displays the ID for the selected Recurring Invoice.
Hover over the Change Information icon to see User Added, Date Added, User Changed and Date Changed information. WinTeam records the logon name of the user entering or changing this record. The Date Added is the original date this record was entered into the system. The Date Changed is the date the record was last changed. Right-click on the Change Info icon to filter for records added or changed by a specific user or date.
When you hover over the User Changed or Date Changed filters, you can:
- Filter By Selection - Filters for all records that match your current records field value.
- Filter by Exclusion - Excludes from your filter all records that match your current records field value.
- Filter For - Filters based on the text/value you enter.
- Sort Ascending - If you already have a filter applied, the Sort Ascending command is available. Also used to include all records in the filter and sort in ascending order based on the current records field value.
- Sort Descending - If you already have a filter applied, the Sort Descending command is available. Also used to include all records in the filter and sort in descending order based on the current records field value.
General tab
Bill To Information
The details under Bill To Information come from the Customer Master File. You can change any of the fields for the current invoice, but to make a permanent change, use the Customer Master File.
Customer
Use the Customer Number field to enter the customer's number.
Type the Customer Number in this field, or use the Quick Lookup to locate the customer's record.You can double-click on the Customer Number to open the Customer Master File record.
For more information see Using Quick Lookups or Lookup Customers.
Attention
The Attention field contains the text entered in the Attention field on the Customer Master File describing who should receive the invoice. You can change this information for an invoice; however, modifications to this field apply only to this record and do not affect the Customer Master File.
Name
The Name field contains the text entered in the Name field from the Customer Master File. You can change this information for an invoice; however, modifications to this field will this particular invoice only.
Address 1 and Address 2
The Address 1 field contains the text entered in the Address field from the Customer Master File. The Address 2 field contains any additional address information entered in the second part of the Address field from the Customer Master File.You can change this information for an invoice; however, modifications to this field affect this particular invoice only.
City, State, and Zip
The City, State, and Zip field contains the text from the Customer Master File. You can change this information for an invoice; however, modifications to this field affect this particular invoice only.
You can use the Zip Code Custom Setting to populate City and State fields. For more information see Auto Populating City and State Fields.
Google Map button
Click to link to Google Maps to quickly view maps and get directions. The link generates a map centered on the address you have entered in WinTeam. For more information see Using Google Mapping.
Primary Service Location
Job Number
The Job Number field contains the default Job Number defined under Default Job Numbers for Invoice Entry from the Customer Master File. If you want to change the Job Number, type the Customer Number in this field, field, or use the Lookup to locate the Job Number.
You can double-click on the Job Number to open the Job Master File record.
If you change the Primary Service Location Job Number on an existing invoice, you will receive a message similar to this:

If you click Yes, the system will recalculate the taxes.
Same button
Click the Same button to copy the name and address from Bill To Information to the Service Location. This affects the active invoice only and will not change information in the Customer Master File.
Print Primary Location on Invoice
This option is selected by default.
Select the Print Primary Location on Invoice check box to print the Job's Primary Location on the Invoice.
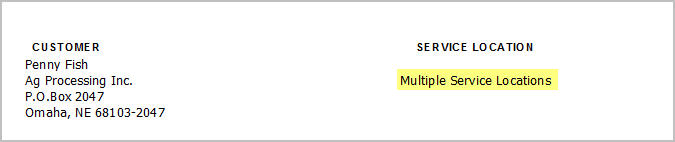
If there are multiple Jobs and this check box is NOT selected, "Multiple Service Locations" will print on the invoice in place of the service location information.
Name
The Name field contains the text entered in the Name field from the Job Master File, unless you have clicked the Same button, which populates the name and address information from the Bill To Information. This affects the active invoice only and will not change information in the Customer Master File or the Job Master File.
You can change this information for an invoice; however, modifications to this field will this particular invoice only.
Address 1 and Address 2
The Address 1 field contains the text entered in the Address field from the Job Master File, unless you have clicked the Same button, which populates the name and address information from the Bill To Information. The Address 2 field contains any additional address information entered in the second part of the Address field from the Job Master File, unless you have clicked the Same button, which populates the name and address information from the Bill To Information. This affects the active invoice only and will not change information in the Customer Master File or the Job Master File.
You can change this information for an invoice; however, modifications to this field affect this particular invoice only.
City, State, and Zip
The City, State, and Zip field contains the text from the Job Master File, unless you have clicked the Same button, which populates the name and address information from the Bill To Information. This affects the active invoice only and will not change information in the Customer Master File or the Job Master File.
You can change this information for an invoice; however, modifications to this field affect this particular invoice only.
You can use the Zip Code Custom Setting to populate City and State fields.
Click to link to Google Maps to quickly view maps and get directions. The link generates a map centered on the address you have entered in WinTeam. For more information see Using Google Mapping.
Validate Address
The Validate Address button will only display if you are licensed to use the Avalara External Sales Tax Interface and have the Enable Address Validation check box selected in System Defaults.
Clicking the Validate Address button will check the entered address format against the required format for Avalara to ensure that the proper tax jurisdictions can be applied.
Notes
Use the Notes field to enter any notes pertaining to this Customer.
To open the field in Zoom mode you can
- Double-click in the field OR
- Press Shift + F2 OR
- Right-click, then select Zoom (only for multi-line text boxes, not in a grid)
From the Zoom screen you can view or edit the entire Notes area. For more information see Using the Zoom Feature.
Start Date/End Date
You can enter a start date for a recurring invoice which allows you to future-date the recurring invoice to begin being updated at a later time. The end date field is only available if a start date has been entered. Invoices are only updated from this recurring invoice if the invoice date is on or after the start date and on or before the end date. If you enter a start date but leave the end date blank, the recurring invoice is active indefinitely. Temporary and permanent holds still apply, invoices on hold are not updated, even if the invoice date meets the specified start and end date criteria. Since these are optional fields, if you leave them blank the recurring invoice will be active for all invoicing dates. This functionality makes it possible to build future billing rate changes into your recurring accounts receivable invoices.
Type
Use the Type box to select the day of the month you will bill this recurring invoice.
If you previously set up a default Type, it will display here.
Type or select the Recurring Invoice Type.
To add a new Recurring Invoice Type, double-click in the Type field, or type a new Recurring Invoice Type and press Enter.
The Recurring Invoice Types >add/edit list displays.
Terms
Use the Terms field to define the billing terms for a customer.
If you previously set up a default Term, it will display here.
Type or select the Invoice Terms you want to use.
To add a new Term, double-click in the Term field, or type a new Term Type and press Enter.
The Invoice Terms screen add/edit list displays.
PO Number
Use the PO Number field to enter an invoice's corresponding purchase order number.
Sales Rep
Use the Sales Rep field to assign a Sales Representative to a customer.
Type or select the Sales Representative you want to assign to this customer.
To add a new Sales Representative, double-click in the Sales Rep field, or type a new Sales Rep name and press Enter.
The Sales Representatives add/edit list displays.
Permanent Hold
The Permanent Hold check box defaults as cleared during initial entry. You may select this option to place a recurring invoice on permanent hold. While an invoice is on permanent hold, no invoice will be generated during the Update Recurring to File process. When you want to begin billing again you must clear this check box.
Temporary Hold
You may select this option to place a recurring invoice on temporary hold. If selected, a recurring invoice will not update to the AR: Invoices screen the next time Update Recurring to File is run.
After the next Update to Recurring File is completed, the Temporary Hold status will be removed from the record and the recurring invoice will update to AR: Invoices during the next update.
Show 'Do Not Pay'
Select the Show 'Do Not Pay' check box to print 'For Approval Only DO NOT PAY' on each invoice processed for this Customer.
This setting defaults to the setting you have made in the Customer Master File.
Show in eHub CSS
This check box displays if you are licensed for eHub.
The Show in eHub CSS check box is selected by default.
This option allows the invoice to be shown to Customers in eHub using CSS. You can clear this check box any time, even after a record is Posted /Printed.
Go To tab
You can use the shortcut key, ALT + T, to open the Go To menu.
Billable Work Orders
Click Billable Work Orders to display the Unbilled Work Tickets screen. The Unbilled Work Tickets screen shows billable work tickets that have not been invoiced. If you select to import a Work Ticket, the billing information is added to the invoice under Invoice Details.
Go To Resale
Click Go To Resale to display the Inventory Sold screen. From this screen, you can enter inventory to be resold to the customer that is currently being invoiced. It may also be used to view an existing document.
Go To WO's
Click Go To WO's to display the WS: Schedules (Where tab). From this screen, you can enter billable work orders, which can then be billed through Invoice Entry.
Tax Summary
This command is not available until Taxes have been computed.
Click Tax Summary to open the Tax Summary screen.
The Tax Summary displays tax information by Jurisdiction.
Unbilled Resale
Click Unbilled Resale to display the Unbilled Resale screen.
This screen displays all documents from Inventory Resale that have not been invoiced through Accounts Receivable. The screen displays the Reference ID, Job Number and Description, Customer Number, and Document Date. It also allows for the selection of specific inventory documents to be imported into an Invoice. Only items that HAVE NOT been invoiced will display.
If a Purchase Order Number exists on the Usage/Resale record, it will be imported.
If a Purchase Order Number already exists with the Invoice, the Usage/Resale record's purchase order number WILL overwrite any existing Purchase Order number that is set up with the Invoice.
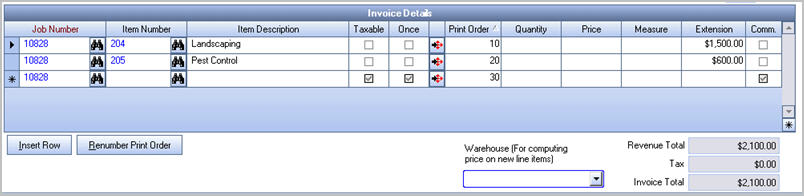
Invoice Details grid
Job Number
Use the Job Number field to enter the Job Number.
Type the Job Number in this field, or use the Quick Lookup to locate the Job Master File record.
When multiple jobs are displayed in the Invoice Details grid, a tool tip on the Job Number column displays the job description.
You can double-click in this field to open the Job Master File record.
For more information see Using Quick Lookups or Lookup Jobs.
When importing Unbilled Resale records, the Job of the Unbilled Resale will populate the Job Number in the Invoice Details grid.
When importing Unbilled Work Tickets, the Job Number from the Work Ticket will populate the Job Number in the Invoice Details grid.
Item Number
Use the Item Number field to enter invoice items by the number assigned on the Inventory Item Number in the Inventory module for Service items only.
To bill for products on this invoice, use the Unbilled Resale button.
Type the Item Number in this field, or use the Lookup to locate the Item Number.
Item Description
This field contains the information from the Description field in the Item Master File. You can edit the description for this invoice; changes you make to the description apply only to this invoice and do not change the Item Master File description.
The name of the person who requested this invoice displays in this field when the Include Requested By check box is selected in the Unbilled Work Tickets window. The name comes from the Requested By field in the WS Schedules window or the Requested By field in the Work Ticket details screen from eHub Mobile (on both Android and iOS devices.)
Warning: Do not use Ctrl + Enter in this field to enter a line break. This causes the invoice detail and detail line amount to be misaligned. It may also cause detail lines to be omitted from the printed invoice if the invoice contains multiple pages.
Taxable
Select the Taxable check box if the invoice item or service is subject to sales tax. If the service or item is not taxable, be sure to clear the check box if necessary.
Items and services are automatically marked taxable on an invoice when the customer is designated as taxable in the Customer Master File and the items and services are designated as taxable in the Job Master File. If either the customer or the invoice item or service are not designated as taxable, the check box is cleared upon entry.
Once
Select the Once check box to add a line item to the recurring invoice one time.
This is great for one-time charges that you do not want to appear on every recurring invoice. Once you update recurring to file, the line item you added (with the Once check box selected), will no longer display on the Recurring Invoice.
An asterisk will display on the Preview report when updating to recurring to indicate the line item is a one-time charge.
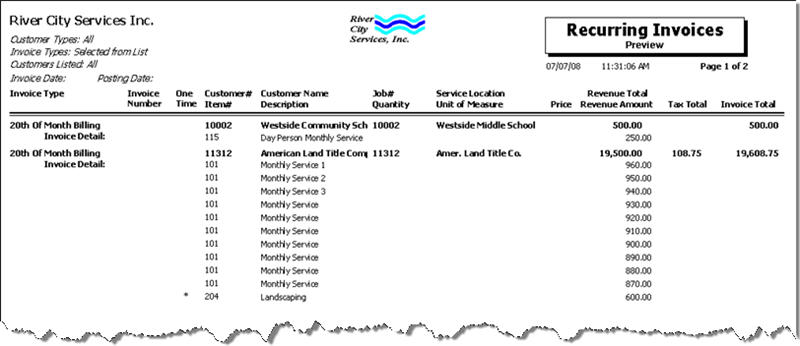
Recurring Invoice with a one-time charge added
If you selected the Once check box on the Recurring Invoices screen to add a line item to the recurring invoice one time, an asterisk will display on the Preview report when updating to recurring to indicate the line item is a one-time charge.

 Detail button
This button is disabled until Taxes have been computed (by clicking the Compute Taxes button).
Click the Detail button to display the Invoice Tax Details screen.
You cannot edit tax details on the Invoice Tax Details screen when accessing it directly from Recurring Invoices.
Print Order
Use the Print Order field to set the order each detail item will print on the on the Invoice.
For new invoices the print order field defaults by >increments >of 10 for each detail line item.
The Print Order saved with the Recurring Invoice will carry through to the invoices when updating to AR Invoices.
Quantity
Use the Quantity field to enter how many of the items to invoice.
Type the number of items in the Quantity field. Typically, use whole numbers, however, you can use decimals when necessary.
Example: If you are billing a customer for a month of Weekend Service, the quantity would be 4 signifying four weekends worth of Service.
If Billable Work Orders are imported into the invoice, the Quantity (if entered) will default from the Work Order.
Note: You may enter an Extension without entering a value in the Quantity field. If you enter a Quantity the system calculates the Extension using Quantity times Price.
Price
The Price field contains the amount entered in the Inventory Master File, if a price has been set. If you import Billable Work Orders the Price (if entered) will default from the Work Order.
Type the price of the item or service in the Price field.
You can change this information for an invoice, however, modifications to this field will affect this particular invoice only.
Note: You do not have to enter a value in the Price field. You may enter an Extension without entering a value in the Price field. If you enter a Price, the system calculates the Extension using Quantity times Price.
Measure
The Measure field contains the measuring unit from the Unit of Measure field in the INV: Item Master File, if Unit of Measure is used for this item.
If you import Billable Work Orders into the invoice, the Measure defaults from the Work Order.
Type the unit of measure in the Measure field, if it does not already contain the price.
Typically, the Measure field is blank when invoicing service items, and filled when invoicing products. You may edit the information in the Measure field for printing invoices. You can change this information for an invoice, however, modifications to this field will affect this particular invoice only.
Extension
The Extension field contains the total value of the service being invoiced. For many service items the Quantity and Price fields do not contain a value, and only the value of the service is entered in the Extension field. If you import Billable Work Orders into the invoice, the Extension field information defaults from the Work Order.
If a Quantity and Price are entered, the extension value is computed as follows:
Quantity x Price = Extension
You may enter an extension amount without entering a price or quantity. You may enter a $0.00 amount.
The Backspace key can be used when editing the Extension field.
Comm
This column displays if you selected the Commissions Determined By >Invoice Details check box in AR: Defaults.
Select the Commissionable check box next to each invoice detail line you want to calculate commissions on.
Insert Row
Click the Insert Row button (or press ALT + I) to open a new line in the grid.
Renumber Print Order button
Click Renumber Print Order button (or press ALT + R) to clear the current print order values and renumber in increments of 10 based on the order listed in the Invoice Details grid.
This message displays when you click Renumber Print Order.

If you click Yes, the first record in the grid is set to 10, and each successive row will increment by 10.
This is a good way to evenly space your Print Order numbers in the grid.
You cannot reset the Print Order if the Invoice Details have been filtered in the grid.
Warehouse
Select the Warehouse for the system to use when computing the price for a new line item.
As long as you have selected the Warehouse prior to adding line items to the Invoice Details grid, the system will pull in the resale price. You will not see the Price until you have entered a value in the Quantity field.
This makes it very easy to pull in prices for items from different warehouses.
Each line item can use a different warehouse. Just make sure that you select the Warehouse prior to adding the new line item.
Revenue Total
The Revenue Total displays the total of all the extension values for the items entered in the Invoice Details section of the screen. This figure does not include taxes for the items.
Tax
The Tax displays if you have already computed taxes (by clicking the Compute Taxes button).
Displays the calculated total tax applied to the items entered in the Invoice Details screen.
Invoice Total
The Invoice Total displays if you have already computed taxes (by clicking the Compute Taxes button).
The Invoice Total displays the sum of the Revenue Total and Tax Total for this invoice.
Compute Taxes
The Compute Tax button displays if you have not already computed taxes.
Click the Compute Taxes button to compute sales tax information for the invoice.
The calculated Tax and Invoice Total will display under the Revenue Total, and the Compute Taxes button will no longer be visible.
GL Distribution
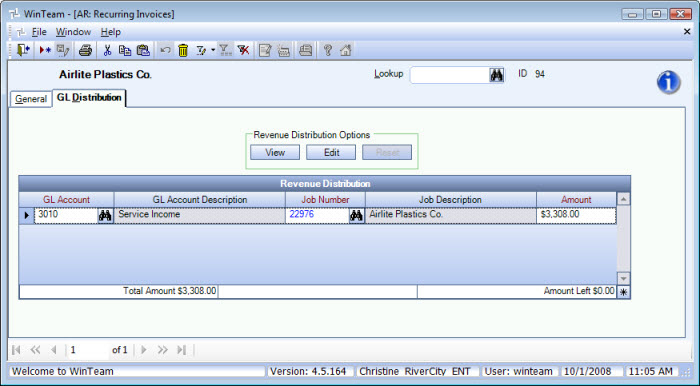
Use the Revenue Distribution grid to enter the General Ledger Account Number you want to distribute the revenue amount to and the Job Number to credit for this distribution. If no edits are made, the distribution will post based on the job number(s) of the invoice detail line(s), and the Income Account’s General Ledger number that is set up with the Item number’s Inventory Category.
Normally you would not be making any edits to this information unless you wanted the revenue amount to be distributed differently in the General Ledger.
You can
- click the View button (or press ALT + V) to view the Revenue Distribution
- click the Edit button (or press ALT + E) to edit the Revenue Distribution
If you are in Edit mode the Reset button becomes available.
You can click the Reset button (or press ALT + R) to clear the grid and restore the default distribution. When resetting the GL Distribution, the Job Number comes from the Invoice Detail line.
If your cursor is in the Amount field and you want to distribute the entire Invoice Amount, you can press the space bar and the Invoice Amount will populate the Amount field in the GL Distribution grid.
Related Information
The AR: Recurring Invoices screen has its own Security Group, AR Recurring Invoices.
The following security features are available for this screen:
- Read-Only
The AR Recurring Invoices screen is part of the AR ALL Security Group.
In order for a User to access the Unbilled Work Tickets a User must have rights to the AR ALL Security Group. If not, a Custom Security Group must be created in order to use the Go To menu from AR: Invoices and/or Recurring Invoices to access Unbilled Work Tickets. The Custom Security Group must include the 'AR Unbilled Work Orders' Screen. The Security Feature, Can Override Valid Dates for Date Entry can also be selected, if applicable.
For more information see Creating a Security Group.
For more information see Learning about Security Groups.
This screen has the Read-Only Feature. For more information see Learning about Read-Only Security.
Company and Location security are implemented for Enterprise and SaaS Customers. For more information see Learning about Location Security.
| Section | Item | Value | Module and Purpose |
|---|---|---|---|
| Addresses | UseZipsForCityState | Yes |
This setting automatically fills in the City and State (City and Province) fields when entering a Zip Code. It also removes the City and State fields from the tab stop order. |
| Addresses | TabCityState | Yes | This setting will leave the City and State fields (City and Province) in the tab stop order when the Zip Code Custom Setting is in place. |
For more information see Custom Settings and List of Custom Settings.