
Overview
One of the first steps in using TeamBid is setting up Prospects. A Prospect Master File record will have a Prospect Type defined which can be used for filtering different types of Prospects. Only basic information is required to save a Prospect Master File record. When a new Prospect record is saved, the system automatically creates the first Building record for the Prospect. Most of the time, Prospects will have only one Building. However, you can enter more Building records for a Prospect, and version each of those Buildings separately.
The Diary button and the Rollover button are available for use from the toolbar.
The Prospect Master File has three tabs of information: General, Custom Fields, and Versions.
A Prospect can have one or multiple Contacts. One Contact can be designated as the Primary Contact for each Prospect. The Primary Contact information displays on the General tab of the Prospect record. For more information, see Adding Contacts to a Master File Record or Creating Contacts.
Each Prospect may have multiple Buildings for Work Loading and Bidding. Each Building can have one or multiple Versions of the Work Load and Bid. For more information, see Setting Up Buildings and Setting Up Versions.
| Section | Item | Value | Module and Purpose |
|---|---|---|---|
| Addresses | UseZipsForCityState | Yes |
This setting automatically fills in the City and State (City and Province) fields when entering a Zip Code. It also removes the City and State fields from the tab stop order. |
| Addresses | TabCityState | Yes | This setting will leave the City and State fields (City and Province) in the tab stop order when the Zip Code Custom Setting is in place. |
For more information see Auto Populating City and State Fields.
For more information see Custom Settings and List of Custom Settings.
The Prospect Master File screen belongs to the TB Prospect Master File security group.
The TB Prospect Master File Group is part of the TB All group.
This screen has the Read-Only Feature. For more information see Learning about Read-Only Security.
Tip: For more information see Security Groups Overview and Security Groups By Module.
Prospect Master File screen
Related Information
- Learn about Customer Types
- Set up Prospects
- Set up TeamBid Defaults
- Set up Versions
- Use Google Mapping
- See Work Scheduling & TeamBid topics
- Go to TeamBid Menu
Key Functionality
The Diary enables you to keep notes concerning issues or to track using Follow Up Dates. Record any interaction you want to remember—such as a phone conversation or a handwritten letter you mailed or received. For more information see Diaries.
Click the Diary button to the Prospect Diary screen.
Rollover
Click the Rollover button to display the Prospect Rollover screen.
You can select to rollover Versions, Buildings, Work Loading, Bidding, and Diary files.
For more information see Prospect Rollover.
Prospect Lookup
The Prospect Lookup field is by name. If you enter a name and the name matches an existing Prospect, the Prospect record automatically populates. If there is more than one match for the name entered, the system displays the Find Prospects screen with a list of the matching records. If you click the Lookup button, the Lookup Prospects screen displays with the focus set to the Prospect Name field.
Prospect ID
Once a Prospect Master File record is saved, the system assigns a Prospect ID to the record.
Hover over the Change Information icon to see User Added, Date Added, User Changed and Date Changed information. WinTeam records the logon name of the user entering or changing this record. The Date Added is the original date this record was entered into the system. The Date Changed is the date the record was last changed. Right-click on the Change Info icon to filter for records added or changed by a specific user or date.
When you hover over the User Changed or Date Changed filters, you can:
- Filter By Selection - Filters for all records that match your current records field value.
- Filter by Exclusion - Excludes from your filter all records that match your current records field value.
- Filter For - Filters based on the text/value you enter.
- Sort Ascending - If you already have a filter applied, the Sort Ascending command is available. Also used to include all records in the filter and sort in ascending order based on the current records field value.
- Sort Descending - If you already have a filter applied, the Sort Descending command is available. Also used to include all records in the filter and sort in descending order based on the current records field value.
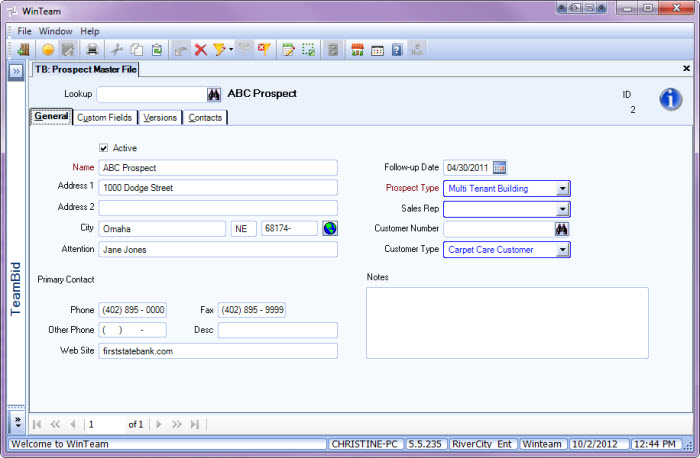
Prospect Master File (General tab)
Active
Use the Active check box to indicate whether the Prospect record is active or inactive. This check box is selected by default when you create a new Prospect.
Name
Use the Name field to enter a unique name for the Prospect.
Address
Use the Address field to enter the address of the Prospect. Use the second address line if the address information exceeds the first line, or to enter additional information, such as a suite number.
City, State, Zip
Use the City, State and Zip fields to complete the address of the Prospect.
You can use the Zip Code Custom Setting to populate City and State fields.
For more information see Auto Populating City and State Fields.
Click to link to Google Maps to quickly view maps and get directions. The link generates a map centered on the address you have entered in WinTeam. For more information see Using Google Mapping.
Attention
Use the Attention field to enter the name of the person or department to direct correspondence to.
Primary Contact
If a Primary Contact has been designated in the Contacts tab, the Salutation, First Name, and Last Name display here in blue text.
You can double-click on the contact information to open the Contact record.
Phone
Use the Phone field to enter the Prospect's phone number. You must enter the area code for all phone numbers, including local phone numbers.
Fax
Use the Fax field to enter the Prospect's fax phone number. You must enter the area code for all phone numbers, including local phone numbers.
Other Phone & Desc
Use the Other Phone field to enter another phone number for the Prospect. You must enter the area code for all phone numbers, including local phone numbers. Enter a description for the Other Phone number.
Web Site
Use the Web site field to enter the Prospect's Web site address.
Follow Up Date
Enter a date as a reminder to follow-up with the Prospect, or use the Date Control to select a date.
The Prospect Master File Report can be run to Group By or Sort by Follow Up Date.
Prospect Type
Type or select the Prospect Type you want to use. The Prospect Type field is used to group similar type Prospects for filtering, sorting and reports.
To add a new Prospect Type, double-click in the Prospect Type field, or type a new Prospect Type and press Enter.
The Prospect Types add/edit list displays.
Sales Rep
Use the Sales Representative field to assign a Sales Representative to a Prospect.
If the Prospect becomes a Customer the Sales Rep field will populate in the Customer Master File.
Type or select the Sales Representative you want to assign to this Prospect.
To add a new Sales Representative, double-click in the Sales Rep field, or type a new Sales Rep and press Enter.
The Sales Rep add/edit list displays.
Customer Number
Enter a Customer Number or use the Lookup to locate an existing Customer. You cannot enter a Customer Number if the Customer Master File record does not exist.
If you need to set up the Prospect as a Customer, double-click in the Customer Number field to open a new Customer Master File record.
You can double-click on an existing Customer Number to open the specified Customer Master File record.
Customer Type
Use the Customer Type field to group similar type Customers. This is useful when creating a Customer from the Prospect Master File. The Customer Type will carry over to the Customer Master File record if the Import from TeamBid feature is used.
Type or select the Customer Type you want to use for this Prospect.
To add a new Customer Type, double-click in the Customer Type field, or type a new Customer Type and press Enter.
The Customer Types add/edit list displays.
The Customer Types add/edit list can also be accessed from the Customer Master File.
For more information, see Learning about Customer Types.
Notes
Use the Notes field to enter any notes about the Prospect Master File record. If you enter more than one line of information, the system automatically wraps the lines of information for you.
Prospect Master File (Custom Fields)
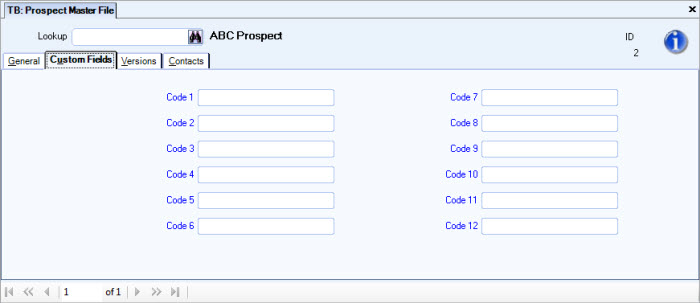
Use the Custom Fields screen to record or track information that is specific to the Prospect.
Custom Fields allow you to set up fields to record or track information that is specific to the Prospect. You may choose to use none of the Custom Fields or all of the fields. You may customize each field to have a Drop Down list, Text entry, Numeric or Date field. There are 12 Custom Fields available for use with Prospects.
For more information, see Using Custom Fields.
Prospect Master File (Versions tab)
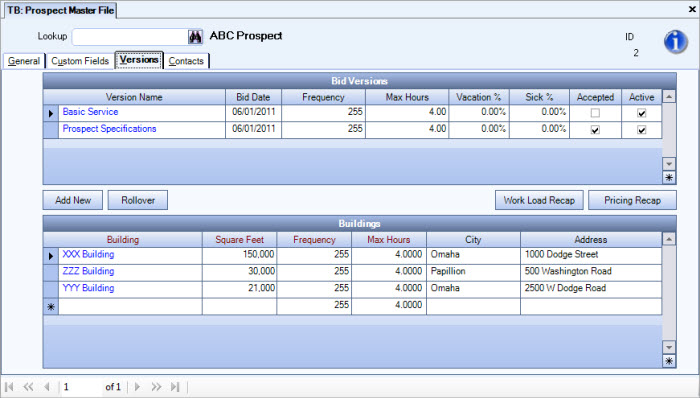
Bid Versions grid
The Bid Versions grid displays a line record for each Version associated with the Prospect. The Bid Versions grid is read-only, however, the Add New button opens the Version Setup screen for adding a new Version.
Information in the grid populates from the Version Setup screen for each Version added to the grid.
You may change the information in the grid by double-clicking on the Version Name, opening the Version Setup screen, then making changes to the Version Setup screen. Changes will populate to the Bid Versions grid.
Add New button
Click the Add New button to open the Version Setup screen to set up a new Version.
For more information, see Setting Up Versions.
Rollover button
Click the Rollover button to open the Versions \ Buildings Rollover screen. The Versions \ Buildings Rollover screen can be used to copy Versions and Buildings of bids, and their associated Areas, Tasks and Bidding into the Prospect Master File record that you accessed the Versions \ Buildings Rollover screen from.
Work Load Recap button
Click the Work Load Recap button to display the Work Load Recap for the selected Prospect.
When called from the Prospect Master File, the Prospects and Versions are passed in and the levels are set to Version, Building, Area, Task.
Pricing Recap button
Click the Pricing Recap button to display the Pricing Recap for the selected Prospect.
When called from the Prospect Master File, the Prospect, Versions, and Buildings are passed in and the levels are set to Version and Building.
Buildings grid
The Buildings grid displays information for each Building associated with the selected Version.
You may double-click in the Building field to open the Building Setup screen. If there are no records in the grid, the Building Setup screen opens to a new record.
If there are records in the grid, the Building Setup screen opens the selected Building Setup record.
Information entered in the Building Setup screen will populate the Buildings grid on this screen.
For more information, see Building Setup or Setting Up Buildings.
Prospect Master File (Contacts tab)
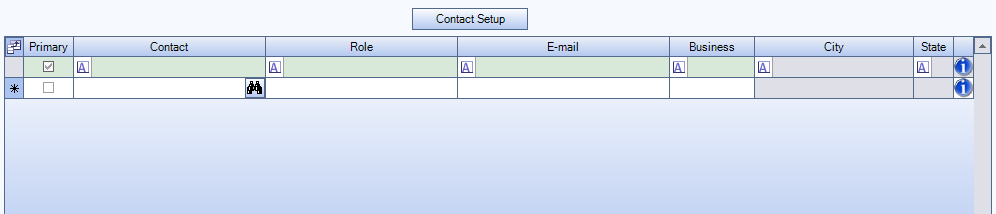
Contact Setup button
Click the Contact Setup button to open the SYS: Contacts screen.
Contact grid
Primary
Select the Primary check box to mark the selected Contact as the Primary Contact for this Prospect.
Once you select a Primary Contact, that Contact displays on the Prospect Master File (General tab).
Contact
Enter a Contact Name, or use the Quick Lookup to locate a Contact.
Role
Select a Role for the Contact. The Role can change based on where it is used. A Role should not be confused with the Title of a contact, but rather it is more the “purpose” of a contact.
Example: For our Customer Master File Contacts, the Primary Contact that you have identified is more than likely going to be the one that you would contact for billing and accounts receivable type questions. In that sense, you may want to just set up a Role called “Billing Contact” or “Collections”. As the Contacts area evolves in WinTeam, the Contact Role will be used in differing areas to identify the Role of the contact record you want included on a particular report, for instance.
Enter an e-mail address for the Contact. If you have entered an e-mail address in the Contact Setup screen in will populate here.
Business
Enter a phone number for this contact.
For more information see Adding Contacts to a Master File Record or Creating Contacts.