
Overview
The Contacts screen can be accessed from the Supervisor screen (in the Employee Master File, Job Master File, Prospect Master File, and WS: Schedules), by double-clicking in the Supervisor field, and then double-clicking in the Contacts field.
It can also be accessed from the Tier Descriptions screen (in the Job Master File, Tier Parameters tab), by double-clicking in the Contacts field.
To access the Contact screen from the Customer Master File, Prospect Master File, or Vendor Master File, click the Contacts tab, then click Contact Setup (or double-click on a Contact Name in grid to display the Contact record for the selected contact). For more information see Creating Contacts and Adding Contacts to a Master File Record.
Contacts can be assigned to Employee Supervisors, Job Supervisors, Job tiers, Prospects, Customers, and Vendors.
You can create Contact Groups and Contact Types. You can assign a Contact to a Contact Group and instruct WinTeam to send e-mail messages to an entire Contact Group or Contact Type. Contacts can be assigned to a maximum of three Contact Groups. All Contacts must be assigned a Contact Type.
Example: If you want to send an e-mail message to all building supervisors, you would create a Contact Group called "Building Supervisors", and then assign your building supervisors to that Contact Group.
Security
The SYS Contacts screen has its own Security Group, SYS Contacts.
The SYS Contacts screen (not the SYS Contacts Security Group) is part of the SYS ALL Security Group.
Related Information
Key Functionality
Lookup
Use the Lookup to locate an existing Contact record.
Type the Contact in this field, or use the Lookup to locate an Contact.
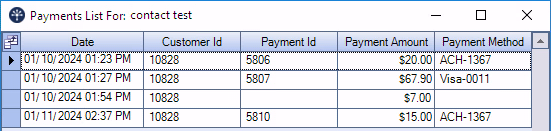
View Contact Payments
The View Contact Payments button displays for clients licensed for Online Payments. Click it to open the Payments List window. This button is unavailable if the contact is not a payment contact, or has not made any payments.
The Payment List contains a list of all payments made by the contact, including all payments made by the contact for different customer numbers. The information in the list includes the Date and Time of the payment, Customer ID, Payment ID, Payment Amount, and Payment Method (ACH or credit card type followed by last four digits of account or card).
Note: The Payment ID and Payment Method fields are always blank for payments in a No Settlement or Rejected status.
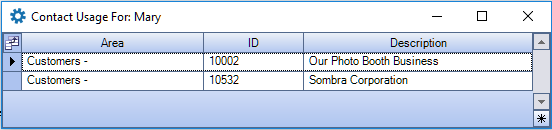
View Contact Usage
Click the View Contact Usage button to open the Contact Usage list. This list contains the different areas a contact is assigned to.
Changed Information Icon
Hover over the Change Information icon to see User Added, Date Added, User Changed and Date Changed information. WinTeam records the logon name of the user entering or changing this record. The Date Added is the original date this record was entered into the system. The Date Changed is the date the record was last changed. Right-click on the Change Info icon to filter for records added or changed by a specific user or date.
-
For online payment contact who make one-time payments, both the User Added and User Changed fields will be labeled WinTeam API since there was not a logged-in user tied to the payment at the time it was made. The date/time updates each time the payment changes status, so there are differences for ACH payments between the Date Added and Date Changed.
-
For online payments contacts who make payments as a logged in user, the User Added and User Changed fields will initially be labeled with the name of the logged-in user that made the payment. Once a payment changes status, the User Changed label updates to WinTeam API and the Date Changed date updates to the date/time of the status update. The User Added and Date Added fields are the initial status of the payment being made so they will remain unchanged throughout the entire life-cycle of the payment process.
ID
Displays the ID of the Contact.
This was included in order to assist when entering Checkpoints, so the user can tie back the ID to the Customer.
Hover over the Change Information icon to see User Added, Date Added, User Changed and Date Changed information. WinTeam records the logon name of the user entering or changing this record. The Date Added is the original date this record was entered into the system. The Date Changed is the date the record was last changed. Right-click on the Change Info icon to filter for records added or changed by a specific user or date.
When you hover over the User Changed or Date Changed filters, you can:
- Filter By Selection - Filters for all records that match your current records field value.
- Filter by Exclusion - Excludes from your filter all records that match your current records field value.
- Filter For - Filters based on the text/value you enter.
- Sort Ascending - If you already have a filter applied, the Sort Ascending command is available. Also used to include all records in the filter and sort in ascending order based on the current records field value.
- Sort Descending - If you already have a filter applied, the Sort Descending command is available. Also used to include all records in the filter and sort in descending order based on the current records field value.
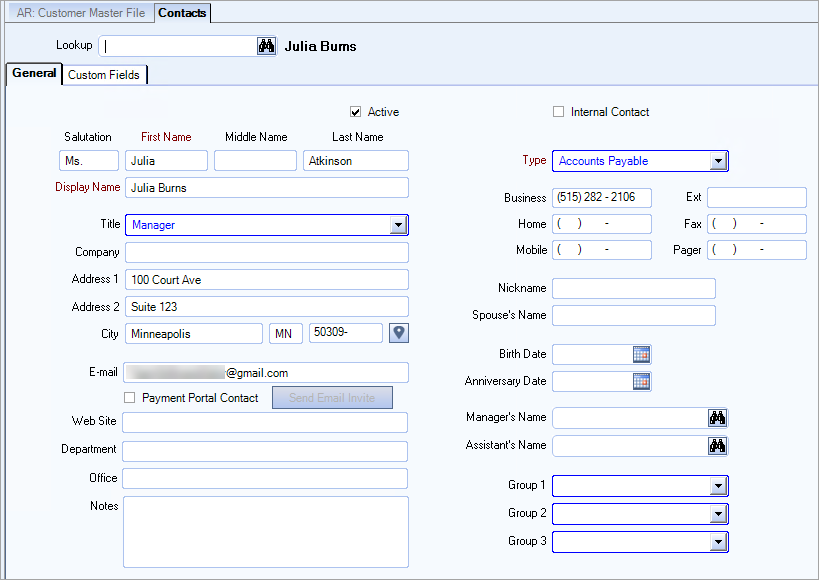
Contacts (General tab)
Active
Use the Active check box to indicate whether the Contact record is active or inactive.
This check box is selected by default when you create a new Contact.
Internal Contact
Use the Internal Contact check box to indicate if the Contact record is internal to your company. This check box is not selected by default.
Salutation
Use the Salutation field to enter the contact's title abbreviation. Example: Mr., Mrs., or Ms., etc.
First Name
Use the First Name field to enter the Contact's first name. This is part of the Display Name and is a required field.
Middle
Use the Middle Name field to enter the Contact's middle initial or middle name.
Last Name
Use the Last Name field to enter the Contact's last name. This is part of the Display Name if entered; however, it is not a required field.
Display Name
The First Name field appends to the Display Name field. If you enter a Last Name, it also appends to the Display Name field.
Title
Use the Title field to select the Contact's title. Title defines who you are. When adding a new Contact, the system displays the default Contact Title assigned in the Contact Title add/edit list.
To add a new Contact Title, double-click in the Title field, or type a new Contact Title and press Enter. The Contact Titles add/edit list displays.
Company
Use the Company field to enter the name of the company the Contact works for.
Address
Use the Address field to enter the billing and mailing address of the customer. You may use the second line to enter secondary address information such as a Post Office box, or a Suite number.
City
Use the City field to enter the city for the billing address of the customer.
To automatically populate the City and State field based on the ZIP Code entered see Auto Populating City and State Fields.
State
Use the State field to enter the two-digit abbreviation for the state or province for the customer’s mailing address. You can use the Zip Code Custom Setting to populate this field.
To automatically populate the City and State field based on the ZIP Code entered see Auto Populating City and State Fields.
Zip
Use the Zip field to enter the ZIP/postal code of the customer's address. After you type the first number, a dash (-) displays for the entry of the four-digit extension. If the first character you type is an alpha character, the system changes the format to a Postal Code for Canadian addresses.
To automatically populate the City and State field based on the ZIP Code entered see Auto Populating City and State Fields.
Click to link to Google Maps to quickly view maps and get directions. The link generates a map centered on the address you have entered in WinTeam. For more information see Using Google Mapping.
Use the e-mail field to enter the Contact's e-mail address.
Payment Portal Contact
Use this check box to allow the contact to use Online Payments. When this check box is selected, the email address becomes a required field.
Send Email Invite/Pending
This button displays when the Payment Portal Contact check box is selected. When clicked it sends an invite link to the email address listed on the contact. If the button reads as Pending, it indicates an invite has already been sent. You may click the Pending button to resend another invite link to the email address. Once the email has been sent, the link is active for 15 minutes.
Web Site
Use the Contact's Web site field to enter the Contact's web site address.
Department
Use the Department field to enter the name of the department the Contact is associated with.
Office
Use the Office field to enter any designation you may have for the Contact's office.
Notes
Use the Notes field to enter any notes pertaining to this employee. If you enter more than one line of information, the system automatically wraps the lines of information for you.
All Customer Numbers for Invoices except...
Use the All Customer Numbers for Invoices except grid to enter any customer numbers that you do not want the contact to make Online Payments.
Type
Use the Type field to select the Contact Type. When adding a new Contact, the system displays the default Contact Type.
To add a new Contact Type, double-click in the Type field, or type a new Contact Type and press Enter. The Contact Types add/edit list displays.
Business
Use the Business field to enter the Contact's business phone number. You must enter the area code for all phone numbers, including local phone numbers.
Ext.
Use the Ext. field to enter the Contact's business extension phone number.
Home
Use the Home field to enter the Contact's home phone number. You must enter the area code for all phone numbers, including local phone numbers.
Fax
Use the Fax field to enter the Contact's fax phone number. You must enter the area code for all phone numbers, including local phone numbers.
Mobile
Use the Mobile field to enter the Contact's mobile phone number. You must enter the area code for all phone numbers, including local phone numbers.
Pager
Use the Pager field to enter the Contact's Pager number. You must enter the area code for all phone numbers, including local phone numbers.
Nickname
Use the Nickname field to enter the name you use to refer to the contact.
Spouse's Name
Use the Spouse's Name field to enter the name of the Contact's spouse.
Birth Date
Use the Birth Date field to enter the Contact's birth date, or use the Date Control to select the date.
Anniversary Date
Use the Anniversary Date field to enter the Contact's anniversary date, or use the Date Control to select the date.
Manager's Name
Use the Manager's Name field to enter the Contact's manager's name.
Type the Manager's Name in this field, or use the Quick Lookup to locate a Contact.
Assistant's Name
Use the Assistant's Name field to enter the assistant's name.
Type the Assistant's Name in this field, or use the Quick Lookup to locate a Contact.
Group 1, Group 2, and Group 3
Use the Group 1, Group 2, and Group 3 fields to assign the Contact to a Contact Group.
Type or select the first Contact Group to assign to the Contact.
To add a new Contact Group, double-click in the Group field, or type a new Contact Group and press Enter. The Contact Groups add/edit list displays.
SYS: Contacts (Custom Fields tab)

Use the Custom Fields screen to record or track information that is specific to this contact record.
For more information, see Using Custom Fields.