Overview
The most efficient way to use the Insurance Benefits module is to set up components first, and then reuse them as you continue the setup process.
You can use the INS: Benefit Setup screen to define any benefit that has a cost either to you or to an employee, such as medical, dental, life or vision insurance. Efficiently setting up benefits packages requires that you first set up package components such as individual benefits. You can then reuse these components throughout the Insurance Benefits module.
Key Functionality
To begin setting up a Benefit, you must at least enter basic information in the required fields.
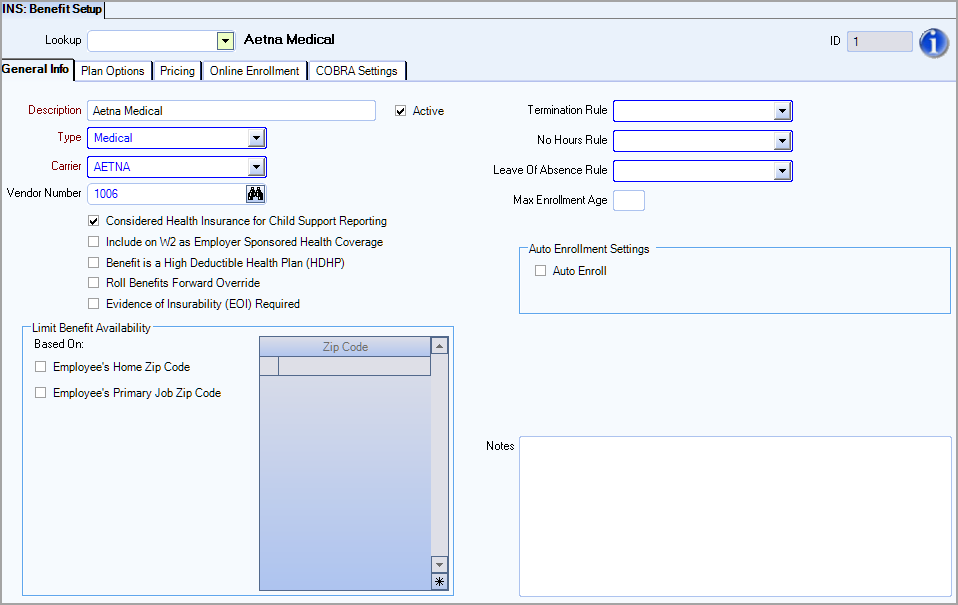
The Type field is an add/edit list. Double click on this field, type a Description for the new benefit type, and then press Tab. The system automatically assigns a unique identification number that appears in the ID box, and the Active check box is selected by default.
To enable types for online enrollment, enter a number in the Online Benefits Display Order column to determine the order in which the benefits will display on the progress bar in eHub. For example, if you enter a “1” for the Medical and a “2” for the Dental benefit types, the medical plans will be the first type of benefit displayed during the open enrollment process and dental plans will be second.
Select the Hide From OE Wizard check box to hide a benefit type from the Online Enrollment Wizard. This is useful if you want to hide the employer paid benefits that the employee is already enrolled in from the wizard. All of the employee’s benefits, including those paid by the employer will still display in the Confirmation and Summary window.
The Able To Waive From OE column contains a check box that controls the display of the benefit in eHub Online Enrollment. This check box is selected by default for all benefits. When it is selected, employees can choose to waive the benefit during online enrollment. When it is cleared, the benefit automatically displays as waived during online enrollment and employees do not have the option to adjust the benefit. For example, Basic Life Insurance is often provided to all employees and employees could be confused when they are given the opportunity to "waive" the benefit during online enrollment.
This check box displays only for Insurance / Other Benefits. It does not display on Hours Accrual Benefits.
Select this check box if this benefit is considered as Health Insurance for Child Support Reporting. For more information, see Using FIPS for Child Support Related Items.
This field displays if the Benefit Method of Insurance/Other is selected.
Select to include this benefit as Employee Sponsored Health Coverage. Any benefits set up with this check box selected are included on the Healthcare Costs Report.
Use to track whether a Health Savings Account (HSA) requires enrollment in a High Deductible Health Plan (HDHP) and receive relevant warnings when enrolling employees.
Select this check box to override the package-level roll benefits forward setting for just this benefit. See Rolling Benefits Forward for details.
This check box helps you manage a benefit where evidence of insurability is required to determine the final amount and cost of benefits. For example, a life insurance coverage amount that is the same for all employees unless an employee elects additional coverage, where the issuance of the additional coverage is dependent on the employee passing a medical examination. For details about how to manage the benefit so the employee receives the correct benefits, and is charged the correct amount while waiting for the evidence of insurability, see Evidence of Insurability.
When this check box is selected, only the guarantee amount (instead of the requested amount) is deducted for this benefit until an employee's EOI is approved.
When the EOI check box is selected, the following changes occur in eHub:
Initial Eligibility, New Hire, or Newly Eligible employees—When an employee enrolls within 31 days of their initial eligibility date, they can elect coverage up to the guarantee issue level with no evidence of insurability required. Any amount requested above the guarantee amount requires evidence of insurability.
Employee is required to provide an EOI before they are guaranteed the requested amount
Deductions will not occur for the requested amount until the EOI is approved
A message displays in eHub web with this information
Late Entrant employees— When an employee elects coverage for the first time more than 31 days after their initial eligibility date, any amount of employee or spousal coverage requires evidence of insurability.
Employee is required to provide an EOI before they are guaranteed the elected amount
Deductions will not occur for the specific benefit until the EOI is approved
A message displays in eHub web with this information
Increase in Coverage employees— When an employee is already enrolled in coverage, they can elect to increase coverage (within 31 days of a change in status or at annual enrollment) up to the guarantee issue limit without evidence of insurability. Any amount requested above the guarantee amount requires evidence of insurability.
Employee is required to provide an EOI before they are guaranteed the increased amount
Deductions will not occur for the specific benefit until the EOI is approved
A message displays in eHub web with this information
Limit benefit availability to a list of ZIP codes in which an employee must reside or work, to fulfill some carriers' HMO benefit availability based on provider location. On the Benefits by Employee screen, the system will display a warning when you are attempting to enroll an employee in a benefit that is limited by zip code.
Termination Rule–the rule for termination of the benefit when the employee is no longer employed with the company
No Hours Rule–the rule for termination of the benefit when the employee has not worked any hours
Leave of Absence Rule–the rule for termination of the benefit when the employee has been gone past their leave of absence.
Double-click in the fields to set up a new in that category. These rules rely on Durations, see setting up a Duration for more information.
These fields can be used to limit the benefit eligibility age for an employee or their dependents. In the Max Enrollment Age field input the maximum age an employee or dependent can be to still enroll in this benefit. This field must be equal to or less than the age listed in the Tiers Age To field on the pricing tab (if this is set). When the Use Pricing Effective Date to Lock in Age field is selected, we validate the age by using the birth date and the Pricing Effective Date for eligibility. When this field is cleared, we validate the age by using the birth date and the current date for eligibility.
If you enroll an employee or dependent who exceeds the age limit, a warning displays on the bottom of the Benefits by Employee -Details screen. You can still proceed with the enrollment in WinTeam even if this warning displays. When using eHub online enrollment, an employee cannot proceed with a restricted enrollment.
Select Auto Enroll if this benefit is one in which you want employees to be automatically enrolled. (Plan Options are set up on the next tab.)
Note: The Election Amount in INS: Benefits by Employee-Details will only populate if you are using a fixed Election Type (typically used for life insurance). If you are using a list or variable Election Type, the auto enrollment will populate the election amount as $0.
A benefit Plan Option is a list of coverage and participation options from which an employee may choose, such as insurance for the employee only, employee plus child, or employee plus spouse. Before you set up a Plan Option, you must Set up a Plan Option Type. You can double-click in the Type field to open the Plan Option Types Add/Edit list.
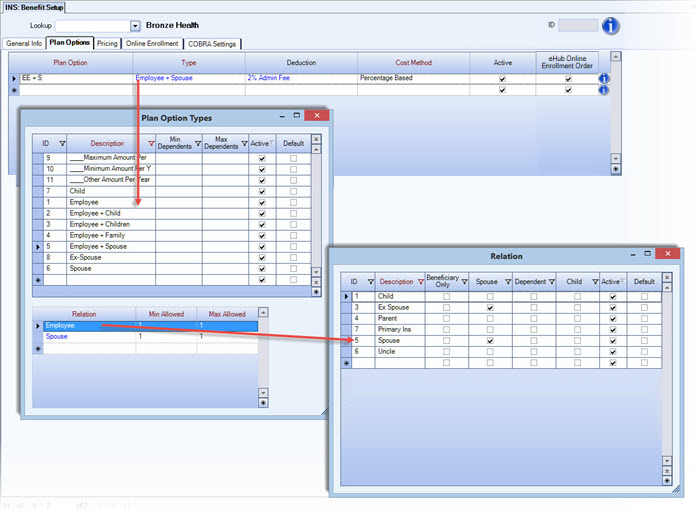
Enter a Description for this Plan Option, such as Employee Only or Employee + Family. The Active check box displays selected by default. (Clear the check box to make the plan option inactive. It will remain in the system, but no longer appear in lists.)
A Plan Option Type is a way to associate Relations to Plan Options. You are required to select a Plan Option Type when you Set up a Plan Option. Before you set up a Plan Option Type, you must set up Benefit options on the General tab for at least one benefit.
Example: Some examples of Plan Option Types are Employee Only, Employee + Spouse, and Employee + Children.
Select from the drop-down list, or double-click in the field to open the Plan Option Types window.
Select the Cost Method to use for pricing this benefit.
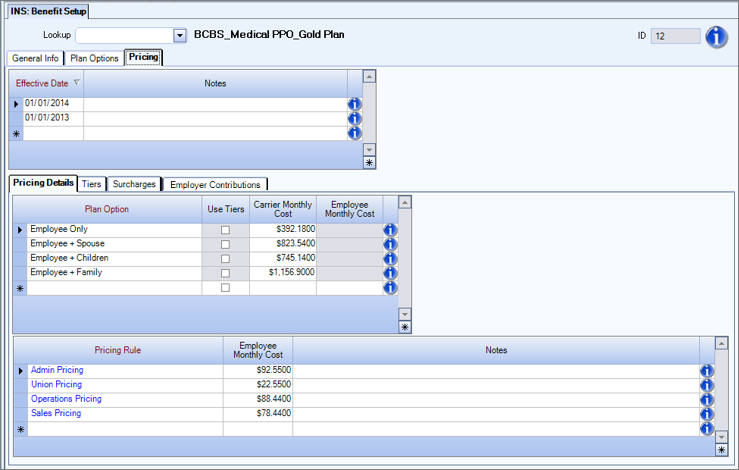
- Pricing Rules - Select this option to set up different deduction amounts based on elections on the Pricing tab. This would typically be used for a health insurance benefit where the cost is fixed dependent upon the plan option chosen. On the Pricing tab set the appropriate Pricing Rule for each of the Plan Options. The Pricing Rule field is an add/edit list to assist with differentiating which pricing options are available for this plan. For example, you may only have one Pricing Rule which applies to everyone who chooses that Plan Option. Or you may have multiple Pricing Rules for each Plan Option, such as a rule (deduction amount) for Union, Admin, Operations, Management and Special Contract Pricing. The actual deduction amount to be paid by the employee is entered for each Plan Option and Pricing Rule applied. See setting up a pricing rule for additional information.
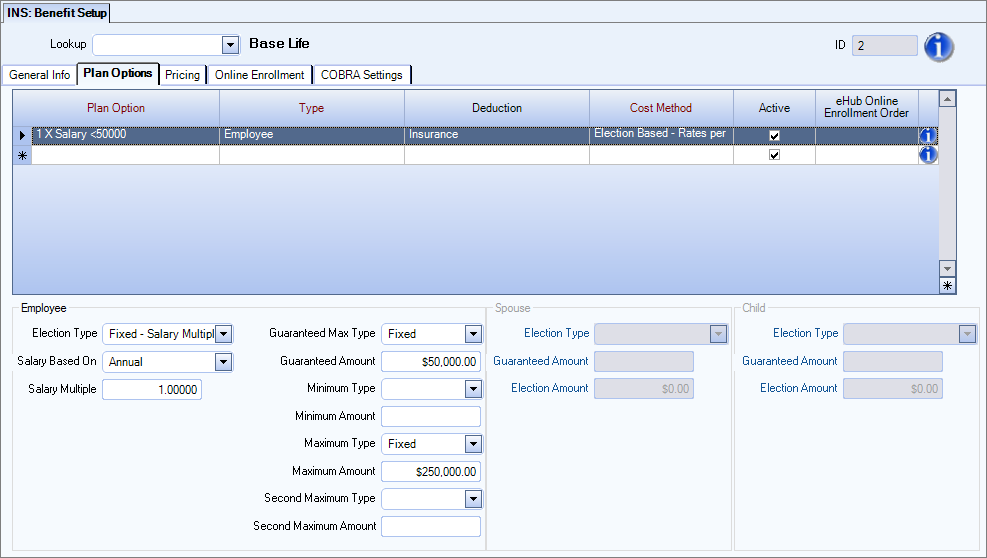
- Election Based - Select this option to indicate the Election Type, Amount and Guaranteed amount for this plan. This might be used for a life insurance policy with a set benefit amount. Pricing is per $1 of the election amount. See details on Election Types below.
- Election Based Rates per $1000 - Use this option to indicate the Election Type, Amount and Guaranteed amount for this plan. This would be useful for a life insurance policy with pricing based on the amount selected per $1000.
- Fixed - Dollar Amount - Indicates the policy is a fixed dollar amount, such as $25,000. Enter the amount of the policy in the Election Amount field. You can also indicate a Guaranteed Max Type and Guaranteed Amount/Salary Multiple which tells the system how to determine a guaranteed amount the employee can elect for insurance without undergoing a medical examination. Guaranteed Max Type options include Fixed, Monthly Salary Multiple and Annual Salary Multiple.
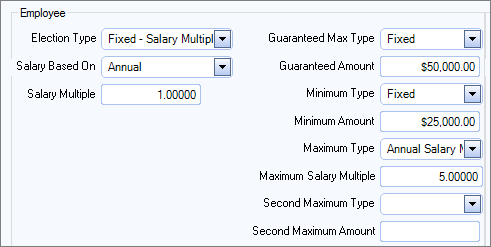
- Fixed - Salary Multiple - Indicates the policy is a multiplier of the employee’s salary. For example, if the employee’s salary is $50,000 per year and the multiplier is set to 1, then the employee’s coverage is $50,000. Use the Salary Based On field to indicate monthly or annual and the Salary Multiple field to indicate the multiplier of the salary, such as one-time or double (two-times). The Guaranteed Max Type, Guaranteed Amount/Salary Multiple, Minimum Type, Minimum Salary Multiple, Maximum Type and Maximum Amount/Salary Multiple fields are also available. If you select a Maximum Type a Second Maximum Type and Second Maximum Amount/Salary Multiple fields display.
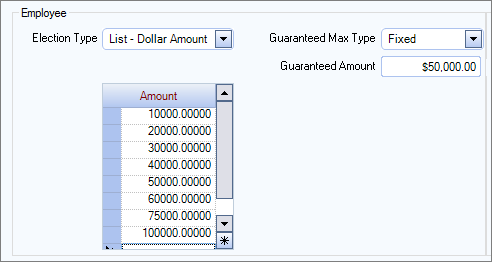
- List - Dollar Amount - Allows you to enter a list of coverage options, such as $10,000, $25,000, and $50,000. Use this type when you have a predetermined election amounts. Enter the election amounts for the choices you want your employees to chose from. Use Guaranteed Max Type and Guaranteed Amount/Salary Multiple which tells the system how to determine a guaranteed amount the employee can elect for insurance without undergoing a medical examination.
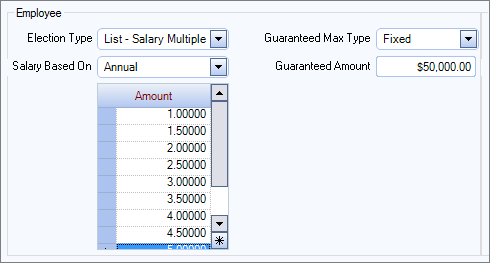
- List - Salary Multiple - Allows you to enter a list of coverage options based on multiples of the employee’s salary. Use this type when the election amounts are based on a multiple of the employee's salary. Enter the multiplier options for the choices you want your employees to chose from. Use Guaranteed Max Type and Guaranteed Amount/Salary Multiple which tells the system how to determine a guaranteed amount the employee can elect for insurance without undergoing a medical examination.
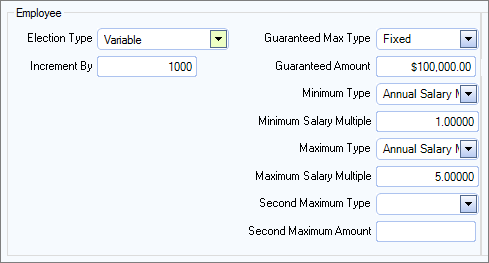
- Variable - Used to indicate an incremental plan, such as any election amount in increments of $1000. For example, if employees can receive life insurance for one time their annual salary up to a limit of $50,000 per year, you would choose variable, indicate the increment amount. Additional options are also available when you choose variable. You can set a Guaranteed Max Type and Guaranteed Amount/Salary Multiple which tells the system how to determine a guaranteed amount the employee can elect for insurance without undergoing a medical examination. You can set a Minimum Type and Minimum Amount/Salary Multiple to tell the system the minimum amount the employee would receive (Fixed, Monthly Salary Multiple or Annual Salary Multiple). Use the Maximum Type (Fixed, Monthly Salary Multiple or Annual Salary Multiple) to set a maximum amount the employee can receive for this benefit. If you select a Maximum Type a Second Maximum Type and Second Maximum Amount/Salary Multiple fields display.
In addition to employee options, you can also set options for a spouse and/or a child in this section. - Flat - This is used for a flat price regardless of plan option choice. When you select Flat on the Plan Options tab, the Pricing tab, Pricing Details grid includes both the Carrier Monthly Cost and the Employee Monthly Cost fields.
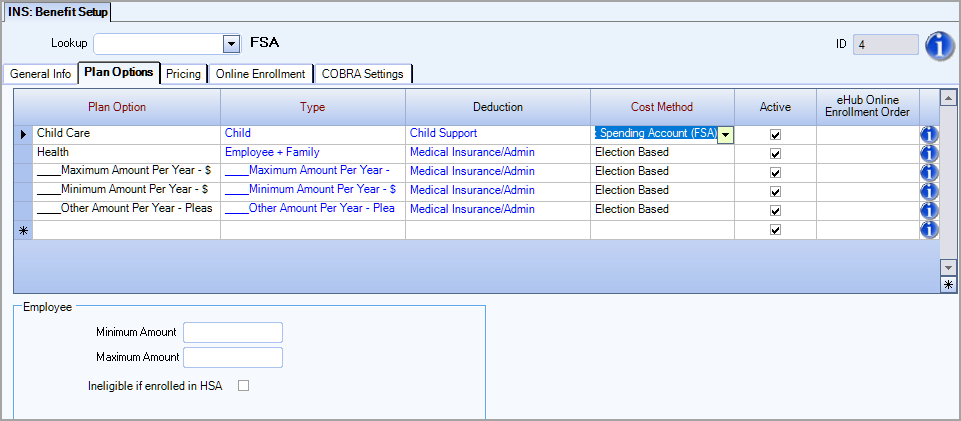
- Flex Spending Account (FSA) - When you choose FSA as a Cost Method, you will enter the Plan Option for either Dependent Care or Health expenses. For each Plan Option, enter the Minimum Amount and Maximum Amount that can be contributed. The system will use this amount to limit the election amount. Nothing is entered on the Pricing tab as the contribution is made by the employee. You will enter the election amount in the Benefits by Employee screen when enrolling the employee in this benefit.
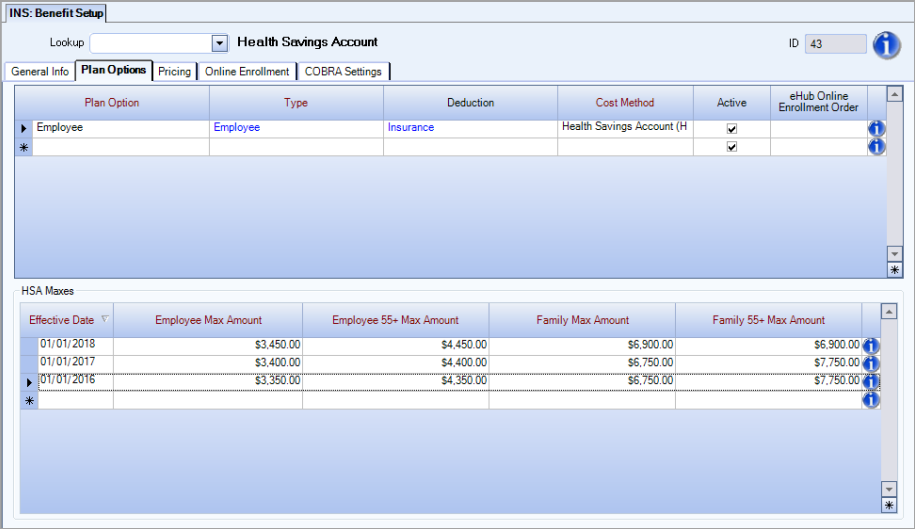
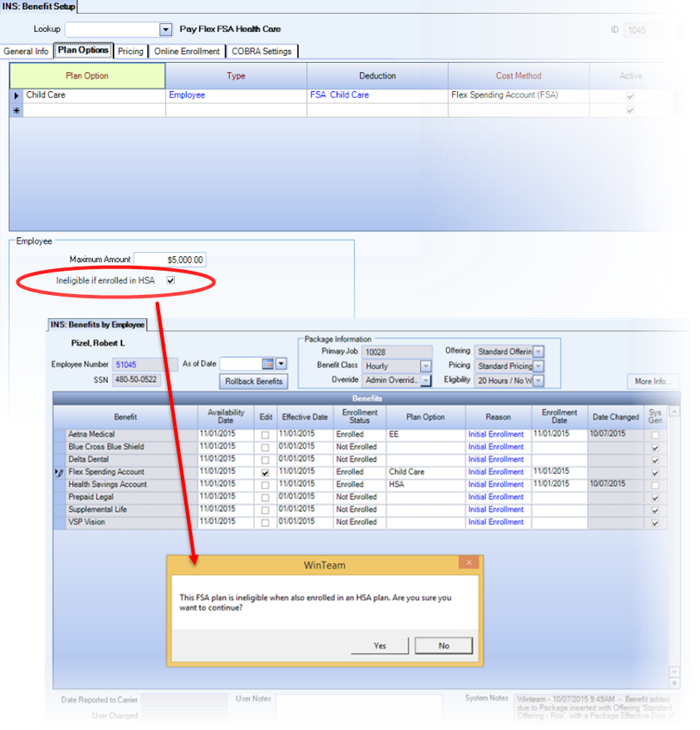
Select the Ineligible if enrolled in HSA check box if employees should be ineligible for this FSA if they are enrolled in an HSA. - Health Savings Account (HSA) - When you choose HSA as a Cost Method, enter the Effective Date, Employee Max Amount, Employee 55+ Max Amount, Family Max Amount and Family 55+ Max Amount information in the HSA Maxes grid. There is a limit of one HSA record, but you may have multiple effective dates in the HSA Maxes grid. The system uses these amounts to limit the election amounts. Nothing is entered on the Pricing Tab as the contribution is made by the employee. You will enter the election amount in the Benefits by Employee screen when enrolling the employee in this benefit.
- Percentage Based - Use the Percentage Based Cost Method to create a variable deduction based on the employee’s wage. The Deduction Code assigned must be set up to use the Percent of Form W2 Box 1 option. Rather than a set amount, the system references wages and then calculates the deduction as a percentage of the wage, using the Employee Cost Percent amount listed on the Pricing tab.
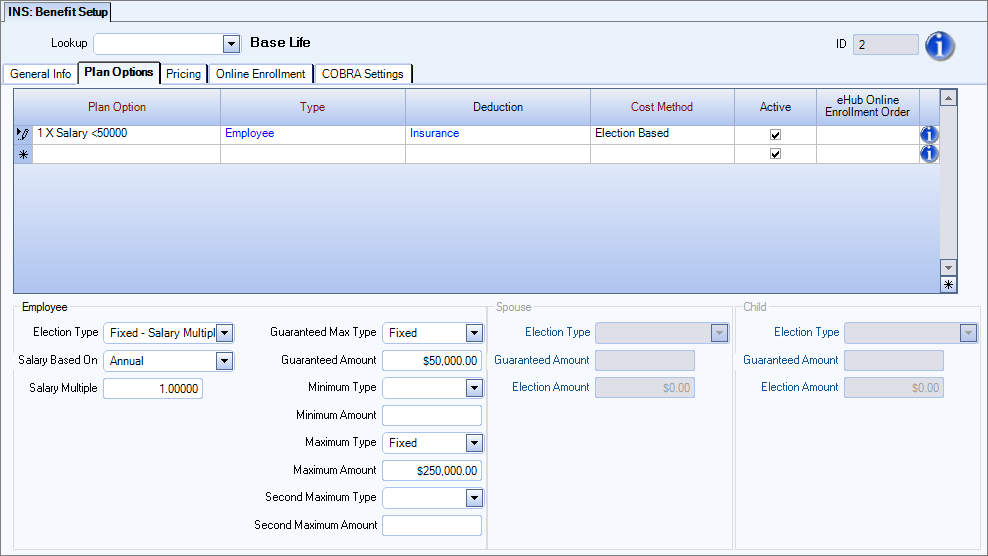
Election Types

If the employee’s salary amount changes between offerings, the system only updates the election amount based on the employee’s current salary if the employee is unenrolled and then re-enrolled with the life insurance benefit with the new effective date.
If only the effective date is changed, the election amount will not automatically update based on the employee’s current salary. The employee must be unenrolled and then re-enrolled to trigger the update.

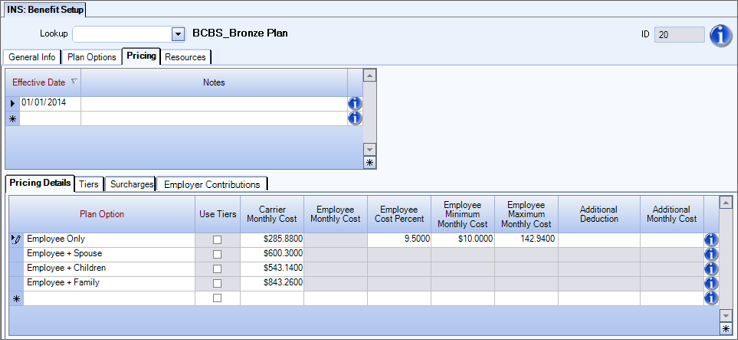
In this example, the Employee Only option is set at 9.5 Employee Cost Percent deduction amount. The option to set a Employee Minimum Monthly Cost and Employee Maximum Monthly Cost deduction amount were also used. This ensures the employee will pay no less than $10.00 per month and no more than $142.94 per month. You can set an additional deduction code and amount. This might be used for Plan Options beyond employee only where the employee pays an additional amount over and above the 9.5 percent for those options.
Note: WinTeam allows you to use whatever naming conventions for Plan Options, Plan Types and Relation Descriptions that work best for your company. Many companies keep naming conventions consistent with previous years, or match their carriers' plan descriptions.
Select the Deduction code from the drop-down list to use for the Plan Option. You can double-click the Deduction code to see how the deduction is set up in the PAY: Other Deduction Codes screen. Use the Post Tax Deduction column to select a Deduction code to deduct from the employee's paycheck post-tax.
If your company is providing a paid benefit (i.e., company-paid life insurance), you can leave the Plan Option Deduction field blank, and use the Auto Enrollment Engine to enroll employees eligible for the paid benefit. If your company offers employees an Online Enrollment option via eHub, since no options to enroll or waive a company paid benefit exist, that paid benefit will not be displayed.
A Plan Option's Cost Method uses a Pricing Rule in calculating Employee Monthly Cost for a benefit. You are required to include a Pricing Rule Description when you set up benefit pricing. Before you set up a pricing rule description, you must set up the required Description, Type and Carrier on the Benefit Setup General Info tab and a Plan Option for at least one benefit.
Select the check box in this column to indicate if the Plan Option will be visible to employees during online enrollment, with or without a deduction code present.
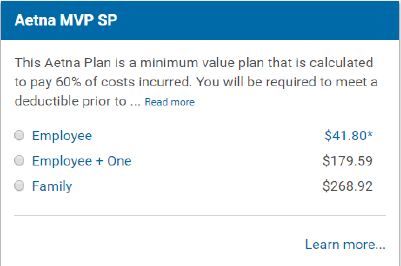
Enter a number in this column to control the display order of the coverage levels for the plan in Online Enrollment. Number one displays first in the list, number two second, etc. For example, Employee=1, Employee+One=2, Family=3 would display in Online Enrollment as:
This field displays if the Election Type is Variable. Use the Increment By field to set the number you want benefits to increment by.
Example: If the maximum amount equals 192,000 but you have the Increment By set to 5,000, then the maximum amount that can be selected will be 190,000. If Employees enter an amount that doesn't fit the Increment By amount, they will receive an error message.
In addition to the existing Maximum Amount, use this field to indicate the maximum amount to use, based on which HSA maximum applies to the employee. Both the Benefit by Employee screen in WinTeam and the Online Enrollment screen in eHub will use this maximum if the employee is age 55 at the beginning of the year or turns 55 during the year.
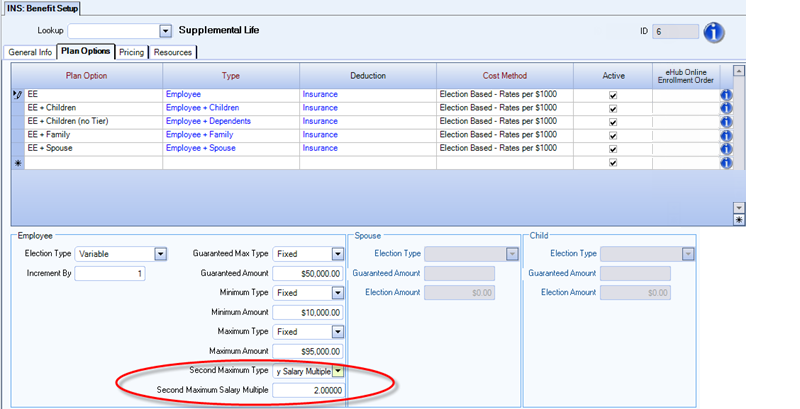
In addition to the existing Election-Based Maximum Type and Maximum Amount fields, use the identically functioning Second Maximum Type and Second Maximum Salary Multiple fields to support additional carrier requirements. When enrolling in plans with both Maximums set up, Benefits by Employee and Online Enrollment will validate the election amount using the lowest maximum for the employee.
This field will be displayed when a benefit's Cost Method is Flexible Spending Account (FSA). On the Benefits by Employee screen, the system will display a warning when you are attempting to enroll an employee in an ineligible FSA. Federal regulations prohibit enrollment in some types of FSA plans if the employee is already enrolled in an HSA.
This check box displays for Election Based and Election Based - Rates per $1000 Cost Methods. If selected, Long Term Disability and Short Term Disability plans would not require a beneficiary in eHub Online Enrollment.
Note: Before you can set up benefit pricing, you must first set up benefit options on the Benefit Setup General tab (see above), and then set up benefit plan options on the Benefit Setup Plan Options tab.
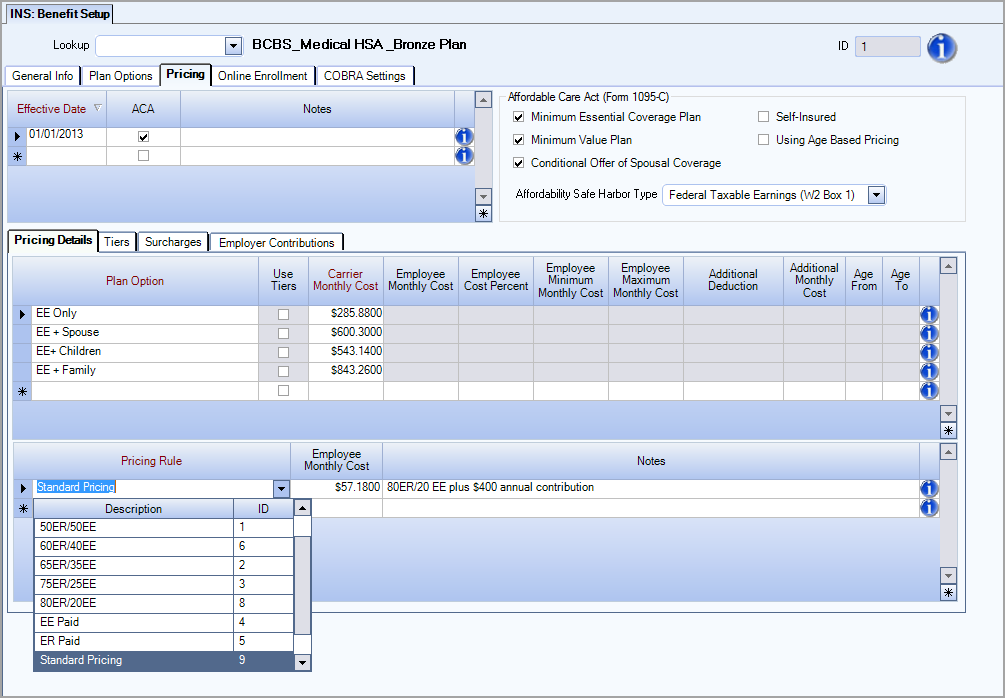
Enter the date on which this benefit pricing will be effective.
Read more about this option at Setting up Form 1095-C.
Plan Option
Select from the list the option for which you want to set up pricing. Only the plan options that you set up on the Plan Options tab for this benefit are available in the list.
Pricing Rule
A Pricing Rule defines the Employee Monthly Cost for a benefit if, on the Benefit Setup Plan Options tab, the Cost Method of Pricing Rules has been selected. A Pricing Rule benefit options set up on the General Info tab, the specific plan option, and the price. A Pricing Rule can also include a surcharge.
Click the down-arrow to pick a Pricing Rule Description from the list, or double-click in the Pricing Rule field to open the Pricing Rules Add/Edit list and create a pricing rule description. Read more about Setting up a Pricing Rule.
Carrier Monthly Cost
For informational purpose only, enter price that the insurance carrier charges you for this benefit plan option.
Employee Monthly Cost
For informational purposes only, enter the price the employee must pay for the benefit.
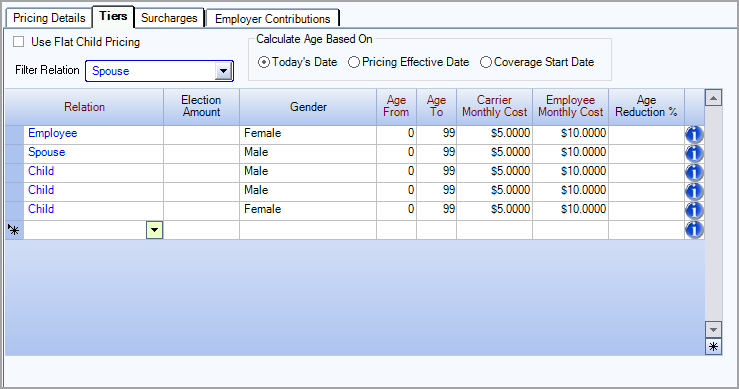
Use Flat Child Pricing
Select this check box to use the same pricing for children (regardless of the number of children). This is typically used to match the pricing in the carrier's plan setup.
Calculate Age Based On:
- Today’s Date–The person’s age is calculated based on the current date. The person may age out of their pricing tier during the year, and receive an updated deduction.
Example: Nick is 49 as of 1/1/2018. His birthdate is 6/19. The current date is 3/24, so his age is calculated as 49.
- Pricing Effective Date–The person’s age is calculated based on their age at the beginning of the plan year (per the Pricing Effective Date). This is true whether the person enrolls in advance of the plan year (Open Enrollment) or during the Plan Year (Life Event, New Hire). Their pricing tier does not change on their birthdate. Typically, the beginning of the plan year matches the pricing effective date, therefore using this method the person would not experience a deduction change during the year.
Example: Nick is 49 as of 1/1/2018. His birthdate is 6/19. The beginning of the plan year is 1/1/2019, so his age is calculated as 50.
- Coverage Start Date–The person’s age is calculated based on their age at the time their coverage began (per the Coverage Start Date). Their pricing does not change as they age, as long as their benefits are rolled forward either by passive enrollment or using Roll Benefits Forward Override. This is also referred to as Issue Age Pricing.
Example: Nick is 49 as of 1/1/2018. His birthdate is 6/19. His age is calculated as 49 for as long as he maintains continuous coverage.
Deductions: Use Age Reduction Percent
When selected the Age Reduction % field is used to reduce the premium. If not selected, the full election amount is used when calculating the deduction.
Filter Relation
Select a relation from the drop down list to limit the contents of the grid to the selected relation type. For example, if you select Child, the Employee and Spouse are removed from display in the grid, and you only see the children. To return all information to the grid, clear the Filter Relation selection.
Gender
For tier-based pricing that is gender-neutral, you can leave the Gender field blank. You are not required to enter the same pricing for Male, Female, Unknown, and Nonbinary genders. If there are two Tiers that apply for a covered individual, one Gender-blank and one Gender-specific, the system uses the Gender-specific Tier. This Pricing is reflected throughout the system, including in Deduction Sync, Benefits Analysis Report and Online Enrollment cost estimate.
Age Reduction % (Percentage)
This field is used to reduce the premium when the Deductions: Use Age Reduction Percent is setting is selected.
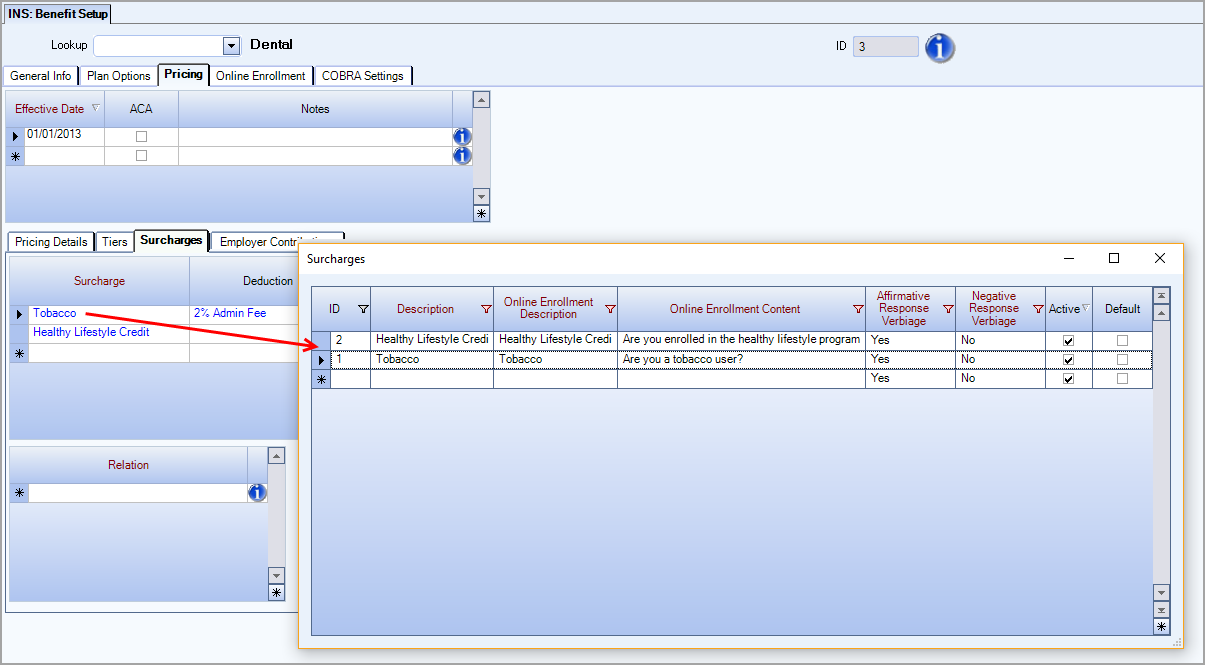
Select the Surcharge you want to assess or double-click to open the Surcharges Add/Edit window. In this window, you can enter the verbiage that displays in Online Enrollment about the surcharge.
You can select a Deduction or Compensation from the drop-down lists.
Note: A compensation selected here cannot be used as a Nondiscretionary Bonus Compensation.
Enter the Monthly Amount to be deducted or compensated each month.
To automatically apply the surcharge when you enroll an employee or relative for the benefit, select the Add On Initial Enroll check box.
If you enter an eHub URL, during Online Enrollment if a user enters an affirmative answer for a surcharge question, a new browser tab will open populated with this URL. For example, if the user indicates they are a smoker, the URL for a smoking cessation program could automatically open. Note, the user is still in eHub Online Enrollment if they close the tab that contains the surcharge URL.
You can only enter URL addresses in this field (not plain text). Valid URL addresses begin with http:// OR https:// OR FTP://. If you enter a URL address that starts with www, such as www.google.com, the system will automatically add the http:// portion of the address.
Enter any Notes about the surcharge.
Select Relation from the list to which you want to apply the surcharge.

Employer Contribution, Employer Contribution Deduction, and Employer Contribution Deduction (Reversal)
These fields work together to allow the tracking of employer contributions to employee HSA plans on pay checks.
- Employer Contribution–Filled out with the annual contribution amount being made by the employer
- Employer Contribution Deduction–Drop-down list, select the deduction code to be used on employee paycheck
- Employer Contribution Deduction (Reversal)–Drop-down list, select the deduction code to be used on employee paycheck for contribution reversal
Set up two deduction codes, one for the contribution and one for the reversal. A reversal is necessary so that the amount can be displayed on the employee pay stub, but the impact to the pay check is net $0.00. When added to the Employee Master File > Other Comps/Deducts through deduction sync, two deductions are added for the same amount, one is positive using the Employer Contribution Deduction code, the other negative using the Employer Contribution Deduction (Reversal) code, resulting in a net zero-dollar impact to the employee’s pay check. In Other Deduction Codes setup, these codes must be set up with Recurring – No Limit as the Basis setting, and $ Amount as the Deduction Method. Other settings, such as description and pay check properties are determined by the user. Take note of the description assigned to each to ensure the correct deduction code is assigned when setting up benefits.
When setting up benefits, enter the annual contribution amount for each line in the Employer Contribution field. Select the Deduction Code to be used for the deduction in the Employer Contribution Deduction field. Select the Deduction Code to be used for the reversal in the Employer Contribution Deduction (Reversal) field.
When an employee enrolls in this benefit and Deduction Sync is run, the system breaks down the annual contribution amount to a per pay check amount. That amount is then used to create the two offsetting deductions of opposite values in their Other Comps/Deducts to be included on their pay check.
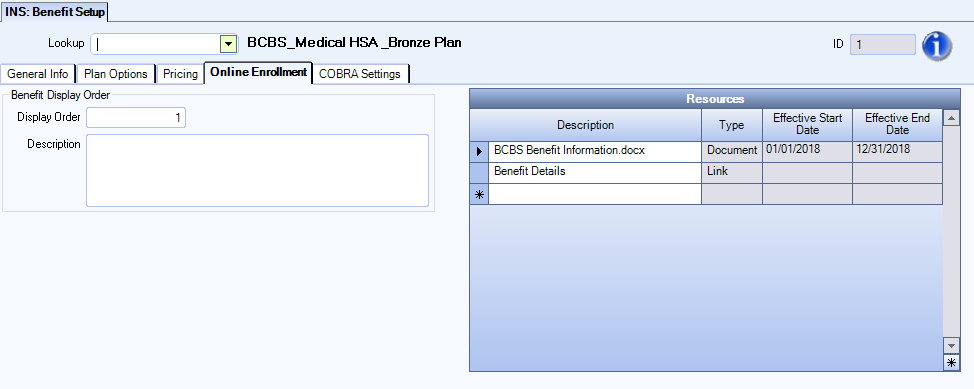
Use the Display Order field to control the sort order of plans of the same type in Online Enrollment.
Example: You have three medical plans, Gold, Silver, and Bronze—you assign the following display order numbers Gold=1 Silver=2 and Bronze=3 to make them display in that order within the medical plans section of Online Enrollment.
Use the Description field to enter a brief summary or additional information to display with the plan title in Online Enrollment.
Use the Resources section to select documents to associate with the plan and display in Online Enrollment as an additional resource for employees to download or print.
Note: You add and edit resources on the Resources tab of the INS: Defaults window.
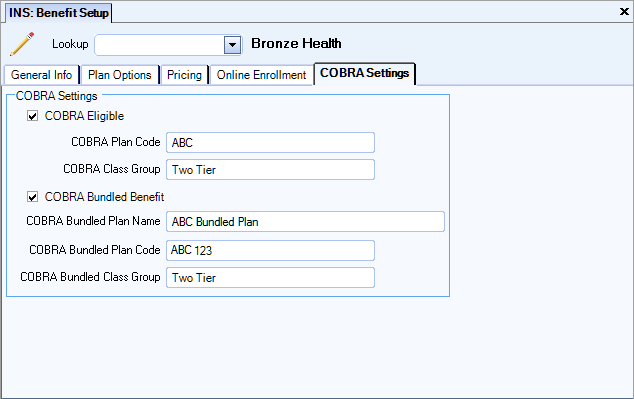
If this Benefit is COBRA Eligible, use the fields on this tab to enter any relevant information. This field displays if you selected a Benefit Method of Insurance/Other. You can filter for the Status of COBRA Enrolled on the Benefit Insurance/Other Analysis Report.
If you select the COBRA Eligible option, you are stating that the benefit is eligible for COBRA once an employee becomes inactive. The Benefit Wizard checks for any employee who is inactive and selects appropriate options on the Benefits By Employee screen. When the Benefit Wizard is running an Insurance/Other batch, the system looks for employees that are inactive during that period and selects both the COBRA Eligible and Action Pending check boxes. This indicates that this Insurance/Other Details record needs review and that the employee is to be offered the COBRA plan for the benefit. If the benefit is not COBRA eligible, the system does not select the COBRA eligible check box on the Benefits By Employee screen, but does select the Action Pending check box.
