PAY: Other Deduction Codes
Overview
You can use the PAY: Other Deduction Codes screen to set up other deductions, garnishments and administrative fees associated with garnishments that you will need for payroll processing. After you set up Other Deduction Codes, they are available for selection in the PAY:Other Compensations and Deductions screen of an employee. You may import Other Deductions into Accounts Payable Invoices.
When designating Deduction Codes as Pre-Tax, the deduction reduces the Gross Earnings from all applicable tax jurisdictions by default. If you DO NOT want the pre-tax amount to decrease Gross Earnings for applicable tax jurisdictions, then select the Include in Gross Earnings check box.
This is only applicable if you use the original tax engine.
A Deduction Code can be tied to a Special Tax Code (W2 Description) that is totaled and placed on the W2 in the appropriate box.
The Rollover button on the toolbar is available if you are on a current record. You can rollover (copy) from one deduction record to another. For more information see Rolling Over Other Deduction Codes.
Key Functionality
For information about using the Lookup field, see Lookup Deductions.
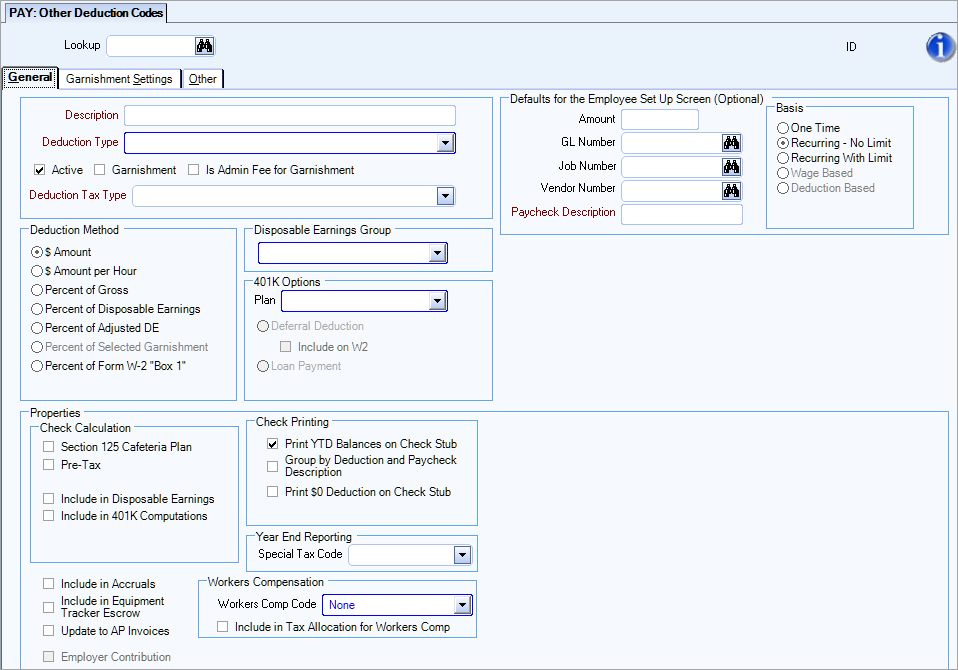
The PAY: Other Deduction Codes window has three tabs:
Use the Description field to describe the Other Deduction Code. You must enter a description for each new other deduction record. After you have created an Other Deduction code, the system displays this Description with the corresponding information in other areas of the Payroll module.
If you attempt to enter the name of an existing Other Deduction Code in the Description field, you will receive a warning to use the Lookup to locate the record. This Description will default to the Paycheck Description field, but it can be overwritten. If you change the Description, and the Paycheck Description was the same as the previous Description, then the Paycheck Description will automatically change to match the new Description.
Use the Deduction Type field to group Other Deduction Codes that are similar in nature.
Example: Deduction Types could be based on the underlying reasons for the deductions (i.e., Insurance, Garnishments, Savings, Union Dues, Child Support, etc.). When creating a batch of checks in the Check Processing Wizard, you may select the Deduction Types to include in the batch (i.e., calculate paychecks using just the Other Deductions grouped under the Deduction Type of Insurance).
To add a new Deduction Type, double-click in the Deduction Type field, or type a new Deduction Type and press Enter. The Deduction Types add/edit list displays. When adding a new Other Deduction Code, the system displays the default Deduction Type selected (if one was selected) in the Deduction Types add/edit list.
Use the Active check box to set this Other Deduction Code to active (checked) or inactive (not selected). The Active check box is selected as the default for new records.
If you attempt to use an Other Deduction Code (on the Employee Other Compensations and Deductions screen) that is not active, the system displays a warning message. At this point, it is up to you to determine if you should proceed with using this Other Deduction Code, or if you should cancel the entry.
Select the Garnishment check box to create the deduction as a garnishment. Once the Garnishments check box is selected, the Garnishments Settings tab is enabled. If the Garnishment check box is selected, the Garnishment Type becomes a required field.
You cannot clear the Garnishment check box if the deduction has already been assigned to an employee. For more information see Learning about Garnishments.
Select the Is Admin Fee for Garnishment check box if you are setting up an administrative fee that will be used for Garnishment deductions. If the Is Admin Fee for Garnishment check box is selected, the Deduction Method must be either a $ Amount or a Percent of Selected Garnishments.
If you clear this check box and the Deduction Method was Percent of Selected Garnishment, then the Deduction Method will be reset to $ amount.
This check box displays when the Is Admin Fee for Garnishmentcheck box is selected. Select the Employer Fee check box if the Admin Fee will be deducted and kept for the Employer. If the Admin Fee is to be paid to an outside Agency, and/or a third party processor like ADP will remit the fee to the Vendor, clear this check box.
The Garnishment Type field is enabled if you select the Garnishment check box. If the Garnishment check box is selected, the Garnishment Type becomes a required field. The Garnishment Type list is hard coded in WinTeam. You can select from the following Types:
- Tax - Federal
- Tax - State
- Support - Child
- Support-Spouse
- Support - Other Dependent Care
- Bankruptcy
- Federal Agency
- Student Loan
- Other Creditor
- Voluntary Agreement
The Deduction Tax Type field is used with the updated payroll tax automation processing. This field is required for the updated payroll tax engine.
This group of deductions are pre-tax and allow for deduction methods of $ Amount, $ Amount per Hour, Percent of Gross and Percent of Form W-2 "Box 1". The deduction method limitations are intended to ensure correct setup. Also, with this group of Deduction Tax Types, all other properties are available except Section 125 Cafeteria Plan and Employer Contribution. The basis options available are One Time, Recurring – No Limit, and Recurring – Limit.
The Custom (Pre-tax) Deduction Tax Type has the same capabilities as the other pre-tax types, however, it should only be used under special circumstances when you want the ability to select the jurisdictions for which this deduction applies. Selecting this option will affect tax calculations and W2 earnings.
By default, all jurisdictions are selected, so you need to specifically select the Pick From List option and check the appropriate jurisdictions in the Tax Jurisdiction area.
This type has all the same capabilities as the other pre-tax types with two exceptions. The Section 125 Cafeteria Plan option is selected and cannot be cleared, and 401k Options are disabled as they should not be used with this deduction tax type. Note, that if 401k options were set on an existing deduction and this deduction tax type is applied, those settings will be cleared.
This group of deductions are after-tax and allow for deduction methods of $ Amount, Amount per Hour and Percent of Gross. Roth IRAs are set up as after-tax deductions and the Pre-tax check box cannot be selected. This limitation is intended to ensure correct set up. Also, with this group of Deduction Tax Types all other properties are available except Section 125 Cafeteria Plan, Include in Gross Earnings and Employer Contribution. The basis options available are One Time, Recurring – No Limit and Recurring – Limit available.
The Custom (After-Tax) Deduction Tax Type is designed as a general type, particularly appropriate for setting up union dues that are currently handled through PAY: Taxes. You would use this type of Deduction Tax Type if the deduction calculation is dependent on your gross wages. This type has similar functionality to the after-tax types, with the following changes.
- Include in 401k Computations (in properties), 401k Options and Workers Compensation settings are disabled.
- Employer Contribution and Monthly Limit fields are enabled. The Employer Contribution option offers the capability to set a percent of the deduction to be paid for by the employer. This value is the percentage of the Withhold $ deduction that is figured by the Deduction Matrix. When you select the Employer Contribution check box, the Employer Contribution % ER GL # and the ER Job # fields display. Once you enter the Employer % value, the remaining percentage is automatically entered in the Employee % field.
- When the Deduction Method is set to Percent of Gross, Basis options for Wage and Deduction Based options are available.
- When the Basis is set to Wage Based, the Earnings Matrix and Max Amount per Check fields are available.
- When the Basis is set to Deduction Based, the Deduction Matrix and Use Monthly Gross Earnings fields are available.
Use the Deduction Method to calculate amounts for this Other Deduction Code. Seven methods are available, and based on the one selected, the system displays different fields and options.
Note: When you change the selection in the Deduction Method area, the value in the Amount/Percent field in the Defaults for the Employee Set Up (Optional) area is automatically removed. This prevents errors such as $2.50 being changed to 250% when you change from a dollar-based deduction method to a percentage-based method.
Percents entered can be less than 1%.
$ Amount
If you select this option, the system calculates the Other Deduction amount based on a fixed dollar amount entered in the $ Amount field of the Employee’s Other Deduction record.
Amount per Hour
If you select this option, the system calculates the Other Deduction amount based on a dollar amount per hour entered in the $ Amount field of the Employee’s Other Deduction record. The Limits and Include Hours options are also enabled.

For detailed information see Limits.
Percent of Gross
If you select this option, the system calculates the Other Deduction amount based on a percentage of the employee’s qualified gross earnings. Whatever percentage is indicated in the Amount field of the Employee’s Other Deduction record will be used for this computation.
The system calculates gross earnings as follows:
Qualified Gross = Normal Wages + Other Compensations that have the Include in Qualified Gross option selected
Percent of Disposable Earnings
If you select this option, the system calculates the Other Deduction amount based on a percentage of the employee’s disposable earnings. Whatever percentage is indicated in the Amount field of the Employee’s Other Deduction record will be used for this computation.
Disposable Earnings (DE) are calculated as follows:
DE = Qualified Gross * - Taxes ** - Other Deductions ***
*Qualified Gross = Normal Wages + Other Compensations that have the Include in Qualified Gross option selected
**Taxes = All taxes, including Additional Withholdings set up in the Employee Master File Tax Info tab for Federal, State, or Local.
***Other Deductions = Other Deductions with a Deduction Method of $ Amount, Amount per Hour, or Percentage Gross where the Include in Disposable Earnings check box is selected.
Percent Adjusted DE
If you select this option, the system calculates the Other Deduction amount based on a percentage of the employee’s adjusted disposable earnings. Whatever percentage is indicated in the Amount field of the Employee’s Other Deduction record will be used for this computation. This method is similar to the Percent Disposable Earnings method, except that you can choose which of the Other Deductions the system includes (or does not include) in calculating adjusted Disposable Earnings.
When you select this option, WinTeam displays the Deductions for Adjusted Disposable Earnings grid that lists all existing Other Deduction Codes, except for those with the Deduction Method of Percent Adjusted DE. Select the Include check box for just those Other Deductions you want included when calculating adjusted disposable earnings.
Select Disposable Earnings Groups to select groups rather than individual deductions.
Note: When you enter a new Other Deduction Code, you choose whether to include this new Other Deduction Code in computing adjusted disposable earnings for any existing Other Deduction Codes that use the Percent Adjusted DE method. The system will do this for any new Other Deduction Code you create, with the exception of deductions using a Deduction Method of Percent Adjusted DE.
Percent of Selected Garnishment
This option is available if the Admin Fee check box is selected.
Rather than using a specified amount for Admin Fees associated with a Garnishment, the system will use a percent of the Garnishment.
Example: If the Garnishment was $100, and the Admin Fee is 2%, the Admin Fee would be $2.00.
Using this method, you can also impose minimum and maximum amount limits per check. See limits.
Percent of Form W-2 "Box 1"
So that this Insurance Benefit will be calculated as a percentage of an employee's "Wages, tips, other compensation," select the Deduction Method Percent of Form W-2 “Box 1”. On the W-2, Box 1 shows the total taxable wages, tips, and other compensation (before any payroll deductions) that you paid the employee during the year. (This does not include elective deferrals, such as employee contributions to certain retirement plans. See see IRS General Instructions for Forms W-2 and W-3 for more information.)
WinTeam will calculate this deduction each pay period, based on information contained in the Employee Master File Other Comps/Deducts screen.
See Percentage Based Deductions and Setting up an ACA-Compliant Payroll Deduction and Benefit Plan Option for more information about how these percentages are calculated.
Double-click the Disposable Earnings Group field to open the Disposable Earnings Groups Add/Edit list. This field allows you to create and maintain groups which are in the same category of disposable earnings. You select these groups from the Deductions for Adjusted Disposable Earnings section when using the Percent of Adjusted DE deduction method.
Use the 401K Options to tie a deduction to an existing 401K plan for reporting purposes. If the deduction is part of a 401K plan, select a 401K plan from the Plan field drop down list. To add a plan to the list, double-click in the Plan field to open the 401K Plans add/edit list. The Standard (ID 1) 401K plan (from the Employee Master File, 401K Plan section) is populated by default. If you have other 401K plans, enter them in the 401K Plans add/edit list using an ID other than 1.
After you select a plan, you specify whether it is a Deferral Deduction or a Loan Repayment.
Deferral Deduction
When you select the Deferral Deduction option, other fields become available which allow you to include information on the employee's W2 and set a deduction limit for the plan.
- Select the Include on W2 check box if you want to include the deduction amount in the 401K deferred amount that prints on the Employee W2 Report (under Taxable Earnings/Taxes).
- Select a Retirement Group from the drop down list. To add a group to the list, double-click in the Retirement Groups field to open the Retirement Groups add/edit list. For each retirement group you enter a description and limit and then select whether the group is active or not (defaults to active when added). No deductions are taken from an employee’s paycheck once the limit has been met for that group. If the limit is met, a pre-tax deduction takes priority over a non pre-tax deduction within the same group.
Note: The same Retirement Groups add/edit list opens from both the Other Deduction Codes and Payroll Defaults windows. This allows you to use the same set of limits to help you stay in compliance with federal contribution limits. You can access this list from either window to make changes or additions.
Loan Repayment
When you select the Loan Repayment option, the other options in the 401K Option area are not available since there are not limits on loan repayments, and they are not included on an employee's W2.
Section 125 Cafeteria Plan
Select this check box to designate the deduction as Section 125. Section 125 deductions must be pre-tax in at least one jurisdiction, so the Pre-Tax check box will select by default.
Pre-Tax
If you select the Deduction Method of $ Amount, Amount per Hour, or Percent Gross, the system displays the Pre-Tax check box.
Select the Pre-Tax check box to set the status of the Other Deduction Code to pre-tax (selected) or not pre-tax (cleared).
Note: It is important that you select the Pre-Tax option correctly, since this field determines if the Other Deduction is subtracted from earnings before they are taxed or after they have been taxed. If you select the Pre-Tax option, the system calculates and subtracts the Other Deduction amount before taxes are figured, and then updates this amount to the employee W2 file.
If you select this check box, the Include in Gross Earnings check box is available.
If this check box was originally selected, then you clear (uncheck) it, the Include in Gross Earnings check box is also cleared (if it was selected).
Include in Gross Earnings
If you select the Pre-Tax check box, the Include in Gross Earnings check box is enabled and selected by default. This check box defines whether or not a tax deductible deduction reduces the Gross Earnings side of all applicable tax jurisdictions.
Warning: Most deductions do not qualify for a reduction in Gross Earnings. If you wish to reduce the Gross Earnings with the deduction, we suggest that you first discuss it with your internal counsel as it will have ramifications on tax filing. It is recommended that changes be completed at the start of a calendar year or fiscal quarter. If you have any questions, contact TEAM Client Services by phone at 800-500-4499 or by email at supportstaff@teamsoftware.com.
Example: Taxable earnings are $1,000.00 with a pre-tax deduction of $50.00. When the Include in Gross Earnings check box is selected, the gross and taxable would be calculated as: gross $1,000.00; taxable $950.00; pre-tax $50.00. However, if the Include in Gross Earnings check box is not selected, the gross and taxable would be calculated as: gross $950.00; taxable $950.00; pre-tax $50.00.
Exception: For government types FUTA and SUTA, pre-tax deductions will always reduce gross earnings, regardless of how this check box is set. See Understanding Subject Wages for more information.
Note: The standard 401K deduction that is system-calculated (not through an Other Deduction Code) is considered to have this check box selected and will never be deducted from the employee's gross earnings.
Include in Disposable Earnings
Use the Include in Disposable Earnings check box to indicate if this deduction code is included in the Disposable Earnings amount.
Disposable Earnings (DE) are calculated as follows:
DE = Qualified Gross * - Taxes ** - Other Deductions ***
*Qualified Gross = Normal Wages + Other Compensations that have the Include in Qualified Gross option selected
**Taxes = All taxes including Additional Withholdings set up in the Employee Master File for Federal, State, or Local.

***Other Deductions = Other Deductions with a Deduction Method of $ Amount, Amount per Hour, or Percentage Gross where the Include in Disposable Earnings check box is selected.
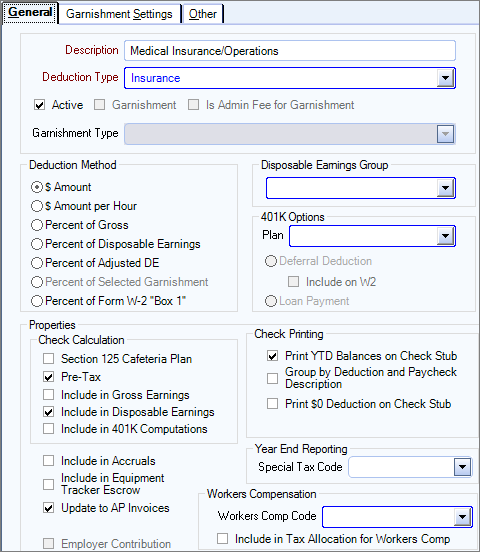
Include in 401K Computations
WinTeam displays the Include in 401K Computations option only if you have selected the Deduction Method of $ Amount, Amount per Hour, or Percentage Gross.
If you select this option, the system subtracts amounts related to this Other Deduction from normal wages to calculate the 401k Earnings. This is important when the 401k deduction is set up with a Percentage. In this case, the 401k Earnings is what is used to determine the 401k deduction amount. If you do not select this option, the system excludes amounts related to this Other Deduction when calculating the 401k Earnings.
Example: Other Deductions, such as payroll savings, might have this option selected so that the Savings deduction reduces the 401k earnings.
Employees Gross Wages: $640.00
Payroll Savings Deduction: $50.00
401k Earnings would then be $590.00 and this is what would be used to calculate the 401k percentage deduction.
Select the Include in Accruals check box to include this Other Deduction when performing a Labor Accrual based on Method 3 (Payroll Batches). Typically, Other Deductions are not items you would accrue for but you do have the option here if you want to include them in the accrual.
Select the Include in Equipment Tracker Escrow check box to include the total of this deduction in the Equipment Escrow calculation.
When this check box is selected, the system totals the activity for all Other Deduction Codes that have this option selected and displays the amount in the HR: Equipment Tracker, Total Deduction field.
Use the Update to AP Invoices check box if this is a deduction you want to update to Accounts Payable Invoice Entry. With this option checked, you will be able to enter a Vendor Number (or have the Vendor Number default) to the Other Compensations and Deductions (Other Deductions tab) screen in the Employee Master File.
If you use this Other Deduction Code for an employee, and this option is selected, the system will require you to enter a Vendor # in the employee's Other Compensation and Deduction (Other Deductions tab) screen. However, if you do not select this option, the Vendor # field is locked on the Employee's record and you cannot enter a Vendor #.
Garnishment Deductions that require a Vendor # will also require that the AP Memo Line be filled in on the Employee’s deduction record. If there is an Employee deduction currently set up that has a Vendor Number entered for this Deduction Code, and then someone clears (unchecks) this check box, it will not affect any deduction currently set up in the Employee Other Deductions. You can continue with the change, and all deductions added to the Employee Deductions from this point on will NOT require a Vendor Number to be entered.
If there is an employee deduction currently that is NOT set up to be updated to Accounts Payable invoices, and then someone selects this check box, it will not affect any deduction currently set up in the Employee Other Deductions. You can continue with the change, and all deductions added to the Employee Deductions from this point on will require a Vendor Number to be entered.
If this is an Administrative Fee for a Garnishment and the garnishment requires that the fee is subtracted, this check box MUST be selected in order for the fee to come through as a credit on the Vendor's AP Invoice.
If the Fee Basis is Subtracted, the fee will be deducted from the garnishment amount before remitting to the vendor. This does not reduce the employee’s garnishment amount withheld on their check. The Subtract Fee does not update to the General Ledger when payroll is processed. It is subtracted from the Vendor’s garnishment payment at the time of AP Update to Invoice Entry (Payroll Deductions option). The Subtract fee comes through as a credit on the Vendor’s AP Invoice created for the garnishment.
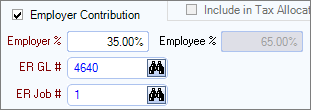
Use the Employer Contribution check box to set a percent of the deduction to be paid for by the employer. This value is the percentage of the Withhold $ deduction that is figured by the Deduction Matrix. When you select the Employer Contribution check box, the Employer Contribution %, ER GL # and the ER Job # fields display. Once you enter the Employer % value, the remaining percentage is automatically entered in the Employee % field.
Print YTD Balances on Check Stub
Select this option to print the year to date balance for this Other Deduction Code on the paycheck stub. If it is not selected, no Year to Date amount will be printed.
Note: A separate YTD line prints for each deduction ID and paycheck description combination. You must add the YTD amounts for each line to obtain the total YTD amount for a deduction ID.
Group by Deduction and Paycheck Description
If a particular Deduction Code/Paycheck Description is used more than one time on the same paycheck with this option selected it will be rolled up into one line for both current and YTD totals. If you do not select this check box, and this Other Deduction Code is used more than one time on a paycheck, the system lists each occurrence separately on the paycheck stub.
Print $0 Deduction on Check Stub
Use this check box to display $0 deductions on the check stub. This applies to all types of deductions, including garnishments and fees.
Special Tax Code
Select a Special W2 Description to tie to the Deduction Code. For any activity within the calendar year for the code, this is totaled and placed on the W2 in the appropriate spot.
If there are tax adjustments for this same Special W2 description, then the amount of the adjustments are reflected in the amount displayed on the W2.
This information is included on the:
- Employee W2 Report – Both from actual paycheck records and also tax adjustment batches.
- Employee W2's – Should tie to the Employee W2 Report.
- Employee W2 Electronic File creation – The special codes are being captured in the electronic files for SSA. (The box 14 items are not shown in the electronic files but those that print in Box 12 are.
- Employee W2 Report for T4s and T4as – (Canadian databases)
The list displays the special tax codes that are applicable based on the Country ID.
Note: WinTeam features enhanced logic to improve the process of setting up an Other Deduction Code that pertains to a Special Tax Code. Special Tax Codes are automatically included on the W2. If you are selecting a Special Tax Code, and also select the Include on W2 option, the system displays a reminder and clears the check box automatically.
USA and Canada have different special tax codes.
USA
- 20% Excise Tax
- 409A Deferral
- 457b Deferral
- 501c Deferral
- Dependent Care
- Flex
- Health Savings Account (if a part of a Cafeteria Plan)
- Insurance
- Roth 401k
- Roth 403b
- Uniform
- United Way
Canada
- Benefits
- Charitable Donations
- Health Savings Account (we are looking at this code for the Employee premium for health services code)
- Pension Adjustment
- Public Transit Pass
- Union Dues
Workers Comp Code
If an Other Compensation/Deduction Code is set up as taxable/tax deductible, you are required to enter a Workers Comp Code. This is used for reporting purposes. Otherwise, you may leave this field blank.
You will need to set up a Workers Compensation Code of "None" to use for any Other Compensation/Deduction Codes that are taxable/tax deductible but are not reportable for workers compensation purposes.
Type or select from the Workers Compensation Code for this record. The Workers Compensation Codes appearing in this list are the same ones used in the Hours Types screen.
To add a new Workers Compensation Code, double-click in the Workers Comp Code field, or type a new Workers Compensation Code and press Enter. The Workers Comp Code add/edit list displays.
Include in Tax Allocation for Workers Comp
This check box displays only if you have selected to use the Tax Allocation program in Payroll Defaults.
This applies only to those Deductions that are "tax-deductible".
Select this check box to include this Deduction when computing the Workers Compensation on the Tax Allocation Journal. This check box is NOT selected by default.
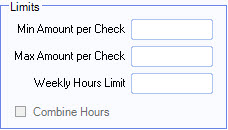
The Limits area displays when the Deduction Method is $ Amount Per Hour.
Minimum Amount and Maximum Amount per Check
During payroll processing, the system ensures that the employee pay is deducted for at least the minimum amount, but not more than the maximum amount for an Amount Per Hour Deduction. You can use either or both of these limits when applicable.
Weekly Hours Limit
Use the Weekly Hours Limit field to limit the number of payable work hours per week, which the system uses to calculate amounts for this Other Deduction Code. The limit applies to the total hours worked by an employee for all jobs during the pay week.
You cannot enter an amount greater than 168 hours.
Combine Hours
Select the Combine Hours check box to force the system to adhere to Weekly Hours limits if a Deduction Code is used more than once for the same employee on the same paycheck.
The only time you would use this feature is to prevent an employee from being paid on hours more than what is specified for the weekly limit.
For more information, see Combining Hours When Determining Weekly Hours Limits.
This field limits the deduction amount that can be applied onto each paycheck. The field displays when the Wage Based Basis is checked. The value entered defaults to the Employee Master File - Other Compensations and Deductions window. If the original value on the Other Deduction screen changes after being entered onto an employee record it will not update this change to the employee record.
This field displays when Wage Based Basis is selected.
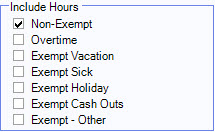
This area displays this when the Deduction Method is '$ Amount per Hour'.
When creating a new deduction record based on $ Amount per Hour, the Non-Exempt check box is selected by default.
Non-Exempt
Non-Exempt hours are any hours that belong to an Hours Type that is not marked as “Exempt from Overtime Always”.
Overtime
Select the Overtime check box to include all overtime and double time hours for this Deduction Code.
If the Include Overtime Hours check box is not selected (unchecked), all overtime and double time hours will be exempt from the amount per hour deduction.
Overtime Hours include those that are system calculated overtime, as well as those hours that are entered with an Hours Type set up as Treat as Overtime Always or Treat as Double Time Always (see Hours Type Defaults screen).
System calculated overtime can include those overtime methods whose overtime rules are based on Daily hours limits. If someone exceeds the daily hours limits (as what can occur in California when using Overtime Methods 2 or 3) and overtime develops, the overtime hours are included in the computation of the amount per hour deduction.
Exempt Hours
Select the Exempt check box next to each exempt hours type to include the selected hours for this Deduction Code.
Exempt hours are any hours paid that belong to an Hours Type with the “Exempt from Overtime Always” option selected.
Exempt Hours include Vacation, Sick, Holiday, and Cash Outs. Within the Hours Type screen, you can identify what type of Exempt hours it is by using the check boxes within the Properties area of the Hours Type setup.
Exempt - Other
Select the Exempt - Other check box next to include exempt hours that are not Vacation, Sick, Holiday, or Cash Outs for this Deduction Code. Exempt - Other includes all other exempt hours that are not categorized (Vacation, Sick, Holiday, and Cash Outs).
Select the Monthly Limit field to limit the total monthly deduction to a specified amount. This value may be modified on the employee record once the deduction is added. If the original value on the Other Deduction screen changes after being entered onto an employee record it will not update this change to the employee record.
This field displays when Wage Based or Deduction Based Basis is selected.
Once this limit amount has been withheld for the month, no further deductions will be taken for that month. On the first paycheck of each month this limit resets.
Select the Use Monthly Gross Earnings check box to apply the deduction percentage to the current month-to-date taxable earnings when the deduction is calculated, or leave it cleared to have the calculation based only on the current check’s taxable earnings. This field displays when Deduction Based Basis is selected.
The selections made here default to the Other Compensations and Deductions (Other Deductions tab) screen in the Employee Master File. These default fields can be changed if necessary for the employee deduction record.
$ Amount
The Amount field displays in this section if you select the Deduction Method of $ Amount or Amount per Hour. You may leave this field blank, or you can enter a default amount (either a fixed dollar amount or an amount per hour). For deductions using the Deduction Method of Amount per Hour, WinTeam displays a warning message if you enter a default amount that is greater than $1.00.
Note: When you change the selection in the Deduction Method area, the value in the Amount field is automatically removed. This prevents errors such as $2.50 being changed to 250% when you change from a dollar-based deduction method to a percentage-based method.
Percent
The system displays this Percent field if you select the Deduction Method of Percentage Gross, Percent Disposable Earnings, Percent Adjusted DE, or Percent of Selected Garnishment. You may leave this field blank, or you can enter a default percent.
Note: When you change the selection in the Deduction Method area, the value in the Percent field is automatically removed. This prevents errors such as $2.50 being changed to 250% when you change from a dollar-based deduction method to a percentage-based method.
GL Number
The GL Number field displays for all Deduction Methods. You may leave this GL Number field blank, or enter a General Ledger account to default. Use the Lookup to locate the GL Number. The GL Number you select is then used to post activity for the Employee Other Deduction.
Job Number
The Job Number field is optional. You may leave this field blank, or use it to select a default Job Number for the system to use when pulling this Other Deduction Code into the Employee Master File, Other Compensations and Deductions (Other Deduction tab) screen. You can use the Lookup to locate the Job Number.
You may overwrite this default amount in the Employee Master File, Other Compensations and Deductions screen. The Job Number you select is then used to post activity for this Other Deduction.
Vendor Number
The Vendor Number field displays for all Deduction Methods and is used for those deduction codes set up to Update to AP Invoices. Use the Vendor Number field to enter a default Vendor Number for the system to use when pulling this Other Deduction Code into the Employee Master File’s other deduction record. You can use the Lookup to locate the Vendor Number if you are unsure of what it is.
Note: Only Other Deductions Codes with the Update to AP Invoices option selected, allow a Vendor Number to be entered (or defaulted) to the Employee Master File, Other Compensations and Deductions screen. If defaulted, the Vendor Number displays in the footer section of the Other Deductions tab. If the Other Deduction code has a Vendor Number entered here but the option Update to AP Invoices is not selected, then no vendor number will default into the employee’s deduction record, nor will the field be available for entry
Paycheck Description
The Paycheck Description prints on employee paychecks to describe the Deduction.
The Description of the deduction code is what initially defaults to this field; however, you may modify it to be something different.
Use the Basis options to select how often an Other Deduction should occur. The selection made defaults to the Employee Master File, Other Compensation and Deductions (Other Deductions tab) screen when this Other Deduction Code is added to the employee record. You may overwrite this default amount in the Employee Master File, Other Compensations and Deductions screen.
Three options are available for the Basis that applies to this Other Deduction Code.
One Time
If you select this option, this Other Deduction occurs just one time.
Example: Assume the Other Deduction Code has been set up with a Basis of One Time and this code has been selected in the Other Compensations and Deductions (Other Deductions tab) screen for an employee. After one paycheck is created for this employee that includes the One Time Other Deduction, the system removes this Other Deduction Code from the Other Compensations and Deductions (Other Deductions tab) screen for this employee. This occurs when the Payroll batch is updated to the general ledger.
Recurring No Limit
If you select this option, this Other Deduction occurs an unlimited number of times without a dollar limit. In other words, if an Other Deduction Code is set up with a Basis of Recurring – No Limit selected in the Other Compensations and Deductions (Other Deductions tab) screen for an employee, each paycheck includes this Other Deduction. The deduction continues until the code is deleted from the Employee Master File, Other Compensations and Deductions screen for this employee, or an ending date for the deduction record is entered. If using the ending date, the deduction will stop being deducted when the ending date is less than the pay period beginning date.
Recurring with Limit
If you select this option, the system displays a Limit field to enter a dollar limit for this Other Deduction Code.
This indicates that this Other Deduction occurs as many times as needed, until the dollar limit is reached. In other words, if an Other Deduction Code is set up with a Basis of Recurring with Limit on the Other Compensations and Deductions (Other Deductions tab) screen for an employee, the Other Deduction continues to be deducted from the employee’s paycheck until the cumulative total of this Other Deduction is equal to the dollar limit. Once the dollar limit for this employee is reached, the system removes this Other Deduction Code from the Other Compensation and Deductions screen when the batch is updated to the General Ledger.
The system does allow this field to have a negative value, and the system will recognize when it reaches the limit. This field is a required field, thus it must have a value to be saved. If you do not want a defaulted value you can enter a 0. When you add this deduction onto the Employee Master File this field will be cleared, and it allows you to enter the appropriate amount for that employee.
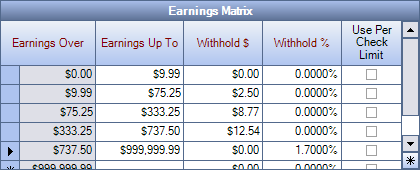
Wage Based
Use this field to set up a deduction which after calculating the employees gross wages it uses a tier to calculate the deduction amount. The Earnings Matrix allows you to set the deduction parameters. You might want to set the Max Amount per Check and/or Monthly Limit fields for this type of deduction.
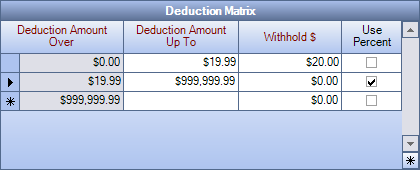
Deduction Based
Use this field to set up a deduction which after the deduction amount is figured, you need to apply a tier to figure the withheld amount. The Deduction Matrix allows you to set up these tier parameters. You may set up as many lines as needed to create the tiers and limits necessary.
Also, you might want to set the Monthly Limit or select Use Monthly Gross Earnings for this type of deduction.
When you select the Percent of Form W-2 "Box 1" Deduction Method, these fields are displayed. The Min Amount per Check and Max Amount per Check are used as defaults when manually entering an Employee Only deduction for insurance benefits on the Employee Master File, with a second deduction for dependents, with amounts monthly and annualized.
You can use the Min Amount per Check to ensure an employee has a co-funding responsibility for insurance in cases where minimal or no hours during the pay period were worked. Similarly, the Max Amount per Check would ensure a highly paid employee isn’t charged more than the actual premium when using Percentage Based Cost Method.
This area displays only when Pre-Tax is selected.
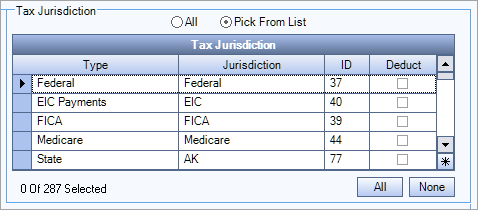
Use the Tax Jurisdictions area to define all or some of the tax jurisdictions in which this Other Deduction Code is pre-tax.
Select All if the Other Deduction Code is pre-tax for all tax jurisdictions. This is the default selection.
Select Pick From List to display a Taxable selection box containing all of the available tax jurisdictions. Select the check box for the tax jurisdictions that apply to this Other Deduction Code.
Note: The Deduct label means it will be included during the calculation of taxes when selected.
Note: Section 125 deductions will always be pre-tax in at least one jurisdiction.
The Garnishment Settings tab is available when the deduction is a Garnishment. The information entered here is used to default information in the Employee Master File, Other Compensations and Deductions (Deductions tab). You can select one limit, multiple limits, or no limits. When multiple limits are selected, the minimum result (minimum calculated deduction) will rule.
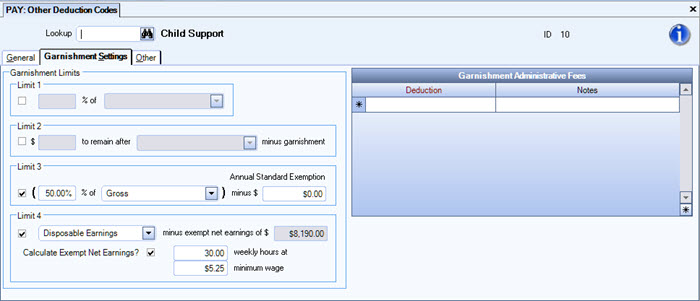
Select Limit 1 to set the garnishment limit on a % of Disposable Earnings or Adjusted Disposable Earnings.
This limit is typically used for support orders and creditor garnishments where consumer credit protection limits apply.
If Limit 1 is selected, the percent field and the basis (% of Disposable Earnings or Adjusted Disposable Earnings) fields are enabled. These fields are not required to be set up with the Other Deduction Code, but are required when using this Limit in the Employee Master File.
When the Limit 1 check box is selected, the Percent field is blank, and the basis defaults to Disposable Earnings. >
You can enter up to 4 decimal places for the percentage and the percentage must be greater than 0 and less than 100%.
In this example, no more than 50% of the employees disposable earnings are subject to garnishment.

Select Limit 2 to enter a dollar amount to remain after Disposable Earnings or Adjusted Disposable Earnings minus the garnishment amount.
In this example, we want the employee to retain at least $150.00 of Disposable Earnings per pay period.

Select Limit 3 to enter a (% of Gross, Disposable or Adjusted Disposable Earnings) minus an annual standard exemption.
The annual standard exemption amount is the sum of the standard deduction and the total amount of the deductions for exemptions.
The amount of your income that is exempt from the garnishment/levy is figured by adding the standard deduction you can claim on your income tax return and the amount you claim on it for exemptions.
In this example the garnishment is 15.00% of Gross Income minus the annual standard exemption . This employees filing status is married filing separately with one personal exemption (this figure is based on 2009 tax tables).

Select Limit 4 to enter Disposable or Adjusted Disposable Earnings minus exempt annual net earnings of a specified dollar amount.
If Limit 4 is used you can also select to Calculate Exempt Net Earnings based on a specified number of weekly hours at a minimum wage amount.
In this example Disposable Earnings minus exempt net earnings is the garnishment limit.
We have chosen to have the system calculate exempt net earnings using 40 weekly hours at a minimum wage of $7.25
40 weekly hours X 7.25 X 52 (weeks) = annual exempt net earnings of $ 15,080.00.

The Garnishment Administrative Fees grid is used to link an Administrative Fee with a Garnishment. Select from the list of garnishment administrative fees. You can double-click to open the Garnishment Admin Fee Deduction Code.

When adding garnishments to an employee record, the system will prompt you to include the Admin Fee if it is linked to a Garnishment Deduction Code.
For more information see Learning about Garnishments, Setting up an Administrative Fee with a Garnishment, Adding Administrative Fees to Employee Deductions.
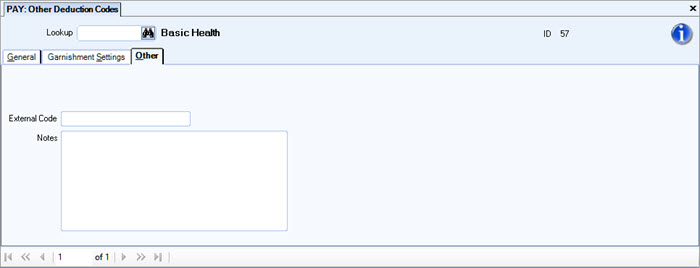
The External Code field can be used for exporting data to 3rd parties, and mapping to outside sources of data. You can enter up to 50 characters.
Enter any notes pertaining to this Other Deduction Code. If you enter more than one line of information, WinTeam automatically wraps the lines of information for you.
Security
The PAY Other Deductions Codes Screen has its own Security Group, PAY Deductions.
This screen has the Read-Only Feature. For more information see Learning about Read-Only Security.
The PAY Other Deductions Codes Screen is part of the PAY ALL Security Group (no Features selected).
Tip: For more information see Security Groups Overview and Security Groups By Module.

