Overview
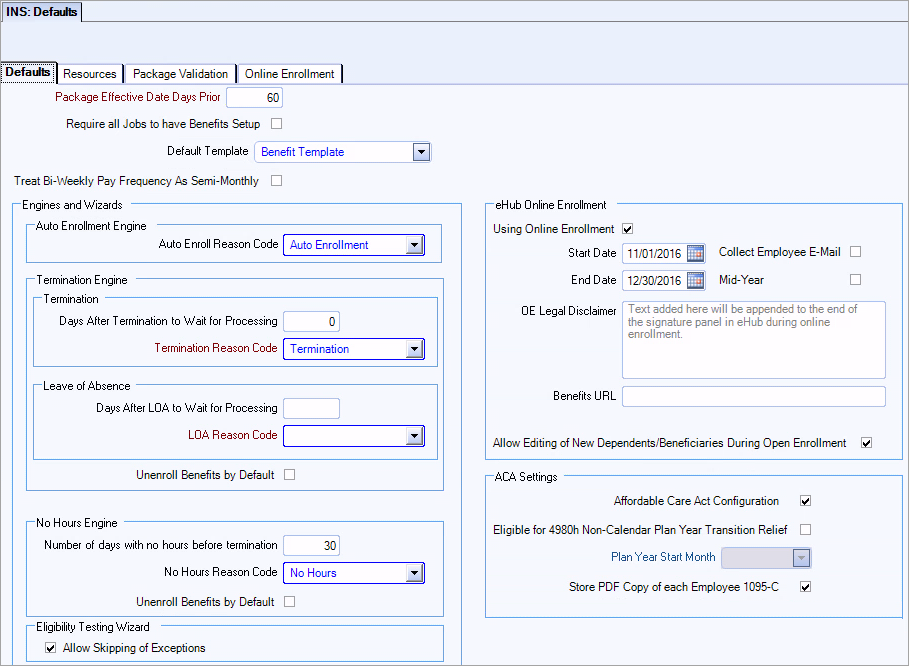
On the Insurance Benefits Defaults screen, you can designate a default Benefit Template or package to help automate the process of assigning a benefits package to an employee. You can also enter default settings and values to help you efficiently run Insurance Benefits Automation Engines. The system automatically uses the Default Benefit Template, and default Automation Engine settings and values set up on the Insurance Benefits Defaults screen unless you cancel or override them. If your company uses the Online Enrollment feature in eHub, you can enter the Open Enrollment period Start and End Dates.
Key Functionality

Select this option if you wish to require every Job to require benefits be set up.
If an employee is not assigned a benefits package through Benefits by Job or Package Assignments, the Insurance Benefits module automatically assigns the benefits package that is indicated here.
Select to have WinTeam calculate insurance benefit deduction amounts for Employees with biweekly pay frequencies such that deductions are limited to two per month, for deduction calculations that more accurately reflect monthly benefit pricing.
Biweekly pay frequencies have two months a year with a third paycheck. When this default option is selected, the system does not take an insurance benefits deduction from those third paychecks of the month.
You can setup the correct monthly benefits pricing. Insurance Benefits Deduction Sync will automatically adjust monthly deduction amounts as necessary for Employees with biweekly pay frequencies.
Example: With option selected:
$50 Benefit Monthly Cost x 12 months = $600 / 24 deductions = $25 Per Paycheck Benefit Deduction Amount (deduction from third paychecks in month is skipped)
With option not selected:
$50 Benefit Monthly Cost x 12 months = $600 / 26 deductions = $23.07 Per Paycheck Benefit Deduction Amount
Example: To set up default values for the Automation Engines, you must first set up a reason for change.
To set up default values for Automation Engines
- To set up the default enrollment reason code to use when you run the Auto Enrollment Engine, in the Auto Enrollment Engine area, select the reason.
- To set up the default Termination Engine settings, do the following:
- In the Days After Termination/LOA to Wait for Processing box, type the number of days.
- To set up the default termination reason code to use when you run the Termination Engine, in the Termination/LOA Reason Code box, select the reason.
- To specify that the Termination Engine automatically unenroll an employee from benefits by default when it determines that an employee's status has been changed to Inactive, select the Unenroll Benefits by Default check box.
- To set up the default No Hours Engine settings, do the following:
- In the Number of days with no hours before termination box, type the number of days.
- To set up the default No Hours Engine reason code, in the No Hours Reason Code box, select the reason.
- To specify that the No Hours Engine automatically unenroll an employee from benefits by default when it determines that an employee's has not worked any hours, select the Unenroll Benefits by Default check box.
Tip: For more information about terminating benefits for LOA employees, see INS: Terminating Benefits for Leave of Absence (LOA) Employees.
When the Allow Skipping of Exceptions check mark is checked, you have the option to progress through the Eligibility Testing Wizard even if there are exceptions. When you use this option, the wizard tests only the employees without exceptions.
The outstanding exceptions still need to be resolved. To resolve these exceptions, run the wizard a second time to get the list of employees with exceptions in the HR: Eligibility Testing - Exceptions window. Use this window as your list of exceptions that need to be worked. Use the drill downs on this window to the PAY: Employee Master File or INS: Benefit by Employee window to research and resolve these exceptions. Once all the exceptions have been removed, run the wizard a third time to test these employees.
If you are considering using this feature, contact TEAM Client Services by phone at 800-500-4499 or by email at supportstaff@teamsoftware.com to discuss the outcome and details.
If your company uses the Online Enrollment feature in eHub, you can enter the Open Enrollment period Start and End Dates on the Insurance Benefits module Defaults screen. WinTeam displays a green Enroll Now button during open enrollment on the eHub My Insurance Benefits Summary screen for all employees eligible for benefits. Specifically, any employee who has a current package with a Package Effective Date in the past, and a related Stability Start Date in the future can enroll using the Online Enrollment feature. In addition, employees who have an OE End Date that is in the future can also use Online Enrollment.
Using online enrollment enables several features across the Insurance module that allow you to filter for Online Enrollments that are In Progress but have not been Confirmed (the employee or proxy has started electing benefits but has not completed the last confirmation step in the Online Enrollment process). These filters are available on the Deduction Sync, Benefits Review and Reporting screens.
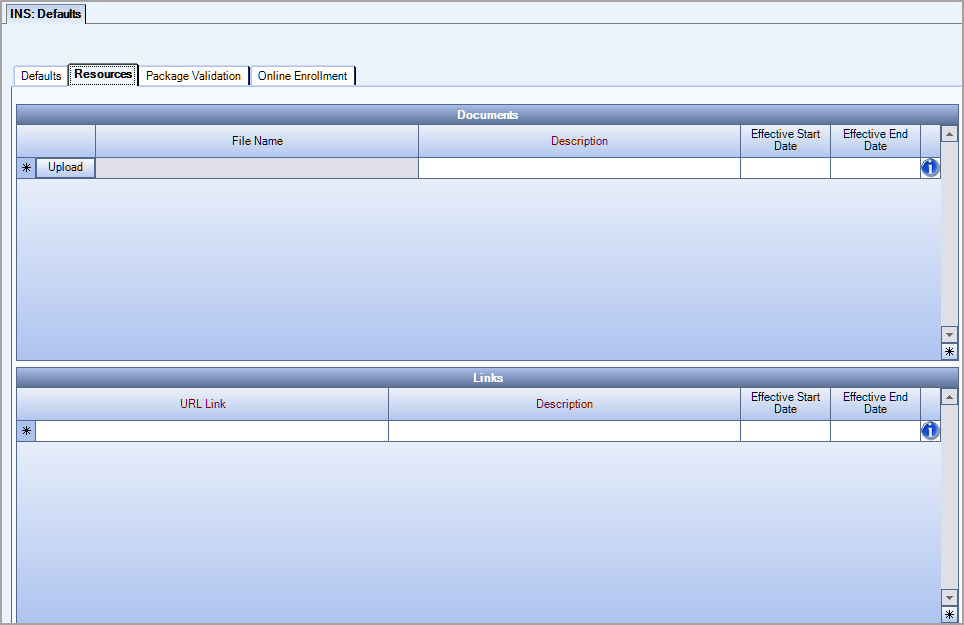
You can use the Insurance Benefits Defaults screen to share insurance benefit documents and links with employees via eHub Web My Insurance Benefits, reducing the need to provide these resources outside of the enrollment process.
Select Using Online Enrollment and enter the Start and End dates for your company's Open Enrollment period. This allows employees who are eligible for insurance benefits to sign up online via eHub Web. If you select the Collect Employee E-Mail check box, then a valid email address is a required piece of information that must be entered by the employee in the Online Enrollment Wizard. If the employee does not enter an email address, they will not be able to advance through the enrollment wizard or save their enrollment information. By default, this check box is cleared and an employee email address is not required.
The Mid-Year check box is used to control open enrollment periods. You must manually select or clear this check box since its selection is not automatically controlled by the system. Most open enrollment periods allow for all employees to enroll, waive and edit insurance benefits selections. However, some employers only want to allow employees who are newly eligible to use eHub Online Enrollment to make changes during open enrollment periods. When the Mid-Year check box is selected, during the open enrollment period controlled by the date fields, only those employees who were previously ineligible but are now eligible can go into Online Enrollment to access their Insurance Benefits and make changes.
The text you add to the OE Legal Disclaimer field displays below the standard message on the electronic signature window. The standard message is "By providing your electronic signature below, you are verifying the information above is correct and you have chosen to elect or waive the above benefits and authorize their deduction from your paycheck."
If you enter a valid URL into the Benefits URL field then a help icon displays on the online enrollment summary window. In eHub, when you hover over the icon the text Benefits URL displays and if you click on the icon it opens the URL.
Checking the Allow Editing of New Dependents/Beneficiaries During Open Enrollment check box allows employees to edit their newly created dependents and/or beneficiaries during the current open enrollment period. Editing can occur only for those dependents and beneficiaries that were added during the current open enrollment period.
Note: This section pertains only if your company uses TEAM's Affordable Care Act (ACA) Solution.
Affordable Care Act Configuration
Select to enable the following options, as well as other ACA-related features throughout the Insurance Benefits module, including the Apply Multi-Employer Interim Rule option in Benefit Offerings and ACA Compliant Eligibility options in Eligibility Setup.
(Optional) Eligible for 4980h Non-Calendar Plan Year Transition Relief
Select if your company is eligible for this ACA relief. For guidelines on eligibility, see the IRS web site. For any Line 16 codes that would have been blank on the 1095-C report, WinTeam will instead populate a Code 2I, signifying the transition relief.
Plan Year Start Month (for 4980h Non-Calendar Year only)
If you select Eligible for 4980h Non-Calendar Plan Year Transition Relief, this field becomes available and is a required field. In the future, the Plan Start Month on Employee 1095-C forms will be based on this month.
Store PDF Copy of each Employee 1095-C
If your company uses eHub, you can select this option to store a PDF copy of each generated Employee Form 1095-C so that employees may access their forms online via eHub.
If your company uses eHub Web Online Enrollment, the INS: Defaults Resources tab is where you may upload documents and list links to more information about individual benefits for which your employees may be eligible. When logged into their eHub Web accounts, eligible employees may download/print the documents or link to additional information to help them make selections during Open Enrollment periods. The Effective Start Date and Effective End Date control how long the document is available in eHub.

Tip: See Automated Package Validation for more information about the contents of this tab.

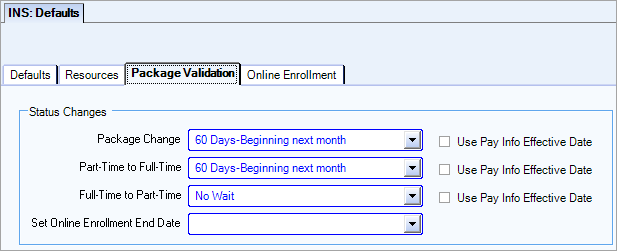
Status Changes
The information in the status changes drop down lists comes from the same table that is used for Benefit Setup and Eligibility Setup.
- Package Change–Examples of package change include job change, classification, employee type, title, company, and location
- Part-Time to Full-Time–There is a 90 day maximum set by ACA in which you have to offer a full-time employee benefits.
- Full-Time to Part-Time–The status changed from full-time to part-time.
- Set Online Enrollment End Date–The period of time that online enrollment is available in eHub for employees with status changes. The amount of time you select depends on your business rules.
Use Package Effective Date
The Use Pay Info Effective Date check box is applicable to all of the status changes except Set Online Enrollment End Date. These check boxes are available after you make a selection in the corresponding status change field. These check boxes are cleared by default.
When the check box is selected, the employee's Effective Date (Employee Master File >Pay Info tab > Pay Info History grid) in used to determine the Package Effective Date.
Tip: See Automated Package Validation for more information.
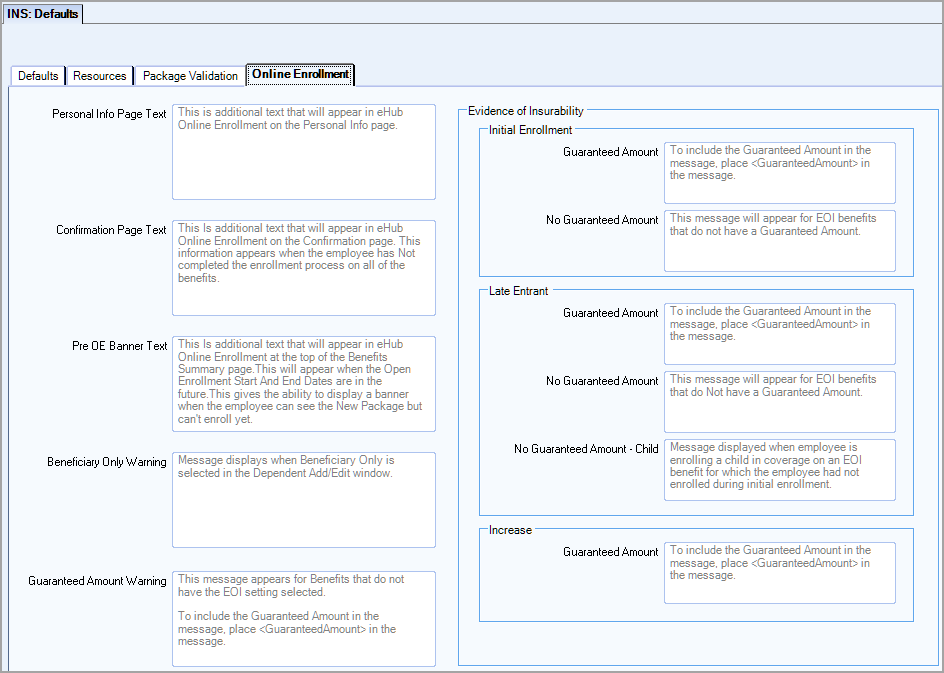
Use this tab to enter language to add custom text to different locations in Online Enrollment to provide more information to your employees.

Personal Info Page Text
You can add a custom message to the Personal Information page to remind employees of the importance of reviewing the accuracy of personal information such as mailing address before confirming elections.
Confirmation Page Text
You can add a custom message to the Confirmation page that displays when an employee does not make a selection for one or more benefits, and proceeds to the confirmation window. This message allows you to communicate the importance of enrolling in or waiving each benefit prior to confirming elections.
Pre OE Banner Text
There is a banner that displays at the top of the Benefits Summary page you can use to communicate a custom message to your employees during an upcoming enrollment period. To use this banner you must be using online enrollment, and the online enrollment start date must be in the future.
Beneficiary Only Warning
When Beneficiary Only is selected in the Dependent Add/Edit page, a message box displays where you can communicate additional information about this selection. If you do not enter a custom message, the following default message displays, "By selecting the Beneficiary Only option, the contact will not be in the list of dependents to choose for any benefit coverage."
Guaranteed Amount Warning
This message displays for benefits that do not have the evidence of insurability (EOI) setting selected.
If you do not enter a custom message, the following default message displays, “The coverage amount entered exceeds the guaranteed amount of $<<Guaranteed Amount>>. In some instances, the insured may need to provide additional documentation or submit to further inquiry or a physical. Please refer to your insurance benefits policy for further information”
You can enter a custom message that displays instead of the default message. You can use a variable to include the coverage amount from Benefit Setup in the message. If you want to do this, you must enter <<GuaranteedAmount>> where you want the amount to appear in the message.
Evidence of Insurability
Initial Enrollment
Guaranteed Amount
This message displays during initial enrollment for an evidence of insurability benefit that has a guaranteed amount.
If you do not enter a custom message, the following default message displays, “During initial enrollment, you may select a coverage amount up to $<<Guaranteed Amount>> without obtaining evidence of insurability. If you or your eligible dependents do not enroll at this time, you can apply for coverage during an annual enrollment period or as a result of a change in status. At that time you will be required to furnish evidence of insurability for ANY amount of coverage.”
The coverage amount is a variable that inserts the amount from Benefit Setup in the message. If you enter custom message, and want to include the coverage amount, you must enter <<GuaranteedAmount>> where you want the amount to appear in the message.
No Guaranteed Amount
This message displays during initial enrollment for an evidence of insurability benefit that does not have a guaranteed amount.
If you do not enter a custom message, the following default message displays, “During initial enrollment, you may select coverage without obtaining evidence of insurability. If you do not enroll at this time, you can apply for coverage only during an annual enrollment period or as a result of a change in status, but you will be required to furnish evidence of insurability at that time.”
You can enter a custom message that displays instead of the default message.
Late Entrant
Guaranteed Amount
This message displays during late enrollment for an evidence of insurability benefit that has a guaranteed amount.
If you do not enter a custom message, the following default message displays, “Since coverage was not selected during your initial offering, you will be required to furnish evidence of insurability.”
You can enter a custom message that displays instead of the default message. You can use a variable to include the coverage amount from Benefit Setup in the message. If you want to do this, you must enter <<GuaranteedAmount>> where you want the amount to appear in the message.
No Guaranteed Amount
This message displays during late enrollment for an evidence of insurability benefit that does not have a guaranteed amount. This message does not apply to dependent children.
If you do not enter a custom message, the following default message displays, “Since coverage was not selected during your initial offering, you will be required to furnish evidence of insurability.”
You can enter a custom message that displays instead of the default message.
No Guaranteed Amount-Child
This message displays when employee is enrolling a child in an evidence of insurability benefit in which the employee did not enroll during initial enrollment.
If you do not enter a custom message, the following default message displays, “Since coverage was not selected during your initial offering, coverage for the Child will be pending until evidence of insurability is furnished for the employee.”
You can enter a custom message that displays instead of the default message.
Increase
Guaranteed Amount
This message displays when employee increases the coverage amount over the guaranteed amount for an evidence of insurability benefit.
If you do not enter a custom message, the following default message displays, “You can increase your coverage up to $<<Guaranteed Amount>> without answering any medical questions. If you are increasing your coverage to an amount that is greater $<<Guaranteed Amount>> then evidence of insurability is required. If you are currently enrolled for coverage over $<<Guaranteed Amount>>, you will not need to submit evidence of insurability to maintain your current level of coverage.”
The coverage amount is a variable that inserts the amount from Benefit Setup in the message. If you enter custom message, and want to include the coverage amount, you must enter <<GuaranteedAmount>> where you want the amount to appear in the message.
