Overview
WinTeam's visual approach makes it easier to identify what tasks to perform. Whether you’re a veteran or new user, a plethora of options exist to help make you the most efficient possible at performing your daily tasks with WinTeam. These topics should help you become familiar with the design and functionality of the software.
Key Functionality
WinTeam's workspace is flexible, uses a modern tabbed interface, and gives you several options to work how you want to.
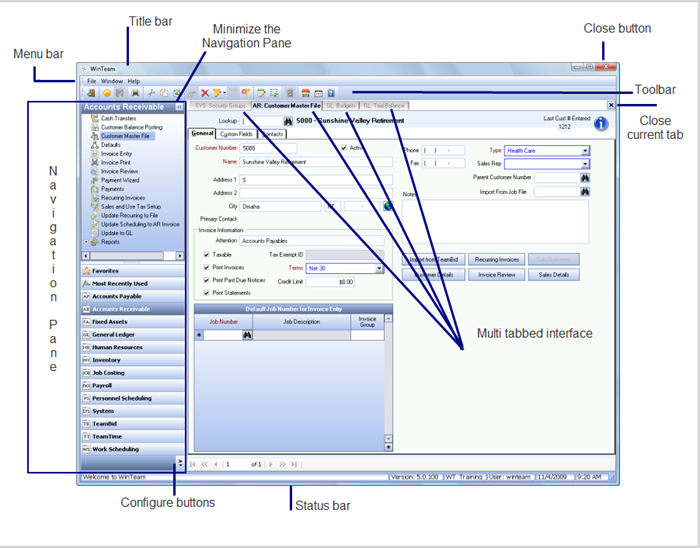
The horizontal bar at the top of the window that displays WinTeam.
At the top of the window is the toolbar. It looks similar to this:

Select any one of the buttons to perform a function. For a complete list of toolbar buttons and their functions, see WinTeam Toolbar.
For information on filtering, see Advanced (SQL) Filters.
For information on Rollovers, see Rollover Functionality.
The left side of the WinTeam interface is the Navigation Pane, which can be used to open screens, create favorites, and view and access recently used screens.
You have the flexibility to expand or minimize the Navigation Pane, along with options to configure the buttons.
Every area within WinTeam can be accessed from the Navigation Pane on the left.
The items that display in the Navigation Pane are controlled by the User Security of the person who is logged on. Therefore, only the items that you have security permissions for will display in the Navigation Pane.
The large middle section of the interface is the default location for all 5.x screens. It also displays the Home Page and Menu Maps.
WinTeam supports a multiple tabbed interface. It is useful for organizing, switching, and viewing multiple screens. You can even split these screens horizontally or vertically for even more screen space.
- The Home Page contains contact information and links to TEAM's Technical Support, Home Office, and our Sales Department.
- To view all areas of WinTeam, along with the workflow of each module, use the new Menu Map's. Although all screens display (the Menu Map is not security driven like the Navigation Pane), security permissions are still enforced.
In addition, you can customize the Home Page to display important messages for your company, that will display when a User logs on.
The Home Page can be accessed at anytime from the Home Page icon on the toolbar.
The Menu Maps can be accessed at anytime from the Menu Page icon on the toolbar.
For more information see WinTeam Main Menu in the WinTeam Help program.
Displays WinTeam Version, Database Name, User, Date, and Time.
Keyboard shortcuts can be used to perform different tasks in WinTeam.
For a complete list of keyboard shortcuts for screens and buttons see WinTeam Shortcuts.
Every WinTeam module has Reports. Reports may be accessed from the Reports icon ![]() under each module in the Navigation Pane.
under each module in the Navigation Pane.
For more information, see Learning about WinTeam Reports.
At the top of every report in WinTeam is the WinTeam Report toolbar. It looks like this:

For a complete list of report toolbar buttons and their functions, see Using the WinTeam Report Toolbar.
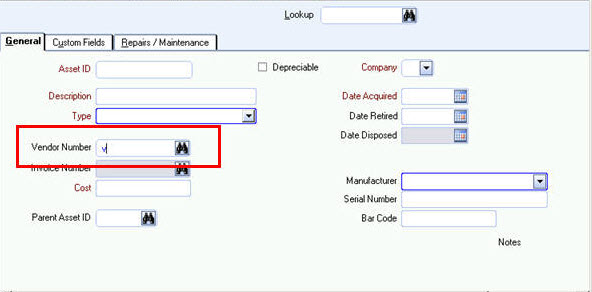
If you key in an alpha character in a numeric field, and then press Tab, a list of records will display that start with that letter.
Example: In this example, we typed "v" in the Vendor Number field, and then pressed Tab.
A record list displays showing all Vendor Names that begin with "v".
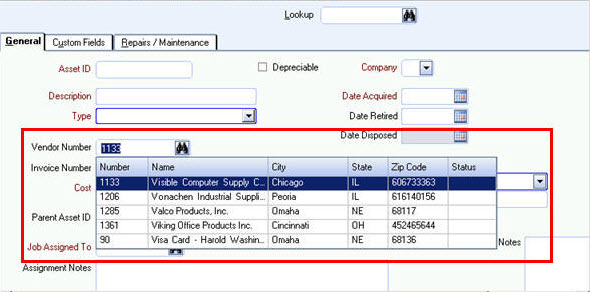
Quick Lookups are available from many areas in WinTeam. Quick Lookups are used to find specific records.
For more information, see Using Quick Lookups.

Grids are used throughout WinTeam to display a tabular view or list of records.
A typical grid supports the following features:
- Virtual Data - WinTeam can display unlimited numbers of rows and columns to load data on demand.
- Sorting - Single and Multi-Column sort operations.
- Filtering - Built in filtering expressions including regular expression support Outlook Grouping - Groups rows with similar values together, just like Microsoft Outlook.
- Fixed Headers, Rows and Columns - You can control how data is displayed.
- Microsoft Excel Operations - Export to Excel
For more information, see Understanding Grids.
The Filter Row is a fixed row in the column header area used for filtering rows. Filter rows are found on all WinTeam Quick Lookup screens.
For more information, see Using the Filter Row Feature.
You can navigate through a recordset by using the Record Selector. For additional details, see Record Selector.
Right-click functionality is available as long as you are in a filtered record set. For more information, see Filtering and Right-click Functionality.
Custom fields offer you a way to keep track of specific information for your unique business needs. While WinTeam already provides fields to record most common data, you may require other information from time to time. Custom fields allow you to set up and store that unique data.
WinTeam provides custom fields for all master files: Asset, Customer, Employee, Inventory, Job, and Vendor. Custom Fields display in their own tab of the master files. Each modules's master file can contain up to 26 custom fields.
For more information, see Using Custom Fields.
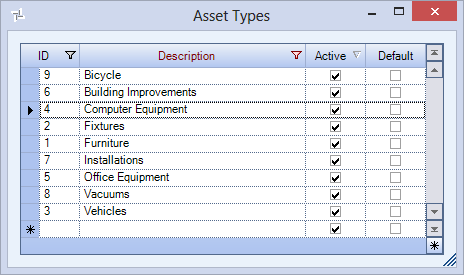
Add/Edit Lists are used throughout WinTeam to group related items into categories. These lists help you classify and manage items. All fields highlighted with a blue border indicate the ability to double-click within the field to open an Add/Edit List. For more information, see Add/Edit Lists.

A Date Control is available for each date field. The Date Control makes entering correct dates easy. For more information, see Using the Date Control.
One of our most powerful features is WinTeam's ability to restrict or sort information without having to create queries. You can define a filter while on a screen. When you apply the filter, you will see only the data that matches the criteria you entered.
For more information, see Using Filters.
Text that displays with a blue font indicates that double-clicking takes you to another window. For example, double-clicking the Posted status displays the G/L Log # the transaction was posted by. In some cases, the double-clicking feature is available in grids.
In this example the Job Number has blue text. If you double-click on the Job Number, the system displays the JOB: Master File record.

All required fields are denoted in maroon.
WinTeam automatically formats all text entries to Title Case (except for multi-line text fields).
You can override this feature by using the F11 shortcut key .
Example: If you type NorthWest street, the system will automatically change your text to Northwest Street. Notice the first character of each word is capitalized and all other characters are lower-case. If you type NorthWest Street, and press F11, the text will save as you typed it.
All screens will print in landscape mode when using the Print button or using the print option in a grid.
You can double-click in multi-line text fields to open the field in Zoom mode, or use the shortcut key, SHIFT + F2. You can The Zoom Feature can be used when you have a lengthy description and a limited amount of viewing space available on the screen. For more information, see Using the Zoom Feature.
All status messages now display with green text, with the exception of status messages that have the double-clicking function as previously discussed.
The Tab key is used to move between fields.
It is important to note that when you move from screen to screen, the system automatically saves the record as long as all required fields have been filled in.
However, if changes are made to any default screen option, it will NOT take effect until you exit out of WinTeam and then log back in OR click the Refresh command in the File menu.
The pencil ![]() in the top left hand corner of the screen indicates:
in the top left hand corner of the screen indicates:
- A record has been changed, or a new record is being added.
- The current record's changes have not been saved.
Throughout WinTeam you will see the Change Info icon .
.
When you hover over this image, you will see the User Added/Changed and Date Added/Changed information.
This icon will also be used in Grid records to show the Changed information (and Added if these also exist).

You can also right-click on the Change Info button to filter for records added or changed by a specific user or date.
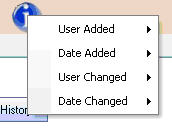
When you hover over one of the fields, you will see a filter menu.
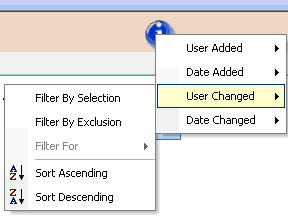
Select Filter By Selection to filter for all records that match your current record’s field value.
Select Filter By Exclusion to exclude from your filter all records that match your current record’s field value.
If you already have a filter applied, then the Sort Ascending and Descending buttons will be available. If you want to include all records in the filter and want to sort ascending based on the current record’s field value, select Sort Ascending.
If you already have a filter applied, then the Sort Ascending and Descending buttons will be available. If you want to include all records in the filter and want to sort descending based on the current record’s field value, select Sort Descending.
 The Details button lets you explore more information about a record. The specific functionality of this button will change depending on what module and screen you are working in, but in general it allows you to see/edit information about a record.

