
Overview
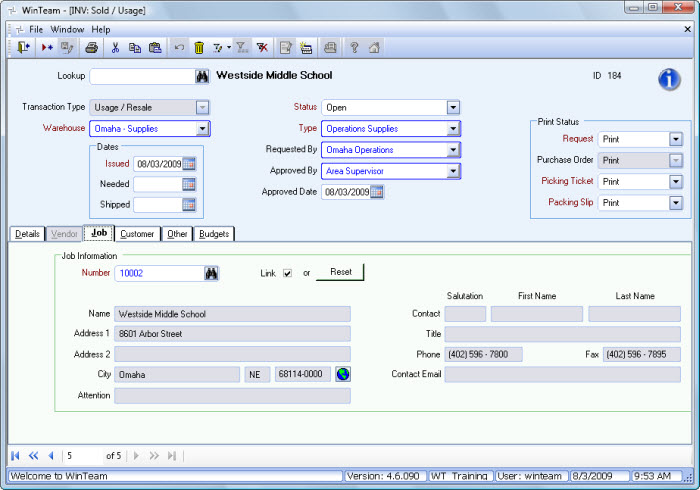
You can use the Sold/Usage to enter and track items delivered to a Job or Customer from an inventory warehouse. The Sold/Usage screen has several tabs of information available. Based on the Transaction Type, the tab focus and required fields vary. For a Usage/Resale Transaction Type the tab focus is set to Job.
Custom Settings
| Section | Item | Value | Module and Purpose |
|---|---|---|---|
| Addresses | UseZipsForCityState | Yes |
This setting automatically fills in the City and State (City and Province) fields when entering a Zip Code. It also removes the City and State fields from the tab stop order. |
| Addresses | TabCityState | Yes | This setting will leave the City and State fields (City and Province) in the tab stop order when the Zip Code Custom Setting is in place. |
For more information see Auto Populating City and State Fields.
For more information see Custom Settings and List of Custom Settings.
Key Functionality
Toolbar
Click the Advanced filter button to create or edit a filter for finding and/or sorting specific records. You can also select a Saved filter. Click the Apply Filter/Sort button to apply any filter or sort criteria you created. Click the Remove Filter/Sort button to remove a filter or sort, if one is currently applied. For more information see Advanced Filtering.
Rollover button
You may use the Rollover button on the toolbar to create a new INV: Usage / Resale record.
For more information on Rollovers, see Rollover Functionality .
The Sold/Usage screen has several tabs of information available. Based on the Transaction Type, the tab focus and required fields will vary.
Lookup
Enter the Usage/Resale, or use the Lookup to locate an existing Usage/Resale record.
The Find Usage / Resale screen opens with the Starting Date field populated. The Starting Date defaults to "Today's Date" minus 45 days.
When the system filters the records, it first looks for records that have a Shipped Date that meets the specified date criteria. Those records then populate the Details grid displaying the Shipped Date in the Activity Date column.
If the Shipped Date is blank, only then does the system look at the Issued Date for additional records.
ID
The system uses the ID field to identify each Usage/Resale record. The system automatically assigns an ID to each new record. The ID does not affect any function of the transaction, and you cannot modify it.
Hover over the Change Information icon to see User Added, Date Added, User Changed and Date Changed information. WinTeam records the logon name of the user entering or changing this record. The Date Added is the original date this record was entered into the system. The Date Changed is the date the record was last changed. Right-click on the Change Info icon to filter for records added or changed by a specific user or date.
When you hover over the User Changed or Date Changed filters, you can:
- Filter By Selection - Filters for all records that match your current records field value.
- Filter by Exclusion - Excludes from your filter all records that match your current records field value.
- Filter For - Filters based on the text/value you enter.
- Sort Ascending - If you already have a filter applied, the Sort Ascending command is available. Also used to include all records in the filter and sort in ascending order based on the current records field value.
- Sort Descending - If you already have a filter applied, the Sort Descending command is available. Also used to include all records in the filter and sort in descending order based on the current records field value.
Transaction Type
The Transaction Type is set to Usage/Resale and dimmed. It is not available for selection.
Warehouse
Use the Warehouse field to specify the name of the warehouse responsible for the Usage/Resale.
Type or select the Warehouse Location responsible for the Usage/Resale.
To add a new Warehouse Location, double-click in the Warehouse field, or type a new Warehouse Location and press Enter.
The Warehouse Locations add/edit list displays.
Dates
Issued
Use the Issued field to enter the original date of the Usage / Resale. The system defaults the current date when adding a new record.
Type a date in this field, or use the Date Control to select a date.The Issued Date is a required field for Usage / Resale.
Needed
Use the Needed field to enter the date the items should be delivered.
Type a date in this field, or use the Date Control to select a date.An entry in the Needed field is not required for Usage / Resale.
Shipped
Use the Shipped field to enter the date the items shipped.
Type a date in this field, or use the Date Control to select a date.An entry in the Shipped field is not required for Usage / Resale.
Status
Use the Status field to select the current state of the Usage / Resale record.
Open
Use the Open status when the Usage/Resale is initially set up and waiting for approval.
An Open status is the default status on a new Usage/Resale.Not Approved
Use the Not Approved status when a Usage/Resale is not approved for delivery.
Note: When the status is set to Not Approved the Approved By/Date fields change to Not Approved By/Date.
Approved
Use the Approved status when a Usage/Resale is approved for delivery.
Shipped / Closed
Use the Shipped/Closed Status when a Usage/Resale is shipped.
Closed / Not Shipped
Use the Closed / Not Shipped status when a Usage/Resale was ordered, but will not be received.
Type
Use the Type field to group Sold Usage records of similar type for report purposes.
Type or select the Type you want to use.
To add a new Type, double-click in the Type field, or type a new Type and press Enter.
The Types add/edit list displays.
Requested By
Use the Requested By field to enter the name of the person or department requesting the products or items.
Type or select the requesting person (department) you want to use.
To add a new entry to the list, double-click in the Requested By field, or type a new name and press Enter.
The Requested By add/edit list displays.
Use the Approved By field to enter the name of the person who approved the products or items for purchase.
Type or select the approval authority you want to use.
To add a new entry to the list, double-click in the Approved By field, or type a new name and press Enter. The Approved By add/edit list displays.
This setting requires entries to be made in the Approved By and Approved Date fields when the record Status is anything butOpen on Activity screens.
| Section | Item | Value |
|---|---|---|
| Inventory | RequireApprovalInformation | Yes |
Use the Approved Date field to enter the date the Drop Shipment was approved for ordering. Type a date in this field, or use the Date Control to select a date.
This setting requires entries to be made in the Approved By and Approved Date fields when the record Status is anything but 'Open' on Activity screens.
| Section | Item | Value |
|---|---|---|
| Inventory | RequireApprovalInformation | Yes |
Print Status
Use the Print Status to view or change the print status of the Usage/Resale record.
When entering a Usage/Resale the options to print a Request, Picking Ticket, or Packing Slip are available. The only option NOT available is Purchase Order.
Request
On a Usage/Resale the default status is Print.
When entering a Usage/Resale the only valid status options are Print and Don't Print.Purchase Order
Purchase Order is not an option available to Usage/Resale. Purchase Order is dimmed and not available for selection.
Picking Ticket
On a Picking Ticket the default status is Print.
When entering a Usage/Resale the only valid status options are Print and Don't Print.Packing Slip
On a Packing Slip the default status is Print.
When entering a Usage/Resale the only valid status options are Print and Don't Print.
Below is an explanation of each Print Status option:
The system defaults to this status upon initial entry.
A Usage/Resale remains in this status until it has been printed.Don't Print
This option is available during initial entry. If you select this status, the Usage/Resale is not printed during the Print function.
Printed
Once a Usage/Resale is printed, the status changes to Printed.
Reprinted
If a Usage/Resale is printed from a Duplicate or Needs Reprinted status, the system changes the status to Reprinted.
Needs Reprinting
If the Drop Shipment is printed once, and then is modified before it is closed, the status updates to Needs Reprinting. The Drop Shipment reprints when the P.O's Print Status Marked for Reprinting is selected.
Duplicate
If the Usage/Resale is printed once, the Print Status may be set to Duplicate. If a Duplicate status is selected, the Usage/Resale reprints with the word Duplicate, and the status changes to Reprinted.
Sold / Usage (Job tab)
For a Usage/Resale the tab focus is set to Job.
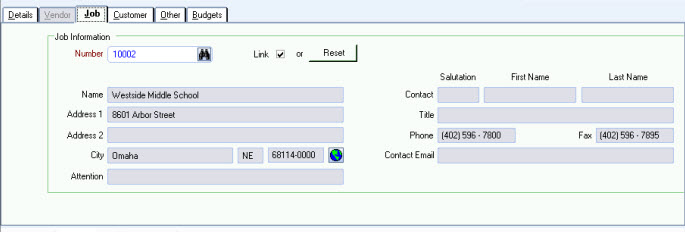
Number
Use the Number field to enter the Job location that requested the items, or use the Lookup to locate the Job Number.
The Number field is required for a Transaction Type of Usage/Resale.
Link
If you entered a Job Number, the Job information defaults from the Job Master File. The Link option is selected by default. When the Link option is selected, any changes made to the fields in the Job Master File reflect for the Drop Shipment when you preview or print it. When you select this option, the fields are dimmed, meaning that the system locked them and you cannot modify these fields.
If this option is not selected, the fields are available for modification. Changes apply only to the selected record and do not affect the Job Master File.
Reset Button
If changes to the Job information have been made in error and you want to restore the original information from the Job Master File, click the Reset Button. This will re-read the Job Master File and display the information from the Job Master File in the given fields.
Sold / Usage (Details tab)

Item Number
Use the Item Number field to enter the items ordered, or use the Lookup to locate the Item. This is not a required field. This field can be left blank and an Item Description can be entered.
You can double-click in this field to open the item record in the Item Master File.
Item Description
Use the Item Description to enter the Description of the item ordered. If an Item Number was entered in the Item Number field, the Description field is populated with the information from the Item Master File. You may change the Description on the Drop Shipment record without affecting the Item Master File.
Quantity
Use the Quantity field to enter the quantity to order. This is not a required field and can be left blank.
Price
The Price will default based on whether you have selected to use Standard or Average Cost (on the Item Master File record). You can also overwrite the default and enter in a new price.
Standard Pricing comes from the Item Master File (Warehouse tab), Standard Cost field.
Average Cost is calculated by dividing Total Quantity on Hand by Total Cost for all Warehouses. You can click the Quantities on Hand button (near the bottom of the screen) to see the average cost for each warehouse.
Measure
Use the Measure field to enter the unit of Measure of the item ordered.
Type or select the Unit of Measure you want to use.
To add a new Unit of Measure, double-click in the Measure field, or type a new Unit of Measure and press Enter. The Unit of Measure add/edit list displays.
Extension
The system calculates the Extension based on the Quantity x the Price. You may overwrite the system calculated extension or enter an extension amount manually if you did not enter a Quantity and Price.
Resale
Use the Resale check box to indicate that this item is being resold to a customer.
Taxable
The Taxable check box is not applicable for the Usage & Resale screen.
This is only applicable for Purchase Orders and Drop Shipments to indicate whether an Item is taxable by the Vendor.Status
Status
Use the Status field to select the current Status of the Item. When the Status is changed at the top, all detail lines below which had a status that matched the main record's status are automatically updated.
Resale Description
Use the Resale Description to enter the description of the item being sold. The system defaults the Item Description to the Resale Description field; however, you may modify the Resale Description. The Resale Description is used on the Accounts Receivable Invoice.
Resale Quantity
Use the Resale Quantity field to enter the resale quantity to invoice. The system defaults the Quantity into the Resale Quantity field; however, you may modify the Resale Quantity. The Resale Quantity is used on the Accounts Receivable Invoice.
Resale Price
Use the Resale Price field to enter the resale price for the Item. If this item is normally resold to the Job, the system displays the resale price based on the Item Group of the Job; however, you may modify the Resale Price.
Resale Measure
Use the Resale Measure field to enter the resale Unit of Measure of the item.
Resale Amount
The system calculates the Resale Amount based on the Resale Quantity x the Resale Price. You may overwrite the system calculated extension or enter an extension amount manually if you did not enter a Quantity and Price.
Work Ticket Number
Use the Work Ticket field to enter a work ticket number (or use the Lookup) if the items ordered are going to be used to perform work on a project or work order.
Enter a Work Ticket # to associate the usage record with a Work Ticket if the items ordered are going to be used to perform work on project or work order.
Double-click to open the WS: Ticket Details screen.
Status Date
Displays the date the Status was changed.
The status date will automatically update to today's date anytime the status is changed in the grid.
Sub Total
Displays the total of the Extension amounts.
Tax
This field displays only on Purchase Orders and Drop Shipments.
Inventory Total
Displays the sum of the Extension amounts.
Total Resale
Displays the sum of the Resale Extension amounts.
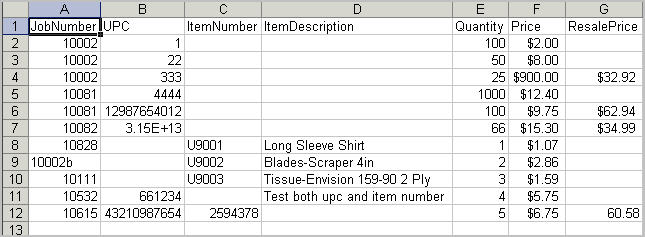
Bar Code Import button
The Bar Code Import button is visible if you have the following Custom Setting in place.

Headers are required in the .csv file.
Document: Inventory Bar Code Import sample file
Click to display the Item Activity History screen.
Click to display the Quantity on Hand screen.
Click to display additional information about this item.
Sold/Usage (Vendor tab) screen
For a Transaction Type of Sold/Usage, the Vendor tab is dimmed and not available for entry.
Sold / Usage (Customer tab) screen

Number
Use the Number field to enter the Customer Number who is using or ordering the items, or use the Lookup to locate the Customer Number.
The Number field is optional for a Transaction Type of Drop Shipment.
You can double-click to open the Customer Master File.
Link
If you entered a Customer Number, the Customer information defaults from the Customer Master File. The Link option is selected by default. When the Link option is selected, changes made to the fields in the Customer Master File reflect for the Drop Shipment when you preview or print it. When you select this option, the fields are dimmed, meaning that the system locked them and you cannot modify these fields.
If this option is not selected, the fields are available for modification. Changes apply only to the selected record and do not affect the Customer Master File.
Reset button
If changes to the Customer information have been made in error and you want to restore the original information from the Customer Master file, click the Reset button. This will re-read the Customer Master File and display the information from the Customer Master file in the given fields. You can also accomplish this by selecting the Link check box, which relinks the Customer Master File information.
Sold / Usage (Other tab)

General Ledger Distribution grid
Use the General Ledger Distribution grid to enter the General Ledger Account Number you want to distribute the purchase order amount to and the Job Number to charge for this distribution.
If your cursor is in the Amount field and you want to distribute the entire Amount, you can press the space bar and the amount will populate the Amount field in the GL Distribution grid.
If you have already added a partial Amount to the GL Distribution grid, you can press the space bar and the remaining amount (the portion that has not been distributed) will populate the Amount field in the GL Distribution grid. Once you tab off the line item in the GL Distribution grid, the Amount Left is recalculated to a zero amount.
Note: For single companies - If you enter a balance sheet account number, the Job Number will default to [None]. For multiple companies - If you enter a balance sheet account number, you will need to select a Job Number.
Note: If you have entered General Ledger Distribution information in the Vendor Master File (Invoices tab) for this vendor, click the Lookup button. The Lookup feature will display only the default GL number and Job number information specifically for this Vendor.
Ticket Number
Enter the Ticket Number to associate with this Purchase Order. Double-click to open the WS: Ticket Details screen for the specified ticket.
P.O. Message
The system defaults the Purchase Order message based on the Vendor Master File. These notes print on the Purchase Order. Select the message option:
Use Vendor Master
Select the Use Vendor Master message option to default the Purchase Order message to the message set up in the Vendor Master File.
Use AP Defaults
Select the Use AP Default message option to default the Purchase Order message to the message set up in Account Payable Defaults.
Use Custom
Select the Use Custom message option to enter a unique message for this Purchase Order.
Notes
Use the Notes area to enter any notes regarding the Usage/Resale record. These notes do not print on the Purchase Order.
System Notes
The system writes information to the System Notes when items are added and changed.
Sold / Usage (Budget tab)

The first level of the grid shows budgets for each GL Number associated with Inventory Items.
The second level of the grid shows budgets for each Inventory Category.
The third level of the grid shows budgets for each Inventory Item.
For more information, see Using Budgets with Inventory.
As of
The As of date defaults to the last day of the month, based on today's date. You may modify this date.
When viewing Budgets the system uses the As of date to display Budgets totals as of this date. The As of date is also the basis for YTD totals. (The start of a year is the Fiscal Year Start Date based on the As of date.)
Requery button
Click Requery to have the system pull data from GL Budgets and Inventory Activity to tally Budgets versus Actuals, based on the As of date, and the Job. The query then populates the results in the General Ledger Distribution grid.
Security
The INV Usage and Resale screen has its own Security Group, INV Usage and Resale.
The following security features are available for this screen:
- Can Override Valid Dates for Data Entry
- Read-Only
- Restrict Approval Authority - If this Feature is selected, the User cannot change the Status of the record.
The INV Usage and Resale screen is part of the AP ALL Security Group, but it is not set up to include any features.
The INV Usage and Resale screen is part of SYS Drill Down INV Security Group with the Read-Only feature selected.
If a User has the Can Override Valid Dates for Data Entry Security Feature selected for this screen and a transaction date is entered that is not within the From and To Dates specified as a Valid Date for Data Entry (on the SYS: Fiscal Year Setup screen), a message displays prompting to override the date.
Theses Security Features can be added to a Custom Security Group allowing a User to override dates on transaction screens that are outside of the valid date range. For more information see Security Screen Features and Creating a Super User Security Group.
This screen has the Read-Only Feature. For more information see Learning about Read-Only Security.
Tip: For more information see Security Groups Overview and Security Groups By Module.