Overview
You can use the Warehouse Locations screen to manage your warehouse locations and associated General Ledger Asset Account Numbers. Warehouses are used to track inventory items by warehouse. An item may belong to more than one warehouse.
Example: Omaha, Gary, Minnesota, Office, Window Cleaning Van, etc.
If you select a Default Warehouse Location, it will populate the Warehouse Filter on the Equipment Tracker screen and will default to the Warehouse field in the Equipment Tracker Details grid on a new record.

You can access the Warehouse Locations add/edit list from:
- AP: Purchase Orders
- AR: Invoices
- AR: Recurring Invoices
- HR: Equipment Tracker
- INV: Adjustments
- INV: Drop Shipment
- INV: Item Activity History
- INV: Master File
- INV: Received
- INV: Requests
- INV: Sold / Usage
- INV: Physical Count
- INV: Transfers
- Lookup GL Accounts
- Quantity on Hand
Key Functionality
WinTeam automatically assigns an ID to each new record, and uses the ID field to identify each record. You may change system-assigned ID Numbers.
Use this field to enter a unique name for the record. After a new record is created, WinTeam displays this Description with the corresponding ID number in the Add/Edit list.
Enter the Company Number to use that the Warehouse belongs to. This establishes company ownership of that record.
The Company is strictly used in regard to posting to GL. It is not used to limit security based on Company #.
Use the Asset GL # field to select the General Ledger asset account number to use for transactions involving increases and decreases from the selected warehouse, or use the Quick Lookup to locate the General Ledger account number.
Select to include the record for display on eHub Mobile.
Select this check box to make the selected record active. Clear the check box to make the record inactive.
Select this check box to make the selected record the default value for this Add/Edit list. WinTeam uses this record to automatically fill in the corresponding field on a new record in the related screen.
Enter the warehouse location name, address, city, state, ZIP, phone and fax numbers for each selected warehouse.
Click to link to Google Maps to quickly view maps and get directions. The link generates a map centered on the address you have entered in WinTeam. For more information see Using Google Mapping.
Click the Validate Address button to check the address you entered against the address in the USPS database (Melissa Data).
Important: Validating addresses is part of the implementation process for the Updated Tax Engine. See Job and Employee Master File Address Validation for more information.
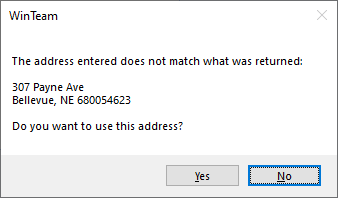
The following message box displays when the system finds a close match to the address you entered–click Yes to accept the system's suggestion or click No to close the message box and adjust the address.

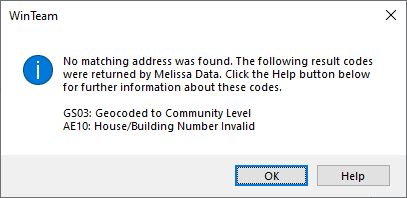
The following message box displays when the system cannot find a match to the address you entered–click OK to close the message box or click Help to see more information about the result codes.

