Overview
The eHub Setup screen is used to set eHub timekeeping options and default security roles, and to edit notification e-mail addresses used in eHub. An e-mail notification can be sent automatically alerting an e-mail recipient after a Checkpoint has been marked as Completed. The notifications contain links to view the Checkpoint details and Deficiencies. Area-level items are included in the notification's attached PDF.
The eHub Setup screen can be accessed from the System - Setup Menu.
Note: This screen should not be setup until AFTER eHub has been configured by a TEAM Representative.
Key Functionality

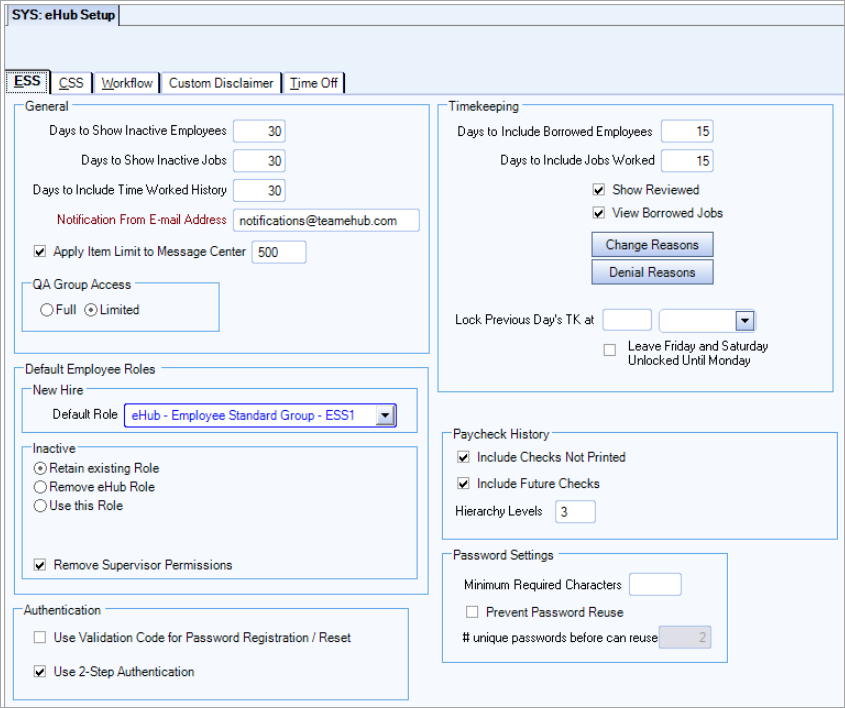
Days to Show Inactive Employees
Enter the number of days supervisors should have access to inactive employees in eHub. If this field is blank, the system assumes no limitation and will show inactive employees regardless of when they became inactive. Enter 0 if you do not want to show any inactive employees.
For CSS Users, the inactive employees are not available.
Days to Show Inactive Jobs
If the field is null (blank) all inactive Jobs are included in searches. If the value is "0", no inactive Jobs are included in searches. If a numeric value, that is the number of days a Job can be inactive and display in search results.
This does not apply to Timekeeping. Only the Custom Setting allows for the display of inactive Jobs.
For CSS Users, the inactive Jobs are not available.
Days to Include Time Worked History
Enter the number of days Personnel Scheduling history should appear in the Personnel Scheduling screen in eHub.
If a value does not exist, the system looks back 35 days.
Notification From E-mail Address
This is the "From" e-mail address used in eHub-based e-mail notifications (e.g., notifications of completed Checkpoints). This address displays in the "From" field of the recipient's e-mail.
The default address is notifications@teamehub.com.
Apply Item Limit to Message Center
Select the check box and enter the maximum number of messages to display in the eHub Message Center. The default value is 500.
QA Group Access - Determines whether users can access all Checkpoints performed at jobs in the QA Group (Full) or only the Checkpoints they create (Limited).
You can use the QA Group Access option to give QA Group members full or limited access to the Jobs they are part of.
An individual whose function at their QA Group Jobs is to perform inspections, but not manage the process or results generally holds the role of Inspector/Cross-Inspector and is assigned a limited access. Basically, eHub uses existing Employee-level security to ensure these individuals only see their own items.
An individual whose function at their QA Group Jobs is to perform inspections, verify overall results of others inspections, deficiencies and Action Items generally hold the role of QA Manager and are assigned full access. They are responsible for ensuring a level of quality at these Jobs. eHub uses existing Supervisor-level security to allow these individuals to see all items performed/submitted by all users at these Jobs.
For cross-Job Supervisors who are responsible for Quality Assurance in full, not just inspecting, generally hold the role of Quality Assurance Managers. You can assign these users Full Access which gives them permission to access the Checkpoint screen and the Deficiency Review screen. Users with full access can see all Checkpoints, not just their own, for the Jobs where they are part of the QA Group. Basically, we are treating them as Supervisors for the purposes of Quality Assurance functions in eHub.
New Hire Default Role
Select the Default Role to assign to new employee records. Only the Security Groups created for ESS Users display in the list. CSS Security Groups do not.
If you are licensed for eHub, the Default Role will default to the Employee Master File when creating a new record. If you are not licensed for eHub, then a Role will not default to the employee record (eHub Settings are not visible).
The Roles available in the list are based on the eHub Security Group Roles. Double-click to open the SYS: Security Group screen.
The system will use all employee records (active or inactive) with a Role assigned as a count in the license setup. For more information see SYS: License Management.
Select the Role to assign to an employee if they become terminated.
Once an employee is inactive through the WinTeam Employee Master File, the eHub Settings in the Employee Master File (Other Info tab) will change based on one of these settings:
- Retain existing Role - No change will be made to the eHub Role for the inactive employee. The Employee will count as a User in the License count.
- Remove eHub Role - If an employee is Inactive and this option is selected, the existing eHub Role will be removed from the employee. Since the Role is removed, the employee does not count as a User in the License count.
- Use this Role - If this is selected, you are required to select from the Roles listed. If an employee has been made Inactive and this option is selected, the eHub Role selected in the list will be assigned to the employee. The Employee will count as a User in the License count.
Tip: You may want to create a Security Group called Terminated Employees, and then assign basic features to the Role. See Update Licensing for Terminated Employees using eHub or TeamTime.
Note: When an employee becomes inactive, the eHub Role changes immediately in the Employee Master File to the setting in eHub Setup. WinTeam does not look at the Date Effective to determine when the employee becomes inactive. If employee has a future inactive date, WinTeam immediately updates the eHub Role when the status is changed.
Remove Supervisor Permissions
Select the Remove Supervisor Permissions check box to allow WinTeam to automatically revert a Supervisor to an Employee when the Supervisor is terminated. As an employee, he will have access only to his own information. As an employee, he can no longer view or change any records for employees he previously supervised.
This also lowers the Supervisor License Count by 1 and increases the Employee License Count by 1. For more information see SYS: License Management.
Enable the 2-Step Authentication option to add the capability of two-step authentication for eHub users to more securely log into their eHub account. When the Use 2-Step Authentication option is enabled for an eHub user, a code is sent to the email listed on the Employee Master File once the user enters their log in credentials. The user must enter the code into eHub within 15 minutes of receiving it to gain access.
Days to Include Borrowed Employees
Enter the number of days a User can modify a schedule for an employee they do not supervise.
Cannot exceed 250 days.
Example: If setting is for five days from the day they worked the job, the employee will display in your quick lookup for five days, and you will be able to schedule him/her for past or future work.
Days to Include Jobs Worked
Enter the number of days a User can modify a timekeeping record for a Job worked.
This allows an employee to enter time or modify timekeeping (depending on permissions).
Cannot exceed 250 days.
- For an Employee - In eHub Timekeeping, Jobs that are NOT considered a 'Primary Job', but the employee has worked at, are indicated by the 'Not My Job' icon.
- For a Supervisor - In eHub Timekeeping, Jobs that are NOT supervised by the User are also indicated by the 'Not My Job' icon.
Show Reviewed
Select the Show Reviewed check box to display a 'Reviewed’ column on the eHub Timekeeping screen.
This makes it easier to track the records that have been reviewed.
View Borrowed Jobs
Select the View Borrowed Jobs check box to display borrowed jobs in eHub web and mobile Timekeeping. A borrowed job occurs when a supervisor's employee works at a job in which they do not supervise. The job the employee worked at is considered a borrowed job.
When this check box is cleared, supervisors will only see jobs they supervise in eHub web and mobile Timekeeping.
Change Reasons button
The Change Reasons button opens the Change Reasons add/edit list. A selection from this list is required when changes are requested on the eHub Timekeeping screen. Edit or add new selections on this list to be used for eHub Timekeeping.
Denial Reasons button
The Denial Reasons button opens the Denial Reasons add/edit list. A selection from this list is required when an eHub approver denies requests on the eHub Timekeeping screen. Edit or add new selections on this list to be used for eHub Timekeeping.
Lock Previous Day's Timekeeping Records
Use these settings to lock timekeeping records in eHub web and mobile for the previous day based on a specific time. A blue lock icon displays to the right of locked records in eHub web and mobile.
There is a security feature labeled Can Edit Previous Day's Locked Records under the TK Timekeeping screen in eHub security you can use to allow supervisor users to edit locked timekeeping records.
Enter the time at which you want to lock the records for the previous day in the first Lock Previous Day's TK field and then select a time zone from the drop down list in the second field. Enter all times using a 24-hour clock—for example, 10:00 for 10 a.m. and 22:00 for 10 p.m.
Example: If you enter 10:00 CST, timekeeping records dated Tuesday will be locked at 10 a.m. CST on Wednesday.
Select the Leave Friday and Saturday Unlocked Until Monday check box if you want to leave weekend timekeeping records unlocked until the following Monday.
Example: If this check box is cleared, Friday timekeeping records will be locked on Saturday at 10 a.m. CST and Saturday timekeeping records will be locked on Sunday at 10 a.m. CST. If this check box is selected, those records will be left open until Monday at 10 a.m. CST.
Supervisors
Supervisors cannot made edits to work date, employee, job, hours description, in/out/meal&rest/hours, work ticket number, or notes and cannot add new timekeeping records after the cut-off time for records dated the previous day.
Supervisors can still approve, deny, or mark timekeeping records as reviewed after the cut-off time for records dated the previous day.
Employees
Employee cannot make edits to their timekeeping records or add new timekeeping records after the cut-off time for records dated the previous day.
Include Checks Not Printed
Select the Include Checks Not Printed check box to display checks that have not been printed.
If this check box is not selected, only checks that have been printed will display.
Include Future Checks
Select the Include Future Checks check box to display checks with a date after today's date.
This info is also used by eHub. When viewing Paycheck History in eHub, if this check box is selected, the history screen automatically displays checks that are dated within 90 days of today's date.
Hierarchy Levels
Enter the number of levels to be displayed below that of a Supervisor.
Minimum Required Characters
Enter the minimum required characters for eHub passwords. If no value is entered the system defaults to a minimum of 8. The maximum characters allowed is 64. Password requirement verbiage on the eHub password reset page adjusts according to the value entered here.
Prevent Password Reuse
Select the check box to force users to create unique passwords.
# unique passwords before can reuse
Enter the number of unique passwords that must be used before a password can be reused. The minimum allowed value is 2, which is the default for the field, values less than 2 cannot be entered. Employees do not see the reuse setting, they only see a message prompting them to create a new password.
Note: The settings entered here are also used in the Password field in the eHub Settings section on the Other Info tab of the Employee Master File.

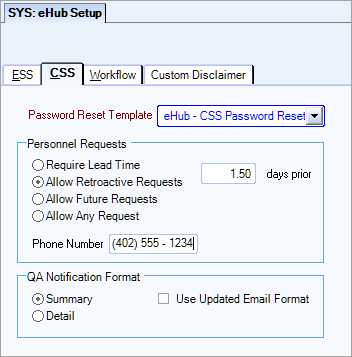
Should your customer request an eHub password reset (by clicking the 'Forgot your password?' link on the eHub login screen), the system will automatically email the customer two replies: one to confirm the password has been reset, and one that includes the temporary new password. The verbiage used in the latter email is comprised by the Template set up here. Double-click in the Password Reset Template description field to open/edit the template. A list of all active e-mail templates of the Type CSS Password Reset will be listed.
Example: While you are setting up/selecting CSS Password Reset Template(s), you may notice the Type drop-down list includes the repository of other Types of email templates used by WinTeam. Types other than CSS Password Reset are set up in other areas of WinTeam. Please ensure the Description you create/select and Type you select here are both directly related to customer CSS Password Reset requests. Click to learn more about other types of SYS: Email Templates.

Use one of the four choices displayed to determine how Personnel Request submissions from Customers will be handled. (Employee users in eHub have no restrictions on Personnel Requests.)
Require Lead Time
Select Require Lead Time in order to require a minimum amount of time before a service date that a Personnel Request can be submitted by a Customer. Then enter the number of days of lead time required. Use a decimal to indicate part of a day. For example, use 2.5 days for 2 and a half days lead time.
In eHub if a user's Personnel Request does not meet the minimum lead-time requirements, a message will display the soonest service date available based on the number of days entered in the field, and the Customer will be unable to submit the request.
Example: For instance, a Customer submits a Personnel Request for service beginning tomorrow. If your lead-time is two days, the Customer will be unable to submit the request and will receive a message indicating the minimum lead-time necessary and the soonest date for which a Personnel Request can be submitted. The phone number (see below) will also display.
Allow Retroactive Requests
Select Allow Retroactive Requests in order to allow Customers to submit requests retroactively, that is with service dates and times prior to the current date and time. This functionality is for record-keeping purposes for requests that have already occurred. Then enter the maximum number of days prior to the current day that retroactive Personnel Requests will be allowed. Use a decimal to indicate part of a day. For example, use 2.5 days if you want to allow requests to be entered up to 2 and a half days after the fact (2.5 days prior).
In eHub, a notification message will display letting the user know they have entered a date and time prior to today's date and time.
Allow Future Requests
Select Allow Future Requests in order to allow Customers to submit requests for any service date that is later than the current date and time. This functionality allows Customer users to submit Personnel Requests for dates from the current day forward in eHub. No lead time is required, and retroactive requests are not allowed.
Allow Any Requests
Select Allow Any Requests in order to allow Customers to submit requests for any service date. Retroactive requests are allowed for any day in the past, and there are no lead-time restrictions.
Phone Number
Enter the phone number Customers should call when their Personnel Requests do not meet minimum lead-time requirements. This phone number will display on the message received by Customer users in eHub, prompting the user to call in order to submit a request for personnel.
Select Details or a Summary format when emailing Checkpoints to your Customers. Clients will receive the information in the email and the attached PDF and will not need to need to login to eHub to see this information. The default selection is Summary.
Also, if you select the Use Updated Email Format check box the information includes the total number of Areas and Deficiencies, Deficiency star rating, Deficiency Inspection notes, and Deficiency images among other differences.
See this link for examples of the detailed, summary and the updated format.

Enter an e-mail address, usually a WinTeam or eHub administrator, where notification will be sent if a Workflow fails.
Note: If an e-mail is generated for an e-mail address that is missing or incorrect, the WinTeam eHub administrator is notified of the error.
Click the Work Requests Types button to display the Work Request Types add/edit list. Enter the types of Work Requests that will be available for eHub users when they submit Work Requests. Select Active to allow the type to appear in the Request Type list menu within the Work Request in eHub.
Example: You might start with Service, Complaint or Other as types of Work Requests.
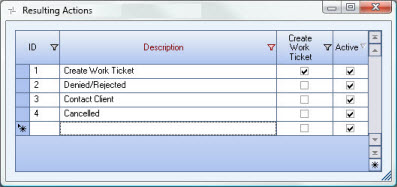
Click the Resulting Actions button to display the Resulting Actions pop-up. The actions indicated here determine what happens when a Work Request is Approved, Canceled or Rejected in eHub. If the Active check box is selected, these actions will appear in the Resulting Action list in the User Comments box in eHub after the user takes action on the request.
Include a description and select Create Work Ticket if a Work Ticket should be created on the final step. Create Work Ticket must be selected in order to import the request from eHub into the WinTeam Work Schedule module.

Select to which Tier each type of request will default in the Workflow Setup screen if the Default Workflow check box is cleared. The Tier selected here will display in the Job Attributes section of the Workflow Setup screen.
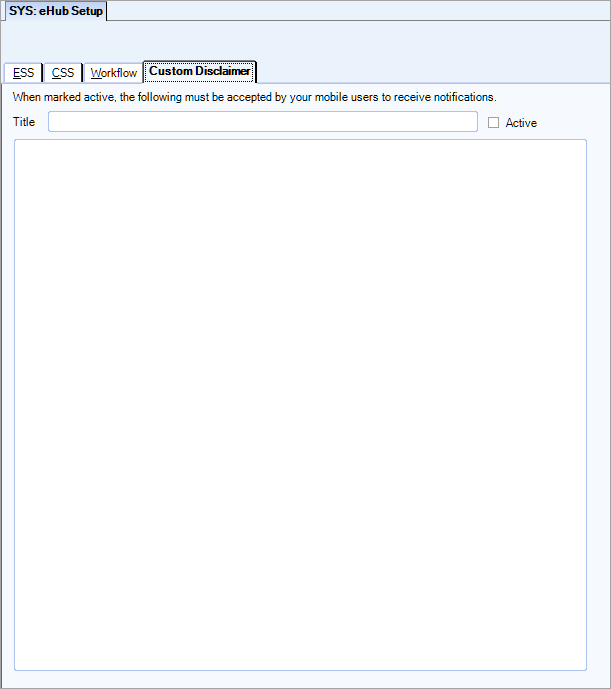
Use this tab to enter the custom disclaimer language that displays when a user logs on to eHub for the first time using a mobile device. The disclaimer information states eHub usage is optional on personal devices and is contained in two different message boxes. The first message box contains general terms of use for eHub, and the second contains End User License Agreement (EULA) information. It is the EULA language that you can enter in this tab. The user must click accept in each message box before they can use the eHub app.
When you initially open this a tab, a message box displays that contains a WinTeam disclaimer. You must click OK in the message box before you can use the tab. Also, you must have SYS eHub Setup screen security to use this tab.

In the Title field, enter the title for the disclaimer and then enter the body of the disclaimer in the large field. Select the Active check box to make the disclaimer active in eHub Mobile. When the disclaimer displays in eHub Mobile, the title displays above the body.

The SYS eHub Setup screen has its own Security Group, SYS eHub Setup. The SYS eHub Setup screen is part of the SYS ALL Security Group. Security for this screen should only be given to Users who are licensed for eHub.
Tip: For more information see Security Groups Overview and Security Groups By Module.
For more information see eHub Timekeeping Security.
