PS Report: Scheduling
Overview
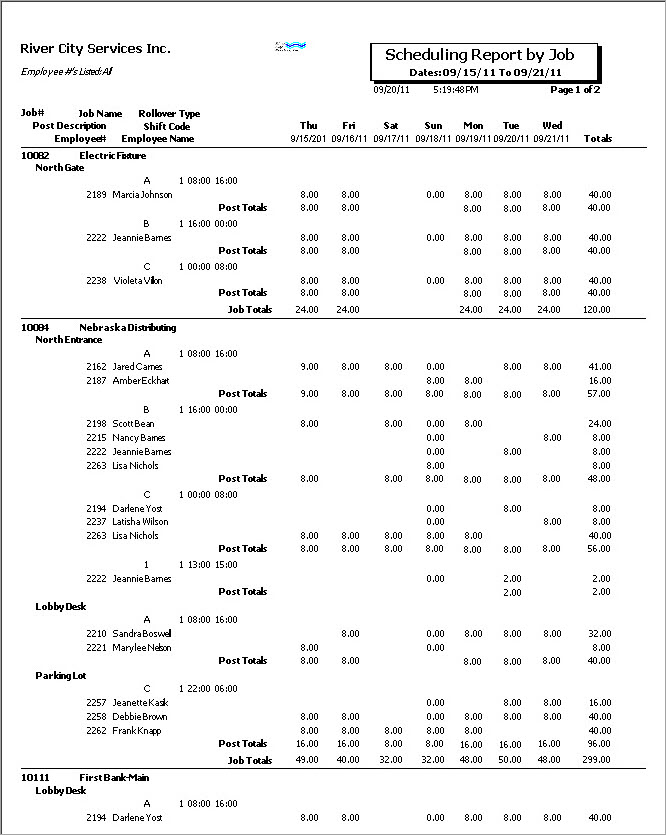
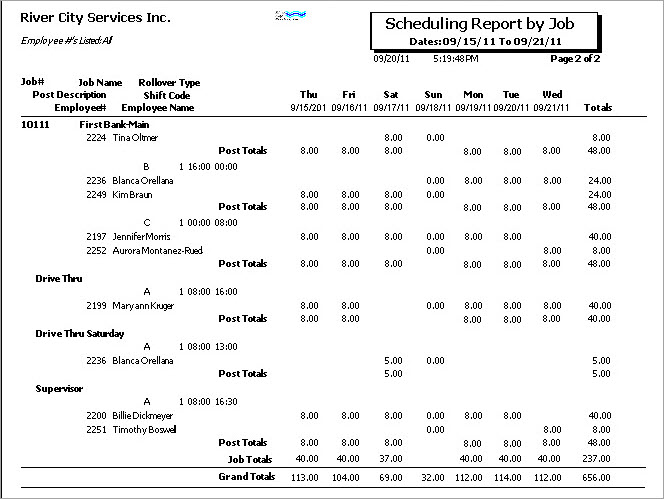
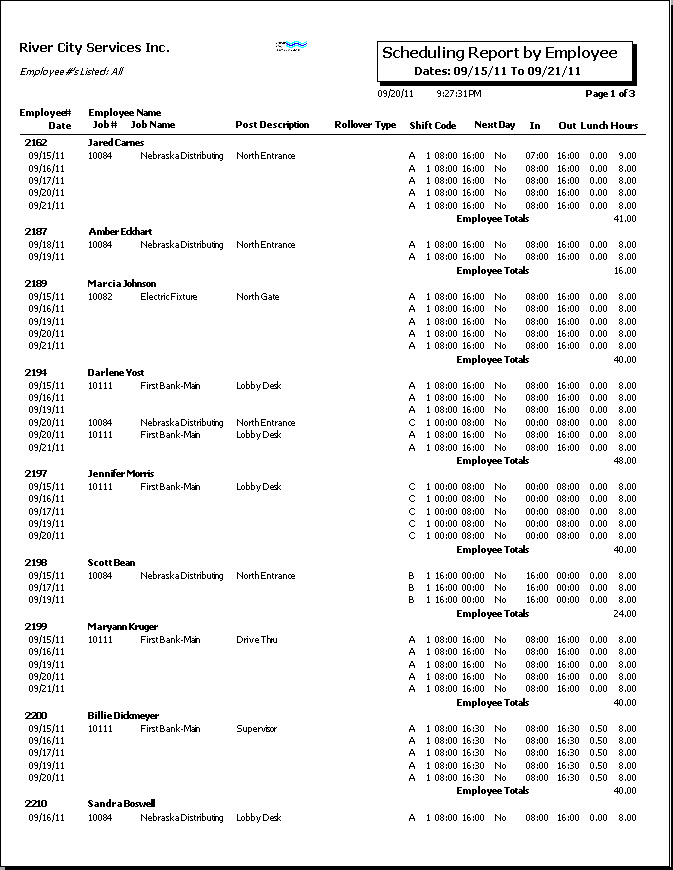
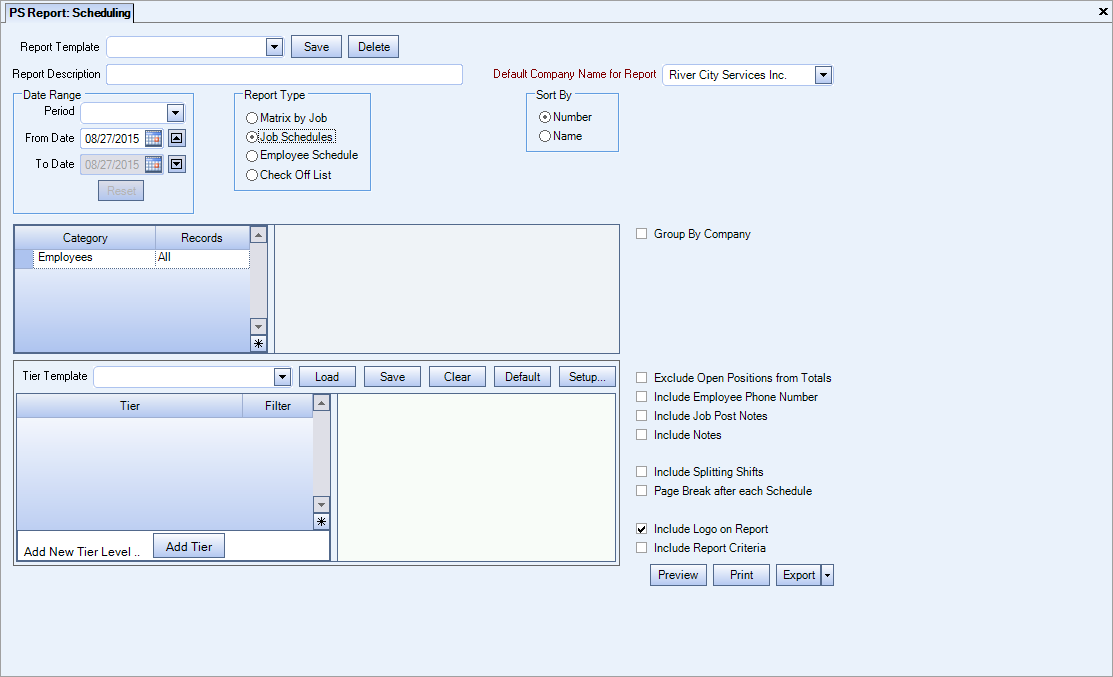
Use the Scheduling Report to list Job Information, along with the Schedules and shifts for each schedule. Report includes unassigned posts.
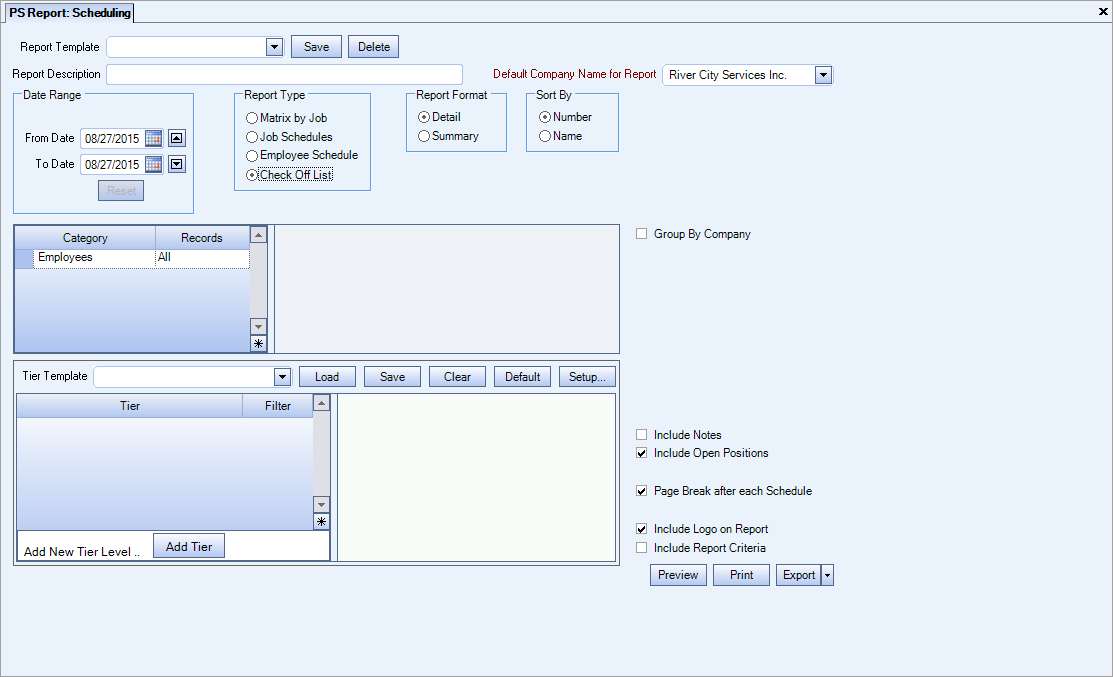
You can also choose to print a Scheduling Check Off List. This report will show all scheduled personnel for the criteria specified. This can serve as a Check Off sheet to record when Guards have called in to a post. If the In and Out Time is different from the Shift Time, the report will show the In and Out Time. For the Scheduling Check Off List you can also specify to "Include Open Positions". If you select the check box to include open positions, all unassigned shifts will print on this report. Then when you find out who is going to be filling the shift you can manually write it in.
When using Matrix by Job as the Type of Report and using the “Dividing Shifts” feature, the hours information per cell prints on a separate line from the shift times. The divided hours show as two hours totals in the cell.
Typically this report is not run for the current week, so the date range will default to the NEXT week’s date range. This is different from the Overtime Report and the Scheduling Activity Report.
This report looks at posts with a start date up to 8 weeks in the future.
Note: If a Company Name is more than 50 characters, only the first 50 display on the report.
You may filter, group, and print the report by tiers, allowing for total customization of the report. Use the Tier Templates to set up and save templates. This makes it easy to create a specific report each time you need one without recreating the criteria. See Using Tier Templates for more information.
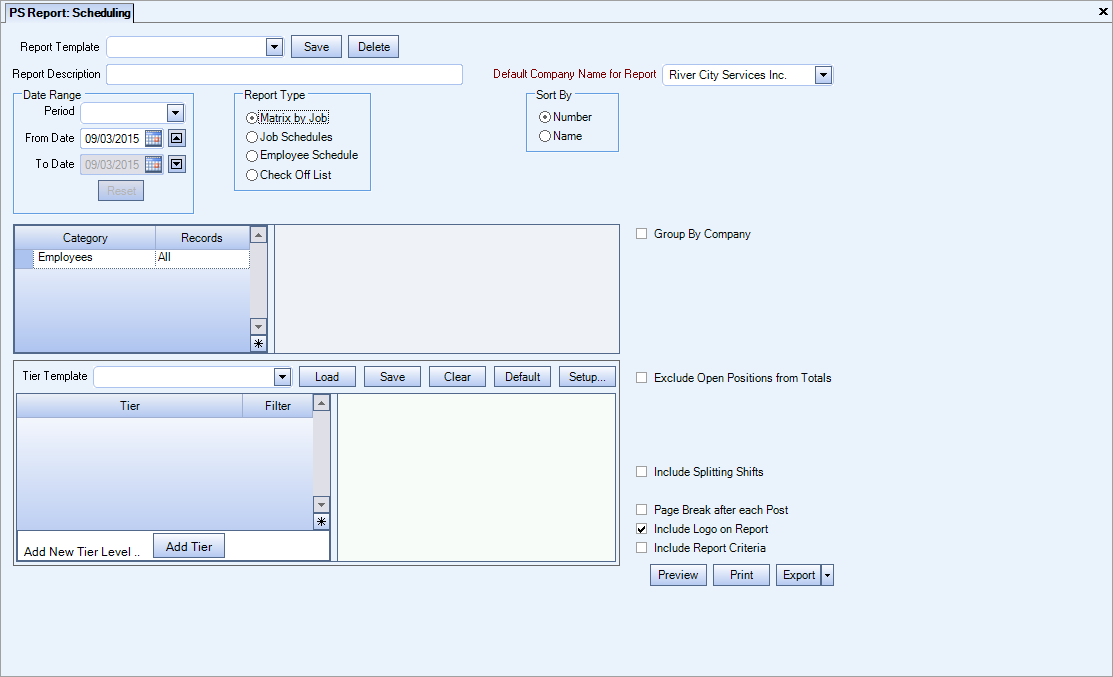
There are four report types:
Key Functionality
Select a report template from the list, or type a description and Save your settings to create a report template for later reuse. You may also select and Delete report templates from the list. See WT: Report Criteria Templates for more information.
Note: You must have Can Manage Report Criteria Templates checked in User Security for the Save/Delete functionality.
Type a description to name the report. This description prints above the Report Title.
Available for Clients using the Multi-Company feature. The Default Company Name for Report is populated from the Company Setup screen. The list contains all companies you have permission to access. The default company prints on every page of the report.
If the User has permission to only one company, then just that one company will display in the list. If the User has permissions to more than one company, the list will contain all companies the User has rights to PLUS the default reporting company. For more information see Learning about WinTeam Reports.
Use the Date Range fields to select filter the report by schedule dates or by Pay Period.
The Date Range defaults to the week following the current week, since this report is typically not run for the current week. The Date Range cannot exceed 7 days.
Type the beginning date in the From field.
- The From date must be a valid pay week beginning date for Matrix by Job.
- The From date for Job Schedules and Employee Schedules are not required to be the first day of the pay week. You will receive a message if it is not, but are allowed to continue.
The To date defaults to the last work day of the specified week.
Use the Sort By option to sort report data by Number or Name.
Click Number to sort report data by Employee Number or Job Number (depending on the report).
Click Name to sort report data by Employee Name or Job Name (depending on the report). If there are employees with the same last name, they are first sorted by last name and then by first name.
Employees
Use the Employees category to select the Employees to include on the report.
Select All to include all Employees on the report.
Select Range to define a range of Employees for the report. Type the beginning Employee Number in the From field and the ending Employee Number in the To field.
Select Create to define your own list of Employees. When you select Create, a small grid displays to the right. Enter the Employee Numbers you want to include in the list, or use the Lookup to locate the Employee Numbers.
Select Exclude to identify records that should not be included. When you select Exclude, a small grid displays to the right. Enter the Employee Numbers you want to exclude in the list, or use the Lookup to locate the Employee Numbers.
Use the Tier Template to define and save customized settings for a report. To use an existing template, select the template from the list and click Load.
To create a new template, you can load an existing template, make the necessary modifications, click Save, and define a new template name in the Save As dialog box. Alternatively, you can start with a blank template by clicking the Clear button.
To modify an existing template, load the template, make the necessary modifications, and then click Save. The name of the existing template display in the Save As dialog box. Click OK.
For more information see Using Tier Templates and Using Tier Parameters.
This option is available to users who have more than one company, but is not selected by default. If selected, the default company prints on the Grand Total Page and the Report Criteria page. All other pages print the applicable company name. If not selected, the default company prints on every page of the report.
Select this check box to exclude the Open Position hours from the Totals on the report.
The Include Shifts that Cross Day Divide check box displays as an option for this report regardless of whether or not you are using the Day Divides feature.
If the 'Show Day Divides on Scheduling Screen check box is selected on the PS:Defaults (General tab), then the Include Shifts that Cross Day Divide check box is selected as the default for this report.
When this check box is selected, the report reflects any hours that are dividing over to a new day under the appropriate day on the report. This also means any carry-over from the previous week is shown and included under the proper date.
When using the “Dividing Shifts” feature with the Matrix by Job Type of Report, the hours information per cell prints on a separate line from the shift times. The divided hours show as two hours totals in the cell.
If you do not want Users to have the ability of clearing (deselecting) this check box when looking at Schedules or running the scheduling reports, use this Custom Setting. This way when scheduling Jobs with midnight cut-offs, the logic for dividing shifts is always enabled.
Section Item Value Personnel Scheduling ShowSplittingShiftsCheckbox No For more information see Custom Settings and List of Custom Settings.
Select the Page Break after each Post check box to create a new page after each post.
Select this check box to print the company logo on the report. It is selected or cleared by default based on the option selected in SYS:Defaults. However, you can modify the setting on each report.
Select this check box to include a list of the report options selected for the report. The Report Criteria page includes any ranges specified and each Category/Record selection made for the report. This check box is cleared selected by default.
Preview
Click the Preview button (or use the shortcut key, ALT + V) to view the report before printing.
Click the Print button (or press ALT + P) to send the report to your default printer.
Export
Click the Export button (or press ALT + X) to export the report to a specified format. Reports may be exported to Adobe Acrobat (PDF), Excel, Comma-Separated Values (CSV), Grid View and E-mail (available for premise-based clients only).
Key Functionality
Select a report template from the list, or type a description and Save your settings to create a report template for later reuse. You may also select and Delete report templates from the list. See WT: Report Criteria Templates for more information.
Note: You must have Can Manage Report Criteria Templates checked in User Security for the Save/Delete functionality.
Type a description to name the report. This description prints above the Report Title.
Available for Clients using the Multi-Company feature. The Default Company Name for Report is populated from the Company Setup screen. The list contains all companies you have permission to access. The default company prints on every page of the report.
If the User has permission to only one company, then just that one company will display in the list. If the User has permissions to more than one company, the list will contain all companies the User has rights to PLUS the default reporting company. For more information see Learning about WinTeam Reports.
Use the Date Range fields to select filter the report by schedule dates or by Pay Period.
The Date Range defaults to the week following the current week, since this report is typically not run for the current week. The Date Range cannot exceed 7 days.
Type the beginning date in the From field.
- The From date must be a valid pay week beginning date for Matrix by Job.
- The From date for Job Schedules and Employee Schedules are not required to be the first day of the pay week. You will receive a message if it is not, but are allowed to continue.
The To date defaults to the last work day of the specified week.
Use the Sort By option to sort report data by Number or Name.
Click Number to sort report data by Employee Number or Job Number (depending on the report).
Click Name to sort report data by Employee Name or Job Name (depending on the report). If there are employees with the same last name, they are first sorted by last name and then by first name.
Employees
Use the Employees category to select the Employees to include on the report.
Select All to include all Employees on the report.
Select Range to define a range of Employees for the report. Type the beginning Employee Number in the From field and the ending Employee Number in the To field.
Select Create to define your own list of Employees. When you select Create, a small grid displays to the right. Enter the Employee Numbers you want to include in the list, or use the Lookup to locate the Employee Numbers.
Select Exclude to identify records that should not be included. When you select Exclude, a small grid displays to the right. Enter the Employee Numbers you want to exclude in the list, or use the Lookup to locate the Employee Numbers.
Use the Tier Template to define and save customized settings for a report. To use an existing template, select the template from the list and click Load.
To create a new template, you can load an existing template, make the necessary modifications, click Save, and define a new template name in the Save As dialog box. Alternatively, you can start with a blank template by clicking the Clear button.
To modify an existing template, load the template, make the necessary modifications, and then click Save. The name of the existing template display in the Save As dialog box. Click OK.
For more information see Using Tier Templates and Using Tier Parameters.
This option is available to users who have more than one company, but is not selected by default. If selected, the default company prints on the Grand Total Page and the Report Criteria page. All other pages print the applicable company name. If not selected, the default company prints on every page of the report.
Select this check box to exclude the Open Position hours from the Totals on the report.
This check box displays when the Report Type is Job Schedules or Employee Schedules.
Select to include the Employee Phone Number on the report.
This check box display when the Report Type is Job Schedules.
Select the Include Job Post Notes check box to include any notes that were included with the Post Setup.
This option is NOT selected by default.
This check box is not available for Matrix by Job.
Select the Include Notes check box to include the Notes from the Detail Cell in PS.
This option is NOT selected by default.
The Include Shifts that Cross Day Divide check box displays as an option for this report regardless of whether or not you are using the Day Divides feature.
If the 'Show Day Divideson Scheduling Screen check box is selected on the PS:Defaults (General tab), then the Include Shifts that Cross Day Divide check box is selected as the default for this report.
When this check box is selected, the report reflects any hours that are dividing over to a new day under the appropriate day on the report. This also means any carry-over from the previous week is shown and included under the proper date.
When using the “Dividing Shifts” feature with the Matrix by Job Type of Report, the hours information per cell prints on a separate line from the shift times. The divided hours show as two hours totals in the cell.
If you do not want Users to have the ability of clearing (deselecting) this check box when looking at Schedules or running the scheduling reports, use this Custom Setting. This way when scheduling Jobs with midnight cut-offs, the logic for dividing shifts is always enabled.
Section Item Value Personnel Scheduling ShowSplittingShiftsCheckbox No For more information see Custom Settings and List of Custom Settings.
Select the Page Break after each Post check box to create a new page after each post.
Select this check box to print the company logo on the report. It is selected or cleared by default based on the option selected in SYS:Defaults. However, you can modify the setting on each report.
Select this check box to include a list of the report options selected for the report. The Report Criteria page includes any ranges specified and each Category/Record selection made for the report. This check box is cleared selected by default.
Preview
Click the Preview button (or use the shortcut key, ALT + V) to view the report before printing.
Click the Print button (or press ALT + P) to send the report to your default printer.
Export
Click the Export button (or press ALT + X) to export the report to a specified format. Reports may be exported to Adobe Acrobat (PDF), Excel, Comma-Separated Values (CSV), Grid View and E-mail (available for premise-based clients only).
Key Functionality
Select a report template from the list, or type a description and Save your settings to create a report template for later reuse. You may also select and Delete report templates from the list. See WT: Report Criteria Templates for more information.
Note: You must have Can Manage Report Criteria Templates checked in User Security for the Save/Delete functionality.
Type a description to name the report. This description prints above the Report Title.
Available for Clients using the Multi-Company feature. The Default Company Name for Report is populated from the Company Setup screen. The list contains all companies you have permission to access. The default company prints on every page of the report.
If the User has permission to only one company, then just that one company will display in the list. If the User has permissions to more than one company, the list will contain all companies the User has rights to PLUS the default reporting company. For more information see Learning about WinTeam Reports.
Use the Sort By option to sort report data by Number or Name.
Click Number to sort report data by Employee Number or Job Number (depending on the report).
Click Name to sort report data by Employee Name or Job Name (depending on the report). If there are employees with the same last name, they are first sorted by last name and then by first name.
Use the Date Range fields to select filter the report by schedule dates or by Pay Period.
The Date Range defaults to the week following the current week, since this report is typically not run for the current week. The Date Range cannot exceed 7 days.
Type the beginning date in the From field.
- The From date must be a valid pay week beginning date for Matrix by Job.
- The From date for Job Schedules and Employee Schedules are not required to be the first day of the pay week. You will receive a message if it is not, but are allowed to continue.
The To date defaults to the last work day of the specified week.
Employees
Use the Employees category to select the Employees to include on the report.
Select All to include all Employees on the report.
Select Range to define a range of Employees for the report. Type the beginning Employee Number in the From field and the ending Employee Number in the To field.
Select Create to define your own list of Employees. When you select Create, a small grid displays to the right. Enter the Employee Numbers you want to include in the list, or use the Lookup to locate the Employee Numbers.
Select Exclude to identify records that should not be included. When you select Exclude, a small grid displays to the right. Enter the Employee Numbers you want to exclude in the list, or use the Lookup to locate the Employee Numbers.
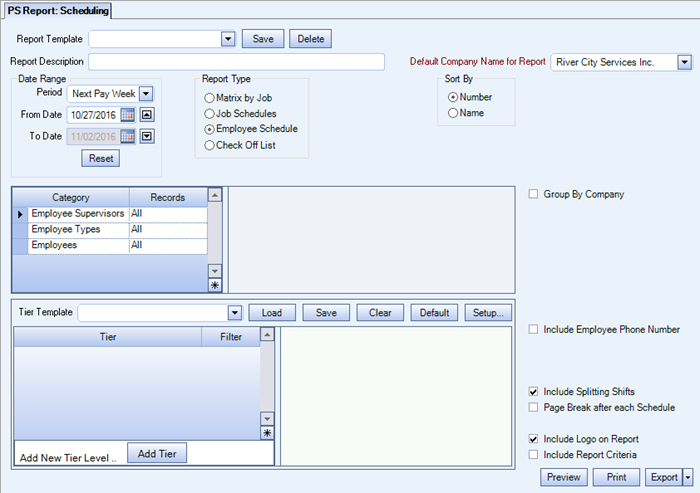
Employee Supervisors
Use the Employee Supervisors category to filter the report by Employee Supervisors.
Select All to include all Supervisors.
Select Pick to select the Supervisor(s) to include.
This category is available for the Employee Schedule Report Type.
Employee Types
Use the Employee Types category to select the Employee Types to include.
Select All to include all Employee Types.
Select Pick to define specific Employee Types. When you select Pick, the Employee Types list displays. Select the check box next to each Employee Type to include.
This category is available for the Employee Schedule Report Type.
This option is available to users who have more than one company, but is not selected by default. If selected, the default company prints on the Grand Total Page and the Report Criteria page. All other pages print the applicable company name. If not selected, the default company prints on every page of the report.
This check box displays when the Report Type is Job Schedules or Employee Schedules.
Select to include the Employee Phone Number on the report.
The Include Shifts that Cross Day Divide check box displays as an option for this report regardless of whether or not you are using the Day Divides feature.
If the 'Show Day Divide on Scheduling Screen check box is selected on the PS:Defaults (General tab), then the Include Shifts that Cross Day Divide check box is selected as the default for this report.
When this check box is selected, the report reflects any hours that are dividing over to a new day under the appropriate day on the report. This also means any carry-over from the previous week is shown and included under the proper date.
When using the “Dividing Shifts” feature with the Matrix by Job Type of Report, the hours information per cell prints on a separate line from the shift times. The divided hours show as two hours totals in the cell.
If you do not want Users to have the ability of clearing (deselecting) this check box when looking at Schedules or running the scheduling reports, use this Custom Setting. This way when scheduling Jobs with midnight cut-offs, the logic for dividing shifts is always enabled.
Section Item Value Personnel Scheduling ShowSplittingShiftsCheckbox No For more information see Custom Settings and List of Custom Settings.
Select the Page Break after each Schedule check box to create a new page after each schedule.
Select this check box to print the company logo on the report. It is selected or cleared by default based on the option selected in SYS:Defaults. However, you can modify the setting on each report.
Select this check box to include a list of the report options selected for the report. The Report Criteria page includes any ranges specified and each Category/Record selection made for the report. This check box is cleared selected by default.
Preview
Click the Preview button (or use the shortcut key, ALT + V) to view the report before printing.
Click the Print button (or press ALT + P) to send the report to your default printer.
Export
Click the Export button (or press ALT + X) to export the report to a specified format. Reports may be exported to Adobe Acrobat (PDF), Excel, Comma-Separated Values (CSV), Grid View and E-mail (available for premise-based clients only).
Key Functionality
Select a report template from the list, or type a description and Save your settings to create a report template for later reuse. You may also select and Delete report templates from the list. See WT: Report Criteria Templates for more information.
Note: You must have Can Manage Report Criteria Templates checked in User Security for the Save/Delete functionality.
Type a description to name the report. This description prints above the Report Title.
Available for Clients using the Multi-Company feature. The Default Company Name for Report is populated from the Company Setup screen. The list contains all companies you have permission to access. The default company prints on every page of the report.
If the User has permission to only one company, then just that one company will display in the list. If the User has permissions to more than one company, the list will contain all companies the User has rights to PLUS the default reporting company. For more information see Learning about WinTeam Reports.
Use the Date Range field to select the dates to filter the report by schedule dates.
Normally, the Scheduling Report - Check Off List would be run for only one day at a time.
When you enter the From Date, the To Date will default to be the same. If, for some reason, you want to include more than one day, you can overwrite the To date.
Use the Report Format option to choose the level of detail for the report.
Select to run a Detail or Summary Report. The system defaults to Detail.
The Summary report includes the Work Date, In Time, Out Time, Job Name, Post Description, Shift, Code, and Employee Name. A Certified By signature line prints at the bottom of the report.
The Detail report includes all items in the Summary report plus the Employee #, Job #, Site Phone #, Site Address, and Checked In? column. The Detail report prints in landscape mode.
Use the Sort By option to sort report data by Number or Name.
Click Number to sort report data by Employee Number or Job Number (depending on the report).
Click Name to sort report data by Employee Name or Job Name (depending on the report). If there are employees with the same last name, they are first sorted by last name and then by first name.
Employees
Use the Employees category to select the Employees to include on the report.
Select All to include all Employees on the report.
Select Range to define a range of Employees for the report. Type the beginning Employee Number in the From field and the ending Employee Number in the To field.
Select Create to define your own list of Employees. When you select Create, a small grid displays to the right. Enter the Employee Numbers you want to include in the list, or use the Lookup to locate the Employee Numbers.
Select Exclude to identify records that should not be included. When you select Exclude, a small grid displays to the right. Enter the Employee Numbers you want to exclude in the list, or use the Lookup to locate the Employee Numbers.
Use the Tier Template to define and save customized settings for a report. To use an existing template, select the template from the list and click Load.
To create a new template, you can load an existing template, make the necessary modifications, click Save, and define a new template name in the Save As dialog box. Alternatively, you can start with a blank template by clicking the Clear button.
To modify an existing template, load the template, make the necessary modifications, and then click Save. The name of the existing template display in the Save As dialog box. Click OK.
For more information see Using Tier Templates and Using Tier Parameters.
This option is available to users who have more than one company, but is not selected by default. If selected, the default company prints on the Grand Total Page and the Report Criteria page. All other pages print the applicable company name. If not selected, the default company prints on every page of the report.
This check box is not available for Matrix by Job.
Select the Include Notes check box to include the Notes from the Detail Cell in PS.
This option is NOT selected by default.
The Include Shifts that Cross Day Divide check box displays as an option for this report regardless of whether or not you are using the Day Divides feature.
If the 'Show Day Divides on Scheduling Screen check box is selected on the PS:Defaults (General tab), then the Include Shifts that Cross Day Divide check box is selected as the default for this report.
When this check box is selected, the report reflects any hours that are dividing over to a new day under the appropriate day on the report. This also means any carry-over from the previous week is shown and included under the proper date.
When using the “Dividing Shifts” feature with the Matrix by Job Type of Report, the hours information per cell prints on a separate line from the shift times. The divided hours show as two hours totals in the cell.
If you do not want Users to have the ability of clearing (deselecting) this check box when looking at Schedules or running the scheduling reports, use this Custom Setting. This way when scheduling Jobs with midnight cut-offs, the logic for dividing shifts is always enabled.
Section Item Value Personnel Scheduling ShowSplittingShiftsCheckbox No For more information see Custom Settings and List of Custom Settings.
Select to include positions that do not have an Employee scheduled.
Select the Page Break after each Schedule check box to create a new page for each schedule.
This check box is NOT available for the Matrix by Job Report Type.
Select this check box to print the company logo on the report. It is selected or cleared by default based on the option selected in SYS:Defaults. However, you can modify the setting on each report.
Select this check box to include a list of the report options selected for the report. The Report Criteria page includes any ranges specified and each Category/Record selection made for the report. This check box is cleared selected by default.
Preview
Click the Preview button (or use the shortcut key, ALT + V) to view the report before printing.
Click the Print button (or press ALT + P) to send the report to your default printer.
Export
Click the Export button (or press ALT + X) to export the report to a specified format. Reports may be exported to Adobe Acrobat (PDF), Excel, Comma-Separated Values (CSV), Grid View and E-mail (available for premise-based clients only).
Detail

Summary

Security
The PS Report Scheduling Report screen has its own Security Group, PS Report Scheduling Report.
The PS Report Scheduling Report screen is part of the PS Reports All Security Group.
Tip: For more information see Security Groups Overview and Security Groups By Module.
Custom Settings
| Section | Item | Value | Module and Purpose |
|---|---|---|---|
| PSSchedulingReport | EnableToDate | Yes | This setting enables the Scheduling Report to be run up to 31 days by enabling the Date To field. |
| Personnel Scheduling | ShowSplittingShiftsCheckbox | No | Use this setting if you do not want Users to have the ability of clearing (deselecting) this check box when looking at Schedules or running the scheduling reports. This way when scheduling Jobs with midnight cut-offs, the logic for dividing shifts is always enabled. |

