Overview
Budgets are used to set up and display budgets for Jobs. Use the Rollover button on the toolbar to rollover individual Jobs, or to rollover an entire years’ worth of budgets into a new year. Click the Show All Budgets button, the system displays all Budget Details.

The Budgets screen can be accessed from the General Ledger Menu in the Navigation Pane or from the Job Master File (GL Budgets tab).
Key Functionality
Click the Advanced filter button to create or edit a filter for finding and/or sorting specific records. You can also select a Saved filter. Click the Apply Filter/Sort button to apply any filter or sort criteria you created. Click the Remove Filter/Sort button to remove a filter or sort, if one is currently applied. For more information see Advanced Filtering.
Rollover
Click the Rollover button to display the Budget Rollover screen.
It is used to rollover individual Jobs, or to rollover an entire years worth of budgets into a new year. If you click the Show All Budget's button, the system displays all Budget Details. However, when a budget is rolled over, notes are excluded. The new record will now have a blank Notes field to prevent content being copied that is not applicable.
If a header record already exists (which is simply a Fiscal Year and Job that make up the header) and no details exist, and a rollover occurs, the system will rollover any details from the year you are rolling FROM.
Note: Make sure you recalculate Budgets after rolling over.
Use the Fiscal Year field to indicate the fiscal year for this budget.
Type or select the Fiscal Year you want to use. The current Fiscal Year defaults.
If you select a prior year, the system notifies you that you are selecting an old fiscal year.
You may enter fiscal budget information for only the years that are set up in the Fiscal Year Set Up file.
Use the Job Number field to enter the job or department number for this budget.
Type the Job Number in this field, or use the Lookup to locate the Job Number.
Note: If you attempt to use an inactive Job Number, the system warns you. You may then proceed to use the inactive Job Number at your discretion. To maintain referential integrity (historical information), Job Numbers cannot be deleted from the system. Instead of the system deleting Jobs, they are set to inactive.
Note: If you view an existing budget record for a Job, all previously entered information displays. To delete the budget record, click the Fiscal Year field and then click the Delete button. A verification screen displays. Click Yes to confirm deletion of the record. Click No to abort the deletion of the record
Use the Filter Criteria and Defaults fields to select the General Ledger accounts to display in the Budget Details section of the Budget screen. Your selections also become the default answers for the FS (Financial Statement) and JC (Job Cost Analysis) check boxes for new records that you add.
Financial Statement - The system automatically selects this check box during initial record entry. To exclude items selected as Financial Statement accounts on the budget list, clear this check box.
Job Cost Analysis - The system automatically selects this check box during record initial entry. To exclude those items selected as Job Cost Analysis accounts on the budget list, clear this check box.
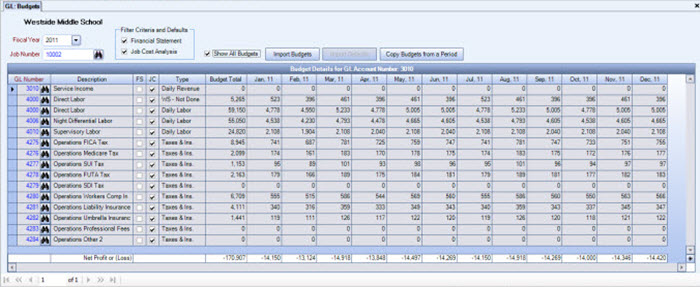
Select the Show All Budgets check box to display labor costs and revenue from Daily Job Budgets, WS- Done, WS - Not Done, Taxes and Insurance, and Daily Job Revenue in the Budget Details area.
Note: When you select the Show All Budgets check box, you cannot add or modify items in the Budget Details area.
The following labor and revenue dollar categories display in the Type column to the right of the Description column in the Budget Details area:
User Entered – An account entered in the Budget Details area by the user.
Daily Job Budgets – Labor dollars from Job Budgets in the Job Master File (Budgets) screen.
WS - Done – Labor dollars updated from the WS: Ticket Details (Budgets, Billing and Profit tab), Ticket Budgets grid, where the 'For Job Cost' check box is selected. Calculation based on the Budgeted Hours, Budgeted Hrly Rate, and Hours Type.
WS - Not Done – Labor dollars are updated from the WS: Ticket Details (Budgets, Billing and Profit tab), Ticket Budgets grid where the 'For Job Cost' check box is selected. Calculated using the Budgeted Hours, Budgeted Hrly Rate, and Hours Type.
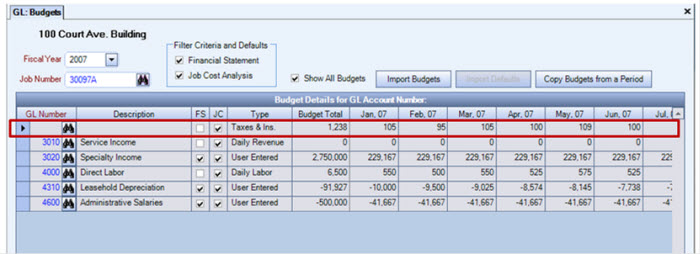
Taxes and Insurance – If the database is set up to not use Tax Allocation by Job, the Budget Details Type: Taxes & Ins. is used. Calculated based on the Payroll Tax percentage selected in the Job Master File (Accounting Info) screen. (Total labor x Taxes and Insurance Percent)

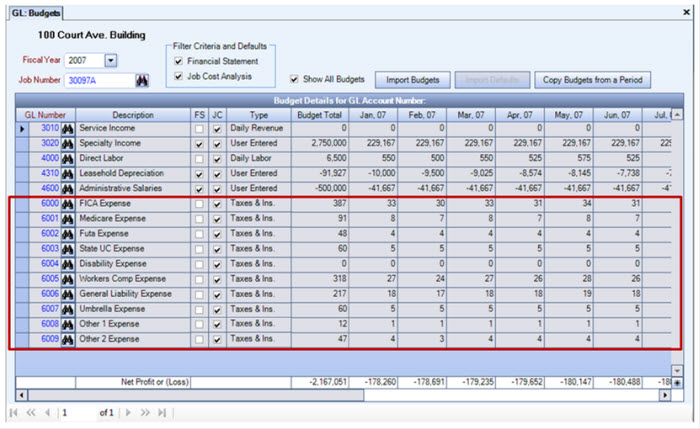
Payroll Taxes and Insurance details display when the 'Show All Budgets' check box is selected. The Payroll Taxes and Insurance are broke out by each tax code.
Once Daily Budgets are generated, WinTeam stores the hours, labor dollars, and total Payroll Taxes & Insurance amount for each calendar day and GL expense account combination that is specified in the Job Master File.
The variations are pulled from all of the records that meet the report criteria and total as needed to produce total amounts for the Budgets screen.
Daily Job Revenue – Revenue dollars from Job Budgets in the Job Master File (Budgets) screen.

Use the Import Defaults button (or press ALT + D) to import GL account numbers from the Default Accts to Budget section in the JOB: Defaults screen. The button is available only when a budget does not exist for this Job.
Press the Import Budgets button (or press ALT + I) to access the Import Budgets screen. The Import Budgets screen allows you to import budget information from a specially formatted .xls file. The import will create the header records. A header record consists of a unique Fiscal Year and Job Number combo. Then the system will create the details that go with the header and link the two based on budget ID.
Although the Import Budgets button always displays on this screen, you must have the proper security permissions to access the GL Import Budgets screen.
For more information, see Importing Budgets.
This button displays if you have access to the GL Budgets screen with the Can Copy Budgets from a Period Feature selected.
Click the Copy Budgets from a Period button (or press ALT + C) to access the Copy Budgets from a Period dialog box.
Budget Details grid
Use the Budget Details area to view, add, change, or remove items for this budget. To filter the items that display, use the Financial Statement and Job Cost options in the Filter Criteria and Defaults area.
Budgets details can be sorted by GL Number, Description, or Type (Show All Budgets check box selected) by clicking the header on the grid. Upon entry into to this screen, they are sorted by GL Number.
If you selected the Show All Budgets check box you cannot add or modify items in the Budget Details grid.
Click on the row with an asterisk to add an item for this budget.
To change an item, click in the row you want to change and press Tab key.
To delete an item, select it and then press the Delete button or Delete key.
GL Number
The GL Number field identifies the General Ledger account number for this budget item.
Type the General Ledger account number in this field, or use the Lookup to locate the GL Number. Only the GL Account Numbers not yet selected for this Budget will display in the list.
You can enter a General Ledger account number in a budget once. If you enter a duplicate account number, the system displays a message stating that the GL Number must be unique.
Description
Displays the description associated with the GL account number in the Description field.
FS
Use the FS field to indicate whether this item is a Financial Statement account.
The default for a new item is based on the current selection in the Filter Criteria and Defaults area. In addition, the system displays existing items based on the current selection in the Filter Criteria and Defaults area.
Note: For a new item, check FS, JC, or both. Do not leave both options blank, as this prevents the account from displaying under normal circumstances.
JC
Use the JC field to indicate whether this item is a Job Cost Analysis account.
The default for a new item is based on the current selection in the Filter Criteria and Defaults area. In addition, the system displays existing items based on the current selection in the Filter Criteria and Defaults area.
Note: For a new item, check FS, JC, or both. Do not leave both options blank, as this prevents the account from displaying under normal circumstances.
Type
The Type column displays if the Show All Budgets check box is selected.
Displays the Type of budget category assigned. Explanations of each Type display in the Type field.
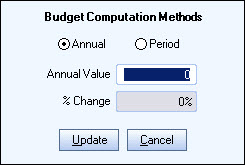
Click the budget icon ![]() to display the Budget Computation Methods popup.
to display the Budget Computation Methods popup.
Select the method to compute budgets.
Example: If you select Period, enter in the starting value for the first month. Then enter % Change. A $100 starting value where the % of change is 10%, will increase by 10% each month: 100, 110, 121, 133, 146, 161, etc. Each month will x 10%.

Annual
Select the Annual option calculate and populate the periodic amounts based on an annual amount. The system divides this by the number of periods (12 or 13), and populates the budget periods accordingly. The system allocates any odd amount to the last period in the budget year and rounds the amounts to the nearest whole dollar amount.
Type the annual amount for this item in the Annual Value field. If the item is income (a credit), enter the amount as a negative number.

Example: Annual = $1200, Number of Periods = 12
1200 / 12 = $100 per period
Example: Annual = $6100, Number of Periods = 12,
6100 / 12 = $508.3333 per period (rounded to 508)
508 x 11 (periods) = 5588
6100 - 5588 = $512 allocated to period 12
The % Change field is disabled for Annual Budget Computation Methods.
Period
Select Period option to populate all budget periods for this item with the same amount.
Type the period amount in Starting Value field. If the item is income (a credit), enter the amount as a negative number.

When the Periods option is selected, you can increase each period amount a specific percentage by entering a percentage in the % Change field.
Example: If you select Period, enter in the starting value for the first month. Then enter % Change. A $100 starting value where the % of change is 10%, will increase by 10% each month: 100, 110, 121, 133, 146, 161, etc. Each month will x 10%.
Periods 1 thru 13
Use the Period fields to view, enter, or change periodic budget amounts.
Type data in Budget Compensation Methods popup to have the system automatically calculate period budget amounts. Otherwise, type the budget amounts in each period field as needed. If the item is income (a credit), enter the amount as a negative number.
If the fiscal year is based upon 12 monthly periods, the system lists each period by month, with the first period as the first month of the fiscal year. The thirteenth field is headed N/A. If the fiscal year is based on 13 four-week periods, the system lists each period in order as "Period 1" through "Period 13.”
The Budget Total field displays the total of all of periodic budget amounts for this item. You may modify the amount only by changing periodic budget amounts.
The Net Profit or Loss field displays the total Net Profit or Loss for each period and the total Net Profit or Loss for the fiscal year. The figures display in the same arrangement as the periodic and Budget Total column headings. Losses display in parentheses.
The Net Profit or Loss for each period is the sum of the budget item figures in the column for that period.
The Net Profit or Loss for the fiscal year is the sum of the Budget Total column.
If you select the Show All Budget button, the Net Profit or Loss reflects the Total Gross Margin for this Job. Otherwise, if you do not select the Show All Budget button, the Net Profit or Loss becomes overstated because labor is not being considered.
Tip: Enter revenue/income (credit) amounts as a negative number to ensure it displays correctly on reports.
