Overview
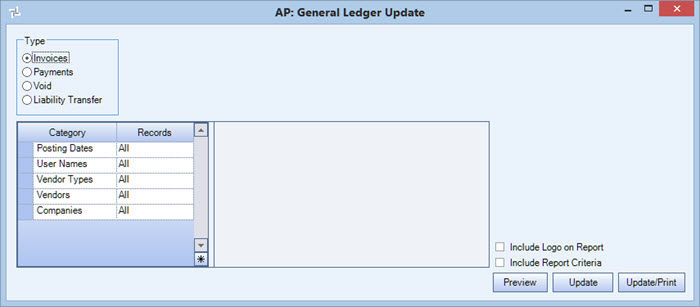
You can use the Accounts Payable General Ledger Update to preview, print, and update invoices, payments, voided payment batches, and Liability Transfers (with Custom Setting) to the General Ledger.
Items to update may be printed through the Preview screen. If the reports are previewed, then printed, two reports are created. The first report displays records that are unable to post. These items should be corrected before the update is run. Any invoice or check that is not in balance does not update to the General Ledger. The second report displays invoices or payments that will update to the General Ledger.
The posting date for the Accounts Payable account and the General Ledger account post on the same day.
The Unable to Post Report does not display when selecting to Update or Update/Print.
General Ledger Update for Accounts Payable can be accessed from the Accounts Payable Menu and the GL: Reconciliation (Recaps tab).
Key Functionality
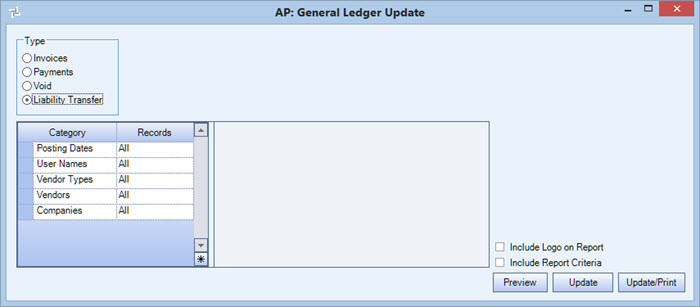
Select the Type of records to update to the General Ledger. You may select to update Invoices, Payments, Void (voided batches), or Liability Transfers (with Custom Setting). The Categories vary depending on your selection.
Batches
Use the Batches category to select the Batches to update that were previously created through the Payment Wizard.
Select All to include all Batches in the update.
Select Pick From List to define specific Batches for the update. When you select Pick From List, the Batches list displays. Select the check box next to each Batch to update.
Note: This category is available when updating Payments.
Check Dates
Use the Check Dates category to filter the report criteria by Check dates.
Select All to include all Checks.
Select Range to define a range of Check Dates for the update. When you select Range, the Check Dates range fields display. Type the beginning Check Date in the From field and the ending Check Date in the To field. Where applicable, payments are sorted by Fiscal Period and then Check Number.
Note: This category is available when updating Payments.
Check Types
Select the Check Types to update.
Select All to include all records.
Select Pick From List to define specific Check Types for the update. When you select Pick From List, the Check Types list displays. Select the check box next to each Check Type to update.
Note: This category is available when updating Payments.
GL Cash Accounts
Use the GL Cash Accounts category to select the GL Cash Accounts to update.
Select All to include all GL Cash Accounts in the update.
Select Pick From List to define specific GL Cash Accounts for the update. When you select Pick From List, the GL Cash Account list displays. Select the check box next to each GL Cash Account to update.
Note: This category is available when updating Payments.
Note: Only the GL Cash Accounts that are set up in Cash Accounts (defaults) for use with Accounts Payable will display in this list.
Posting Dates
Select the Posting Dates category to filter the report criteria by posting dates.
Select All to include all records.
Select Date Range to define a range of Posting Dates for the update. When you select Range, the Posting Dates range fields display. Type the beginning Posting Date in the From field and the ending Posting Date in the To field.
Note: This category is available when updating Invoices or Liability Transfers.
User Names
Select the records to update based on who created the records. This allows users to update their own work without updating the work of others.
Select All to update records for all users.
Select Pick to define specific users name for updating records.
Note: This category is available when updating Invoices, Payments and Liability Transfers.
Vendors
Use the Vendors category to select the Vendors to include on the report. (On the HR: and INS: Benefit Insurance/Other Analysis Reports, this Category is available when the Report Type is Vendor Billing.)
Select All to include all Vendors.
Select Range to define a range of Vendors for the report. When you select Range, the range fields display. Type the beginning Vendor Number in the From field and the ending Vendor Number in the to field, or use the Lookup to locate the Vendor Number.
Select Pick to define specific Vendors for the report. When you select Pick, the Vendor list displays. Select the check box next to each Vendor to include on the report.
Select Create to define your own list of Vendors. When you select Create, a small grid displays to the right. Enter the Vendor Numbers you want to include in the list, or use the Lookup to locate the Vendor Numbers.
Select Exclude to identify records that should not be included. When you select Exclude, a small grid displays to the right. Enter the Vendor Numbers you want to exclude in the list, or use the Lookup to locate the Vendor Numbers.
Note: This category is available when updating Invoices, Payments or Liability Transfers.
Vendor Types
Use to select the vendor types to include on the report.
Select All to include all Vendor Types on the report.
Select Pick to define specific Vendor Types for the report. When you select Pick, a list of Vendor Types from the Vendor Master File displays. Select the check box next to each Vendor Type you want to include the on the report.
Note: This category is available when updating Invoices, Payments and Liability Transfers
Void Batches
Use the Void category to select the voided batches to update.
Select All to include all voided batches in the update.
Select Pick From List to define specific voided batches for the update. When you select Pick From List, the voided batch list displays. Select the check box next to each voided batch to update. This is the default selection.
Note: This category is available when updating Void batches.
Companies
The Company Pick option filters for AR Invoice and Payment records. The Companies category is available for Clients using the Multi-Company feature.
Select the Companies to include on the report.
Select All to include all companies on the report.
Select Pick to define specific Companies for the report. When you select Pick, the Companies list displays. Select the check box next to each Company to include on the report.
Note: When running reports using the Company Category/Record Pick and the company name exceeds the maximum number of characters, WinTeam will truncate the name.
Note: This category is available when updating Invoices, Payments and Liability Transfers.
Select the Include Logo on Report check box to print the company logo on the report. This check box is selected or cleared by default, based on the option selected in SYS:Defaults. However, you can modify the setting on each report.
Select the Include Report Criteria check box to include a list of the report options selected for this report. The Report Criteria page includes any ranges specified and each Category/Record selection made for the report. This check box is NOT selected by default.
Note: for Multi-Company: WinTeam looks to the Job's Company logo to determine which Company logo to use on the Work Ticket Report and Work Tickets. The option to "Include report Criteria" is only applicable from the General Ledger Update screen. This information does not print when reprinting a Journal Log from the General Ledger Journal Log screen. WinTeam does not save the criteria that is selected when the update is performed, which means it can't be used later when reprinting a journal.)
Use the Preview button to preview the reports prior to performing the update. Two reports are generated for the Invoices/Payments/Liability Transfers to be Updated to the General Ledger. The first report lists those invoices/checks/liability transfers that cannot be updated to the general ledger (Unable To Post Report). Those invoices/checks/liability transfers should be corrected before the update is run. The second report lists those invoices/payments/liability transfers that will update to the General Ledger (To Post Report).
Click Update to start the General Ledger update, without printing the Entries To Post report. Click Update/Print to update the General Ledger and print the Entries To Post report.
The GL Posting Status dialog box displays to confirm that the debits and credits match. Click Cancel if the update does not balance. Click Commit if the update balances.
By default, the timer in the title bar starts with 8 seconds, after which the commit automatically takes place. A message displays stating that posting was successful. The update can be canceled during those eight seconds.

The eight-second default value can be changed using this Custom Setting:
| Section | Item | Value | Module and Purpose |
|---|---|---|---|
| GLUpdate | AutoPostTime | # (in seconds) |
This setting determines how many seconds the system will wait before it will commit a General Ledger update. The default is 8 seconds. If you set a negative Value, the next time you post, the system will display an option to tell WinTeam Don't show this message again. If you select this option and Commit, going forward, the system will automatically post and close the Posting Status box, providing there are no errors. |
For more information see Custom Settings and List of Custom Settings.
The AP General Ledger Update screen has its own Security Group, AP Update to G/L.
The following security features are available for this screen:
- Can Override Closed Fiscal Period
- Read-Only
The AP General Ledger Update screen is part of the AP ALL Security Group.
This screen has the Read-Only Feature. For more information see Learning about Read-Only Security.
Tip: For more information see Security Groups Overview and Security Groups By Module.


