
Overview
You can use the Workflow Setup screen to set up the approval and notification process for Customer Work Requests and Employee Requests generated through eHub.

The Workflow Setup screen can be accessed under System in the Navigation Pane.
Key Functionality
Toolbar
Click the Advanced filter button to create or edit a filter for finding and/or sorting specific records. You can also select a Saved filter. Click the Apply Filter/Sort button to apply any filter or sort criteria you created. Click the Remove Filter/Sort button to remove a filter or sort, if one is currently applied. For more information see Advanced Filtering.
Rollover button
You may use the Rollover button on the toolbar to create a new Workflow Setup record. When
When a record is rolled over, the new Description name takes the original Description and appends (1) to the end.
For more information on Rollovers, see Rollover Functionality.
Workflow Name
Enter the name of the Workflow you want to create or select an existing one from the Lookup list.
By choosing an existing Workflow, you can edit it or roll it over to create a new one without starting from scratch.To rollover a Workflow, select a Workflow from the Lookup field pull-down menu. Then, click the rollover button  in the toolbar at the top of the screen.
Workflow Type
Select the type of Workflow to be applied to the Workflow name you have chosen.
When you choose the Workflow Type, the corresponding Job Attributes and E-mail Templates will display.
Workflow Types include Customer Work Request, Employee Work Request, Employee Address Request, Employee Phone/E-mail Request, Employee Pay Rate Request, Employee Primary Job Request and Employee Status Request, Personnel Request and Cancel Personnel Request.
If you change the Workflow Type, the associated E-mail template and the Tier values from the Job Attributes are removed. The change of the Workflow Type also affects the eHub Workflow Defaults (JOB: Job Master File (Job Requirements tab). You will be prompted for confirmation of a change to the Workflow type.
Mode

Mode determines how some Requests are processed. Mode does not apply to Customer Work Requests or Employee Work Requests.
Select Approvals for Requests to proceed and be approved through a Workflow approval process. These request statuses will appear as Approved, Canceled, In Process, Pending, or Rejected in eHub.
Select No Approvals for Requests to be automatically approved upon submission by the originator, without the request going through a Workflow approval process. When No Approvals is selected, the assignees grid will not appear at the bottom of the SYS: Workflow Setup screen, and the E-mail Templates and Timeout Information sections will be grayed out. For requests that have been Auto Approved, the statuses will appear as Received in eHub.
Auto Update WinTeam
The Auto Update WinTeam option is available only for Employee Address change requests or Employee Phone/E-mail change requests.
Select this check box when you want Employee Address or Phone/E-mail change request information to automatically update in WinTeam when an employee submits a request that has been Auto Approved or approved through a Workflow process.
If this box is not selected, the updated information, upon approval, will need to be imported using the eHub Employee Change Request button in the Employee Master File.
Note: When the updated tax engine is enabled on a database, the Auto Update WinTeam check box in the System Workflow Setup window is read-only and cannot be selected. The address changes and requests are shown by clicking the change request icon instead of being auto updated. This happens because the changes must be reviewed by the payroll manager since address changes can also change assigned taxes.
Notify By E-mail
This check box displays only for Personnel Requests or Cancel Personnel Request Workflow Types that have the No Approvals option selected.
When this box is selected, the Assignees grid will display at the bottom of the screen where you can choose the Assignees that will receive notification via e-mail that a new Personnel Request has been created or that one has been canceled.
Timeout Information

Total Time Allowed
Enter the time allowed for a Request to make it through the Workflow process before it times out.
Example: For example, if 96 hours is entered, a request will timeout after four days if it no Action has been taken on it since initial submission. An e-mail notification will be sent to whichever Employee, E-mail Group and/or E-mail is indicated in the fields below.
Note: If you enter Minutes greater than 59, the system will adjust the Hours and Minutes accordingly.
For example: If you enter 75 minutes, once you tab off the minutes field, the Hours field will adjust to 1 hour and the minutes field will adjust to 15 minutes.
Notify on Timeout
Enter the Employee, E-mail Group and/or E-mail Address to which a notification will be sent when a Request times out.
Employee
Enter employee name or number or use the Lookup to search for an employee.
E-mail Group
Double click the E-mail Group field to bring up the SYS: E-mail Groups screen.
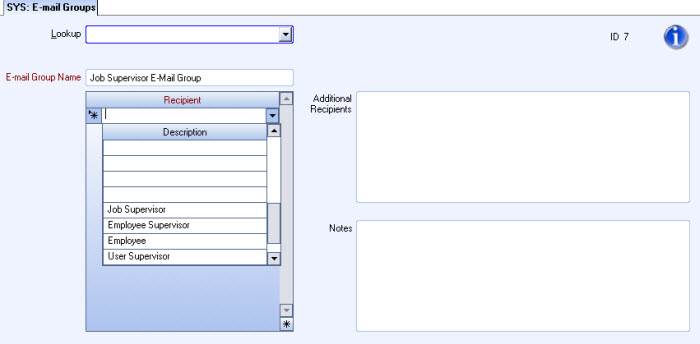
E-mail Group Name
Required: Choose a name for the E-mail Group you want to create, or select a group from the Lookup pull-down menu to edit or review it.
For example, you want Job Supervisors to be notified if a Customer Work Request times out. A Job Supervisor E-mail Group can be created using the Job Supervisor tier as the recipient (see below).
Recipient
Required: Select the Recipients in the E-mail Group from the list.
Recipients are based on Tiers set up in the Job Master File.
For more information, see JOB: Job Master File.
Additional Recipients
Add any additional recipients to the E-mail Group you desire.
Separate e-mail addresses using a semi-colon. Do not press "Enter" between e-mail addresses. eHub only supports semi-colon delimited lists of e-mail addresses.
Notes
Add any notes for the E-mail Group you desire.
E-mail Address
Enter the E-mail Address where a timeout notification should be sent.
Notify Originator on Total Expiration check box
When this check box is selected, a notification will be sent to the originator of the Request upon timeout.
Available in eHub Workflow Defaults
When this check box is selected, the selected Workflow will be available in the eHub Workflow Defaults in the Job Master File (Job Requirements tab).
Clear this box to make a Workflow Type inactive; that is, the Workflow Type will no longer be available in the Job Requirements tab. This means that any Requests that have the inactive Workflow Type applied to them and are still pending will proceed through the original Workflow process; however, the inactive Workflow process will not be available for any new Requests.
Default Workflow
If this box is checked, this sets the Default Workflow for most Requests unless 1) a Workflow Default is applied to a specific Job in the Job Master File or 2) Job Attributes (Tiers) are applied to a specific Request type in the Workflow Process Defaults section of the in the eHub Setup screen.
Only one Default Workflow per Workflow Type is allowed.
Job Attributes

Job Attributes are set up in the Workflow Process Defaults section of the eHub 2 tab in the eHub Setup screen. Job Attributes determine how specific Requests are handled and can be helpful in customizing Workflow processes to meet your company's needs.
For instance, if your company has multiple locations, setting up Customer Work Requests with a Location Attribute will allow Requests to proceed through Workflow processes specific to individual locations.
Job Attributes are based on the Tier Parameters tab set in the Job Master File screen.
For more information see JOB: Job Master File and SYS: eHub Setup.
CC: Originator on All Actions
Select this checkbox if you prefer to have the originator of the Request be notified of all actions taken on the Request.
Tip: Throughout WinTeam you will see this Change Info icon  . When you hover over this image, you will see the User Added/Changed and Date Added/changed information.
For more on the Change Info icon, see the Change Info icon section in WinTeam Basics.
E-mail Templates
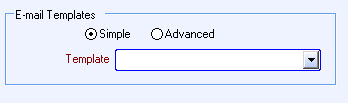
Select the E-mail Template to use with each Action. E-mail Templates are set up in the E-mail Templates screen under the Setup menu. These templates will display the text that will be e-mailed to Assignees at various points in the Workflow process depending on actions taken on a Request.
There must be at least one E-mail Template in order to set up a Workflow.
Several default templates have already been set up for you.
Choose the Simple radio button to have one basic E-mail Template sent to Assignees in the Workflow process. This option is useful if you plan to use the same e-mail for each step in a Workflow process.
Choose the Advanced radio button to send Assignees various E-mail Templates specific to steps in the Workflow process or actions taken on a request. This option is useful if you would rather customize the e-mail messages sent for each step in a Workflow process.
Then select from the pull-down menu which the E-mail Template will be sent to Assignees in the Workflow.
For more information see E-mail Templates.
Steps grid
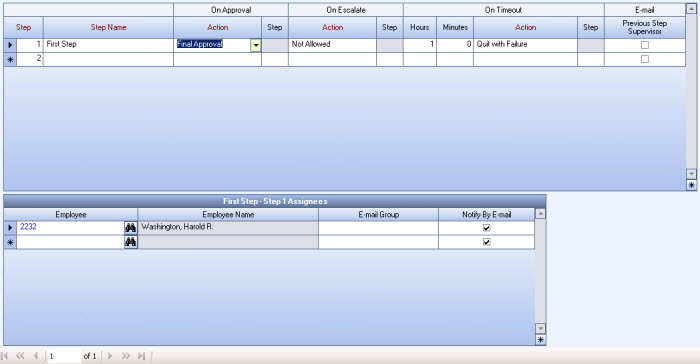
Step Name
Assign a name for the first step in your Workflow process. It can be as simple as 'First Step' or 'Supervisor'.
There is no limit to the number of steps you can create.
Action
Define the Actions to be taken during each step in a Workflow process.
Each Step can proceed in three possible ways depending on what the Step Assignee chooses to do with the Request:
On Approval
If the Step Assignee approves the Request, it will proceed as indicated in the On Approval Action field.
The Action options include Move to Next Step, Go to Next Step and Final Approval.
On Escalate
If the Step Assignee neither Approves nor Rejects the Request, but instead Escalates it, the Request will proceed as indicated in the On Escalate Action field.
The Action options include Move to Next Step, Go to Next Step and Not Allowed.
On Timeout
If the Request times out because the Step Assignee has not taken action on the Request in the amount of time allotted for the step, it will proceed as indicated in the On Timeout field.
Enter the number of hours and minutes allowed for that particular step to be completed. This should be a shorter period of time than indicated in the Timeout Information section since this is just for the step and not the entire Workflow process.
The Action options include Move to Next Step, Go to Next Step, Quit with Success and Quit with Failure.
E-mail Previous Step Supervisor
Check this box if you prefer to have the Supervisor of the Employee assigned to the Previous Step notified of action taken on the Request. This option is not applicable to the First Step in any Workflow.
Action Definitions
Move to Next Step
By selecting Move to Next Step, the Request will proceed to the next consecutive step in the Workflow.
Go to Next Step
By selecting Go to Next Step, the Request will proceed to the step you indicate in the Step field. This may mean some steps are skipped.
Final Approval
Select Final Approval on the last step. The Request will be marked as Approved/Closed in eHub and the Workflow process will be considered complete.
Not Allowed
This option is only for the On Escalate Action field. Select Not Allowed if the Request is not to be Escalated and is Required to have an Approval or Rejection Action taken on it before proceeding through the rest of the Workflow.
Quit with Failure
When a Request times out between steps, this option will stop the Workflow process and require that a new Request be submitted by the Originator. Notifications will be sent based on E-mail Templates selected and whether the CC: Originator on All Actions check box is selected.
The Request will appear with a 'Quit with Failure' status in eHub.
Quit with Success
When a Request times out, this option will stop the Workflow process but assume approval for the Request.
The Request will appear with a 'Quit with Success' status in eHub.
Step Assignees
Contact
Enter the name of a Customer Contact whom you may want to include in the Workflow process for notification purposes.
For example, if your Customer submits a Customer Work Request, you may want your Customer Contact to be aware that the Request is being handled.
Enter all or part of the Customer Contact name or number and tab off the field to bring up an exact match or a list of choices. Or use the Lookup to search for a Customer Contact.
Employee
Enter the Employee assigned to take action on the selected step. More than one Employee can be assigned to a step, and the Request will proceed through the Workflow once any one of the Assignees takes action on it.
Enter all or part of the Employee Contact name or number and tab off the field to bring up an exact match or a list of choices. Or use the Lookup to search for an Employee.
Employee Name
This field will automatically populate with the name of the Employee when an Employee number is entered into the Employee field.
E-mail Group
Enter an E-mail Group to be notified of Actions taken on a Request.
For more information see the E-mail Groups section of this topic.
Notify by E-mail
This box is automatically selected in order to send E-mails to Step Assignees (as well as Contacts and E-mail Groups). Clearing the box means that Step Assignees (as well as Contacts and E-mail Groups) will not receive e-mail notifications that action is required on a Request assigned to them. However, the Request will appear in eHub where Step Assignees can take action on the Request.
Troubleshooting
Q. How do I know which Workflow process my request picked up?
A. SS requests table – Workflow ID column
Q. My request picked up the wrong workflow process.
A. Check JMF, Check Job Attributes, check Default workflow as last resort
Q. My requests are erroring out and not sending an email. (Workflow Admin email)
A. Reason: No email in the EMF, Invalid email in the EMF, No email set up in system:setup for Workflow admin
Q. ***Employee Requests
A. New features to edit or view only **With new release clients will need to redo their features selected for My Profile and Employee Profiles