
Overview
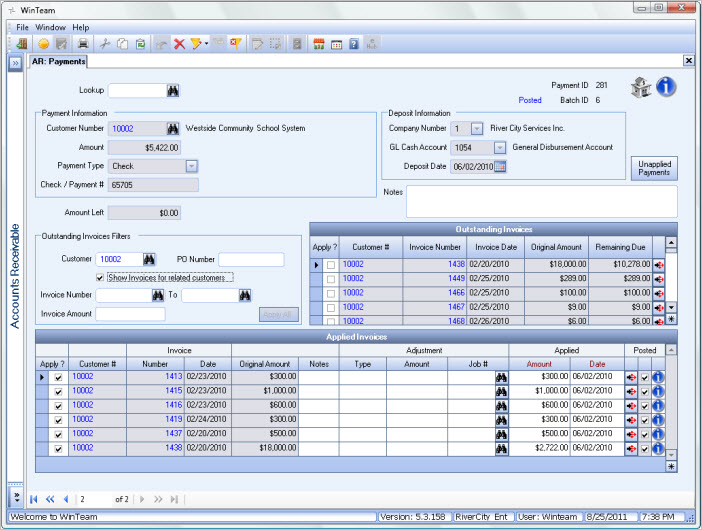
Use the AR Payments window to apply cash receipts, unapplied cash, and credit card payments. You may also use AR Payments to apply credit memos, adjustments, and miscellaneous deposits.
The Allow Batchless AR Payments check box (in AR: Defaults) must be selected to allow payment processing without creating a batch through the AR Payment Wizard. If this check box is NOT selected, you cannot create payment records without going through the Payment Wizard. The Payments window is read-only. All fields related to the Payment record are locked, except for the Lookup field. The outstanding invoices area is also available if you are applying unapplied cash or creating an adjustment.
You can use one check (or other payment type) to pay invoices for multiple customers. When a Collections invoice is paid in full or adjusted to zero dollars remaining due, all Customer Master File Diary entries related to the invoice where the Diary Type = Collections is updated with a Closed status.
- The invoice being paid or written off is the only invoice on the diary entry
- The other invoices on the diary entry are paid in full (or written off).
Key Functionality
Lookup
The Payment Lookup field is numeric only. If you enter a Payment Number and the number matches an existing record the record displays. If you type an "i", followed by an invoice number, the system drops down the Customer Number related to the invoice.
Note: This invoice # does not have to be outstanding invoice. It shows you the Customer Number is regardless of whether or not the invoice is outstanding.
To search for a record in a list, select the Quick Lookup button.
To search for a record in a list with the focus set to the Number/ID field, press F4. You can press the shortcut key ALT + L to place your cursor in the Lookup field. If you entered this window from the AR Payment Wizard, the Batch ID defaults into the criteria section of the Lookup Payments window. For more information see Using Quick Lookups or Lookup Customers.
ID
Displays the ID of the Payment record. You can right-click on the on the ID to filter for records. For more information see Filtering and Right-click Functionality.
Batch ID
Displays the Batch ID of the Payment record. Batch ID's are assigned when using the AR Payment Wizard. You can right-click on the on the Batch ID to filter for records. For more information see Filtering and Right-click Functionality.
Batch Information
The Batch Information displays only when you access the Payments window from the AR Payment Wizard. This indicates you are in batch mode. The Batch Total is the total amount for all payments in this batch.

Click the Show Summary button (or use ALT+ S) to display the Payments Summary window.
Click the Filter By Batch button (or use ALT + B) to filter for records only with the original Batch ID.
Recurring Invoice
Indicates if this invoice is recurring.
Recipients Edited Status
Displayed if changes have been made to the original Recipients grid Recipients Edited.
Status
The invoice status displays in green text. It will display either New Invoice, Paid, Partial Paid or Outstanding.
Posted Status
To view the GL Log# with which the transaction was posted and/or speed the process of un-posting and/or reprinting GL entries, the GL: Journal Update Log screen may be accessed by double-clicking a record's blue Posted status.
Bank Information icon
You can hover over the bank icon to see User Cleared, Date Cleared, User Reconciled, Date Reconciled, and Bank Statement Date provided the payment has been cleared or reconciled. If the payment has not been cleared or reconciled, you see the bank icon.

If there is a R on the bank icon , the payment has been reconciled.

If there is a C on the bank icon , the payment has been cleared, but not reconciled.

Note: You cannot make adjustments to payments that are in a Cleared or Reconciled status (with the exception of the Notes field).
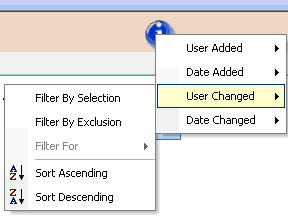
Hover over the Change Information icon to see User Added, Date Added, User Changed and Date Changed information. WinTeam records the logon name of the user entering or changing this record. The Date Added is the original date this record was entered into the system. The Date Changed is the date the record was last changed. Right-click on the Change Info icon to filter for records added or changed by a specific user or date.
When you hover over the User Changed or Date Changed filters, you can:
- Filter By Selection - Filters for all records that match your current records field value.
- Filter by Exclusion - Excludes from your filter all records that match your current records field value.
- Filter For - Filters based on the text/value you enter.
- Sort Ascending - If you already have a filter applied, the Sort Ascending command is available. Also used to include all records in the filter and sort in ascending order based on the current records field value.
- Sort Descending - If you already have a filter applied, the Sort Descending command is available. Also used to include all records in the filter and sort in descending order based on the current records field value.
The User Added and User Changed fields display the logged-in user for manual payments made in WinTeam. Different information displays for payments made in the Online Payment Portal based on whether a one-time payment was made or if a payment was made by a logged-in user.
- One-time payments–the User Added and User Changed fields are labeled WinTeam API since there was not a logged-in user tied to the payment at the time it was made. The timestamp updates each time the payment changes status, therefore there is a difference for ACH payments between the Date Added and Date Changed.
- Logged-in user payments–the User Added and Date Added fields contain information from the initial status of the payment and remain unchanged throughout the payment process. The User Changed field initially contains the name of the logged-in user who made the payment. When the payment’s status changes, the User Changed field is updated to WinTeam API and the Date Changed field is updated to the date and time of the status change.
You can also right-click on the Change Info button to filter for records added or changed by a specific user or date.

When you hover over one of the fields, you see a filter menu.
Select Filter By Selection to filter for all records that match your current record’s field value.
Select Filter By Exclusion to exclude from your filter all records that match your current record’s field value.
If you already have a filter applied, then the Sort Ascending and Descending buttons are available. If you want to include all records in the filter and want to sort ascending based on the current record’s field value, select Sort Ascending.
If you already have a filter applied, then the Sort Ascending and Descending buttons are available. If you want to include all records in the filter and want to sort descending based on the current record’s field value, select Sort Descending.
Payment Information
Customer Number
Use the Customer Number field to enter the customer number for applying payments. Type the Customer Number in this field, or use the Lookup to locate the customer. Once you enter a Customer Number in the Payment Information section, the Customer Number defaults to the Outstanding Invoices Filter, and then filters the invoices in the Outstanding Invoices grid based on that Customer Number.
If you type an "I", followed by an invoice number, the system drops down the Customer Number related to the invoice.
Note: This invoice # does not have to be outstanding invoice. It shows you the Customer Number is regardless of whether or not the invoice is outstanding.
Amount
Use the Amount field to enter the amount of the payment. Negative amounts are not allowed.
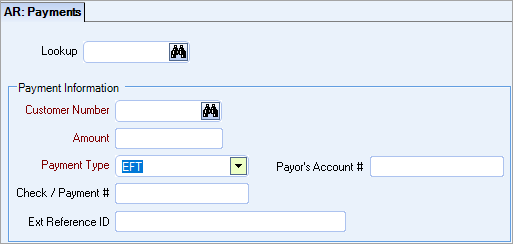
Payment Type
Use the Payment Type field to select the kind of payment being entered. Typically, payments are made with checks, but payments may be made using cash, a credit card, Electronic Funds Transfer (EFT), or categorized as Miscellaneous Deposits. You can also apply a Adjustment / Credit to an invoice.
Note: The required fields on the Payments window change depending on the Payment Type chosen.
The Payor's Account # (number) field displays when the Payment Type is EFT (electronic funds transfer). Use this field to enter the bank account number of the party who is making the payment.
Adjustment / Credit is used when creating payment records for applying credits or adjustments. These records always have 0 in the amount field. The Amount and the Check / Payment # fields are disabled.
The Posting Date that the system uses for adjustments is based on whether or not the Payment record that the Adjustment was entered is Posted or not.
- If the Payment record that the Adjustment was entered under is NOT posted, the Posting date of the Adjustment is the Payment Date.
- If the Payment record that the Adjustment was entered under IS posted, the Posting date of the Adjustment is the Applied Date.
Check/ Payment #
This field displays when you select all Payment Types, except Cash or Credit Card. Use the Check / Payment # field to enter the check number if you selected a Payment Type of Check. You may reference this number if there is a dispute over payment of the check. The Check / Payment # field may also be used to enter a reference number for the EFT transfer, if you selected a Payment Type of EFT.
A maximum of 20 alphanumeric characters can be used for the Check Number. The Check /Payment # is included on the Statements and Past Due Notices (Transaction Statement) in the Reference # column. The Reference No. refers to the Check/Payment# field on this window.
Credit Card Type
The Credit Card Type field displays when you select Credit Card for Payment Type. Use the Credit Card Type field to assign a Credit Card Type. Type or select the Credit Card Type for the payment you are posting.
Example: Visa, Master Card, American Express
To add or edit the Credit Card Type list, double-click in the Credit Card Type field to display the Credit Card Types add/edit list.
Card #
The Card # field displays when you select Credit Card for Payment Type. Use the Card # field to enter a customer's credit card number using spaces and dashes when necessary.
Card Holder
The Card Holder field displays when you select Credit Card for Payment Type. Use the Card Holder field to enter the name of card holder.
Expiration Date
The Expiration Date field displays when you select Credit Card for Payment Type. Use the Expiration Date field to enter the date from the credit card. If the expiration date on the card does not contain a day, use the last day of the month. Type the date from the credit card using the standard MM/DD/YY date format, or use the Date Control to select a date.
Ext Reference Id (External Reference ID)
The Ext Reference Id field displays when the Payment Type is Credit Card. Use this field to manually enter the external reference identification for credit card payments. If you use WorkWave Payments, this field contains the automated reference ID generated as part of the online payment integration. See AR: External Reference ID for more information.
Miscellaneous Deposit Name
The Miscellaneous Deposit Name field displays when you select Miscellaneous Deposits as the Payment Type. Use the Miscellaneous Deposit Name field to enter a name or description to identify the source of the deposit. Typically, this is the name of the person or company that made the deposit.
GL Reference
The GL Reference field displays when you select Miscellaneous Deposits as the Payment Type. Use the GL Reference number to enter a label for the deposit. This label prints as the General Ledger Reference on the General Ledger reports for the transaction.
Deposit Information
The Deposit Information section is disabled if you are in "batch mode". You can right-click to filter records. For more information see Filtering and Right-click Functionality.
Company Number
If the database has multiple companies this field displays. The Company # limits the cash accounts available. Select the Company Number.
GL Cash Account
Use the GL Cash Account field to select the General Ledger Cash Account to post payments to. The only available options in the Cash Account list are those that are defined in the Cash Accounts Setup window for Accounts Receivable.
Deposit Date
Use the Deposit Date field to enter the date when you are posting a cash receipt. The current date defaults to this field. You may modify this by typing a new date, or use the Date Control to select a date.
Amount Left
The Amount Left field displays the amount of the money received that has not been applied to an invoice. The system calculates the amount left as: Payment Amount — Total Applied Amount = Amount Left
Other Unapplied Payments
The Other Unapplied Payments displays with green text when there are other unapplied payment records for a Customer. The Other Unapplied Payments field displays ONLY when the Customer has Other Unapplied Payments, not including the current record.

The amount displayed in the Other Unapplied Payments field is calculated as follows:
Customer Unapplied Payments - Unapplied Payment from this record = Other Unapplied Payments
Customer Number 10532 has two unapplied payments for a total of $17197.94.
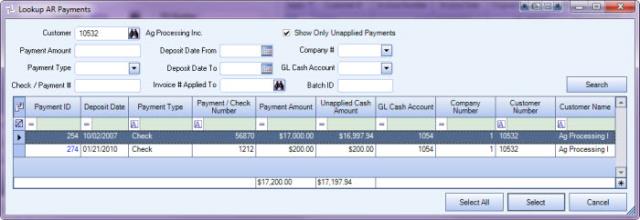
When viewing the record for Payment ID 254, the Other Unapplied Payments text displays. The Other Unapplied Payments amount does not include the current record, only the amount of Other Unapplied Payments for this Customer. In this example, Customer 10532 has only one Other Unapplied Payment record for the amount of $200.00.

Customer Unapplied Payments - Unapplied Payment from this Payment record = Other Unapplied Payments
$17197.94 - $16997.94 = $200.00
Once the payment is applied, the Lookup AR Payments display ONLY the record for the remaining unapplied payment.
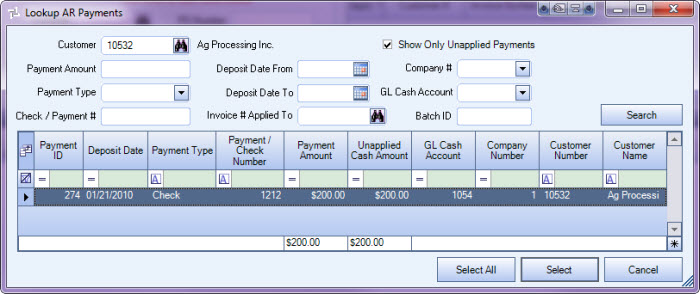
If a Customer has only one Unapplied Payment, the Other Unapplied Payment amount does not display on the AR Payments window, since the Customer has no other Unapplied Payment records.
When viewing the record for Payment ID 274, Other Unapplied Payments text does not display since this Customer has no other Unapplied Payment records.

Remember that the Other Unapplied Payment amount is calculated as follows:
$200.00 (Customer Unapplied Payment) - $200.00 (Unapplied Payment from this Payment record) = $0.00 (Other Unapplied Payment)
Total Processing Fees
This field displays when the Payment Type is Credit Card. It is used with the Processing Fee CC adjustment type. See Using the Processing Fee – CC Adjustment Type for more information.
Notes
Use the Notes field to enter any notes about this payment record. If you enter more than one line of information, the system automatically wraps the lines of information for you.
Unapplied Payments button
Click the Unapplied Payments button (or press ALT + U) to display the Lookup Payments window filtered for Payment records with unapplied payments.
Note: A Payment record does not need to be selected in order to query for all unapplied payments.
Outstanding Invoice Filters
The Outstanding Invoice Filters are used to find outstanding invoices to be paid with this payment. The Outstanding Invoices grid populates based on the filter criteria. The Outstanding Invoices grid automatically refreshes when you Tab off a field. You must specify at least some criteria.
Customer
If you are on an existing Payment record, the Customer Number defaults to this field. If you are creating a new Payment record, once you enter a Customer Number, under Payment Information, that Customer Number defaults to this field and the Show Invoices for related customers check box is selected. You can double-click on the Customer Number to open the Customer Master File record.
PO Number
Use the PO Number field to filter for outstanding invoices using a PO Number. You must enter an exact match.
Show Invoices for related customers
Once a Customer Number is entered, the Show Invoices for related customers check box is selected. When a Customer value is part of the selection filter, and this check box is selected, records for other related customers (any parent or sub customer) displays in the Outstanding Invoices grid.
Invoice Number
Use the Invoice Number range fields to filter for outstanding invoices using a From and To range. The To field defaults from the From field.
If you are using an invoice number filter and you click Apply All, the outstanding invoices filter is now cleared if all invoices have been applied. The information in the Outstanding Invoices grid is refreshed to show all remaining outstanding invoices (if any) based on the other filter criteria.
If you are using an invoice number filter and you select and apply one outstanding invoice, the filter does not clear and the remaining entries in the Outstanding Invoices grid are not removed.
Invoice Amount
Use the Invoice Amount field to filter for outstanding invoices using a specific amount.
Outstanding Invoices grid
The Outstanding Invoices section lists invoices that are not paid in full. Invoices move from the Outstanding Invoices section of the window to the Applied Invoices section by selecting the Apply? check box in the Outstanding Invoices section of the window.
If you are applying a payment that includes more than one customer’s invoices, and before applying you have sorted the Outstanding Invoices grid in a particular way, the system saves this sort during the time in which you are applying the payment.
Apply All
Click the Apply All button (or press ALT + A) to have the system automatically apply Invoices in the order they are listed in the Outstanding Invoices grid. Invoices continue to be applied until an error message is received, or the Amount Left field is 0.
You want to be sure to sort or filter the records before you click the Apply All button.
Apply?
Use the Apply? check box to select an outstanding invoice to apply a payment. When you select the check box, the amount of payment is applied to the invoice, then the invoice moves from the Outstanding Invoices section to the Applied Invoices section.
If a partial payment is made, the invoice remains in the Outstanding Invoices section, but updates the Applied Invoices section to show the payment made. The Remaining Due field reflects the current payment and the invoice balance details.
Note: If you accidentally select the Apply? check box and apply a payment to an invoice (it moves to the Applied Invoice list) unselect the Apply? check box in the Applied Invoices section. The selected invoice moves back up to the Outstanding Invoices section.
Customer Number
Displays the Customer Number of the Invoice. You can double-click to open the Customer Master File record.
Invoice Number
Displays outstanding invoices for a customer. To view detail about the invoice, double-click on the Invoice Number to view the AR: Invoices window for that invoice.
Invoice Date
Displays the date the invoice was created.
Original Amount
Displays the original balance of the invoice under Original Amount. The Original Amount does not reflect any payments made on the invoice.
Remaining Due
Displays the invoice's unpaid balance under Remaining Due. If no payment has been made, the Remaining Due is the same as the Original Amount. If payments have been made on the invoice, this value reflects the remaining balance.
Detail button
Click the Detail button to open the AR: Payment Details window. This window contains payments applied to the selected invoice. If no payments have been made to an invoice, the window does not display any entries.
Applied Invoices grid
The Applied Invoices section lists payments posted to invoices. Invoices move from the Outstanding Invoices section to the Applied Invoices section by selecting the Apply? check box in the Outstanding Invoices section.
Apply?
When you select the Apply? check box under Outstanding Invoices to apply a payment to an invoice, the invoice moves from the Outstanding Invoices section to the Applied Invoices section.
If a partial payment is made, the invoice remains listed in the Outstanding Invoice section, but updates the Applied Invoices section to show the posted payment.
Note: If you accidentally select the Apply? check box and apply a payment to an invoice so that it has moved to the Applied Invoice section, unselect the Apply? check box in the Applied Invoices list. The selected invoice moves back up to the Outstanding Invoices section.
Customer Number
Displays the Customer Number of the Applied Invoice. You can double-click to open the Customer Master File record.
Invoice Number
Displays applied invoices for a customer. To view details about the invoice, click the Detail button to view the AR: Invoices window.
Invoice Date
Displays the date the invoice was created.
Original Amount
Displays the original balance of the invoice. The Original Amount does not reflect any payments applied to the invoice.
Notes
Use the Notes field to enter any notes pertaining to this Payment. If you enter more than one line of text, the system automatically wraps the information. To start a new line or paragraph, press Ctrl + Enter.
To open the field in Zoom mode you can
- Double-click in the field OR
- Press Shift + F2 OR
- Right-click, then select Zoom (only for multi-line text boxes, not in a grid)
From the Zoom screen you can view or edit the entire Notes area. For more information see Using the Zoom Feature.
Adjustment Type
Use the Adjustment Type field if you entered an adjustment amount in the Adjustment Amount field. Select from these adjustment types:
- Discounts - Enter discounts as a positive dollar amount. Because it is a discount, the system knows that it is reducing the amount of the Applied Invoice.
- Finance Charges - Enter Finance Charges as a negative number. Because it is a finance charge, the system knows that it is increasing the amount of the Applied Invoice.
- Fee CC – Processing Fee CC (credit card) – This adjustment does not reduce the payment amount. During posting, these fees are deducted from the company's cash account as a direct expense. For detailed information see Using the Processing Fee – CC Adjustment Type.
- Revenue Adjustments - Enter Revenue Adjustments when there is a discrepancy between the amount of the invoice and the amount of the payment received. A Job Number is required for this adjustment type.
- Write-Offs - Enter a Write-off entry as a positive dollar amount. Because it is a write-off, the system knows that it is reducing the amount of the Applied Invoice. A Job Number is required for this adjustment type. For detailed information see Writing Off a Bad Debt.
Adjustment Amount
Use the Adjustment Amount field to enter any adjustments to an invoice.
Applied Amount
As each invoice is applied from Outstanding Invoices to Applied Invoices, the Remaining Due amount carries to the Applied Amount. You may modify the Applied Amount. The Amount Left adjusts accordingly.
The system does not allow you to apply an Invoice total greater than the Payment Amount. If an Outstanding Invoice has a Remaining Due that is greater than the Amount Left for the Cash Posting, only the amount that balances the Cash Posting to $0.00 is applied. Any amount not applied displays in the Remaining Due field. You cannot bring the Cash Posting Amount Left into a negative amount. You can only apply invoices down to a zero dollar value.
Applied Date
The Applied Date field defaults to the current date. You may modify this date.

Posted Status
Displays the Posted Status for invoices posted to the General Ledger. You can double-click in the Posted column to display the original posted log #.
Hover over the Change Information icon to see User Added, Date Added, User Changed and Date Changed information. WinTeam records the logon name of the user entering or changing this record. The Date Added is the original date this record was entered into the system. The Date Changed is the date the record was last changed. Right-click on the Change Info icon to filter for records added or changed by a specific user or date.
When you hover over the User Changed or Date Changed filters, you can:
- Filter By Selection - Filters for all records that match your current records field value.
- Filter by Exclusion - Excludes from your filter all records that match your current records field value.
- Filter For - Filters based on the text/value you enter.
- Sort Ascending - If you already have a filter applied, the Sort Ascending command is available. Also used to include all records in the filter and sort in ascending order based on the current records field value.
- Sort Descending - If you already have a filter applied, the Sort Descending command is available. Also used to include all records in the filter and sort in descending order based on the current records field value.
Related Information
The AR Payments window is part of the AR ALL Security Group.
The AR Payments window is part of the SYS Drill Down AR Security Group with the Read-Only feature selected.
Tip: For more information see Security Groups Overview and Security Groups By Module.