Overview
The AP: Payments window opens from the WinTeam Accounts Payable menu. Use it to add payments, review payments, replace payments, and print or reprint payments. Payment records can be created through the Payment Processing Wizard, by entering a payment directly into the payment screen, or by creating a Cash Transfer. You can also mark a payment as escheated. For more information, see Complying with State Escheat Laws.

Key Functionality
Use the Lookup button to locate an existing payment.
Enter the Check Number of the Payment to pull up an existing Payment record, or use the Lookup to locate a Payment record.
If you enter a check number that exists in multiple Cash Accounts, the Lookup AP Payments screen will automatically filter to these records in order for you to make a selection.
For more information see Using Quick Lookups.
The Credit Vendor Information icon displays only when the invoice is paid by a Credit Vendor account.
It indicates the cleared/reconciled status based on the Credit Vendor.
- If there is an R on the Credit Vendor icon, the Payment has been reconciled.
- If there is a C on the Credit Vendor icon, the Payment has been cleared, but not reconciled.
You can hover over the bank icon to see User Cleared, Date Cleared, User Reconciled, Date Reconciled, and Bank Statement Date provided the payment has been cleared or reconciled.
If the payment has not been cleared or reconciled, you will see the bank icon.
If there is a R on the bank icon, the payment has been reconciled.
If there is a C on the bank icon, the payment has been cleared, but not reconciled.
Status
To speed the process of un-posting and/or reprinting GL entries, the GL: Journal Update Log screen may now be accessed by double-clicking a record's blue Posted status.
Hover over the Change Information icon to see User Added, Date Added, User Changed and Date Changed information. WinTeam records the logon name of the user entering or changing this record. The Date Added is the original date this record was entered into the system. The Date Changed is the date the record was last changed. Right-click on the Change Info icon to filter for records added or changed by a specific user or date.
When you hover over the User Changed or Date Changed filters, you can:
- Filter By Selection - Filters for all records that match your current records field value.
- Filter by Exclusion - Excludes from your filter all records that match your current records field value.
- Filter For - Filters based on the text/value you enter.
- Sort Ascending - If you already have a filter applied, the Sort Ascending command is available. Also used to include all records in the filter and sort in ascending order based on the current records field value.
- Sort Descending - If you already have a filter applied, the Sort Descending command is available. Also used to include all records in the filter and sort in descending order based on the current records field value.
Use the Payment Type to select the type of this payment. The list is limited based on how the payment was created.
- In an Automatic Batch, the only options are Check and NACHA. NACHA can only be selected if the vendor is a NACHA vendor.
- A NACHA payment type can be changed to a Check, as long as the NACHA file has not been processed.
- A Cash Transfer creates a Payment Type of Transfer. Although you cannot create a Cash Transfer from the Payment screen, once a Cash Transfer (from AR) has been updated to the General Ledger, the system creates an Accounts Payable Payment record.For more information, see Performing Cash Transfers.
Use the Check Number field to assign a check number to a Handwritten check. The system assigns check numbers when printing checks for Automatic and Single Entry batches. No entry is required for EFT, Debit payments, or Adjustments.
The system assigns the Check Date when printing checks for Automatic and Single Entry batches. A Check Date is required for Handwritten, EFT, Debit, Adjustment, and Service Charge batches.
The system calculates the Amount field for checks in an Automatic or Single Entry batch, and for Cash Transfers. The Amount is a total of all invoices and credit memos selected for payment. An entry in the Amount field is required for any payment that is being entered as an Apply to Expense payment.
Use the Apply to Expenses check box if an invoice has not been generated or an Other Vendor is used. A payment is generally distributed to Expenses if it is issued for a relatively small amount and an invoice has not been generated. If you select this option, the label of the first tab is Apply to Expenses. If you leave this check box cleared, the first tab will be Apply to Invoices and the Select Invoices button will be available.
Note: The system does not allow you to clear this check box unless the Payee Information is Standard.
Use the Cash Account field to enter the account to use. The only available options in the Cash Account list are those that are defined in the Cash Accounts Setup screen for Accounts Payable and/or Transfers.
For a Payment Type of Transfer, the Cash Account field displays the account the transfer came from.
Use the Payee Information to select a Standard or Other Vendor. The system defaults to the Other Vendor option.
If this payment is for a Standard Vendor, enter the Vendor Number, or use the Lookup to locate the Vendor Number.
Tip: Use the F4 key to look up the Vendor using the Vendor Number. Use the F5 key to look up the Vendor using the Vendor Name.
A check issued to an Other Vendor may only be applied to expenses. Type or select the Other Vendor you want to use. To add a new Other Vendor, double-click in the Name field, or type a new Other Vendor and press Enter. The Other Vendors add/edit list displays.

Use the General Ledger Distribution grid to enter the General Ledger Account Number and the Job Number to charge for this distribution.
The Notes field can contain up to 250 characters.
Use the General Ledger Distribution grid to enter the General Ledger Account Number you want to distribute the payment amount to and the Job Number to charge for this payment.
If your cursor is in the Amount field and you want to distribute the entire payment Amount, you can press the space bar and the Payment Amount will populate the Amount field in the GL Distribution grid.
If you have already added a partial Amount to the GL Distribution grid, you can press the space bar and the remaining amount (the portion that has not been distributed) will populate the Amount field in the GL Distribution grid. Once you tab off the line item in the GL Distribution grid, the Amount Left is recalculated to a zero amount.
Note: For single companies–If you enter a balance sheet account number, the Job Number defaults to the Balance Sheet Job Number indicated in your Company Defaults.
For multiple companies–If you enter a balance sheet account number, you will also need to enter the Balance Sheet Job Number of the Company to whom the distribution belongs to.
Note: If you entered General Ledger Distribution information in the Vendor Master File (Invoices tab) for this Vendor, click the Lookup button. The lookup feature will display the default GL number and Job number information specifically for this Vendor.
Ticket Number
Enter the Ticket Number, or use the Lookup to locate the Ticket Number) to associate with this Purchase Order. Double-click to open the WS: Ticket Details screen for the specified ticket.
Notes
Use the Notes field to concerning the distribution. The Notes field can contain up to 250 characters.
Amount Left
The Amount Left field displays the amount of the invoice that has not been distributed. When the entire invoice
amount has been distributed, the value in this field will be $0.00. The invoice cannot be saved until the invoice amount and distributions equal one another.
Ticket Number
Enter the Ticket Number, or use the Lookup to locate the Ticket Number) to associate with this Purchase Order. Double-click to open the WS: Ticket Details screen for the specified ticket.
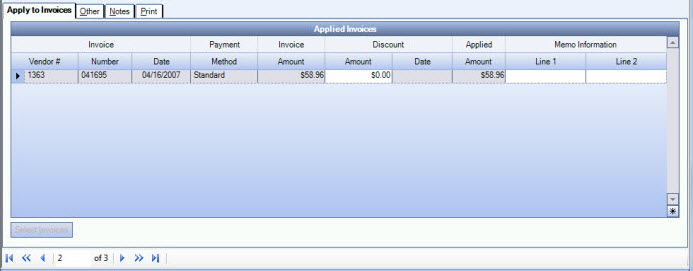
The Apply to Invoices tab is not visible for a Payment Type of Transfer.

Select Invoices button
Click the Select Invoices button (or press ALT + I) to display the AP: Payments-Select Invoices screen. The Select Invoices screen lists all unpaid invoices in the system for the selected Vendor. Select the invoice(s) you want to apply this payment to. Click Close. The invoice information will display in the Applied Invoices grid.
Applied Invoices grid
The Applied Invoices grid displays the invoice(s) you imported to apply to this payment. You may add discount information at this time, and you may edit the memo lines.
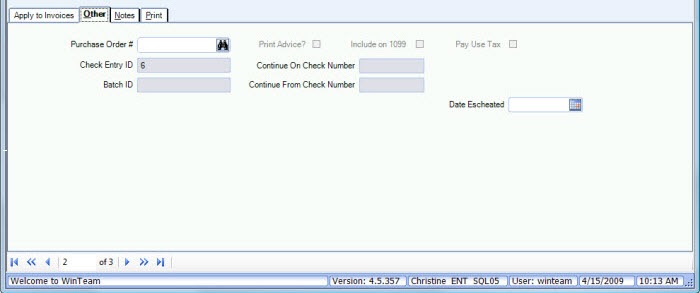
The Other tab is not used for Transfers.

Purchase Order #
If the payment is based upon an existing Purchase Order, type the Purchase Order number here, or use the Lookup to locate the Purchase Order number.
Print Advice?
The Print Advice? check box is available only for Payment Types of Checks and NACHA. If NACHA is used as the Payment Type, the Print Advice? check box is selected by default.
Include on 1099?
The Include on 1099? check box is available for all Payment Types, but only if using a Standard Vendor.
Use the Include on 1099? check box if this vendor requires a 1099 at the end of the year. If the vendor is a corporation and does not require a 1099, leave the check box cleared. Normally, any non-corporate vendor who is paid more than $600.00 a year is issued a 1099 form at the end of the year.
Select the Pay Use Tax check box if your if your company is required to pay Use Tax for the items purchased from this Vendor. If the Vendor does not charge sales tax on the items you purchase from them, you will normally have to pay Use Tax on those items purchased at appropriate times during the year. If you selected the Pay Use Tax check box on the Vendor Master File, the check box defaults to selected on the Payment screen. Once this option is selected, two additional fields display.
Use Tax Amount
Enter the Use Tax Amount.
Use Tax Code
Type or select the Use Tax Code to apply to this payment. To add a new Use Tax Code, double-click in the Use Tax Code field, or type a new Use Tax Code and press Enter. The Use Tax Codes add/edit list displays.
Check Entry ID
Displays the Check Entry ID.
Batch ID
Displays the Batch ID if the payment was created in a bath.
Continue On Check Number
Displays the next Check Number if the payment was printed on separate checks
Continue From Check Number
Displays the beginning Check Number if the payment was printed on separate checks.
Date Escheated
This field is available once payment has been posted.
Use the Date Escheated field to enter a date that this payment record was escheated.

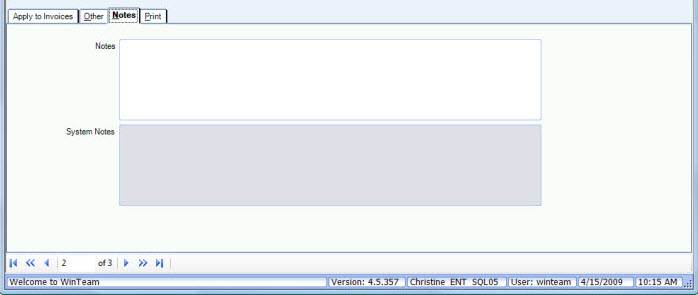
Notes
For a Payment Type of Transfer the Notes field is populated from the Cash Transfers screen.
Use the Notes field to enter any notes about this payment record. If you enter more than one line of information, the system automatically wraps the lines of information for you.
System Notes
For a Payment Type of Transfer, the system generates a note similar to "Cash Transfer for Account 1053". The Account referenced in the system note is the To Account from the Cash Transfer screen.
System Notes include information on the user name and date when activity occurred, when a check was printed, the check number used, replacement check information, and void check information.
The Print tab is not used for Transfers. The Print tab is disabled if details do not exist for distribution or invoices.

Print button
The Print button is available only when the Payment Type is Check.
Click the Print button to display the Automatic Check Writing screen.
For more information, see Printing AP Checks.
Reprint button
The Reprint button is available only when the Payment Type is Check and the payment has not been cleared.
Replace button
Click this button to change (replace) the check number. This button is only available when the Payment Type is Check, the payment has been posted, and has not been cleared. You should only use this feature when you physically have the original check. For example, the original check got damaged in the printer, and you want to replace it with a handwritten check, and you don’t want to go through the process of voiding the original check.
Important: Clicking the Replace button does not print the replacement check–it only changes the check number.
If you entered the replacement check in error, you can delete it in the AP payments screen which makes the original check number valid again. The only time a replacement check can’t be deleted is after it has been marked as cleared through a bank reconciliation.
Enter New Check #
This field is available only when you have selected to Replace a check by clicking the Replace button. Enter the New Check # to use.
Check Date
Enter the Check Date.
Proceed button
Click Proceed to complete the replacement of the original check.
To use the import feature, the Import check box in the AP Payments security group must be selected. If the Read-Only check box is also selected, the Import button displays but is disabled.
You can import information from a .csv, .xls, or .xlsx file. The file must contain the following fields even if they are not populated:
- CompanyNumber (optional, does not apply if PaymentTypeID is 1 (Check) or 3 (NACHA))
- CashAccount (only required if CompanyNumber is required)
- CheckNumber (option, does not apply if PaymentTypeID is 3 (NACHA), 4 (EFT) or 5 (Debit))
- CheckDate (optional, does not apply if PaymentTypeID is 3 (NACHA))
- Amount
- VendorNumber
- GLNumber
- JobNumber
- Notes (optional)
- OtherVendorID (optional)
- TicketNumber (optional)
- PurchaseOrder (optional)
- PaymentTypeID (optional; valid values include 1 (Check), 3 (NACHA), 4 (EFT), 5 (Debit), 6 (Handwritten Check))
Note: This field defaults to 6 (Handwritten Check) if left blank.
- ApplyToExpenses (defaults to true)
- If set to true, the import is applied to Expenses.
- If set to false, the import is applied to Invoices.
- Note: Imports that will be applied to invoices will have system defaults from the original invoices automatically applied unless they are directly provided during import. This information is determined from the invoice indicated by the value in the InvoiceNumber field.
- InvoiceNumber (required for Apply to Invoice Distribution)
- DiscountAmount (optional)
- MemoLine1 (optional)
- MemoLine2 (optional)
If the VendorNumber field is blank, the value from the OtherVendorID field is used. The record will error out if both the VendorNumber and OtherVendorID fields are populated.
The system will validate imports to locate duplicate records and errros:
- Duplicate records detected in an import that will be applied to Expenses will be displayed for the user to confirm or cancel their creation. Then, users will be presented with any errors discovered during validation and have the opportunity to correct them.
- Duplicate records detected in an import will be applied to Invoices display in the same window as errors after validation.
Note: Users can apply AP Payments imports to multiple Expense Accounts in the GL Distribution Grid or multiple Invoices in the Applied Invoices Grid by ensuring that the following values match for the item in the Import file:
- Company Number
- Cash Account
- Check Number
- Check Date
- Vendor Number
Document: AP Payments Import Sample File
Related Information
The AP Payments screen has its own Security Group, AP Payments.
The following security Features are available for this screen:
- Can Override Closed Fiscal Period
- Import
- Read-Only
The AP Payments screen is part of the AP ALL Security Group (no Features selected).
The AP Payments screen is part of the SYS Drill Down AP Security Group with the Read-Only Feature selected.
This screen has the Read-Only Feature. For more information see Learning about Read-Only Security.
Tip: For more information see Security Groups Overview and Security Groups By Module.
Complying with State Escheat Laws
Creating a Single Payment for a Non-standard Vendor
Finding Payments that Have Not Cleared
