Overview
Use the Scheduling Activity Report options screen to view, print, or export schedule information for the selected jobs. The report is a great tool to run before updating hours to bill and payroll, as it makes it easy to find Jobs with scheduled employees who have a zero pay rate.
Key Functionality
Select a report template from the list, or type a description and Save your settings to create a report template for later reuse. You may also select and Delete report templates from the list.
Type a description to name the report. This description prints above the Report Title.
Available for Clients using the Multi-Company feature.
The Default Company Name for Report is populated from the Company Setup screen.
The list contains all companies that the User has Rights for.
- If the User has permission to only one company, then just that one company will display in the list.
- If the User has permissions to more than one company, the list will contain all companies the User has rights to PLUS the default reporting company.
WinTeam will print the correct company name and logo information on any page when it can determine the company of the page of the report, otherwise the Default Company Name will print. In other words, as long as the Company level is included somewhere in the Tiered section and is being shown in the tiered information at the bottom of the page, then that company's Report Name and Logo (if selected) prints on that page.
If there is not a Company identified in the tier area of the page, then the "Default Company Name for Reports" is used. The default Company Name and Logo is also used for the Total Enterprise report.
For more information see Learning about WinTeam Reports.
Use the Report Format option to choose the level of detail for the report.
Detail
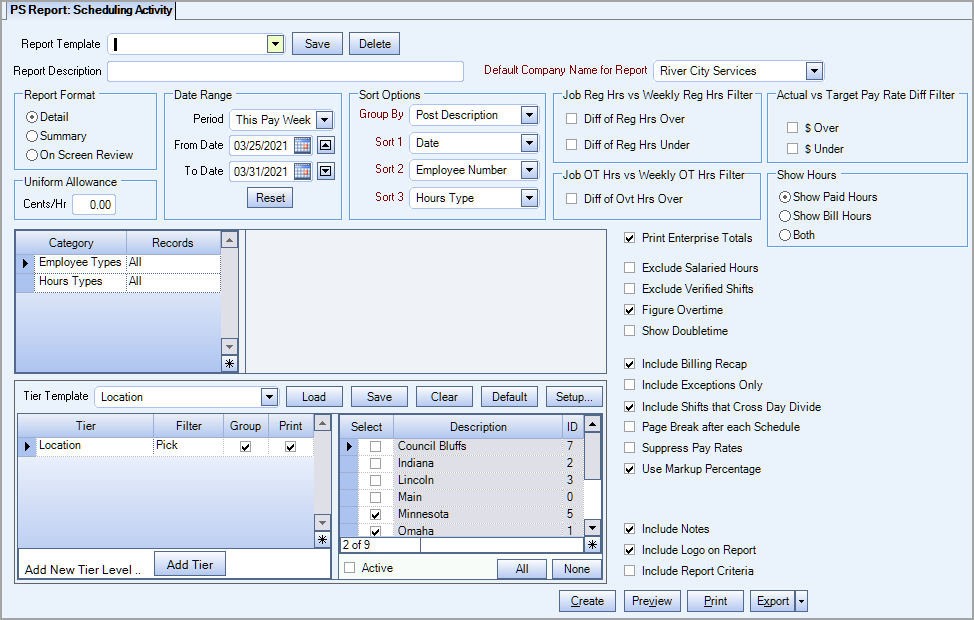
Summary

On Screen Review
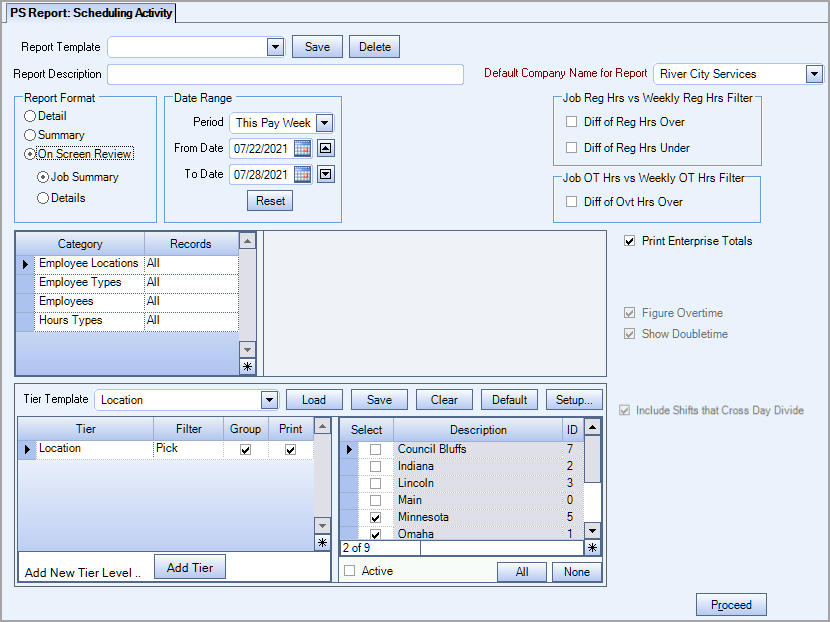
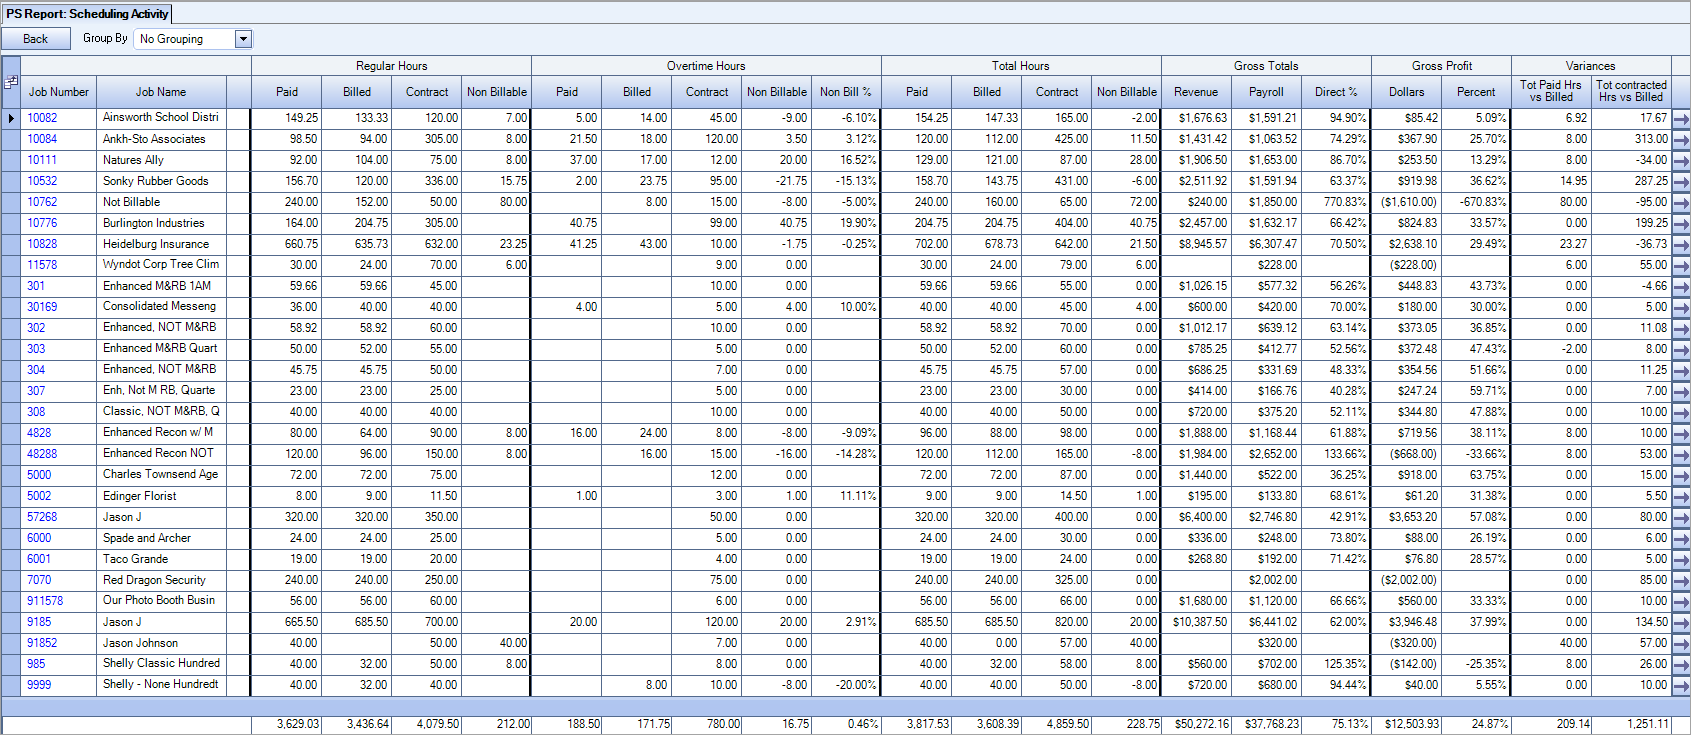
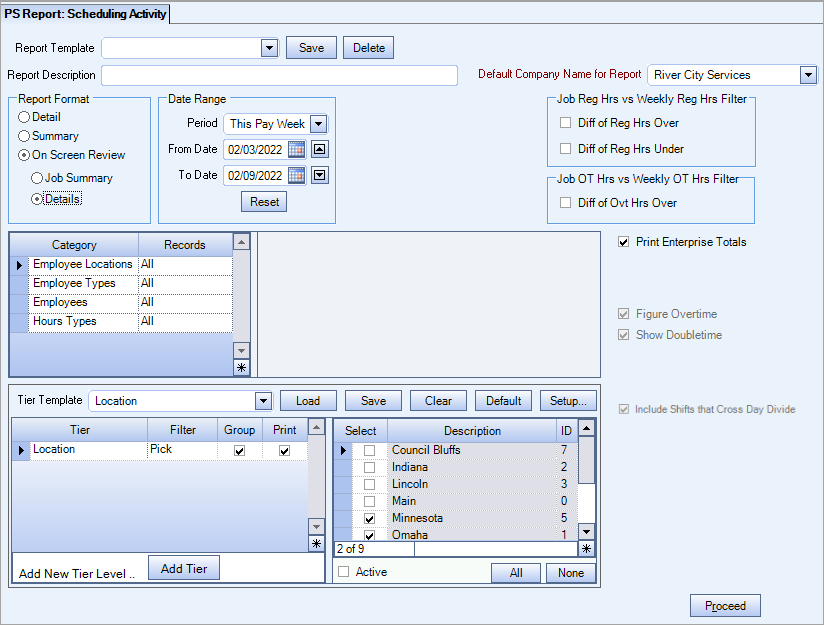
This report format provides reporting and data presentation prior to running payroll so everything can reconcile (payroll and billing). You can run this report at the job level (Job Summary) or the employee level (Details); it has the standard right-click functionality, and it can be printed.
The report displays after you click Proceed. It provides the same valuable information as the SAR but in a different format.
Job Summary Settings
Job Summary Report
Details Settings
Details Report

Security
If the user does not have Bill Write security, they will not see some columns in the report. Also, if the user does not have access to information based on their security level, there is a yellow triangle in the grid with a hover over message to let the user know the numbers are not accurate because they do not have access to all information.
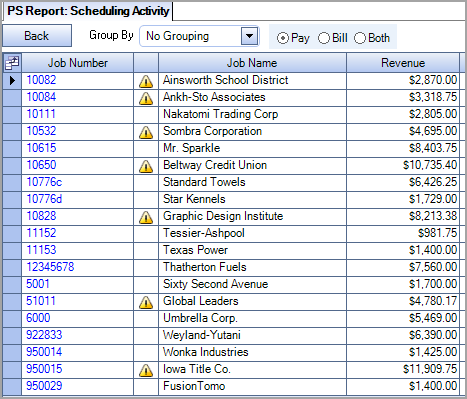
Group By
The Group By options allow you to get totals based on your needs. The grouping options that are available depend on whether the report is by job or employee. You can only select one grouping option at a time. There is no grouping applied to this report by default which shows all totals.
When you select a grouping option, that option becomes the leading field on report.
The following example shows the Job Summary report information being grouped by Job Location.

You can expand each location (in this example) and see totals for each individual location that made up the whole location.
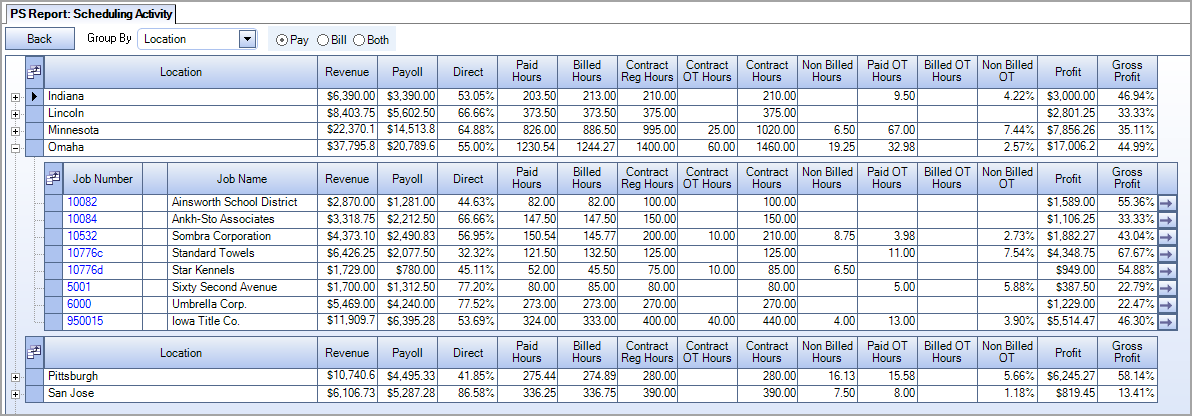
When Group By views are exported to Excel, you must use the Excel feature to expand and collapse hidden rows to correctly reset the nested rows and headers.
Example: Group By Division

Initial exported view (before rows are expanded/collapsed):

View after using the Expand feature in Excel:

View after using the Collapse feature in Excel:

Pay and Bill Amounts
You can view just the pay amounts, just the bill amounts, or both using the Pay, Bill, and Both radio buttons. The column names change based on your selection.
Field Chooser
The report contains a field chooser so you can select the information you want to display in the report. The columns that are available in the field chooser depend on whether the report is by job or employee, and if it is showing pay information, bill information, or both. Your field chooser selections are saved between sessions–you can reset then using the Reset Grid Preference option in the grid right-click menu.
Drill Down
When the report is run by job, the drill-down in the grid opens the Hours By Job window. When the report is run by employee, it opens the Shift Details for that employee/date/job. If your open report is older than one week, a message box displays when you click the drill-down icon to remind you there could be data inconsistencies.

Right Click Menu
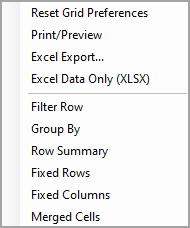
This report has standard right-click functionality and can be printed.
You can select from a list of pre-defined date ranges, or input the specific dates you want to filter the report for. When the Date Range is left blank, the report runs for the Master Schedule.
When the Figure Overtime check box is selected, you can enter a date range up to 370 days (instead of the default maximum of 31 days).
When you enter a date range greater than 31 days, a message box displays to remind you the report may run slowly, and suggest the use of filters to reduce the size of the report.

If you enter a date range greater than 370 days, a message box displays to remind you the maximum date range is 370 days.

Use the Sort Options to select how to group and sort items on the report.
Use the Group By field to select the grouping method for the report. You may Group by Post Description, Pay Rate, Bill Rate, Invoice Description, Post Description & Employee Number, Employee Number & Post Description, or Schedule Date.
When you select Group By Empl Number & Post Description, you can also select to Page Break by Employee (by selecting the check box). This makes it for each employee to review this report before running the Personnel Scheduling Wizard.
Use the Sort fields to select the sort order for the report.
Diff of Reg Hrs Over
Select this option to enter an amount to filter Jobs over this difference amount. Jobs over this difference amount are included in the report. Jobs less than or equal to this difference amount are not included in the report.
Diff of Reg Hrs Under
Selection this option to enter an amount to filter jobs under this difference amount. Jobs under this difference amount are included in the report. Jobs greater than or equal to this difference amount are not included in the report.
Select this option to enter an amount to filter Jobs over this difference amount. Jobs over this difference amount are included in the report. Jobs equal to or less than this difference amount are not included in the report.
If you select all these criteria fields, WinTeam will narrow the criteria based on field input. This is an AND statement, therefore Jobs must fit all criteria that has been entered.
Weekly OT Hours are set up in the Job Master File.
Select to filter criteria either $Over or $Under.
If $Over target pay rate is selected, the report includes only those rates where the employee pay rate is $X greater than the target post pay rate.
If $Under target pay rate is entered, the report includes only those rates where the employee pay rate is $X less than the target post pay rate.
If you select all these criteria fields, WinTeam will narrow the criteria based on field input. This is an AND statement, therefore Jobs must fit all criteria that has been entered.
Use the Uniform Allowance field to include allowance for Uniforms in the report.
Employee Types
Use the Employee Types category to select the Employee Types to include.
Select All to include all Employee Types.
Select Pick to define specific Employee Types. When you select Pick, the Employee Types list displays. Select the check box next to each Employee Type to include.
Hours Types
Use the Hours Types category to select the Hours Types to include on the report.
Select All to include all Hours Types.
Select Pick to define specific Hours Types for the report. When you select Pick, the Hours Type list displays. Select the check box next to each Hours Type to include on the report.
See Using Tier Templates for more information.
The Print Enterprise Totals check box is available to users who have more than one company.
Select the Print Enterprise Totals check box to print enterprise totals on the report. This check box is selected by default.
If this is not selected, the report prints only the tiered reports that are marked for printing.
This check box is available to users who have one company.
Select the Print Company Totals check box to print company totals on the report.
Select the Exclude Salaried Hours check box to exclude cells that have a salaried employee scheduled from the report. This option is normally not used except in those cases where a company might be wanting to run a full company report to review Average Labor Rates and Bill Rates. Since salaried employees pay rates might be $0.00 in the schedule, it would distort those figures.
This option is NOT selected by default.
Use the Figure Overtime check box to include overtime calculations in the report. This option is selected by default. A Non-Billed OT % will print under the Hours Non Bill / OT % field on the report that indicates the percentage of Unbilled Overtime Hours. The percentage calculation is based on the following formula:
(Hours Paid OT Hours – Hours Billed OT Hours) / (Hours Billed Reg Hrs + Hours Billed OT Hours)
|
OT Hours |
Total Billed Hours |
|---|---|
| 1 - 8 = -7 hours |
129 + 8 = 137 |
| 7 /137 = -5.11% | |

If you do not want to print the Non-Billed OT Hrs %, you can add this Custom Setting to exclude this figure from the report.
| Section | Item | Value |
|---|---|---|
| PSReports | PrintNonBilledOT | No |
If you want to base the Scheduling Activity report on Paid Hours, instead of billed hours, add this setting:
| Section | Item | Value |
|---|---|---|
| PSReports | PrintNonBilledPaidOT | Yes |
A Non-Billed OT % based on Paid hours will print to the right of the Non-Billed OT % based on Billed Hours. The percentage calculation is based on the following formula:
(OT Paid - OT Billed) / All Hours Paid (Regular, OT, Training etc) Non-Billed Paid OT %
Select this check box to include doubletime in the Scheduling Activity report. This check box is cleared by default.
Following is a sample of the Scheduling Activity report containing doubletime:
Note: When doubletime is included in the report, the DT Hrs column displays to the right of the OT Hrs column and the OT Rate column does not display in the report due to space constraints.
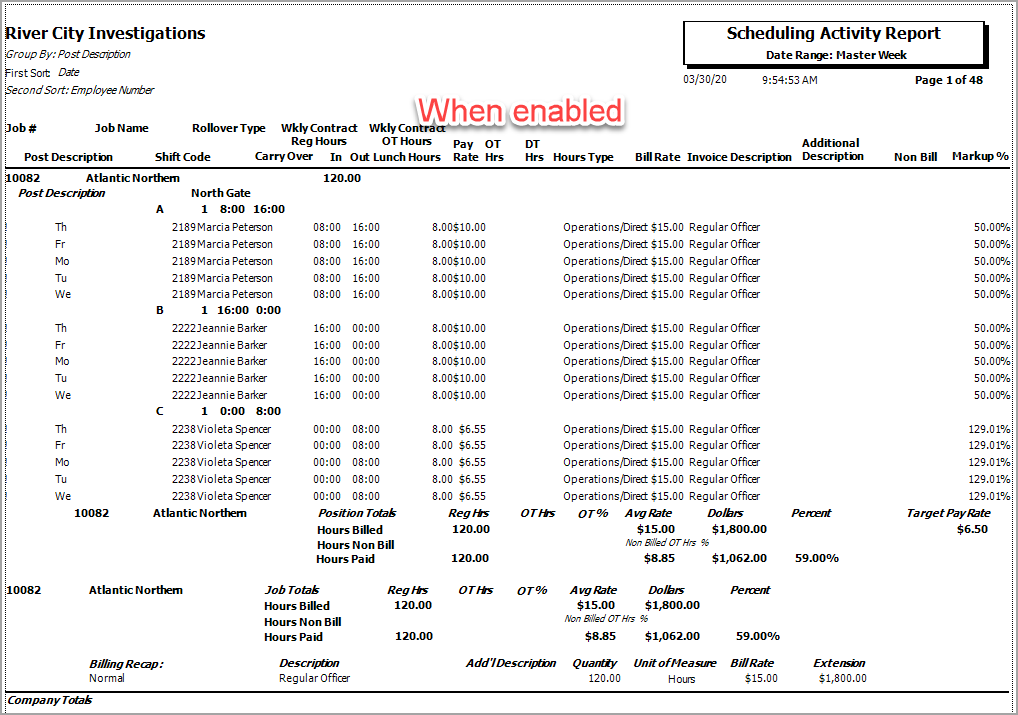
Select the Print Billing Recap check box to provide Grand Totals for each Job. Selecting this option provides totals of all shifts for each Job on the report.
When selecting this option, each line's extension amount is recomputed (quantity times rate). The Billing Recap total that prints on the report will tie back to the Invoiced amount (if the invoice is being collapsed and billed the same way - no daily details). The Hours Billed Dollars amount at the Job level and the Grand total level will be the same as the Billing Recap total.
If you choose not to print the Billing Recap, the Hours Billed Dollars will be computed with each detail cell multiplied and added together.
Select the Include Exceptions Only check box to print a report displaying exceptions only. This report also includes the normal "Summary" information, but the details on the report are limited to just those that are true exceptions. Exceptions are determined by whether or not there are any special flags on the record. These flags include the following:
$ - This signifies that the Employee Pay Rate was changed from what the system would have normally calculated (pay rate put into the Use This Rate field).
B – This signifies that the Bill Rate was changed from what the system would have normally calculated (bill rate put into the Use This Rate field).
O – This signifies that the User flagged this record with the Overtime Indicator flag. This means if overtime develops, the overtime will be figured on these hours first. It does not mean that overtime will be paid on these hours. It just depends on whether overtime develops for this employee or not.
A – This signifies that there is an Absence record in the system for this Employee and Date. This should be reviewed carefully since the employee normally should not be absent on a day they are getting paid unless these hours are being paid for vacation, sick or some other exempt hours type. In this case, this would be legitimate since you are paying the employee for hours that they actually did not work.
S - This signifies that the Employee is salaried.
! - This signifies that the Employee exceeds the target Post pay rate.
These flags also print beside each record when printing a Detail report and not selecting to Print Exceptions Only.
Select this check box to exclude shifts where the In and Out times are both verified. This allows you to view only shifts that have not been verified. With this check box selected, you will see shifts that are not clocked in, or clocked in, but not clocked out. Also, a small check mark displays next to the time if clocked in, but not clocked out.
If this check box is not selected, you will see check marks next to the in and out times that are verified, in addition to those that are not verified.
Clock Ins and Outs can originate from TeamTime or Post Watch.
A Include Shifts that Cross Day divide check box displays as an option for this report regardless of whether or not you are using the Day Divides feature.
This option is selected by default if the Personnel Scheduling Defaults "Show Day Divides on Scheduling Screen" check box is selected.
If you select this check box
- The report will reflect any hours that are dividing over to a new day under the appropriate day. This also means that any carry-over from the previous week will be shown and included under the proper date.
- The Next Day column becomes somewhat meaningless, as these hours, if marked for the next day, are already being shown on the appropriate day (next day). If selected, the Next Day column then becomes the Carry Over column.
If this check box is not selected, the Next Day column remains as the Next Day column. If you had selected the Next Day check box in the Detail Cell Information screen for an employee, "YES" will display in the Next Day column.
This check box is available for all Group By Sort Options except when Grouping By Employee Number and Post Description.
Use the Page Break after each Schedule check box to create a new page for each schedule.
This check box is available when you select Group By Empl Number & Post Description.
Select to Page Break by Employee.
This is a great option to use if you want each employee to review their activity before running the Personnel Scheduling Wizard.
Select the Suppress Pay Rates check box to exclude pay rates from the report.
When suppressing pay rates on the Detail Report option, the Hours Billed Average Rate and Dollars print on the report at all levels.
Select the Use Markup Percentage check box to display the markup percentage in the report.
Markup Percentage is determined by subtracting the labor costs from the billing amount and then dividing that number by the labor costs.
Example: If your labor costs are $75 and you billed $120, then you would take $120-$75 to get $45. Dividing $45 by $75 you get .60, or 60%.
If you clear this check box, the Labor % displays in its place.
Select the Include Notes check box to include Notes from the Detail Cell Information screen in the report. This option is selected by default.
Select the Include Logo on Report check box to print the company logo on the report.
This check box is selected or cleared by default based on the option selected in SYS:Defaults. However, you can modify the setting on each report.
Select the Include Report Criteria check box to include a list of the report options selected for this report.
The Report Criteria page includes any ranges specified and each Category/Record selection made for the report.This check box is NOT selected by default.
Click the Preview button (or use the shortcut key, ALT + V) to view before printing.
If an employee is scheduled with a 0 pay rate, a message displays giving you the option to review the records that may affect billing.
If you select No, a quickie report generates and provides you with the Job #, Job Description, Employee #, First Name, Last Name, Work Date, and Post Description.
Click the Export button (or press ALT + X) to export to a specified format.
Reports may be exported to Adobe Acrobat (PDF), Excel (97-2003), Comma-Separated Values(CSV), Grid View, and E-mail (available for non-ASP Clients only).
Related Information
| Section | Item | Value | Purpose |
|---|---|---|---|
| PersonnelScheduling | ShowSplittingShiftsCheckbox | No | Schedules and some Scheduling reports–This setting hides the "Show Shifts that Cross Day Divide" check boxes on the Schedules, Hours by Job, and Hours by Employee screens. It also hides the check box on the Scheduling Activity Report and the Scheduling Report. For more information, see Understanding Day Divides in Personnel Scheduling. |
| PSReports | PrintAssignmentDate | Yes | This setting appends Employee Master File, Custom Field #1 to the Employee Name on the grouping title when the SAR is grouped by 'Post Descr & Empl Number'. There is no change to the other grouping options. Custom field in Employee Master File must be setup using a Field Type of Date. |
| PSReports | PrintNonBilledOT | No | This setting excludes the Non Billed OT Hours from the report. |
| PSReports | PrintNonBilledPaidOT | Yes | PS Report: Scheduling Activity–Use this setting to base the Scheduling Activity report on Paid Hours, instead of Billed hours. A Non-Billed OT % based on Paid hours will print to the right of the Non-Billed OT % based on Billed Hours on the report. The percentage calculation is based on the following formula: (OT Paid - OT Billed) / All Hours Paid (Regular, OT, Training etc) Non-Billed Paid OT % |
The PS Report Scheduling Activity screen has its own Security Group, PS Report Scheduling Activity Report.
The PS Report Scheduling Activity screen is part of the PS Reports ALL Security Group.
Tip: For more information see Security Groups Overview and Security Groups By Module.
