Overview
Checkpoint Templates are used as a basis for creating Checkpoints, and can be printed using the Checkpoint Templates Report. When printing the Checkpoint Report, the areas will print in the same order that they display on the Checkpoint Template screen. The Checkpoint Templates screen can be accessed from the Quality Assurance Menu, the Job Master File (Quality Assurance tab) and the Checkpoints screen.

Key Functionality
The QA Checkpoints Templates screen does not have its own Security Group. It is part of the QA ALL Security Group. This screen has the following Features:
- Cannot Assign By Job - If a User is assigned the Cannot Assign By Job feature, the User cannot select specific Jobs for the Template.
- Read-Only
This screen has the Read-Only Feature. For more information see Learning about Read-Only Security. For more information see Learning about Security Groups.
Use the Lookup list to locate an existing Checkpoint Template. Only active records display in this list.
Click the Hide/Show Header button to collapse/show the header so viewing for the actual Template is expanded.

The Description field is used to enter a unique name for the record.
After a new record is created, WinTeam displays this Description with the corresponding ID number in the list.
Select the Active check box to mark the selected record as being an active record.
Clear the check box to mark the record as being inactive.
When creating a new Checkpoint Template, the Active check box is selected by default.
If a Checkpoint Template is no longer Active, it does not display in the Lookup list.
When selected, eHub Mobile notifications automatically push to employees (with a Supervisor level eHub license) when their assigned jobs and employees have up-coming checkpoints.
Select the Template Type to associate with the Checkpoint Template. The Template Type lets you group similar types of Checkpoints.
To add a new Template Type, double-click in the Type field, or type a new Template Type and press Enter. The Template Types add/edit list displays.
Select from the list of Response Systems. Only Active Response Systems display in the list.
Double-click to open the Response Systems screen.
Enter the Quality Objective for all of the Checkpoints in the template as a percentage between 0% and 100%. The weighted average of each checkpoint in the template will be measured against this number.
This is a required field.
This optional field shows all currently active Compliance Codes, and links Quality Assurance to Compliance Tracking. If you have security permission to access the QA: Checkpoint Template screen, you can add, change, or remove associated Compliance Codes, effectively leveraging Checkpoints to update employee Compliance Codes.
If you have the necessary security permission, during Checkpoint entry on the QA: Checkpoints screen (via WinTeam, eHub Web or eHub Mobile), if the Employee field is populated, s/he will receive credit in HR: Compliance Tracker by Employee for the Compliance Code selected in the Checkpoint Template. If no Employee is specified, Compliance Tracker is not updated for any employee.
Example: For example, if an employee was required to complete a refresher course conducted by his/her supervisor, the supervisor could validate course completion via a Checkpoint entry, if that Checkpoint is linked to that course Compliance Code. The system would then record the employee as having completed the course/code.
Note: An employee logged into eHub Web or Mobile using Checkpoints who does not have the requisite permission will automatically be credited in Compliance Tracker if his/her name is associated with a Compliance Code.
If the Compliance Tracker is updated to show the Date Performed from the Checkpoint as the Due Date and the Date Closed. System Notes are updated to show "User [Employee submitting Checkpoint] marked this as completed on [same as due date] via Checkpoint # [ID of Checkpoint that created this completion record]." If there was a matching Compliance Code in the Open grid for the Employee in Compliance Tracker, the Compliance Code is moved from the Open to Closed grid.
The eHub area contains the following check boxes:
Capture Signature
Select this check box to allow the capture of up to two signatures on a completed checkpoint via the eHub Mobile app. If a signature is captured, the checkpoint becomes read-only, and in WinTeam will show "Signature(s) captured." You can also view the signatures on the Checkpoint report in WinTeam.
Require Signature
Select this check box to require at least one signature to be captured when completing a checkpoint.
This check box will display only if Capture Signature is selected.
Allow New
Select the Allow New option for ESS and CSS Users to show this Template in the Template list for the Jobs included in the Jobs list, in the eHub Checkpoint screen.
- If Allow New Emp is selected, this template will be available for a Base Employee user to complete.
- If Allow New Super is selected, this template will be available for a Supervisor Employee user to complete.
- If Allow New CSS is selected, this template will be available for CSS users to complete.
If Base is selected, then Super will automatically select.
Note: Access to Templates for eHub Users is based on both the current Job hierarchy and QA Groups. QA Group members are in addition to the current Job hierarchy that we use for eHub or Location/Company for WinTeam.
Default Publish
Select the Default Publish option to auto populate on the Checkpoints. This is used for Completed Checkpoints. If this field is marked, the Completed Checkpoint will automatically populate in eHub.
- If Default Publish Emp is selected, the completed Checkpoint will automatically populate for Base Employee users.
- If Default Publish Super is selected, the completed Checkpoint will automatically populate for Supervisor Employee users.
- If Default Publish CSS is selected, the completed Checkpoint will automatically populate for CSS users.
If Base is selected, then Super will automatically select.
This option allows you to define a frequency for the required completion of Checkpoints for employees or jobs. If a Checkpoint Template is given a frequency, you can run Schedule Exceptions to see which Checkpoints have not been completed. This will help you keep track of contractual obligations such as monthly manager visits or internal obligations such as 90 day reviews.
Type
Select NA for Checkpoint Templates you do not want to show up in the Schedule Exceptions. It is selected by default and will gray out the Frequency field.
Select Job to define checkpoint frequency by job. You can select from the following options:
- Daily
- Weekly
- Bi-Weekly
- Semi-Monthy
- Monthly
- Quarterly
- Annually
Example: To ensure inspections occur at the contracted frequency, you could set up a Checkpoint Template with that frequency. You could then run the Schedule Exceptions to see any outstanding Checkpoints.
Select Employee to define checkpoint frequency by employee. You can select from the following options:
- Weekly
- Bi-Weekly
- Semi-Monthly
- Monthly
- Quarterly
- Annually
- Once. # of days after hire (Defaults to 90 days)
Example: New hires are required to complete a 90 day review. You can set up a frequency for 90 days after hire, and run the Schedule Exceptions to see which employees have not completed their review.
Use the Job options to determine which Jobs should have this template available for use.
Select All to make this template available to all Jobs.
Select Pick to select specific Jobs by Tiers or by excluding or including Jobs.
The Templates will be listed in all Job Master Files (Quality Assurance tab) Available Templates grid for all master files to which it applies.

The Job Numbers Exclude Option is available only when a Tier is selected.
If the Deficiency Notes check box is selected, then any checkpoints marked with a deficient score will require a note to be entered.
If the Deficiency Close Notes Required check box is selected, then when closing a Deficiency on the QA: Deficiency Review screen or in eHub and eHub Mobile, you will be required to enter the Close Notes.
Enter any notes relevant to this template.
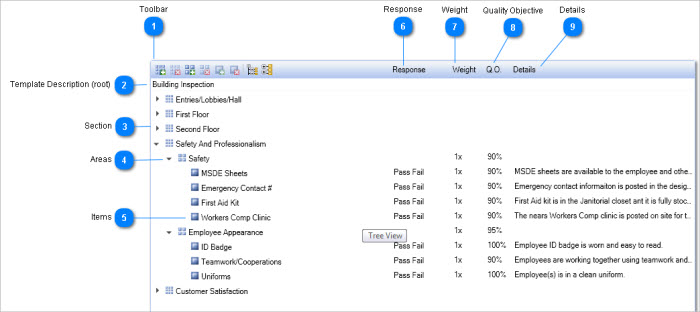
The Checkpoint Template is created in this area. Sections, Areas, Items and Responses are added to create the Checkpoint. You can drag and drop Items or Areas to other locations inside the tree view.
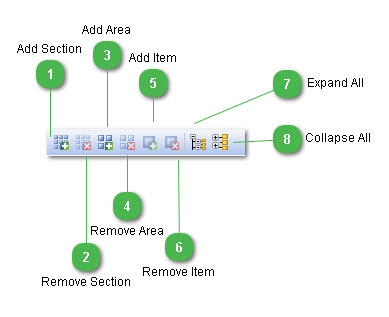
The tree view has its own toolbar to provide actions and has right-click functionality. The commands on the toolbar (will be available or disabled) and in the right-click menus vary depending on whether you are on a Section, Area or Item.
There are several ways to add an Area or Item to a Template:
- Type ahead functionality – Start typing in the field and the system will show Area or Item based on characters entered.
- F4 - if the F4 key is selected when a user is in an Area or an Item, the list of Area/Items will display for selection.
- Arrows – Use the up/down arrows to select Areas or Items from the list.
The commands on the toolbar will be available or disabled depending on whether you are on a Section, Area or Item.
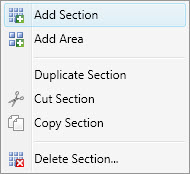
Right-click menus vary depending on whether you are on a Section, Area or Item. When you right-click on a Section, you can add a Section or an Area. The Duplicate, Cut, Copy, and Delete commands pertain to the Section.
When you right-click on an Area, you can add a Section, an Area, or an Item. The Duplicate, Cut, Copy, and Delete commands pertain to the Area.

When you right-click on an Item, you can add a Section, an Area, or an Item. The Duplicate, Cut, Copy, and Delete commands pertain to the Item.

Duplicate Section, Duplicate Area, Duplicate Item - Copy a Section/Area/Item and place the duplicate in the same level.
Cut Section, Cut Area, Cut Item - Cut a Section/Area/Item and copy to clipboard. The Section/Area/Item that is cut is basically deleted from the Tree View until pasted to a different Section/Area/Item.
Copy Section, Copy Area, Copy Item - Copy a Section/Area/Item and copy to clipboard. The Section/Area/Items copied are not deleted from the Tree View.
Paste Section, Paste Area, Paste Item - Paste commands show when a Section/Area/Item has been copied (or Cut) to the clipboard. This takes the Section/Area/Item from the clipboard and pastes where selected.

The root item of the tree view is the Checkpoint level. The Template Description from the header is used as the label. Sections and Areas can be added to the Checkpoint level.
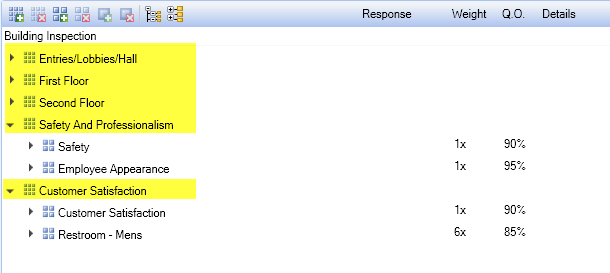
Sections are used only to assist with grouping and organizing the Checkpoint, and contains only a 'Description'. Sections are not tied to an Area or an Item, nor are they used for reporting purposes. Sections can be added to the Checkpoint level. (This will add a child section to this level and is only available if current tree view item is not more than 2 levels.) Areas can be added to the Checkpoint level.
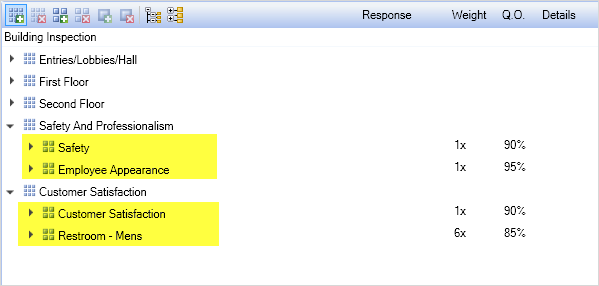
Areas are selected from the list of 'Active' Areas set up. The Weight and Quality Objective default from the Area record.

Areas can be hosted on the root, or in Sections, or in other Areas. Areas contain Items and cannot be empty. Sections, Areas, and Items can be added from an Area. When adding an Area, you can start typing the name of the area in the tree view and be presented with options.
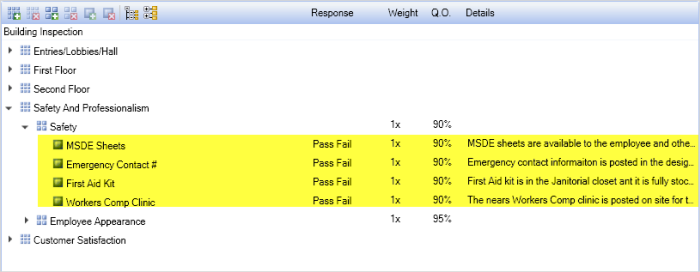
Items are selected from the list of 'Active' Items set up.
Items must be hosted inside of an Area and cannot act as a parent to other objects.
Once an Item is added, the Weight, Quality Objective, and Details default from the Item record, but these can be overwritten. However, the Item Description cannot be overwritten.
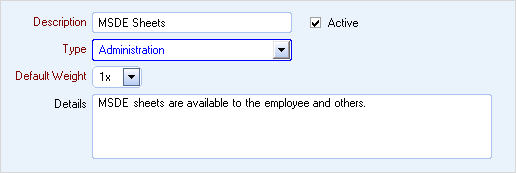
When adding an Item, you can start typing the name of the Item in the tree view and be presented with options.
When you add an Item it will add a sibling Item to this level.
Response Methods display only at the Item level. The Response Methods list defaults based on the Response System default Method selected in the header. However, you can overwrite it.
For an Area, the Weight defaults from the Area record.

For an Item, the Weight defaults from the Item record.

For an Area, the Quality Objective defaults from the Area record.

For an Item, the Quality Objective is based on the Item Type associated with the Item.

Details are available at the Item level and default from the Item record.

Checkpoint Template Sample - Building Inspection
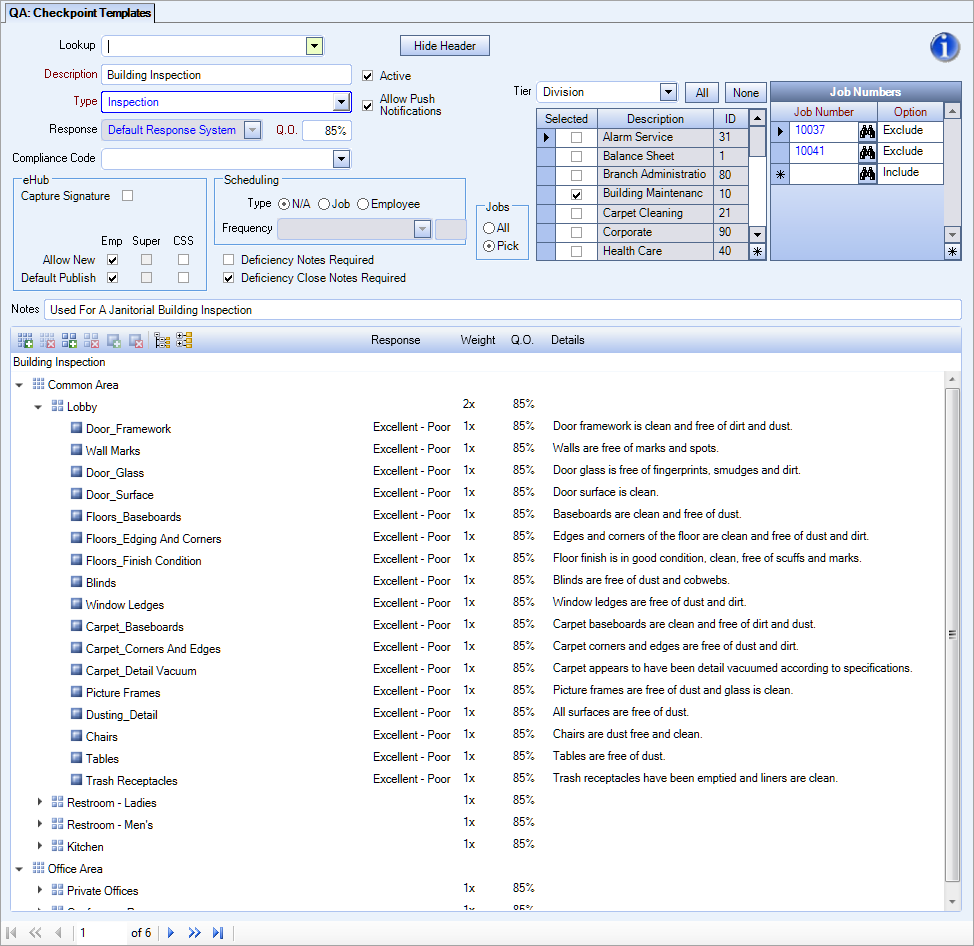
Checkpoint Template Sample - Employee Survey

Checkpoint Template Sample - Daily Activity Report

