Overview
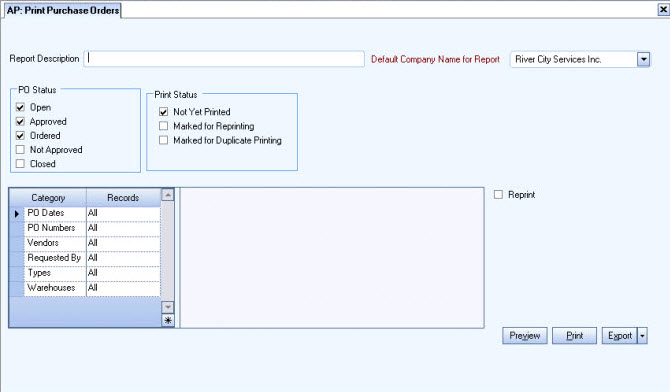
You can use Print Purchase Orders to preview, print and reprint Purchase Orders. Purchase Orders can be printed based on Status (Open, Approved, Ordered, Not Approved, Closed/Not Shipped) orhe Print P.O. Status (Not Yet Printed, Marked for Reprinting, and Marked for Duplicate Printing). You may select one, a few or all of these Statuses.
You may filter the selection of Purchase Orders to print by P.O. Dates, P.O. Numbers, Vendors, Requested By, Types and Warehouses.

The Print Purchase Orders screen can be accessed from the Accounts Payable Menu and the Inventory Menu.
Key Functionality
Type a description to identify the Purchase Order. This description will print above the Purchase Order Title.
This option is available for Clients using the Multi-Company feature, and is populated by default from the Company Setup screen. The list contains all companies for which you have permission to view. Select the Company name from the drop down list that you want the system to use for the Bill To area of the purchase order. The company selected will also determine the logo that will be printed on the purchase order.
Select the check box next to each PO Status you want to print. The Open, Approved, and Ordered Statuses are selected by default.
Select the check box next to each Print Status for which you want to print a Purchase Order.
PO Dates
Use the PO Dates category to filter the Purchase Orders to print by PO Dates. Select All to include all Purchase Orders, regardless of the dates.
Select Range to define a range of Purchase Order dates. When you select Range, the range fields display. Type the beginning PO Date in the From field and the ending PO Date in the To field, or use the Date Control to select a date.
PO Numbers
Use the PO Numbers category to filter the PO's to print by PO Numbers. Select All to include all Purchase Orders.
Select Range to define a range of PO Numbers. When you select Range, the range fields display. Type the beginning PO Numbers in the From field and the ending PO Number in the To field, or use the Lookup to locate the PO Numbers.
Vendors
Use the Vendors category to filter the PO's to print by Vendors.
Select All to print all PO's, regardless of who the Vendor is.
Select Range to define a range of Vendors. When you select Range, the range fields display. Type the beginning Vendor Number in the From field and the ending Vendor Number in the to field, or use the Lookup to locate the Vendor Number.
Select Pick to define specific Vendors. When you select Pick, the Vendor list displays. Select the check box next to each Vendor you want to print Purchase Orders for.
Select Create to define your own list of Vendors. When you select Create, a small grid displays to the right. Enter the Vendor Numbers you want to include in the list, or use the Lookup to locate the Vendor Numbers.
Select Exclude to identify records that should not be included. When you select Exclude, a small grid displays to the right. Enter the Vendor Numbers you want to exclude in the list, or use the Lookup to locate the Vendor Numbers.
Requested By
Use the Requested By category to filter the PO's to print by the name of the person or department requesting the products or items.
Select All to print all PO's regardless of who requested them.
Select Pick to define specific persons or departments who requested the products or items for the report. When you select Pick, the Requested By list displays. Select the check box next to each person or department to print Purchase Orders for.
Types
Use the Types category to filter the PO's to print by Types.
Select All to print all Types.
Select Pick to define specific Types. When you select Pick, a list of Types displays. Select the check box next to each Type you want to print PO's for.
Warehouses
Use the Warehouses category to filter the PO's to print by Warehouse Locations.
Select All to print all PO's, regardless of the Warehouse Locations.
Select Pick to define specific Warehouse Locations. When you select Pick, a list of Warehouse Locations displays. Select the check box next to each Warehouse Location for which you want to print a Purchase Order.
Select the Reprint check box to print Purchase Orders that have already been printed.
Click the Preview button (or use the shortcut key, ALT + V ) to view the PO's before printing.
Click the Print button (or press ALT + P ) to send the PO's to your default printer.
Click the Export button (or press ALT + X ) to export the PO's to a specified format. Purchase Orders may be exported to Adobe Acrobat (PDF) , Excel, Comma-Separated Values (CSV) and Gridview.
Related Information
The AP Print Purchase Orders screen has its own Security Group, AP Print Purchase Orders .
The AP Print Purchase Orders is part of the AP ALL Security Group.
Tip: For more information see Security Groups Overview and Security Groups By Module.
