
Overview
The Update Recurring to File screen updates recurring billing into AR: Invoices and assigns each recurring billing an invoice number. You should Preview the Recurring Invoices reports before running the update.
You may filter the update by Tiers. Use the Tier Pattern Template to set up and save templates. This makes it easy to create a specific update each time you need one without recreating the criteria. See Using Tier Templates and Using Tier Parameters for more information.
Use caution when updating recurring billing. Only update the Invoice Type you want to invoice on that particular date. You should always choose the Pick option for Recurring Invoice Types so the selection of the correct payment type(s) may be made.
After updating, run the Invoice Register to be sure that the Recurring Invoices report balances to the Invoice Register report.
Key Functionality
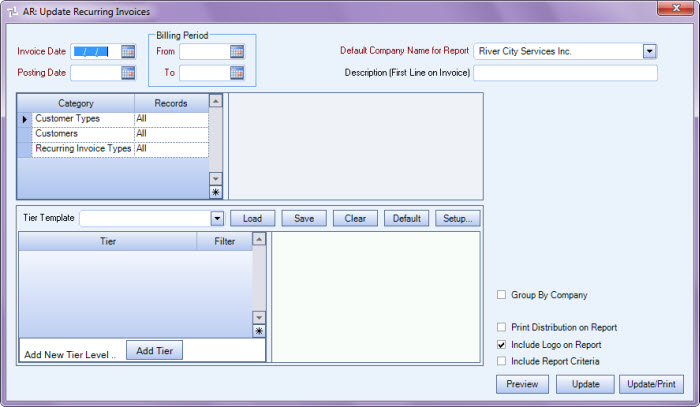
Invoice Date
Enter the Invoice Date you want to print on the invoices. The date you enter here will default to the Posting Date field. It is important that you enter this date accurately to reflect the recurring entries being billed.
Note: Dates must be entered with the leading zero for months and days entered in the date field.
Example
May 7, 2011 would be entered as 050711 and would display as 5/07/11.
Posting Date
The Posting date is the date these invoices will reflect in the general ledger once the Update to the General Ledger has been completed. This date defaults from the date entered in the Invoice Date field. This field should not be changed from the date defaulted.
Billing Period
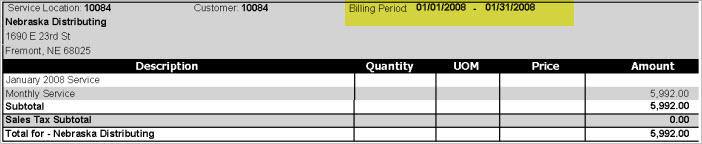
Enter the Billing Period From and To dates. These dates must fall within the Valid Dates for Data Entry.
When each invoice is created, the system will use this date range to fill in the Billing Period From and To for each invoice.
This information is not printed on the invoice itself but is only for informational and filtering purposes, except when using the Framed by Job Invoice Format.
When using the Framed by Job Invoice Format, the Billing Period must be correct. The Billing Period will print on the invoice. For more information see Using the Framed by Job Invoice Format.
Available for Clients using the Multi-Company feature. The Default Company Name for Report is populated from the Company Setup screen. The list contains all companies you have permission to access. The default company prints on every page of the report.
If the User has permission to only one company, then just that one company will display in the list. If the User has permissions to more than one company, the list will contain all companies the User has rights to PLUS the default reporting company. For more information see Learning about WinTeam Reports.
This field allows for any additional description you want to print on the invoice for these Recurring Invoices. This will be the first line printed in the body of the invoice form. An example might be for month of service (i.e.: January Services). This field is not required.
Category/Records
Customer Types
Select the Customer Types to include in the update.
Select All to include all Customer Types in the update.
Select Pick to define specific Customer Types to include in the update. When you select Pick, the Customer Types list displays. Select the check box next to each Customer Type to update.
Customers
Select the Customers to include in the update.
Select All to include all Customers in the update.
Select Range to define a range of Customer Numbers to include in the update. When you select Range, the Customer Number range fields display. Type the beginning Customer Number in the From field and the ending Customer Number in the To field.
Select Pick to define specific Customers to include in the update. When you select Pick, the Customer list displays. Select the check box next to each Customer to update.
Select Create to define your own list of Customers. When you select Create, a small grid displays to the right. Enter the Customer Numbers you want to include, or use the Lookup to locate the Customer Numbers.
Select Exclude to identify records that should not be included in the update. When you select Exclude, a small grid displays to the right. Enter the Customer Numbers you want to exclude, or use the Lookup to locate the Customer Numbers.
Recurring Invoice Types
Select the Recurring Invoice Types to include in the update.
Warning: Use caution when updating recurring billing. Only update the Invoice Type you want to invoice on that particular date. You should always choose the Pick option for Recurring Invoice Types so the selection of the correct payment type(s) may be made.
Select All to include all Recurring Invoice Types.
Select Pick to define specific Recurring Invoice Types to update. This is the preferred method. When you select Pick, the Recurring Invoice Types list displays. Select the check box next to each Recurring Invoice Type to update.
Companies
The Companies category is available for Clients using the Multi-Company feature.
Select the Companies to include in the update.
Select All to include all companies in the update.
Select Pick to define specific Companies to include in the update. When you select Pick, the Companies list displays. Select the check box next to each Company to include in the update.
Locations
The Locations category is available for Clients using the Multi-Location feature.
Use the Locations category to select the Locations to include in the update.
Select All to include all Locations in the update.
Select Pick to define specific Locations to include in the update. When you select Pick, the Locations list displays. Select the check box next to each Location to include in the update.
Use the Tier Template to define and save customized settings for a report. To use an existing template, select the template from the list and click Load.
To create a new template, you can load an existing template, make the necessary modifications, click Save, and define a new template name in the Save As dialog box. Alternatively, you can start with a blank template by clicking the Clear button.
To modify an existing template, load the template, make the necessary modifications, and then click Save. The name of the existing template display in the Save As dialog box. Click OK.
For more information see Using Tier Templates and Using Tier Parameters.
Group By Company
This check box is available to users who have more than one company.
Select the Group By Company check box to group the invoices by company.
This check box is NOT selected by default.
Print Distribution on Report
Select the Print Distribution on Report check box to include GL Distribution information on the report.
Select the Include Logo on Report check box to print the company logo on the report. This check box is selected or cleared by default, based on the option selected in SYS:Defaults. However, you can modify the setting on each report.
Preview button (ALT + V)
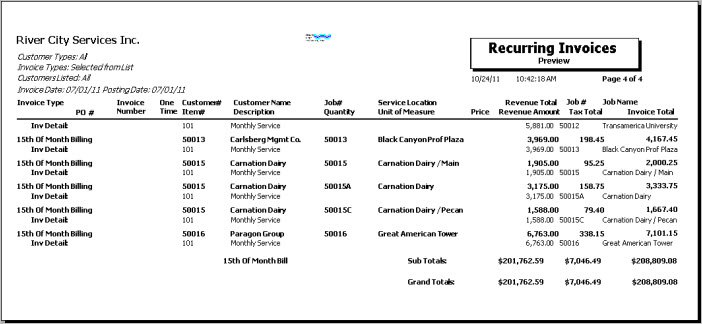
Click the Preview button to generate the Recurring Invoices (Unable to Update) report and the Preview report.
The first report, Recurring Invoices Unable To Update, lists those entries that cannot be updated to the Invoice file because they are not balanced or are missing pertinent information. Invoices that were put on Permanent or Temporary Hold are included on the Unable to Update report. These entries should be corrected before the update is run. Once the first report has been previewed and is closed, a second report, Recurring Invoices Preview report is displayed. This report lists those entries that will be updated to the Invoice file.
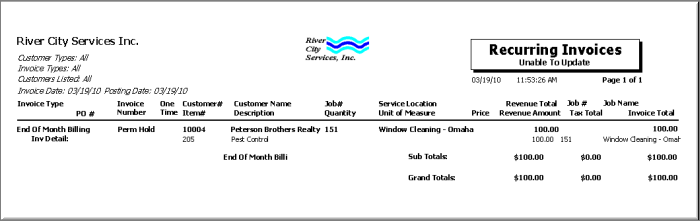

If you selected the Once check box on the Recurring Invoices screen to add a line item to the recurring invoice one time, an asterisk will display on the Preview report when updating to recurring to indicate the line item is a one-time charge.

Update button (ALT + U)
Click the Update button to update the valid Recurring Invoices to the Invoice file. There will not be a report generated for this option. After clicking on the Update Button the Starting Invoice Number screen will be displayed with the next available Invoice Number. You can modify the invoice number.
Normally, this will be left as defaulted. After entering the Starting Invoice Number and continuing with the update, two additional screens will be displayed showing you the number of invoices to be created and the Invoice Number range used for those invoices.
Update/Print button(ALT + P)
Same as the Update button, except a report, Updated to Invoice Entry Report, will be generated for those recurring entries that were updated.
Related Information
The AR Update Recurring Invoices screen has its own Security Group, AR Update Recurring Invoices.
The AR Update Recurring Invoices screen is part of the AR ALL Security Group.
Tip: For more information see Security Groups Overview and Security Groups By Module.