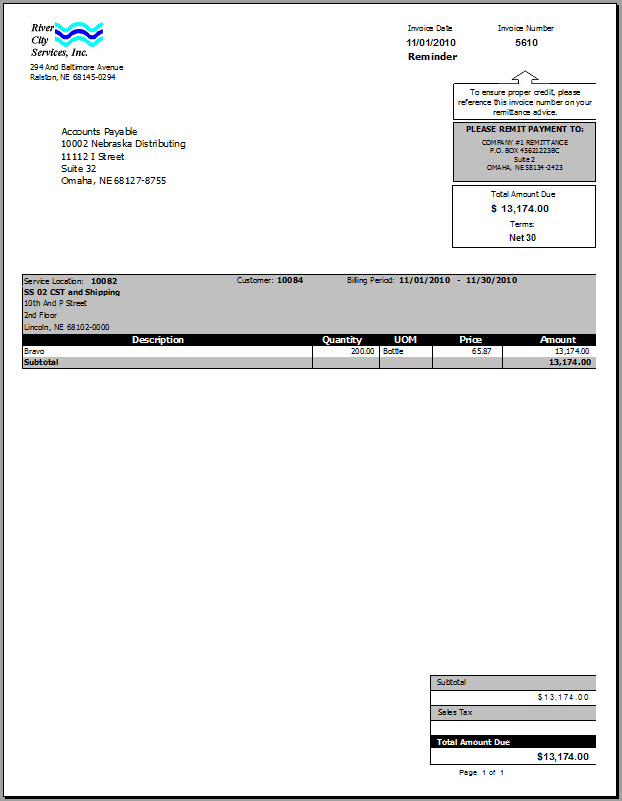
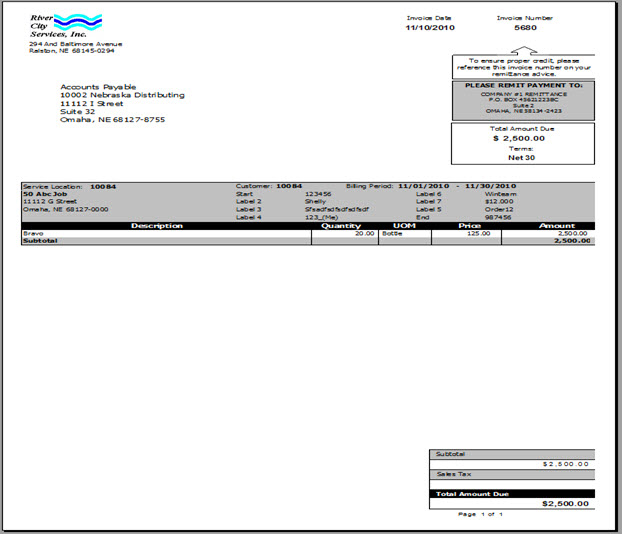
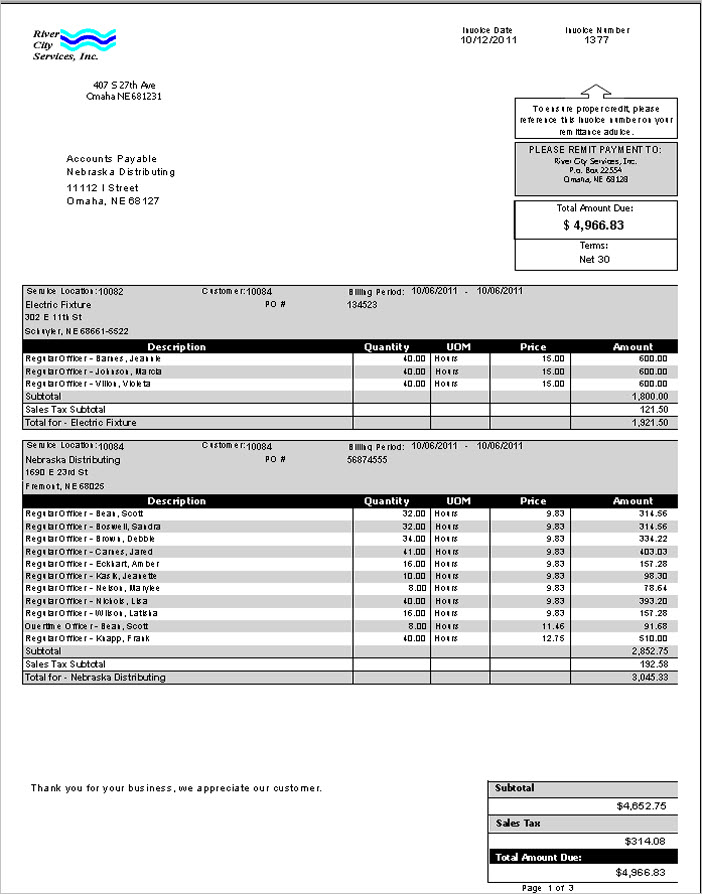
The Framed by Job Invoice Form Type includes many options to customize the invoice, including the ability to group by Jobs. It is a bit more graphical than our other Form Types and each Job that is billed on the Invoice is separated by a shaded header box. The Job header information contains the Service Location, Customer Number, and Billing Period (as specified when the invoice is created), Job Name (or PO Number), Job Address, Job City, Job State, and Job Zip. The header can also display up to 8 lines of information from the Job Master File (Accounting Info tab), Additional Invoice Information grid.
Invoices can also be imported with the ability to specify Billing Period From and To Dates. For more information see Importing AR Invoices.
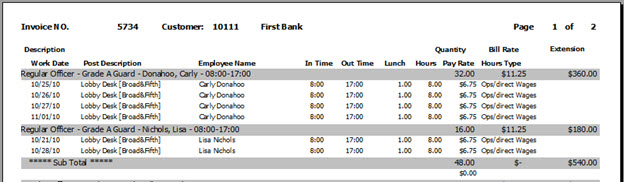
It is a good idea to review setup information in the Bill Codes By Job screen to ensure the invoice information is grouping and printing as intended.
Several Custom Settings can also be used to customize this invoice form type.
| Section | Item | Value | Module and Purpose |
|---|---|---|---|
| LaserInvoice | CenterCompanyAddress | True |
Available for Framed by Job Invoice Form Type only. This setting centers the Address in the Invoice Header. |
| LaserInvoice | ContinuePageNumberonDetail | True |
Available for Framed by Job Invoice Form Type only. This setting will include the Invoice pages AND the PS Detail report pages in the Total Pages count. If this setting is not used then these are treated as two separate “reports” and on the Invoice it will show the pages that are applicable for the invoice and a second set of page numbers for the PS Detail report. |
| LaserInvoice | ExcludeDetailLineWhenNull | True |
This setting excludes Invoice Detail Lines without an amount (amount is NULL). Line items that contain only a Description will not print. This is applicable for ALL Invoice Types. |
| LaserInvoice | ExcludePSDetail | True | This setting determines whether to print ANY PS Detail pages. If this setting exists, no invoice will have this included regardless of whether the Job is set up to Include Personnel Scheduling Details with Invoice. This might be used on those cases where people are starting to get set up to print PS Details but aren’t quite ready to turn on. |
| LaserInvoice | LineWidth | “enter number of characters up to 70 if you are using Framed by Job only or 50 if you are using any other format” |
Normally the maximum number of characters that print on an invoice detail line is 42. Anything after that is moved to the next line(s). This setting increases the amount of characters to print on an Invoice Line. With this setting, the maximum amount of characters that can be specified is 70. The Framed by Job invoice format has an invoice description section that is wider than the other invoice formats. Therefore, you should only use a number above 50 if your company uses just the Framed by Job invoice format. If you are using any other invoice format, the maximum should not exceed 50 for this setting. Warning: Increasing the number of characters to print can make your lines appear full, so this setting is not recommended if all capital letters are used in the Invoice Descriptions. If you are just capitalizing the first letter of a word, that is fine but all CAPS will most definitely cause an issue since the letter width is a lot different. |
| LaserInvoice | SuppressBillRateSign | True |
Available for all invoices using the PS Details pages. This setting will suppress the $ sign of the Bill rate that prints on the Personnel Scheduling Detail pages (does not affect the invoice itself – just the backup). This could be used if the Bill Rate on these details pages is not an amount per hour, but perhaps a quantity. |
To use the Framed by Job Invoice Form Type
- From the Accounts Receivable Menu, select Defaults.
- Under Invoice Information, select the Invoice Form Type Framed by Job.

To add Additional Invoice Information and determine the order and descriptions on the Invoice
- From the Job Costing Menu, select Job Master File.
- Load the Job Master File record.
- Click the Accounting Info tab.
- In the Additional Invoice Information grid select the Label you want to display on the invoice.
To add a new Additional Invoice Label, double-click in the Label field, or type a new Additional Invoice Label and press Enter. The Additional Invoice Labels add/edit list displays. A maximum of 15 characters can be entered.
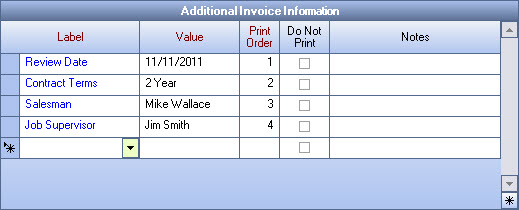
- Enter the Value to display on the invoice. This field displays after the Label field in the job header section of the invoice.
- Enter a number (up to 255) to determine the order the Labels and Value display in the header section of the invoice.
These fields print as two columns, shown left down, then right down in the job headers.
(Hide Pay Rate and Markup
Show Pay Rate (default selection for new records)
Show Pay Rate and Markup