Overview
You can use Credit Vendor Reconciliation to reconcile a credit statement with the invoice, payment, and liability transfer transactions. The Vendors tab displays Credit Vendor accounts along with the Vendor Number, Vendor Name, date Last Reconciled, Balance, and an In Progress indicator. The Statement tab is used to enter information from the statement received from the Vendor. The Transactions tab is used to mark the invoices and payments that show on the statement as 'Cleared'. The Recap tab displays the Credit Account Recap, the difference amount between the calculated balance and the statement balance, Payment Summary information, and a Recap by Credit Vendor.
Once the Difference between the statement Ending Balance and the cleared transactions is zero ($0.00), you can create a payment invoice for the Vendor. A separate invoice is created for Service Charges and Finance Charges (if applicable). A .pdf file is also created and stored, and the Reconciliation History is updated. Invoices are prefixed with CCR- followed by the next sequential number.
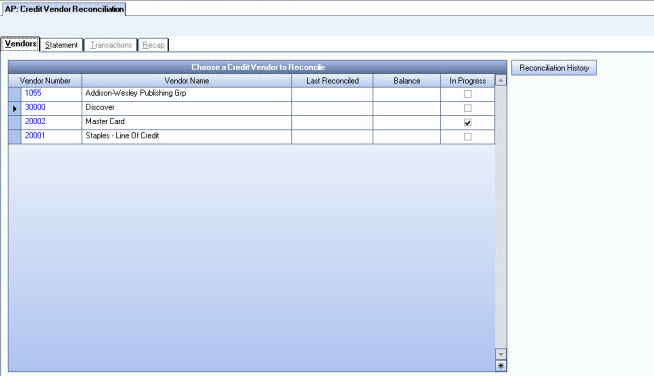
The Credit Vendor Reconciliation screen can be accessed from the Accounts Payable Menu.
Key Functionality
The selected Vendor Number and Vendor Name display in the header area once you are on the Statement tab.
Only the Vendors who have the Reconcile Vendor check box selected in the Vendor Master File (Payments tab) will display in the grid.
The Vendors tab displays Credit Vendor accounts along with the Vendor Number, Vendor Name, date Last Reconciled, Balance, and an In Progress indicator.
The In Progress check box is automatically selected once you start a reconciliation, but have not yet Finished.
The Reconciliation History screen can also be accessed from the Vendors tab.
If the Vendor displays in red text it indicates that the GL liability accounts on the parent and children Vendors differ. If you select a Vendor in this state, a message displays explaining that the parent and child Vendors need to be set to the same GL liability account.
Double-click in the Vendor Number cell to open the Vendor Master File for the selected record.
This grid is read-only.
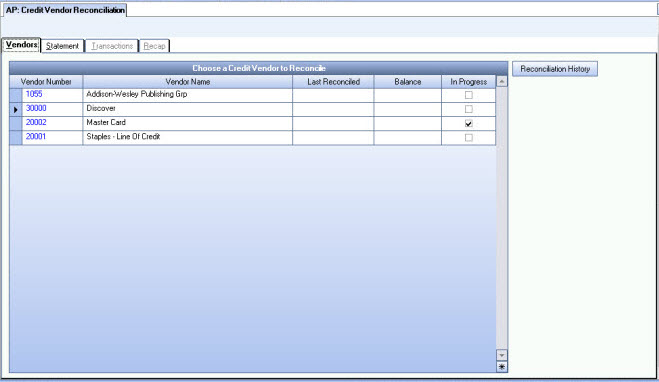
Select the Credit Vendor to reconcile. Once a Vendor is selected, the Statement tab is available.
The Statement tab is available once a Credit Vendor has been selected on the Vendors tab. It is used to enter information from the statement received from the Vendor. Invoice and Payment transactions will be reconciled to the Ending Balance on the statement.
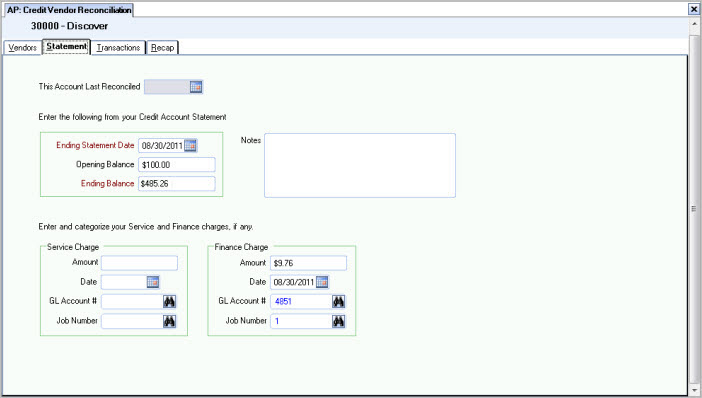
The Last Reconciled Date displays if a previous reconciliation was Finished.
Enter the Ending Statement Date as shown on the statement. Once the reconciliation is finished the Ending Statement Date becomes the Last Reconciled Date. This date then defaults to the Date Thru filter on the Transactions tab.
WinTeam will verify that the current month's statement ending date is greater than the previous month's statement date to ensure that the Credit Vendor Reconciliation is not run twice for the same date, therefore ensuring that the correct beginning balance is brought over.
If this account has not been reconciled yet, enter an Opening Balance for the account. If this account was previously reconciled, the Opening Balance will populate with the ending Balance from the previous reconciliation.
Enter the Ending Balance as shown on the statement. Invoice and Payment transactions will be reconciled to the Ending Balance on the statement.
Enter any Notes applicable to this reconciliation.
Enter any Service Charge reflected on the statement. During the reconciliation process a separate invoice will be created and reconciled for these charges.
Enter any Finance Charge reflected on the statement. During the reconciliation process a separate invoice will be created and reconciled for these charges.
The Transaction tab is used to mark the invoices and payments that show on the statement as 'Cleared'. The Totals grid refreshes as transactions are selected (and unselected) to be Cleared. The Difference between the cleared transactions and the statement display. The Difference must be $0.00 to complete reconciliation. All Invoices, Payments and Liability Transfers must be posted before completing the reconciliation. If you need to enter additional invoices during the reconciliation process, click the Invoice Entry button.
Note: When clearing an AP invoice, the entire invoice is marked as cleared even if the payment amount is for a partial payment. The assumption when clearing an invoice is that the entire invoice will be paid. If you want to create partial payments, you would have to create an invoice for that specific amount and create a credit memo for that same amount and apply to the original invoice. Then you would select the new invoice created for the smaller amount to apply against.
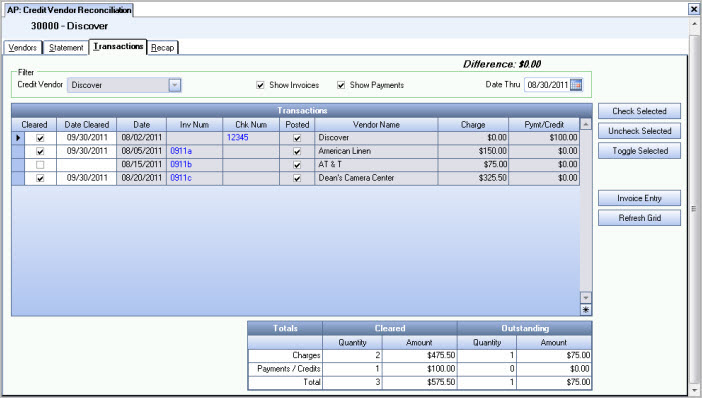
Transactions can be filtered by Credit Vendor, Invoices, Payments, and Date Thru.
The Credit Vendor defaults if there is no parent/child relationship with this Vendor. If there are associated relationships, the Credit Vendor filter is enabled.
Show Invoices and Show Payments are both selected by default.
The Date Thru defaults from the Statement tab and reflects the Ending Statement Date.
If you change the Filters make sure to click the Refresh Grid button to update the grids.
Transactions that display may not all have been posted. All invoices, payments, and Liability Transfers must be posted before completing the reconciliation.
Select the Cleared check box for all transactions that display on the statement.
The Totals grid will refresh as transactions are selected (and unselected) to be Cleared.
Double-click in the Inv Num cell to open the selected invoice.
Double-click in the Chk Num cell to open the Payment record.
The Totals grid displays the total quantity and total amount of each transaction type (Charges and Payments/Credits) for both cleared and outstanding transactions in the Transactions grid.
Check Selected, Uncheck Selected, and Toggle Selected
Click the Check Selected button to mark all records in the grid as selected.
Click the Uncheck Selected button to clear all records selected in the grid.
Click the Toggle Selected button to toggle the marked selections on or off each time you click.
Click Invoice Entry to open the AP: Invoice Entry screen to create a new invoice.
Tip: If you create additional invoices while reconciling, make sure to post those transactions, as they cannot be reconciled until posted.
Click to update the screen after changing filter criteria.
The Recap tab displays the Credit Account Recap, the difference amount between the calculated balance and the statement balance, Payment Summary information and a Recap by Credit Vendor. The Payment Amount and Date can be modified.\
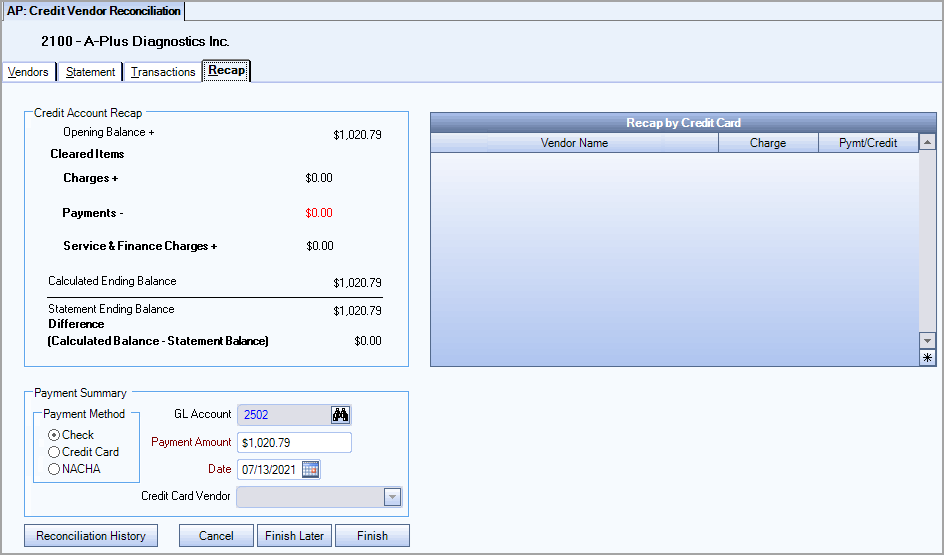
The Credit Account Recap information carries over from the Statement tab.
The Difference carries over from the Transactions tab.
The Payment Summary displays the information to create the Payment invoice when Finish is clicked. The GL Account Number used populates from the Vendor Master File (Payments tab) Credit Information.
The Payment Amount and Date can be modified. If you change the payment amount to less than the calculated payment, the remaining amount owed will be included in next months payment record created during reconciliation. If you do not want to make any payment, then change the payment amount to $0.00.
The Recap by Credit card grid makes it easy to view recap information when there are parent/child relationships.
Click to display the Reconciliation History screen.
Click to exit the reconciliation process without saving your work.
Click to save a reconciliation that is in progress.
Tip: At any time during the reconciliation process, you may click the print icon on the toolbar to print a DRAFT copy of an In Progress Reconciliation Report.
Click when the Difference amounts are $0.00. If you are not in balance the Finish button is not enabled. All items will then be marked as Cleared and Reconciled. A payment invoice is created for the Vendor and a separate invoice is created for Service Charges and Finance Charges (if applicable). A pdf is also created and stored, and the Reconciliation History is updated.
Related Information
The AP Credit Vendor Reconciliation screen does not have its own Security Group.
This screen has the Read-Only Feature. For more information see Learning about Read-Only Security.
The AP Credit Vendor Reconciliation screen is part of the AP ALL Security Group (no features selected).
Tip: For more information see Security Groups Overview and Security Groups By Module.
Creating an invoice for purchases paid with a credit card
Creating an invoice for payment to a credit card vendor
Reconciling a Credit Vendor (Parent)
