Processing Records Using the Update Schedules From TeamTime Window
Note: This functionality is no longer being updated. It is recommended to use Enhanced Reconciliation instead as a better solution. See Enhanced Reconciliation for more information.
Overview
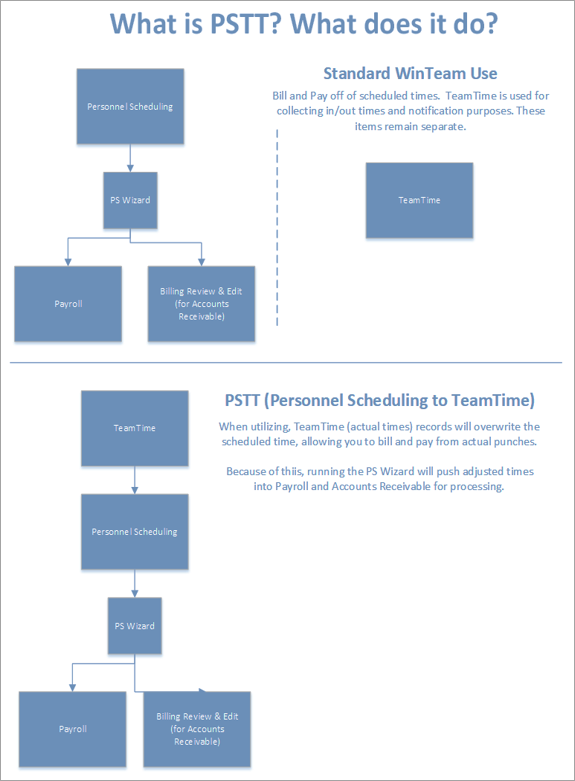
Personnel Scheduling from TeamTime (PSTT) is a reconciliation tool that attempts to merge together schedules and TeamTime records by shift so that you can determine whether to accept the scheduled time, the TeamTime punches, or to manually override the recommended punch(es) prior to running the wizard. This requires manual daily activity for prior day intervention from an employee using WinTeam for every shift that you want to reconcile.
The traditional scenario is where the working schedule is managed daily for any exceptions that may occur, particularly items that impact billing and/or payroll. Once the schedule is complete, the Personnel Scheduling Wizard is run to push bill rates and hours into Accounts Receivable, and pay rates and hours into payroll. You can then bill and pay from scheduled times.
Occasionally, companies may want to bill and pay from TeamTime or reconciled punches, rather than the original schedules, while still utilizing the scheduling feature and using the wizard to push to both payroll and accounts receivable. This is where Personnel Scheduling from TeamTime comes into play.
This topic covers how to manage/reconcile daily punches using the Update Schedules from TeamTime window. For setup information to use this window use this link.

Reconciling/Updating Schedules
The Update Schedules From TeamTime window is accessed from the Menu option in the Schedules window.

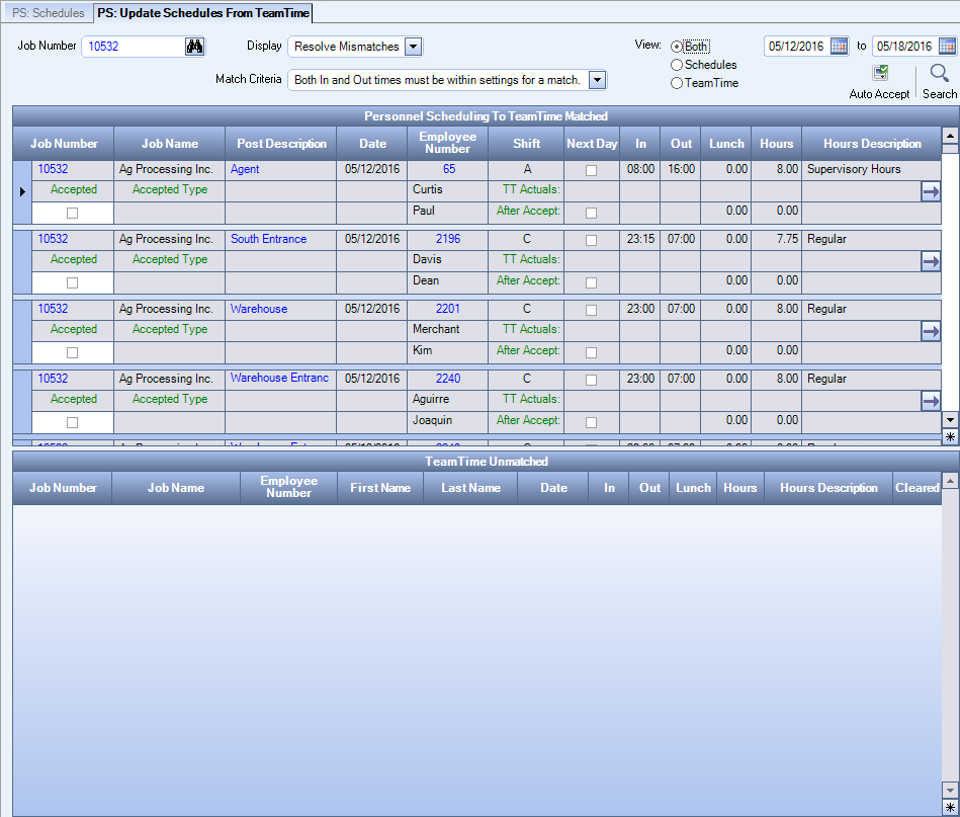
Use the Update Schedules From TeamTime window daily to work the previous days records using the following features. The records are sorted in date order first, followed by job, employee, and in time. For field definitions on this window, use this link.

To display a job, enter the number in the Job Number field and tab, or use the look up to locate the appropriate job.
If you accessed this window from a specific job on PS Schedules, the Job Number of the job you were viewing from auto-populate this field. If a Job Number was not filled in within Schedule, then the Job Number on the Update Schedules window remains blank. If you leave the Job Number field blank, the information displayed in this window contains information for all Jobs.
Click the button to automatically accept any matched records

Tip: The goal is that your tolerances are setup so that the majority of your shifts are matched and your adjustments are applied. Most organizations implement a best practice or policy to enforce employee clock in/outs within a window of time around the scheduled start/end shift times.
To manually verify the matches set the Display drop down to Verify Matches and the Match Criteria to Both In and Out times must be within settings for a match and click the button

In the grid review each record and modify if needed to match you organization's policy around scheduled time and TeamTime punches.
If you manually overwrite the times, the system auto-accepts and overwrites the schedule. If you are satisfied with the recommended time (based on defaults and adjustments), select the Accept check box. The system overwrites the schedule with the proposed/recommended time.
Continue to manually verify the matches by changing the Match Criteria to Only In time must be within settings for a match and Only Out time must be within settings for a match.
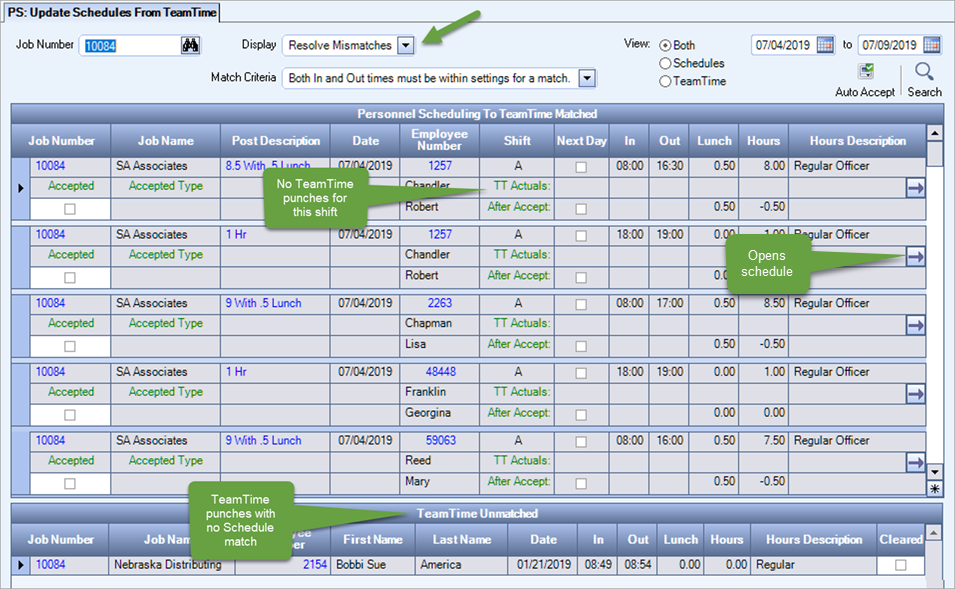
Change the Display to Resolve Mismatches and click the button to view any records that are outside the tolerances and could not be matched

Many times the records in the top grid display employees who were in the Schedule, but have no TeamTime punch that we were able to match based on the default settings. These records need to be corrected manually by either finding a TeamTime record below that did not match with the current settings or verifying the employees actual in/out time by contacting the employee/supervisor and updating manually, or simply just accepting the Schedule time by selecting the Accepted check box.
The records in the bottom TeamTime Unmatched grid have a TeamTime punch with no scheduled shift that matched with the settings or they are not in the schedule at all. These records need to be corrected manually by adding the employee to the appropriate schedule and selecting the TeamTime unmatched record Cleared check box.
Note: At times you may see a record in the TeamTime Hours Review report, but that record is not displaying in this window. This could be a result of your Synchronizer Upload Threshold settings in TeamTime Defaults or your TeamTime Upload and Download Schedules window settings.
This Review Accepted identifies shifts that have been accepted previously and is beneficial in trouble shooting/researching issues or questionable time changes. This display is often used as a second level review or to unaccept a record.
Change the Display to Review Accepted and click the button to display the previously accepted records. Also, you can add an additional Type filter for Automatic, Manual, Accepted Mismatch, Manual In Time Only, Manual Out Time Only and Overwritten. See this link for additional details on the filter types.
The Review Cleared is often used to identify TeamTime records that have been cleared previously using this window and beneficial in trouble shooting/researching issues or accepted times.
Change the Display to Review Cleared and click the button to display the Schedule and TeamTime records that were previously cleared. can see what was previously cleared.
Note: If an employee has been inactive for more than two days, TeamTime does not upload that clock record to WinTeam.
