Overview
You can use the Tax Filing Interface (TFI) Garnishments screen to export garnishments to a TFI, such as ADP. Both Historical and Regular Disbursements can be sent.

You can access the Tax Filing Garnishments screen from the Payroll Menu with the following Custom Settings in place. Both of these Custom Settings are required, as Garnishment Defaults are stored in the ADP Defaults screen:
| Section | Item | Value | Description |
|---|---|---|---|
| Payroll | ADPGarnishments | Yes | This setting displays the ADP Garnishments under the Payroll, ADP Menu. |
| Payroll | ADPTaxFiling | Yes | This setting must be in place for the ADP Defaults, ADP Labels, and ADP Tax Filing options to display under the Payroll, ADP Menu. |
Key Functionality
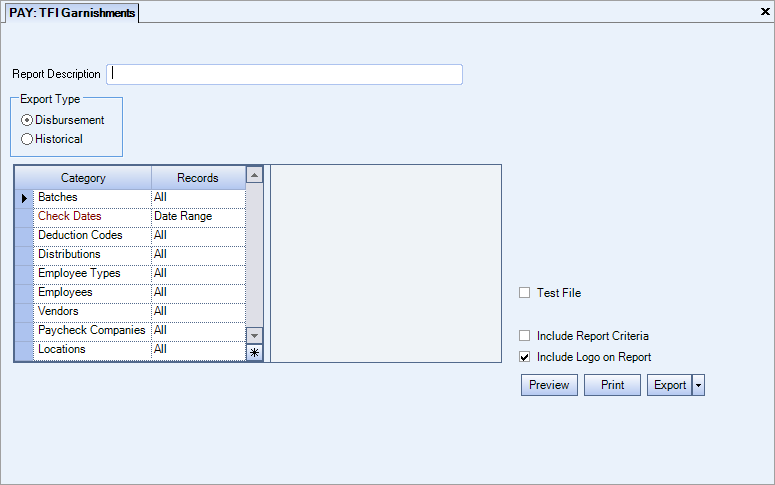
Type a description to name the report. This description prints above the Report Title.
Select Disbursement to send only items that have not been processed. Once an item has been processed, it will be marked as processed and will not be sent again. This is the default selection.
Select Historical if this is the first time sending to the interface. Any future reports will not include the information sent in'C the historical file. More than likely, this will be used only once.
Note: If necessary TEAM generates the required External Vendor ID using the next available ID beginning with 1. This is always done—when Test File is selected and cleared, and for Preview, Print, and Export.
Employees
Use the Employees category to select the Employees to include on the report. Select All to include all Employees on the report. Select Range to define a range of Employees for the report. Type the beginning Employee Number in the From field and the ending Employee Number in the To field.
Select Create to define your own list of Employees. When you select Create, a small grid displays to the right. Enter the Employee Numbers you want to include in the list, or use the Lookup to locate the Employee Numbers.
Select Exclude to identify records that should not be included. When you select Exclude, a small grid displays to the right. Enter the Employee Numbers you want to exclude in the list, or use the Lookup to locate the Employee Numbers.
Distributions
Use the Distributions category to select the Distribution to include.
Select All to include all Distribution types.
Select Pick to define specific Distribution to include. When you select Pick, the Check Distributions add edit list displays. Select the check box next to each Check Distribution to include.
Employee Types
Use the Employee Types category to select the Employee Types to include.
Select All to include all Employee Types.
Select Pick to define specific Employee Types. When you select Pick, the Employee Types list displays. Select the check box next to each Employee Type to include.
Batches
Use the Batches category to select the batch types to include in the file. The Batch list will sort in ascending batch ID order, but you can resort in descending order by clicking on the column header.
Select All to include all Batch Types.
Select Pick to define specific batches for the file. When you select Pick, the Batches list displays. Select the check box next to each Batch to include in the file.
Select Range to define a range of Batch ID's to be submitted.
Vendors
Use the Vendors category to select the Vendors to include on the report. (On the HR: and INS: Benefit Insurance/Other Analysis Reports, this Category is available when the Report Type is Vendor Billing.)
Select All to include all Vendors.
Select Range to define a range of Vendors for the report. When you select Range, the range fields display. Type the beginning Vendor Number in the From field and the ending Vendor Number in the to field, or use the Lookup to locate the Vendor Number.
Select Pick to define specific Vendors for the report. When you select Pick, the Vendor list displays. Select the check box next to each Vendor to include on the report.
Select Create to define your own list of Vendors. When you select Create, a small grid displays to the right. Enter the Vendor Numbers you want to include in the list, or use the Lookup to locate the Vendor Numbers.
Select Exclude to identify records that should not be included. When you select Exclude, a small grid displays to the right. Enter the Vendor Numbers you want to exclude in the list, or use the Lookup to locate the Vendor Numbers.
Check Dates
Select the Check Dates to include.
Select All to include all Check Dates.
Select Date Range to define a range of Check Dates to include. When you select Date Range, the range fields display. Type the beginning Check Date in the From field and the ending Check Date in the To field.
Paycheck Companies
This category is available to users who have more than one company.
Use the Paycheck Companies category to select the Paycheck Companies to include.
Select All to include all Paycheck Companies.
Select Pick to define specific Paycheck Companies. When you select Pick, the Paycheck Companies list displays. Select the check box next to each Paycheck company to include.
Locations
The Locations category is available for Clients using the Multi-Location feature.
Use the Locations category to select the Locations to include on the report.
Select All to include all Locations on the report.
Select Pick to define specific Locations for the report. When you select Pick, the Locations list displays. Select the check box next to each Location to include on the report.
Deduction Codes
Select the Deduction Codes to include.Select All to include all Deduction Codes. Select Pick to define specific Deduction Codes. When you select Pick, the Deduction Codes list displays. Select the check box next to each Deduction Codes to include.
Select this check box to print the company logo on the report. It is selected or cleared by default based on the option selected in SYS:Defaults. However, you can modify the setting on each report.
Select this check box to include a list of the report options selected for the report. The Report Criteria page includes any ranges specified and each Category/Record selection made for the report. This check box is cleared selected by default.
Select this check box to test your export file. When selected, the records will not be marked as transmitted and will be available to transmit in the future. It is NOT selected by default. Make sure that you do not mark it as a Test if you are creating the actual export file.
Click the Preview button (or use the shortcut key, ALT + V) to view before printing.
Click the Export button (or press ALT + X) to export to a specified format.
Reports may be exported to Adobe Acrobat (PDF) , Excel (97-2003), Comma-Separated Values (CSV), Grid View, E-mail (available for non-ASP Clients only), and ADP Format
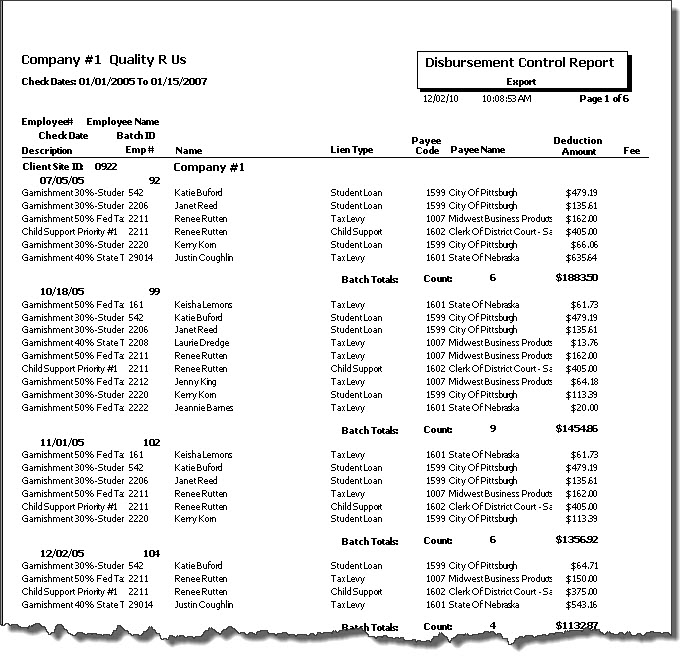
The report displays after the export.

