Overview
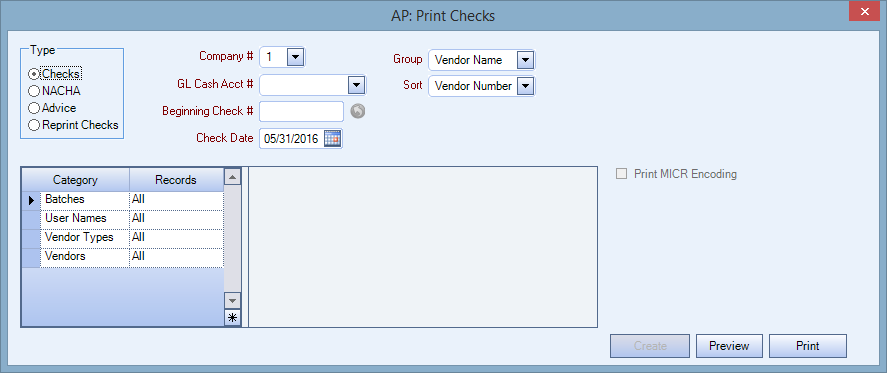
The Print Checks window is accessed from the Accounts Payable Menu.The check writing process is used to select and process all payment records that have been created. You will need to select the type of payments that you want to process. Only one Type (Checks, NACHA, Advice, Reprint Checks) may be selected at a time. You can filter each Type of payment record by various categories.
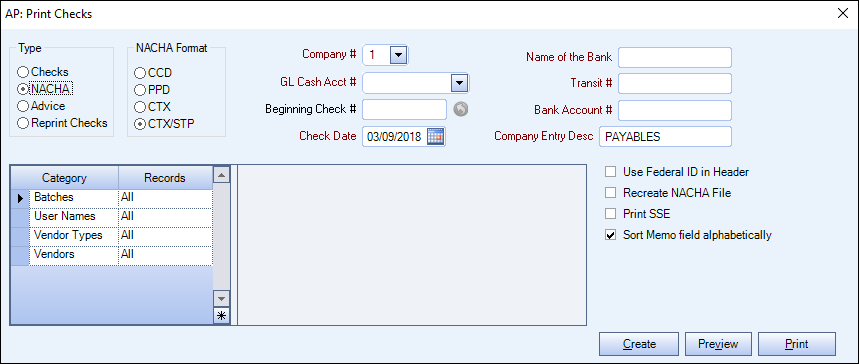
When choosing the NACHA Type, the format that is selected (CCD, PPD, or CTX/STP) is included in the header of the report.
There are four Types:
Key Functionality
Use Type to select the type of payment records to print. The options are:
- Checks - Select Checks to print checks for all payment records that are Not Printed.
- NACHA - Select NACHA to create an electronic file to submit to your bank. If this option is selected, four NACHA Formats display for selection.
- Advice - Select Advice to print Advice statements for each payment record. The system prints an Advice, even if the Vendor is not set up to print an advice.
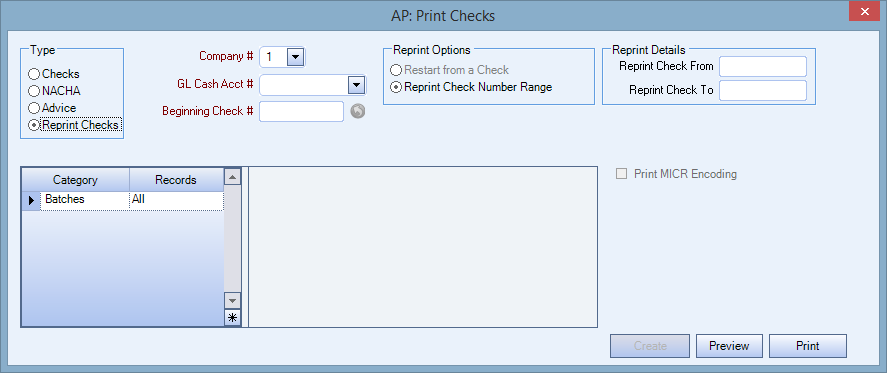
- Reprint Checks - Select Reprint Checks to reprint a check or range of checks that did not print correctly due to a printer error.
Note: You can reprint a check if the security screen feature Cannot Reprint Checks is NOT selected for you, and the check has not been updated to the general ledger.
The NACHA Format group displays if the Type selected was NACHA.
The Accounts Payable Print Checks program can produce four types of NACHA formats. The formats vary from state to state, and bank to bank. Before remitting a payment using these options, you will need to obtain information from the state you are processing payments for (the states utilize either the CCD or CTX formats for distributing support payments paid electronically), or the format your financial institution is expecting for a direct deposit type payment. Please forward these requirements to Team in order to insure that the existing format(s) within WinTeam are sufficient or whether additional programming changes are needed.
The bank information for each AP NACHA format will default based on the Cash Account to Credit. This information is set up in SYS: Cash Accounts Setup.
To explain the different types of ACH transactions, we pulled some information from one of the state’s Electronic Funds Transfer package.
ACH transactions come in many different types, called formats. The different formats primarily exist to accommodate differences in the type and amount of information that is to travel with the transaction. This serves the same purpose and can be compared to remittance advices that come on checks issued by businesses.
Forms of ACH transactions include the following:
- CCD - The CCD format is like a check in electronic form with a remittance advice attached to it. The addenda record of a CCD+ can only hold 80 characters of information. For computer readability, the 80 characters include characters to separate each type of information. If Pre-Note is selected, the check records will come through the files as $0.01 instead of $0.00.
- CTX - The CTX format is like a check that can accommodate a huge remittance advice. This format can obtain up to 9,999 addenda records, and might include other information sections that allow it to be transmitted with other EDI documents. The information section of a CTX is often referred to as an 820. This is the EDI standard for a remittance advice in the form of a computer file.
- PPD - (for example, direct deposit) - The PPD format is for business payments to consumer payments (i.e. Payment of dividends, social security, …) or business payments from consumers (i.e. preauthorized debits of mortgage payment, insurance, utility bills, …). This format does not accommodate the transmission of additional information with the payment.
- CTX/STP - This is a unique format that includes invoice information. This format has not been adopted by all banks, so it should not be used unless you are sure that your bank will accept it.
When using the NACHA Type, the format used (CCD, PPD, CTX, CTX/STP) is included in the header of the report.
Additional fields of information need to be filled in when processing a NACHA file.
- Name of the Bank
- Transit # (routing number)
- Bank Account #
- Company Entry Desc (Description) - PAYABLES is the default text in this field but it can be overwritten.
This information defaults from the SYS: Cash Accounts Setup.
The STP (Straight Through Processing) format is very similar to the CTX format. This is also known as STP 820. The goal of STP is to enable electronic payments to flow seamlessly from the originating company’s AP system to the receiving company’s AR system without human intervention. In the process the addenda records that are created contain check info and also invoice info for the invoices that were paid by each check.
For more information, see Creating a NACHA batch.
Use the GL Cash Acct # field to select the account to credit the payment amount to.
This field is not available if the Type selected is Advice.
The Beginning Check # field displays if the Type selected is Checks, Reprint Checks, or NACHA. The beginning check number is automatically populated from the Next Check # field in SYS: Cash Accounts Setup) when the type is NACHA . You may change this check number, if necessary.
You can also password protect the ability to change the beginning check number. For more information, see AP: Defaults.
Enter the date you want to print on the checks or NACHA Payments, or use the Date Control to select it.
These options are only available when the Type selected is Checks.
Use the Grouping and Sorting Criteria to select the order to print the checks for ease in distribution. The default is to group the checks by Vendor Name and sort by Vendor Number.
Batches
Use the Batches category to select the batches to print.
Only those payment batches that have not been updated to the General Ledger display in the list.
Select All to print all Batches. This includes manual checks, if applicable (identified by Batch #0).
Select Pick From List to define specific Batches to print. When you select Pick From List, the Batch list displays. Select the check box next to each Batch to print.
Note: Batch #0 will always display in the Batches Pick From List if you have at least one batchless payment record in your database, regardless if there are any manual payments to be printed.
To reprint a check that is not part of a Batch, select Batch 0 (with the applicable date) in the Pick List for Batches to reprint the check.
Vendors
The Vendors category is NOT available if the Type selected is Reprint Checks. Use the Vendors category to select the vendors to print.
Select All to include all Vendors.
Select Range to define a range of Vendors to print Checks or process NACHA Payments for. When you select Range, the range fields display. Type the beginning Vendor Number in the From field and the ending Vendor Number in the To field, or use the Lookup to locate the Vendor Number.
Select Pick to define specific Vendors to process. When you select this option the Vendor list displays for you to select the check box next to each Vendor to include on the report.
Select Create to define your own list of Vendors. When you select this option a grid displays to enter the Vendor Numbers you want to include in the process, or use the Lookup to locate the Vendor Numbers.
Select Exclude to identify records that you want to include. When you select this option a grid displays to enter the Vendor Numbers you want to exclude in the process, or use the Lookup to locate the Vendor Numbers.
Vendor Types
The Vendor Types category is NOT available if the Type selected is Reprint Checks.
Use the Vendors Types category to select the Vendor Types to print.
All - Select All to include all Vendor Types in the print run.
Pick From List - Select Pick From List to define specific Vendor Types to print. When you select Pick From List, the Vendor Type list displays. Select the check box next to each Vendor Type to print.
User Names
The User Names field displays if the Type selected is Checks or NACHA.
Use the User Names category to select the records to print based on who created the payment records. This allows users to process their own work without processing the work of others.
Select All to include payments for all users.
Select Pick From List to define specific user names for printing payments.
Check Dates
The Check Dates category is available only when printing Advices or processing NACHA payments.
Use the Check Dates category to filter the print process by Check dates.
Select All to include all Checks.
Select Date Range to define a range of Check Dates to print. When you select Range, the Check Dates range fields display. Type the beginning Check Date in the From field and the ending Check Date in the To field.
Checks
The Checks category is available only when printing Advices.
Use the Checks category to select the Checks to print.
Select All to include all Checks in the print run.
Select Range to define specific Checks to print. When you select Range, the Checks range fields display. Type the beginning Check Number in the From field and the ending Check Number in the To field.
This check box is visible only if you have the following AP Custom Setting.

This check box is only available if you have the proper security permissions. You must have screen Feature Can Print Signature selected in the AP Print Checks screen in order to print a signature on checks.
If you do not have proper security permissions and the GL Cash Account has a signature assigned, a warning message displays. You can choose to print the check without the signature.
This option is available only when the Type selected is Checks or Reprint Checks. This check box is available only if you have entered a Transit Routing Number, Bank Account Number, and have selected the Print MICR Encoding check box on the Cash Accounts Setup screen. Select the Print MICR Encoding check box to print the MICR detail at the bottom of checks. The MICR detail information is stored in the Cash Accounts Setup screen.
Note: Magnetic Ink Character Recognition (MICR) is character recognition technology used by the banking industry. You must have special MICR ink to use this option.
Select this option if you need to recreate a NACHA file that has already been processed.
Typically, unless you are needing to renumber a NACHA Payment, you would not normally recreate the NACHA file from this screen. Instead, you should create the file from the AP Reports: NACHA Bank Transmission screen. For additional information see the AP: NACHA Bank Transmission Report link.
Use the Federal ID in Header check box to include header information in the NACHA file. Normally, you will not select this unless you have received specific instructions from your bank.
This option is available only if you selected Reprint Checks under Type.
These options are available only if you selected Reprint Checks under Type.
Use the Reprint Details to define check criteria for reprinting a range of checks. Enter the Reprint Check From (this is the first check number you want to reprint) and the Reprint Check To (this is the last check number you want to reprint).
This options displays if this Custom Setting is in place.

With this setting in place the check box, Sort Memo field alphabetically displays and is selected by default. When this option is checked, AP checks that contain Union Dues or other Payroll Deductions will have the invoices sorted alphabetically by the Employee's last name. This setting changes the order the memo information is written to be Last Name, First Name, MI, Date, and SSN. Without this option checked, the checks sort by Invoice Date and Invoice Number.
This check box displays when the LaserAPCheck | APCheckLimitAmount | Yes is used. When this check box is selected, the batch process excludes checks with an amount equal to or greater than the dollar amount limit set in the value of the custom setting. This setting allows you to exclude checks from the normal batch process when the checks are equal to or over the dollar amount limit set in the value. In addition to the separation and sorting out of checks over the limit, the checks also do not include a signature. If you clear the check box, the checks that are equal to or over the limit print first (without a signature), followed by the rest of the checks in alphabetical order (with a signature).
Click the Preview button to display the payment records that will print based on your selected criteria in a preview document.
When using this option, no payment records are committed. It simply gives you the opportunity to see what will be printed when you Print (Checks or Create (NACHA Payments). Clicking Preview will show the Check forms with the words "Preview Only" and "VOID" through the check itself.
This button is only available if you select NACHA under Type.
Click the Create button to receive a report and create a file containing the NACHA Payment records that meet the selected criteria. This file can then be submitted to the bank.
To print Advices for any of these payments, you will need to use the Advice Type option and select the criteria of which checks you want to print advices for.
Click the Print button to display the Print Setup screen. Your default printer will be displayed. You may redirect the printing to an alternate printer to print the report/checks.
Security
The AP Print Checks screen has three security features:
- Can Print Signature - Allows printing a signature on checks.
- Cannot Change Beginning Check Number - Prevents changing the beginning of a Check Number to something other than what is set up in SYS: Cash Accounts Setup.
- Cannot Reprint Checks/Recreate NACHA File - Prevents reprinting a batch.


