eHub: Installing a TeamTime Portal Device
TeamTime Portal offers a quick way to capture Employee timekeeping information and features communication capabilities as well as integrated eHub access. This software can be used on a variety of devices from Net books and laptops to other portable computing devices with a Windows® operating system and an Internet connection. For more information on the product, see TeamTime Portal.
The process of installing the software on a new device or replacing an existing device all begins in the TTP Installations window in eHub.
- Navigate to your company's eHub URL and log in to eHub from the device on which you will install the software.
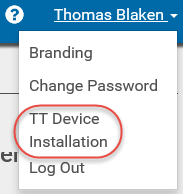
- Select TT Device Installation from the drop-down menu under your user name in the page header.
- New Device—When the screen opens, it defaults to the New Device option. Choose this option to install the software for the first time on a new device.
- Description is required. Enter a brief description for the new device.
- Location is required, unless only one location is available. Choose the location of the device from the list.
- This list is based on the user's Location security which is set up on the Other tab in the User Security window.
- Time Zone is required. Choose the Time Zone for the device.
- This list is populated from information contained in WinTeam in tblSYS_TimeZones.
- Replace Existing Device—Select Replace Existing Device to take an existing device out of service and install the software and existing device settings on a new device.
- Device is required. Select the device to be replaced from the list. This menu includes the Device ID, Description, Machine Name, Machine Key and Location of the device.
- This information comes from the device settings in WinTeam.
- Start Installation. This button becomes enabled after all required fields are completed. When the button is clicked, the TT Device Installation File link displays below. Click the link to begin the installation process on the device you are logged in to.
- You may receive a message asking you to confirm the installation of the software. Click Install. The TeamTime Portal application and required drivers will download automatically to the device. When the device installation is complete, the TeamTime Portal splash screen displays.

Note: If the system detects the software has previously been installed on a new or replacement device, a message displays recommending the user uninstall the software and then re-install, if necessary.
Note: Devices being replaced must first be made inactive before the software and settings can be installed on another device. A message displays asking the user if the old device should be marked as inactive. Select Yes. Then turn on old device one last time in order to complete deactivation process.
Note: The device will not have biometric settings configured when the application is initially installed. See WinTeam Setup: Device Settings. The device will need to be restarted for the designated settings to take effect. Biometric scanners will also need to be connected prior to rebooting.
