Overview
Note: In order to use Query Scheduler, you must be licensed for it. To obtain a Query Scheduler license, please contact a TEAM Sales Representative at 800-500-4499.
The Query Scheduler window is accessed from the System Tools menu. You use it to create, modify, and run select queries against the WinTeam database. The results of these queries can automatically be sent via e-mail to designated individuals or groups. For more information see Setting Up Query Scheduler
You can run a single query at a time and export the results by using the Test Query tab. You can also export query results to a specific excel template that you have set up. This saves time from having to reformat the spreadsheet each time the output is generated. You can also set up your template with formulas, charts, etc. so that when the data is exported to the template, the results are immediately seen and no additional formatting is necessary.
Key Functionality
Toolbar and Header
Click the Advanced filter button to create or edit a filter for finding and/or sorting specific records. You can also select a Saved filter. Click the Apply Filter/Sort button to apply any filter or sort criteria you created. Click the Remove Filter/Sort button to remove a filter or sort, if one is currently applied. For more information see Advanced Filtering.
Type or select the Query Scheduler record from the list. The records are sorted by their Description and the list also contains the ID and Type of each record. After you select an existing Query Scheduler record, the corresponding Description and other related information displays. For more information see Lookup Scheduled Queries.
The system uses the ID to identify each Query Scheduler record. The system automatically assigns an ID to each new record.
The Team ID is used by Team to track queries installed with the program. This field may not be modified. It is automatically populated by TEAM and assigned only to System records.
Hover over the Change Information icon to see User Added, Date Added, User Changed and Date Changed information. WinTeam records the logon name of the user entering or changing this record. The Date Added is the original date this record was entered into the system. The Date Changed is the date the record was last changed. Right-click on the Change Info icon to filter for records added or changed by a specific user or date.
When you hover over the User Changed or Date Changed filters, you can:
- Filter By Selection - Filters for all records that match your current records field value.
- Filter by Exclusion - Excludes from your filter all records that match your current records field value.
- Filter For - Filters based on the text/value you enter.
- Sort Ascending - If you already have a filter applied, the Sort Ascending command is available. Also used to include all records in the filter and sort in ascending order based on the current records field value.
- Sort Descending - If you already have a filter applied, the Sort Descending command is available. Also used to include all records in the filter and sort in descending order based on the current records field value.
To see all of the scripts, use the lookup and clear the Active Only check box.
PR - Check PA, MD & IN Emp Tax Code - This query is available for payroll review for the states of PA, MN, and IN to ensure in the Employee Master file these states have their local tax jurisdictions set up correctly in the Tax Info tab.
PR - Check PA & OH Job Tax Code - This query is available for payroll review for the states of PA and OH to ensure proper tax setup in the Job Master file Accounting Info tab for local jurisdictions.
GL - TAJ Chk Details - This query is available for payroll review of TAJ check details for any date range to review Employees, GL Account Numbers, Jobs, and Posting Date by each tax code.
GL - PRJ Chk Details - This query is available for payroll review of PRJ check details for any date range to review employees, Jobs, Batch ID, and Posting Date by each GL Account Number.
GL - ODJ Chk Details - This query is available for payroll review of ODJ check details for any date range to review Employees, Jobs, Batch ID, and Posting Date by each GL Account Number.
GL - OCJ Chk Details - This query is available for payroll review of OCJ check details for any date range to review Employees, Jobs, Batch ID, and Posting Date by each GL Account Number.
GL - LDJ Chk Details - This query is available for payroll review of LDJ check details for any date range to review Employees, Jobs, Batch ID, and Posting Date by each GL Account Number
HR - Employee Dependent Info - Use this query to find dependent information. For example, you could use this query to proactively identify dependents who are approaching age 26.
Job - Holiday List - This query is available for review of all active jobs to see which Holiday Method is used and the Holiday Dates set up for a date range.
401K YTD - This query provides a list grid view of all employees set up for a 401K who have a deferred amount, Roth amount, loan repayment or other type of catch up amount.
General
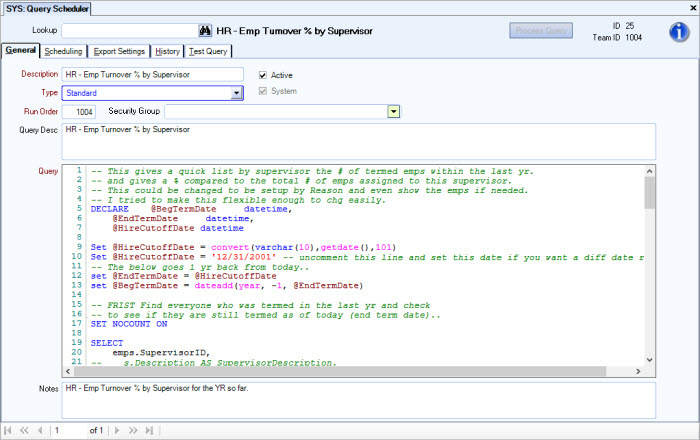
Enter a unique name to describe this Query Scheduler record.
Select the Active check box to indicate whether this query is active. All active queries are considered for processing.
The query is active if the check box is selected. The query is inactive when the check box is cleared. For a new query record, WinTeam selects Active by default.
If you clear this check box, WinTeam does not look at this query, regardless of the schedule.
If you want to store a query, but not schedule it, clear the Active check box. You may also want to change the Type to Not Scheduled.
The System check box is for informational purposes only. It appears "grayed out", which means it is not available for modification.
If a query record was created by TEAM, the System check box is automatically selected by default. If a query record was NOT created by Team, this check box is cleared. Looking at the System check box for each query record is an easy way to determine which ones were created by TEAM (System) and which ones were entered manually (Custom).
Enter or select the Query Type. The Query Type lets you group similar types of queries for filtering purposes. If you want to store a query, but not schedule it, create a Not Scheduled Type, and clear the Active check box.
To add a new Query Type, double-click in the Type field, or type a new Query Type Description, and press Enter. The Query Types add/edit list displays.
Set the order in which the engine processes the queries. This field defaults to 1 ("1" is the highest ranking).
Use the Security Group field to assign the query to a WinTeam Security Group. This list includes all WinTeam security groups including custom groups. Using a security group for a query ensures that only the authorized eHub users can run the export process out of eHub.
Enter a detailed description of the query.
Type the query in this field. If using Group E-mail, a Job # or Employee # must be in the Query and query must be formatted in order to use Group E-mail.
Format for query
SELECT a.* INTO #JobResults FROM (SELECT * FROM tblJB_Jobs where jobnumber in ('10050','10051'))as a
If the query is not correct, you will receive an error message.
Queries that are date sensitive, but failed to run on any given day, can be run again using a specified run date. In order for the query to use the run date you would need to change your syntax from
Set @td=convert(varchar(10),getdate(),101)
to
Set @td='<RunDate>'
Use the Notes field to enter any notes pertaining to this query record. If you enter more than one line of information, the system automatically wraps the lines of information for you.
Scheduling

Enter the date to start running this query and enter the date you want to stop running this query. To run the query indefinitely, leave this blank.
Choose the time you want to execute the query.
Select from the list of valid frequencies.
Depending on the selection made, you may be required to select Additional Parameters and/or Special Day options.
If you select the Daily Frequency, enter the number of days to repeat the query run. An Hourly Run Times box will also display in AdditionalParameters.
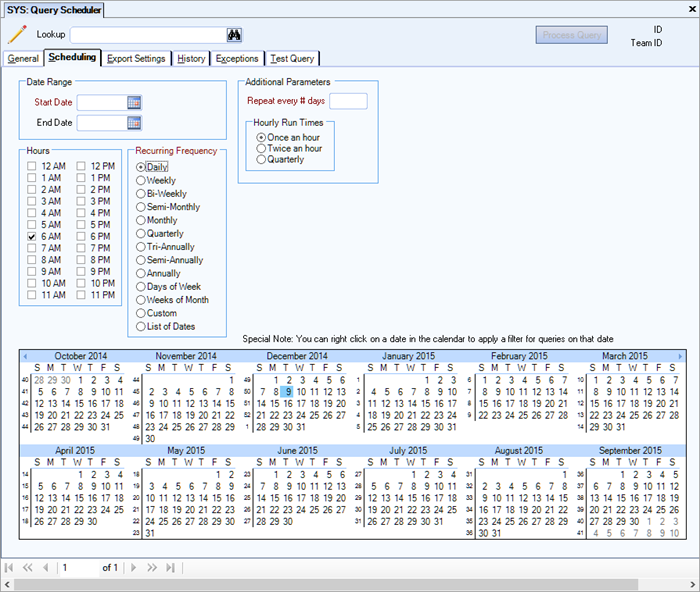
Example: "5" indicates that this query is run every fifth (5th) day.
If you select the Stated Number of Days Frequency is selected, enter the number of days to repeat the schedule.
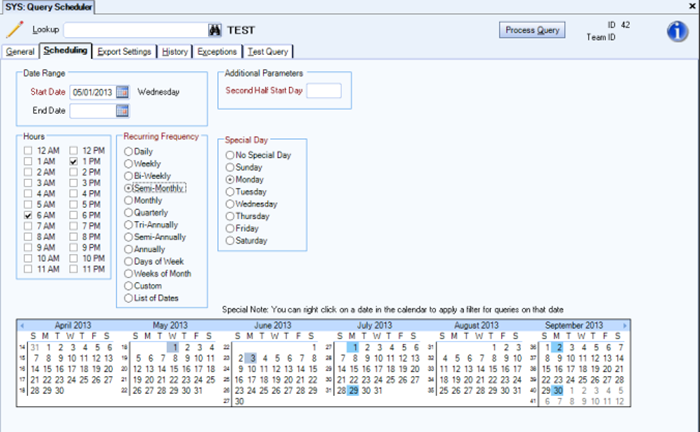
If you select the Semi-Monthly Frequency, two additional fields display requiring entries for Special Days and Second Half Start Days. Select a specific day of the week to perform this schedule and based on the Date To Start, enter the second day in the month this schedule should be repeated.
If the Monthly, Quarterly, Tri-Annually, Semi-Annually or Annually Frequency is selected, the Special Day field requires an entry.
If you select Custom Frequency, two additional fields display requiring entries for Custom Frequency and Special Day. Select the Custom Frequency to assign to this schedule and select a specific day of the week to perform this schedule.
If you select Weeks of Month, two additional options display for entering for Days of the Week and Scheduled Months.
Hourly Run Times
If you select the Daily Frequency, an Hourly Run Times box will display in Additional Parameters. Once an hour, Twice an hour or Quarterly options are available for Hourly Run Times, improving the ability to leverage Query Scheduler as a means to provide virtually real-time data to other systems.
Second Half Start Day
This field displays if the Semi-Monthly Recurring Frequency is selected. Based on the Date To Start, enter the second day in the month this schedule should be repeated.
Example: If the Date to Start is 1/15/10, then the Second Half Start Day may be 28, meaning that the second day of the month to repeat the schedule would be 1/28/01. This schedule will repeat on 2/15/10, 2/28/10, 3/15/10, 3/28/10, etc.
Custom Frequency
This field displays if the Recurring Frequency of Custom Frequency is selected. Type or select the Custom Frequency to assign to this schedule. To add a new Custom Frequency, double-click in the Custom Frequency field, or type a new Custom Frequency and press Enter. The Custom Frequencies add/edit list displays.
This field displays if the Monthly, Semi-Monthly, Quarterly, Tri-Annually, Semi-Annually, Annually, or Custom Recurring Frequency is selected. Select a specific day of the week to perform this schedule.
Export Settings
Using the Export Settings tab, you can specify the file type Query Scheduler creates when it runs a query, and you specify designated recipients, and various delivery methods.

File Name
Enter a name of the query results file. You can use a static name or you can use variables. The file name uses variables by default. See Exporting Query Results. For file names containing variables, the saved file name displays next to Preview.
Overwrite Existing File
Specifies whether to overwrite existing files with the same name when Query Scheduler runs the query. The Overwrite Existing File check box is selected by default.
- If the Overwrite Existing File check box is selected, Query Scheduler overwrites existing files with new files that have the same name.
- If the Overwrite Existing File check box is cleared, Query Scheduler does not overwrite existing files.
Choose to save the file as a CSV, Excel, or XML file.
- If you select CSV File, the query results file saves as a delimited file. When you select this option, the Delimiter field must be identified. You can also select to Include Headers.
- If you select the Excel File, the query results file saves as an Excel file (XLS).
- Enter or browse to the file path of the Excel Template file you created. Make sure you use the UNC path (not a mapped drive) so the Engine knows how to access the template when it is ran as a Windows Task. When running as a Windows Task, mapped drives are not available as a resource. However, you can manually run the engine using a mapped drive.
- Enter the name of the worksheet.
- Enter the starting cell (top left) coordinates for the export.
Tip: The ability to format the results of the output will greatly increase the possibilities and potential uses for Query Scheduler. At the lowest level, you will appreciate nicely formatted headers, and data. At the highest level, this can replace some of the CreaTeam functionality by pushing polished graphs, reports, and pivot tables. If you are a power-Excel user, then you can really do some awesome things.
- If you select XML File, the query results file saves as a raw data file that uses tags to define objects and object attributes, basically a text version of a database. You will need to define the Root Element and Table Name. You can also include the Schema.
All files can be sent as created, zipped, or encrypted.
- Select None to send the file as created.
- Select Zipped to compress the file before sending. You can also add a Password to the zipped file.
- Select PGP Encrypts Results to send using the Pretty Good Privacy (PGP) method. You will need to enter the associated Public Key when you select this option.
Address
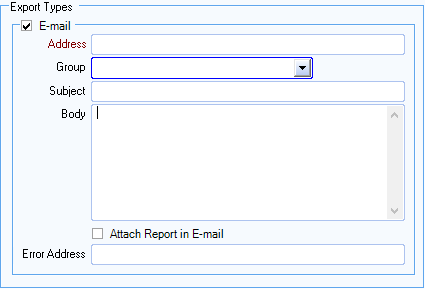
Enter an e-mail address for the Query Scheduler to send the query results to. To enter more than one e-mail address, use a semi-colon between addresses.
When the query results are e-mailed, the record count displays in the Subject line of the e-mail.
Group
Type or select the E-mail group to send the query results to.
A Job # or Employee # must be in the Query and the query must be formatted in order to use Group E-mail.
Format for query
SELECT a.* INTO #JobResults FROM (SELECT * FROM tblJB_Jobs where jobnumber in ('10050','10051'))as a
SELECT a.* INTO #EmployeeResults FROM (SELECT * FROM tblPAY_Employees where employeenumber in ('65','161','200'))as a
To add a new Email Group, double-click in the Group field, or type a new Group and press Enter.
The E-mail Groups screen displays.
The following E-mail Groups cannot be used by the Query Scheduler:
- User
- User Supervisor
Subject
Type the subject matter of the email. You can use a maximum of 150 characters.
Body
Enter any additional information about the query results you want to include in the email in the body of the email.
Attach report in email
Select the Attach report in email check box to attach the CSV file to the email being sent. This check box is NOT selected by default.
If this is selected, the Query Scheduler locates the CSV file from the PrimaryFolder and attaches the file to the email being sent. If you have selected this check box, the Zip Attachment check box displaysto indicate if you would like to zip the file prior to attaching to the email.
If this Attach report in email check box is NOT selected, the Query Scheduler sends an email message with a link to the CSV file.
Warning: SaaS Users: Your only option is to attach the report or the zip file of the report. Please do not select to send a link, this does not work for SaaS Users.
Zip Attachment
This check box displays only if you selected the Attach report in email check box.
Select the Zip Attachment check box to zip the CSV file prior to attaching to the e-mail being sent.
This can be used in those instances where a query could result in a large amount of records processed.
Note: Using this option could cause the Query Scheduler to process a bit slower since another step would be required to run for each query.
Error Address
Enter an e-mail address for the system to send information about failed query errors.
If a query encounters errors, the system will continue to run other queries. However, an e-mail will be sent for that specified query, with pertinent information about the error.
If a query encounters errors and an Error Address is not specified, the system will send an e-mail to the Admin E-mail address.

Select the FTP Results check box to send the Query Results to an FTP address.
Enter the FTP URL Address, Username, and Password related to the FTP site. The maximum number of characters that can be entered in the Password field is 128.
The Query Scheduler saves the Query Results file at the root of this address. You can append a directory name at the end of the URL using \<directory name>, and Query Scheduler will save the Query Results file to that directory instead.
Select the Secure File Transfer Protocol (SMTP) check box to send the results using secure file transfer capability.
History
The History tab display displays scheduled queries and the results of those queries. You can resend a query, view the query results file., or run a History Report for the current query or all queries.

You can use the History Report options to select criteria for creating a query report based on query run dates.
You can run the report for All Queries or the Current Query. If you are on a new Query Scheduler record the only option available is All Queries).
From and To
The Run Date Range fields (From and To) default to yesterday's date (system server date less one day). You can change the Query Run Date Range to filter records as necessary or leave the From and To fields blank to include all run dates.
Criteria
Select to view Query records with Errors Only, No Errors, or Both.
Regardless of the criteria selected, the recap section in the header of the report displays a count of all queries within the selected query and run date range.
Non-Zero-Count Results Only
Select this check box to include only those queries that were successful and do not have zero's for a record count.
Click Preview to view a history report of queries based on selected criteria.
Test Query
The Test Query tab is used to populate the records that will be returned by this particular query. This allows you to immediately see the results without having to use the Query Engine.
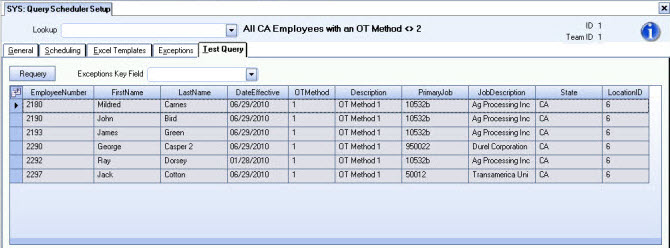
When testing a query you can export the results of your query as a CSV file to a location of your choice. When exporting, a dialog box displays for you to browse to where you want the file saved. Enter a name for the file you want to save. Make sure that you add .csv as an extension since that is the format the file will be saved as.
Example: You can use the attached template as a guide for exporting. Right click and choose "Save As..." (or "Save Target as...") to download this file, sample file.
If there were any exceptions identified on the Exceptions tab, you will see these listed with the Exclude check box selected. If an Exceptions Key Field is not identified on the Test Query tab, you will not see the Exclude column.
Based on the Exception Key Field, if you select the Exclude check box on a row,WinTeam automatically selects any record that shares the same value as the value indicated in the Exception Key Field. Notice that if you select other records for exclusion, the Exceptions value list populates automatically.
Each time you leave the Test Query tab and then return, you will need to press Requery to refresh and repopulate the rows.
Standard grid functionality applies to this screen. For information on grid functionality see Understanding Grids and Using the Filter Row Feature.
Queries that are date sensitive, but failed to run on any given day, can be run again using a specified run date. In order for the query to use the run date you would need to change your syntax from
Set @td=convert(varchar(10),getdate(),101)
to
Set @td='<RunDate>'
Using this syntax will force the system to prompt you for a "run date."
Related Information
Security
The SYS Query Scheduler screen has its own Security Group, SYS Query Scheduler.
This screen has the Read-Only Feature. For more information see Learning about Read-Only Security.
The SYS Query Scheduler screen is part of the SYS ALL Security Group.
Tip: For more information see Security Groups Overview and Security Groups By Module.
