Overview
Use the Pay Print Checks Wizard to print checks generated through the Check Processing Wizard. You have the option to print any batch that has not been updated to the general ledger or to reprint a batch that has been previously printed. You may also create PDFs of paychecks through this wizard. The Pay Print Checks Wizard is accessed from the Payroll menu.
The information that prints on a check depends on the W4 Format that is selected in the Tax Info tab of the Employee Master File.
Checks with a check date of 1/1/2020 or prior continue to print the Federal Number of Allowances/Exemptions on all check formats.
Checks with a check date of 1/1/2020 or after print either:
- The Federal Number of Allowances/Exemptions if the W4 format is 2019
- The Federal Dependent Amount if the W4 Format field is 2020 (only the whole number and dollar sign print—no decimals are printed due to space constraints)
The 2020 Federal Filing Status of Head of Household prints as H on the framed check layout and HofH on all other layout types.
Document: See examples of the 2020 W4 format on printed checks
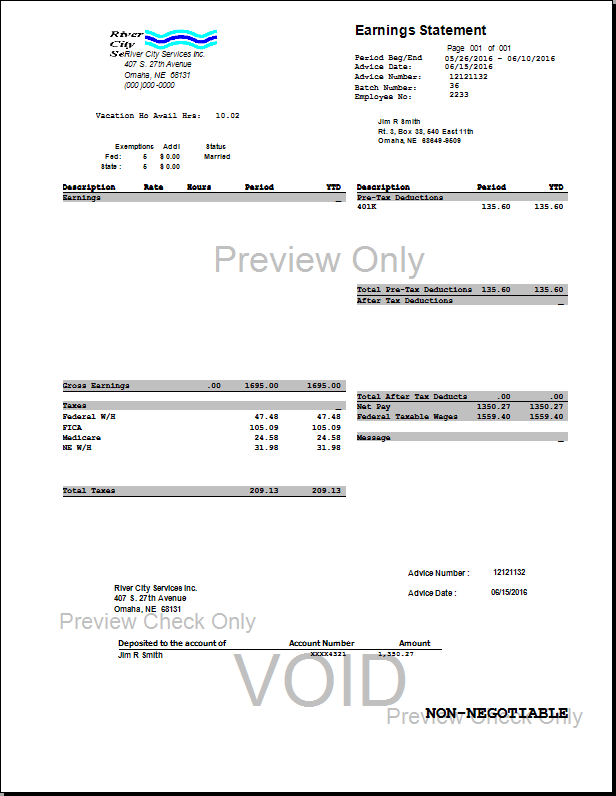
Checks must still be printed prior to creating a NACHA Bank Transmission. When Direct Deposit checks are printed, WinTeam will print "NON-NEGOTIABLE" in the signature area of the Direct Deposit paychecks. You can give these "NON-NEGOTIABLE" checks to employees so that they have their paycheck stub information. You will not see an amount unless you select Print Direct Deposit Information on Paycheck check box selected in PAY: Defaults.
Note: Checks cannot be printed and the NACHA file cannot be submitted if there is no Primary account selected, or if there is more than one Primary account selected. This must be corrected before the print checks process can complete.
One option available when printing payroll checks is to Group Direct Deposit Checks with non-direct deposit checks. Non-direct deposit check will print first, based on your Group By and Sort By criteria, followed by your Direct Deposit checks, again sorting by Group By and Sort By criteria.
In order to prevent the possibility of someone printing a Payroll batch while someone else is in the batch editing, WinTeam tracks users when editing or printing payroll batches. A warning message displays if a user attempts to edit or print an existing batch while it is being edited or printed by another user.
If you cannot determine if another user is in the batch, you can manually clear the locks. For more information, see Clearing Locks.
Legal Size Self Sealer formats that have longer descriptions will be truncated and only the part of the Description that fits will print.
Key Functionality

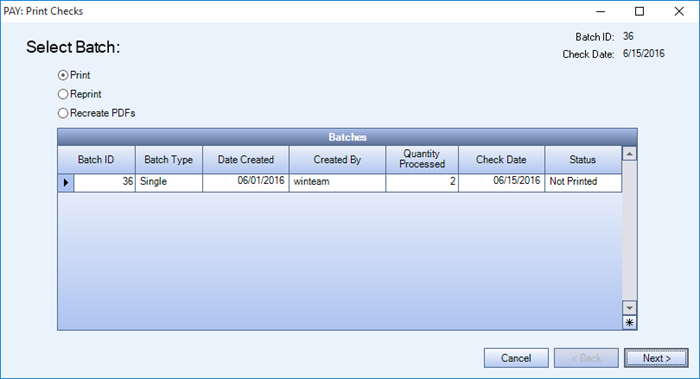
On the Select Batch step of the Payroll Print Checks Wizard there are three options to choose from:
- Print - Print the Payroll Batch.
- Reprint - Reprint a Payroll Batch. When you select this option the Batch grid below will only show batches which have a Status of Printed.
Note: You can reprint checks if the security screen feature Can Reprint is selected for you, and the checks have not been updated to the general ledger.
- Recreate PDFs - Create or recreate Payroll check PDFs. This option is only available if the Store PDF Copy of each Paycheck check box is selected in thePaycheck Properties tab. The PDFs can be accessed from the Paycheck Info button on the Employee Master File. See Creating a Print Checks PDF for more information.
Batch ID
The Batch ID associated with each batch.
Batch Type
The Batch Type field will display either Adjustments, Auto checks, Handwritten checks, Single checks or Voids.
Date Created
The date the batch was created using the Check Processing Wizard.
Created By
The User Login ID who created the batch using the Check Processing Wizard.
Quantity Processed
The number of checks processed in the batch.
Check Date
The date which will print on the check.
Status
The Status of the batch will display if the batch has been Printed, or Not Printed.
If Print is selected the grid will only display Payroll batches which have not been printed.
If Reprint is selected the grid will only display Payroll batches which have been printed.
If Recreate PDFs is selected the grid will display Payroll batches which have been posted and batches which do not have any PDFs created.
Click the Cancel button to end the process.
Click the Next button to proceed to the Select Message step in the wizard.
- None - If you select this option, no message will print on the checks.
- Same for All - If you select this option, a Message text box displays allowing you to enter a message to print on all checks in this batch. You can set a default message that prints on all checks (and is not deleted between printings) using the Message to Print field on the Paycheck Properties tab of the Pay Defaults window. This saves time because you can add the same message to all paychecks that print instead of retyping the same message every time payroll is processed. This message is automatically populated only when the Same for All option is selected. The message does not display when the By Employee Type, By Classification, By Distribution, or By Location options are selected.
- By Employee Type - If you select this option, you may enter a different message for each Employee Type.
- By Classification - If you select this option, you may enter a different message for each Classification.
- By Distribution - If you select this option, you may enter a different message for each Distribution.
- By Location - If you select this option, you may enter a different message for each Location.
Available Employee Types, Distributions, and Locations are based on the selections in the Check Processing Wizard batch.
Note: Only the first 450 characters of the message display on the checks.
Click the Cancel button to end the process.
Click the Back button to move backward to the Select Batch step in the wizard.
Click the Next button to proceed to the Select Options step in the wizard.

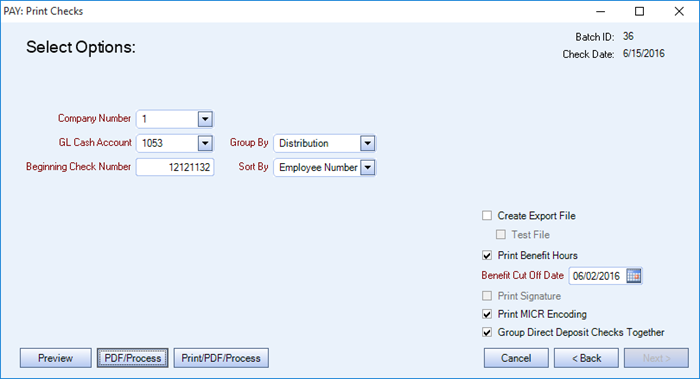
Use the Select Options screen to select the Company Number, GL Cash Account, Beginning Check Number, Grouping and Sorting of the checks as well as other options.
Select the Company who is responsible for the payment of the payroll batch. This option is available for Clients who have a multi-company database.
Select the Cash Account to credit for the net payroll disbursement. If you are reprinting a Payroll Check batch and indicate a different Cash Account than what was used in the original batch, you will receive a warning message. The system then performs another error check to make sure that the entire batch is being reprinted. The reprinted batch must include all checks if you are changing the Cash Account. If you are reprinting all checks, the system will check for duplicate check numbers. If duplicate check numbers are found, you will need to indicate a different starting check number.
For multi-company users - When using the Framed Check Format WinTeam looks to the GL Cash Account to determine which Company logo to use.
The system defaults the next available check number to the Beginning Check # field. You may change this check number. Maximum of 10-digits.
Select the Group By drop down to choose the option you want to group the checks by. Using this option will ease in distribution of the checks. The system defaults to group the checks by Distribution. When selecting to Group By Location or Supervisor, the Distribution Code that normally prints on the paycheck is replaced with the Location or Supervisor in order to prevent paychecks from having to be manually resorted before distribution. If you are printing a previously printed batch, this option will is not available.
Select the Sort By drop down to choose the option you want to sort the checks by. Using this option will ease in distribution of the checks. The system defaults to sort the checks by Employee Number. When selecting to Sort by Location or Supervisor, the Distribution Code that normally prints on the paycheck is replaced with the Location or Supervisor in order to prevent paychecks from having to be manually resorted before distribution. If you are printing a previously printed batch, this option is not available.
Use the Reprint Options to indicate whether you are restarting on a certain check or to reprint a check number range. These options will only be available if you selected to Reprint on the Select Batch screen.
Restart From a Check
Select this option to restart printing from a certain check number.
Reprint Check Number Range
Select this option to reprint a range of check numbers.
The Reprint Details are used to define the Reprint Options. These options will only be available if you selected to Reprint on the Select Batch screen.
Reprint Check From
Use the Reprint Check From field to indicate the starting check number to reprint.
Reprint Check To
Use the Reprint Check To field to indicate the ending check number to reprint.
Use the Create Export File check box to create and save an export file. This field only displays with the following Custom Setting.
| Section | Item | Value | Module and Purpose |
|---|---|---|---|
| LaserPRCheck | ADPExport | Yes | This setting enables the Createan export file for adp when printing paychecks. |
You may also select the check box to indicate if this is a Test File. When you select the Create Export File check box, only the PDF/Process, Cancel or Back buttons are available.
The Print Benefit Hours check box defaults to selected or cleared, based on the setting in PAY: Defaults (Paycheck Properties tab). When this is selected, Benefit Hours will print on the paychecks. You will need to enter a Benefit Cutoff Date. This date defaults to the current date. When this check box is cleared, Benefit Hours will NOT print on the paychecks.
This check box is only be available if you have the proper security permissions. You must have screen Feature Can Print Signatureselected in the PAY Print Checks screen in order to print a signature on checks.
This option is available only when the Type selected is Checks or Reprint Checks. This check box is available only if you have entered a Transit Routing Number, Bank Account Number, and have selected the Print MICR Encoding check box on the Cash Accounts Setup screen. Select the Print MICR Encoding check box to print the MICR detail at the bottom of checks. The MICR detail information is stored in the Cash Accounts Setup screen.
Note: Magnetic Ink Character Recognition (MICR) is character recognition technology used by the banking industry. You must have special MICR ink to use this option.
This option is selected by default. Use this option when printing payroll checks to Group Direct Deposit Checks with non direct deposit checks. Non direct deposit checks will print first, based on your Group By and Sort By criteria, followed by your Direct Deposit checks, again sorting by Group By and Sort By criteria. If you want the system to prompt you with a message before direct deposit checks start to print, you may use this Custom Setting. This Custom Setting allows you to change the paper supply in the printer tray before Direct Deposit Checks start to print.

Click the Preview button to see a preview of the selected checks. A confirmation window displays indicating the number of checks, the check number range and the total dollar amount of the checks. Click Yes to continue. The report displays the words Preview Only and the checks are marked as VOID. Click No to cancel the process.

Click the PDF/Process button to create a PDF file and Process the payroll checks.
Note: Based upon your Payroll Default settings this button might only read Process. The settings are on the Paycheck Properties tab, Store PDF Copy of each Paycheck field.
A confirmation window will display indicating the number of checks, the check number range and the total dollar amount of the checks.
Click Yes to continue.
Click No to cancel the process.
Once the processing is complete a confirmation window will display with a prompt if you would like to print another batch.
Click Yes to continue and it will take you back to the Select Batch screen.
Click No to close out of the screen.
Click the Print/PDF/Process button to print, PDF and Process the payroll checks.
Note: Based upon your Payroll Default settings this button might only read Print/Process. The settings are on the Paycheck Properties tab, Store PDF Copy of each Paycheck field.
A confirmation window will display indicating the number of checks, the check number range and the total dollar amount of the checks.
Click Yes to continue.
Click No to cancel the process.
Once the processing is complete a confirmation window will display with a prompt if you would like to print another batch.
Click Yes to continue and it will take you back to the Select Batch screen.
Click No to close out of the screen.
Click the Cancel button to end the process.
Click the Back button to move backward to the Select Message step in the wizard.
