
You must enter all required information in the Query Scheduler Setup screen to take advantage of its features.
To set up Query Scheduler
- Verify System Requirements.
- Set Up the Query Scheduler Engine.
- From the Systemmenu, click Tools, and then click Query Scheduler Setup. The Query Scheduler Setup screen displays.
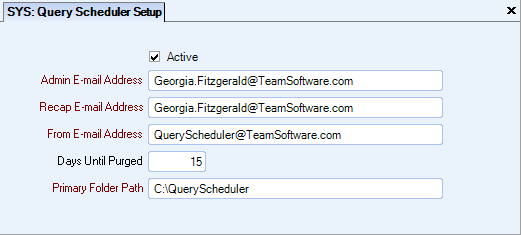
- Keep the Activecheck box selected. It must remain selected for you to use Query Scheduler.
- Enter an Admin E-mail Address for use in the To line of an Admin e-mail messages. Admin e-mail messages are sent when the Query Scheduler encounters errors that cannot be resolved. These unhandled errors are programmatic, coding, or setup errors.
Admin e-mail messages are also sent for query errors, but only if there is not an Error Address in the Query Scheduler (Export Settings tab) screen. -
Enter a Recap E-mail Address to send an e-mail message that contains a summary of the day's Query Scheduler activity.
- Enter a From E-mail Address to use in the From line when the Query Scheduler sends e-mail.
- Enter the Primary Folder Path where you want the CSV files stored.
Related Information
Setting Up the Query Scheduler Engine