
Use the Personnel Scheduling Action Plan in order to fully implement and use the features available within the Personnel Scheduling module.
Verify that all items in the WinTeam Master Action Plan are completed before continuing.
Some of these items may have been completed during the set up of another module.
- Setup PAY: Defaults–Use Payroll Defaults to set up Timekeeping and Overtime options, Employee Master File settings, and other Payroll-related information.
- Set Up Employee Master File–Use the Employee Master File to view and enter information pertaining to employees. The Employee Master File contains multiple screens of information. Upon initial entry into this screen, the system displays basic employee information in the tabbed section. Multiple buttons at the top of the screen allow you to go to additional areas of the Employee Master File record.
- Set Up Pay Security for employees who will be allowed into Payroll–Use the User Security screen to add, edit, or delete users; change passwords for existing users; and assign and unassign Groups to a User.
- Set Up PS: Defaults–Use Personnel Scheduling Defaults to designate the number of weeks that you want the system to store schedules before purging them and the minimum time (in minutes) to allow employees to be scheduled between jobs. On this screen, the system also displays the last day schedules were purged. This screen must be completed before using the Personnel Scheduling module.
- Set Up Personnel Scheduling Security for employees who will be allowed into Personnel Scheduling–Use the User Security screen to add, edit, or delete users; change passwords for existing users; and assign and unassign Groups to a User.
- Set Up PS: Bill Code Categories–Use the Bill Code Categories to group related Invoice Descriptions into a single category. A Bill Code Category may use different combinations of the same Invoice Descriptions. Each Job has a Bill Code Category tied to it. You may add multiple Bill Code Categories to each Job.
- Set Up PS: Bill Codes by Job–Use Bill Codes By Job to enter Bill Code Categories for each Job. You may enter multiple Bill Code Categories for each Job. The Customer Number is also tied to the Job Number.
- Set Up Shifts–Use the Shift Setup screen to define the normal start and end times for each standard work shift recognized by your company. Typically, you will set up the standard (normal) work shifts in the Shift Setup screen; Day, Evening and Night.
- Set Up Posts–Use the Post Set Up screen to enter the normal Shift times for each Post at each Job. The system creates a separate record for each post at a job.
- Set Up Experience and Lock Outs for the Jobs/Posts–Use the Experience screen to view or update experience by employees.
- Set Up Personnel in the Master Schedule–Use the Schedules screen to maintain a Master work schedule for each job site and to create working schedules. Numerous buttons are available to locate information and make the scheduler's job very easy. With the Querying ability you are able to find the best qualified candidates for a shift based upon their job experience and availability. The Master Schedule is the template used to create working schedules for each Job, and become the source file for Payroll and AR: Invoices. For information about working with Schedules see
- Create Work Weeks Using the Rollover Program–Use the Rollover function to create new weekly schedules. The rollover uses the current Master Schedule to create new weekly schedules.
- Once the set up is complete, use the Personnel Scheduling Wizard to preview and update completed Schedules into Billing and Payroll.
It is a good idea to preview the batch prior to committing the update. Once you update the Personnel Scheduling Wizard, the system divides the billing and payroll information from the schedules. The schedule hours are updated to timekeeping for payroll processing and the billing information is sent to Billing Review and Edit.
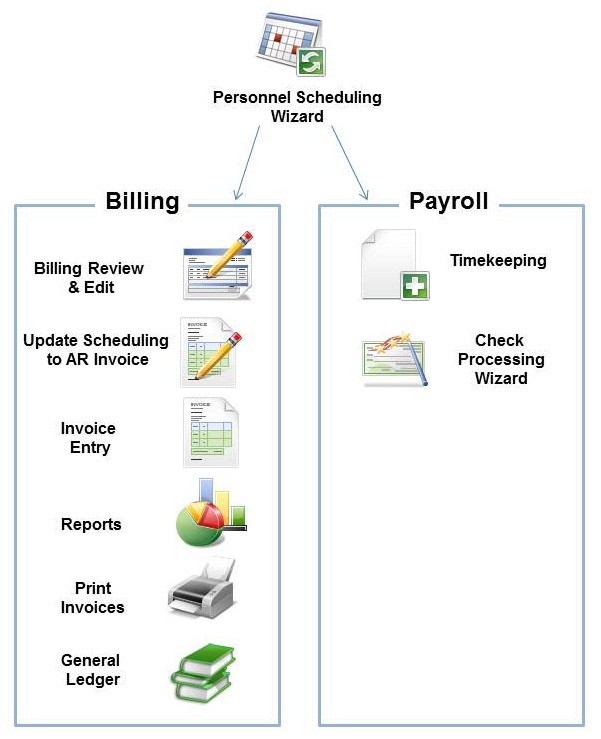
Billing
- Review and Edit Billing Information
Use the Billing Review and Edit screen to review all billing and payroll hours prior to updating (committing for billing and payroll).
Last minute changes may be made to billing items, but changes for payroll must be made through the Timekeeping Selection Option screen within Payroll. - Update Schedules to AR Invoices Use the Update Scheduling to AR Invoices to update schedules from Personnel Scheduling Billing Review and Edit to AR invoices.
- AR: Invoices Use the AR: Invoices screen to review items billed using Update Schedule to File and to update any hours or other billing not included in the invoice.
- Print AR Report: Invoice Register The Invoice Register Report is used to view invoice details for selected invoices. Use this report for reviewing revenue, tax, and invoice totals, and for invoice printing status.
- Print Invoices Use Print Invoices to print Accounts Receivable invoices for services or merchandise.
- Update Printed Invoices to the General Ledger Use the General Ledger Update screen to preview, print, and update invoices to the General Ledger.
Payroll
- Review hours in Timekeeping
Review hours and make changes as necessary. Timekeeping records may be changed until you process payroll. If you make a change to a Timekeeping record, the Timekeeping record does not change the billing record in Accounts Receivable. If you make a change that affects billing, then you will need to change the individual Job record on the Billing Review and Edit screen BEFORE creating the AR invoices. - Process Payroll
Use the Check Processing Wizard to process payroll.
For information on managing Personnel Scheduling, see Managing Personnel Scheduling.