
Overview
The Reconciliation program can be used to assist you in balancing your accounts.
Every entry posted to a Cash Account creates a transaction in the Bank Reconciliation program. This includes AR Payments, AP Checks, Paychecks, and any adjusting entries that affect a Cash Account.
WinTeam also verifies that all transactions that occurred in the period which the user is reconciling, have been updated to the GL, prior to completing the reconciliation process. If there transactions that have not been posted to the GL, they are easily identifiable on the Recaps tab, and you can go directly to the appropriate GL Update screen to post these transactions.
As you are reconciling, the Statement and Register Differences display in the header. This information is also reflected in the Recaps tab. These examples highlight the total amounts that are reflected in the Recaps tab. For a detailed mapping of these transactions see Visual Mapping of Bank Rec.
If a Check Register Adjustment or an Adjusting Journal Entry is required, you can do so directly from the Bank Reconciliation program. Special security is required.
During the finishing process of the reconciliation, a pdf report is created and saved. It can be accessed at any time directly from the Reconciliation History screen.
Key Functionality
To reconcile your account
- Review Bank Reconciliation reference documentation.
- From the General Ledger Menu, choose Check Register and Reconciliation.
- Select the Account you want to reconcile.

- Click the Bank Reconciliation button.
The Reconciliation (General tab) displays.

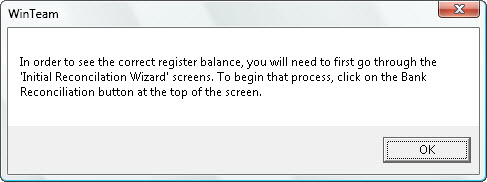
Note: If this account has not previously been reconciled through WinTeam, you will see this message:
Click OK and then begin the Initial Reconciliation Wizard. See Reconciling Bank Accounts for the first time for more information.
- Enter the ending date of your bank statement. The Ending Statement Date must be greater than the Last Reconciled Date.
- Enter the Ending Balance from your bank statement. If you need to enter a negative number, enter the amount first, then click on the - sign.
- In the Service Charge area, enter the amount, date, expense account you use to track service charges and a Job Number. An Accounts Payable payment record will be created using a Service Charge payment Type and will be distributed based on the GL Account and Job Number, and the amount specified here. A notation in the Notes field of the Payment record will state "Service Charge for Account 1054" (or whatever your cash account number is).
-
In the Interest Earned area, enter the amount, date, income account you use to track interest income and a Job Number. An Accounts Payable payment record will be created using the "Service Charge" Payment Type and will be distributed based on the G/L Account and Job Number, and amount specified here. Since this is not really a payment record, but rather an adjustment for interest earned, it will be a negative amount. A notation in the Notes field of the payment record will state "Interest Earned for Account 1054" (or whatever your cash account number is).
- Click the Deposits tab.
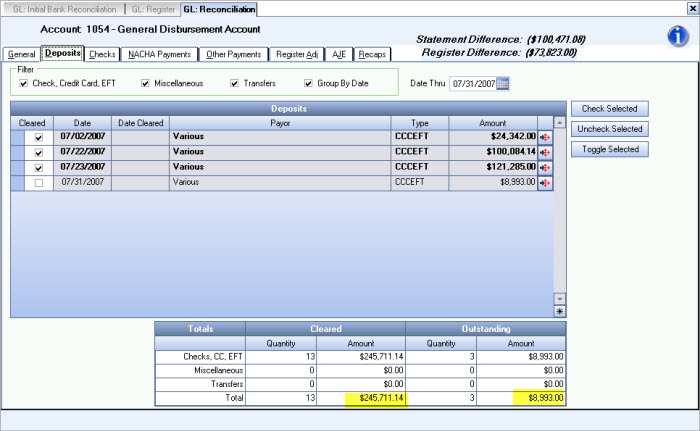
- When you find a transaction on the Reconciliation screen that matches a transaction on the statement, select the transaction to mark it “cleared”.
For each transaction you select, verify that its amount matches the amount listed on the bank statement.
Tip: You can select several records at one time by using the Check Selected, Uncheck Selected, and Toggle Selected buttons.
- Select all the Deposits that show as cleared on your bank statement. Any remaining Deposits are considered "Deposits in Transit' which indicate that the amounts have been received and recorded by the company, but are not yet recorded by the bank.
- Click the Checks tab.
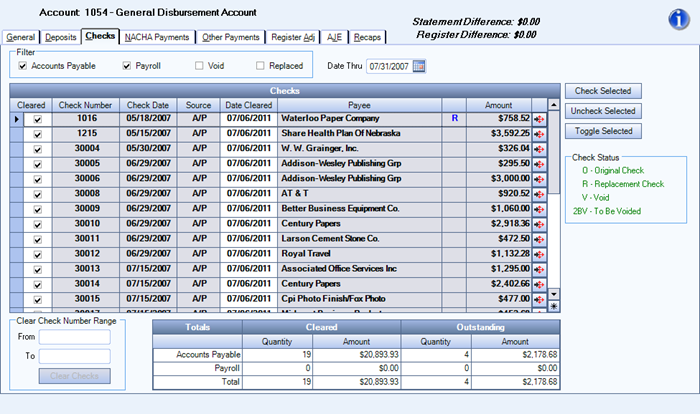
- Select all the Checks that show as cleared on your bank statement. Any remaining checks are considered Outstanding checks. Outstanding checks are checks that have been written and recorded in the company's Cash account, but have not yet cleared the bank account. Checks written during the last few days of the month plus a few older checks are likely to be among the outstanding checks.
- When you are have finished selecting Checks that have cleared, click the NACHA payments tab.
Note: If your security level is lower than of an employee's payroll check or NACHA transaction, you will not have the ability to use the drill down feature on that item. A message box notification displays in these instances.

- Select all the NACHA Payments that show as cleared on your bank statement. Any remaining payments are considered Outstanding. Outstanding payments are payments that have been written and recorded in the company's Cash account, but have not yet cleared the bank account.
- When you have finished selecting NACHA payments that have cleared, click the Other Payments tab.
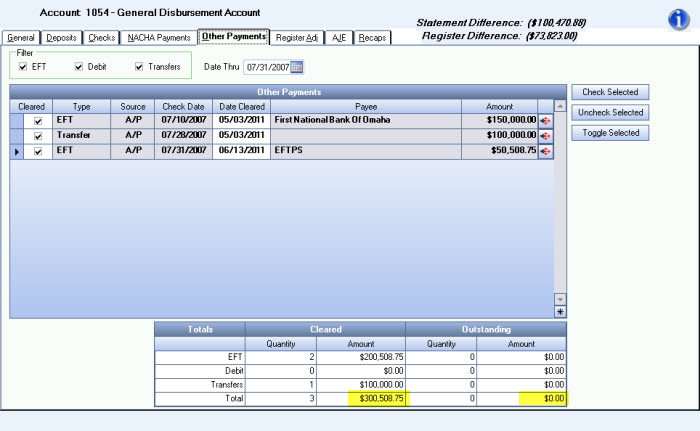
- Select all the Other Payments that show as cleared on your bank statement. Any remaining payments are considered Outstanding. Outstanding Other Payments are payments that have been written and recorded in the company's Cash account, but have not yet cleared the bank account.
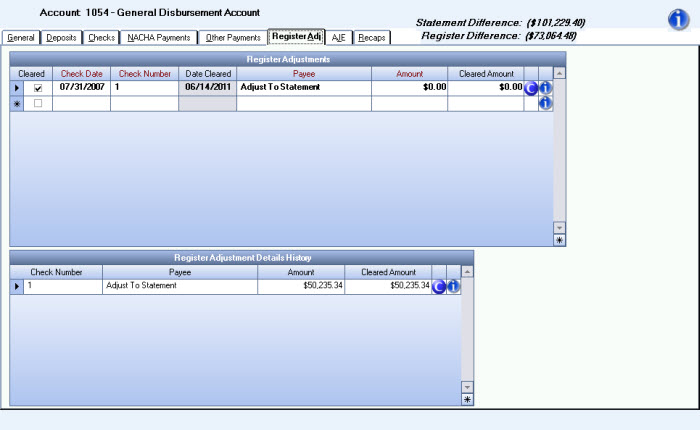
- Click the Register Adj tab.
- Register Adjustments may need to be made to correct bank errors or other discrepancies. To adjust an outstanding payment, enter the amount as positive. To adjust an outstanding Deposit, enter the amount as negative. If the total amount is not cleared, enter the partial amount to clear.
- Click the AJE tab.
- The AJE tab displays all Adjusting Journal Entries that effect cash account. Adjustments to increase the cash balance will require a journal entry that debits Cash and credits another account. Adjustments to decrease the cash balance will require a credit to Cash and a debit to another account. When an Adjusting Journal Entry is created during a bank reconciliation, the entry will display immediately in the Bank Recaps tab. The adjusting entry displays in the Register Balance Recap - Transactions in Register, Not Yet posted area. The Recaps tab displays a visual indicator that indicates that there are Adjusting Journal transactions that need updated to the GL. You can update the adjusting entry directly from the AJE tab by clicking the GL Update button. Once it is updated to the GL (which you can also perform directly from this screen), and marked as cleared, the adjusting journal entry will display the amount in the Bank Statement Recap area under cleared Adjustments.
![]()
- Click the Recaps tab. The Recaps tab displays a summary of information from the Reconciliation tabs. You can tie back the information on the Recaps screen to each tab of the reconciliation process.
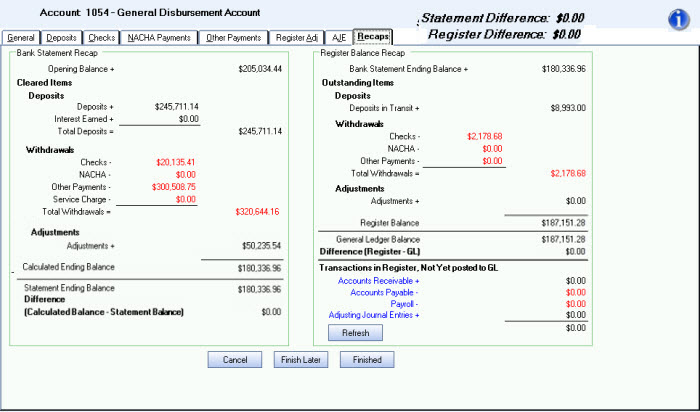
- Click the Finished button when the Difference amounts are $0.00. If your account is not balanced, you will see a message similar to this:
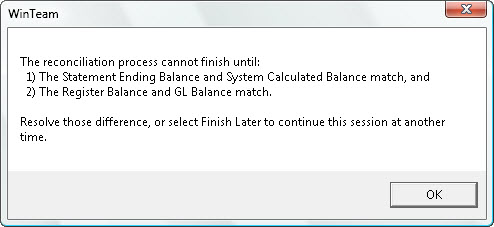
Make the adjustments as necessary.
Once the Finished button is pressed, all items will then be marked as Cleared and Reconciled. A pdf report is created and saved. It can be accessed at any time directly from the Reconciliation History screen.
If you cannot finish at this time, click the Finish Later button. A temporary pdf report is created and saved. This temporary pdf will be overwritten each time you click Finish Later.