
The purpose of the initial bank reconciliation is to enter only outstanding transactions and to establish the correct Register and GL Balance.
Uncleared transactions (payroll, accounts payable, and deposits in transit) through your last reconciled Bank Statement date will consist of:
- Transactions that have been entered into WinTeam
- Transactions from your previous accounting system
If you have not reconciled your account in WinTeam before:
- Review Bank Reconciliation reference documentation.
- Determine starting date to begin tracking transactions in WinTeam.
- Gather last bank statement and last reconciliation statement from previous system (if applicable).
- Identify all uncleared transactions (payroll, accounts payable, and deposits in transit) through your last reconciled Bank Statement date.
- Run a register report of all uncleared transactions through your last reconciled statement date from your previous accounting system, if applicable.
- Run a Check Register Report from the Payroll module through your last reconciled statement date to identify all uncleared Payroll checks, if applicable.
- Run a Check Register Report from the Accounts Payable module through your last reconcile statement date to identify all Accounts Payable uncleared checks, if applicable.
- Run a Cash Posting Report from the Accounts Receivable module through your last reconciled statement date to identify all deposits in transit, if applicable.
- Enter Uncleared transactions.
WinTeam will automatically clear those transactions that are NOT selected as outstanding transactions.
- Transactions from your previous accounting system
These transactions are included in the Beginning GL Register Balance and will need to be entered on the Register Adjustments tab. - Transactions that have been entered into WinTeam
These transactions are NOT included in the Beginning GL Register Balance and are selected on the applicable Deposits, Accounts Payable, and Payroll tabs.
The reconciliation process
- From the General Ledger Menu, choose Check Register and Reconciliation.
- From the Register screen, enter or select the Account you want to reconcile.
- If the account selected has not been reconciled through WinTeam, you will see the following message:
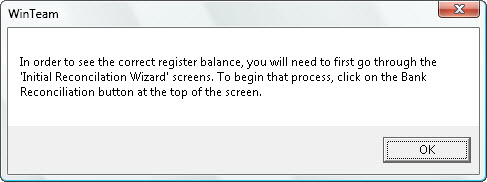
Click OK to begin the Initial Reconciliation Wizard.
- Click the Bank Reconciliation button.
The Initial Bank Reconciliation screen displays with focus on the General tab.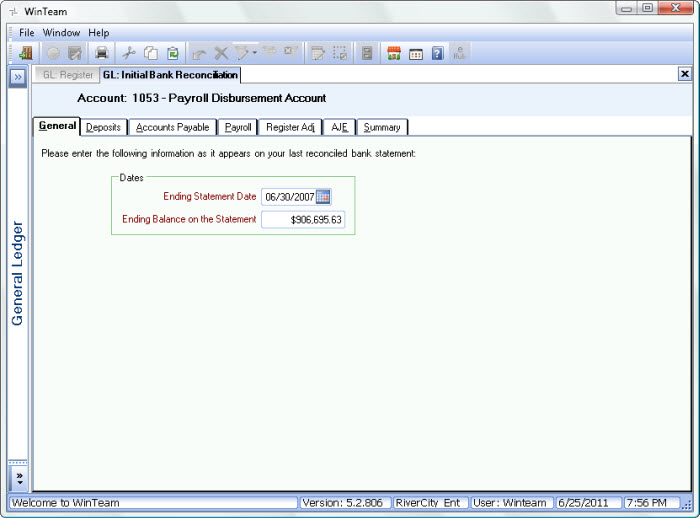
We will begin entering deposits in transit, outstanding accounts payable checks, outstanding payroll checks, deposits and make any necessary adjustments. You can rerun the Check Register Report after the initial reconciliation completes in order to verify your entries.
Note: The Check Register Report includes only WinTeam checks (printed). It does not include any entries from a previous accounting system (those transactions that are included in the Beginning GL Register Balance.
- Enter the Ending Statement Date, or use the Date Control to select the statement date.
- Enter the Ending Balance on the Statement as it appears on your last reconciled bank statement.
- Click the Deposits tab.
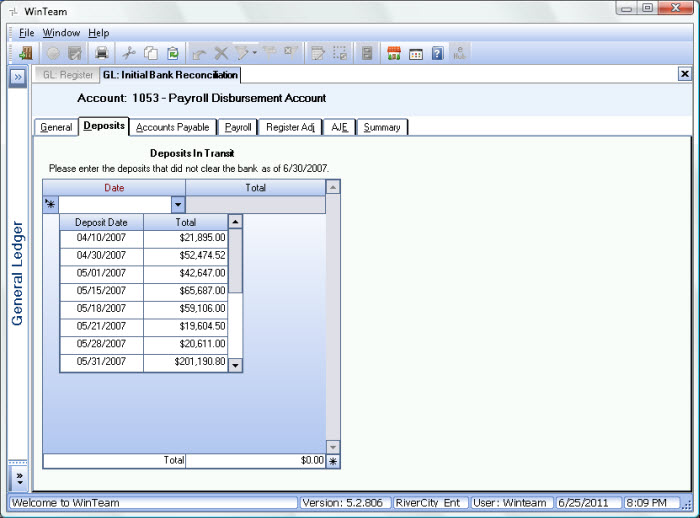
- Select the Deposits that have not cleared the bank as of the ending bank statement date.
These are the transactions that are already entered in WinTeam.
Any remaining items in the list (those that are not added to this grid) will be marked as cleared. - For those Deposits that have not cleared the bank as of the ending bank statement date and have NOT been entered in WinTeam, but are part of the Beginning GL Register Balance, you will need to enter on the Register Adjustments tab.
- When you have finished entering the deposits that have not cleared, click the Accounts Payable tab.
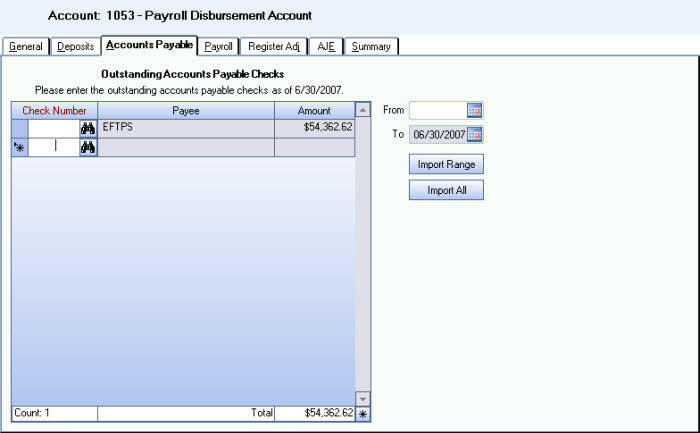
- Enter the Outstanding Accounts Payable checks that have not cleared the bank as of the ending bank statement date. These are the transactions that are already entered in WinTeam. The sys allows you to enter new transactions here during the initial rec, but don't. They should be entered on the Register Adjustment tab so the GL Register Balance does not get whacked. To add an outstanding check, click in the New row, and enter a Check Number, or use the Lookup. Once a valid check number has been added, the Payee and Amount will populate. Press the Tab key to add another outstanding check to the grid. To save a record on a grid, you must Tab off from it. If you see an asterisk * on a line of the grid, that record has NOT been saved. Remember, enter only those checks that have not cleared by the Ending Statement Date.
Any remaining checks (those that are not added to this grid) will be marked as cleared.
Tip: Use the Import Range button or the Import All button, or the Add New button to import or add outstanding checks. Remember, you can only import or add checks that are in the WinTeam system. Keep in mind that you want only outstanding checks in this grid.
- For those Checks that have not cleared the bank as of the ending bank statement date and have NOT been entered in WinTeam, but are part of the Beginning GL Register Balance, you will need to enter on the Register Adjustments tab.
- Click the Payroll tab.
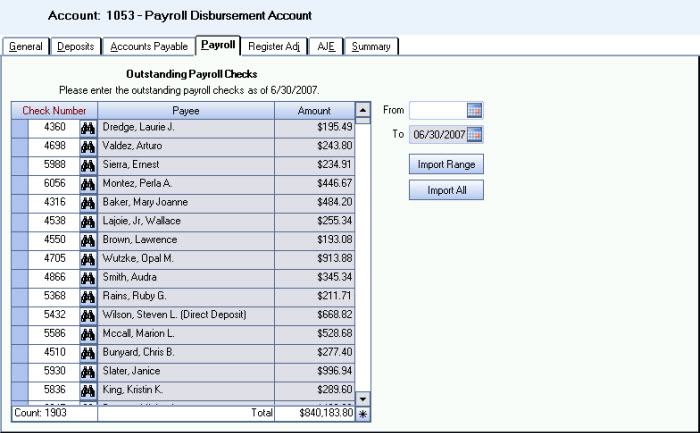
- Enter the Outstanding Payroll checks that have not cleared the bank as of the ending bank statement date. These are the transactions that are already entered in WinTeam.
Tip: Use the Import Range button or the Import All button, or the Add New button to import or add outstanding checks. Remember, you can only import or add checks that are in the WinTeam system. Keep in mind that you want only outstanding checks in this grid.
If you have been clearing checks using WinTeam, you may import your outstanding checks by clicking the Import All button. The grid will populate with all checks that have NOT cleared through the ending statement date. When the initial reconciliation is complete, the system considers only the checks listed here as “outstanding”. All other checks in the system are then considered “cleared and reconciled” through the ending statement date.
Remember, this list contains only uncleared payroll checks.
If you have NOT been clearing checks using WinTeam, you may want to use the Import Range button. Using the Import Range allows you to limit the number of outstanding checks that will populate the grid. This is important because you will need to delete any checks from the grid that have cleared your bank (could be very tedious) through the bank statement date.
Note: Remember, you want only uncleared payroll checks to display in this grid.
If you have only a small number of outstanding checks, you want to add each outstanding check individually by using by adding the check in a new row.
If you need to delete a line record on a grid, click to the left of the Check Number field (you will see an arrow on the selected record), and then click the Delete key on your keyboard.
- For those Checks that have not cleared the bank as of the ending bank statement date and have NOT been entered in WinTeam, but are part of the Beginning GL Register Balance, you will need to enter on the Register Adjustments tab.
- Click the Register Adj tab.
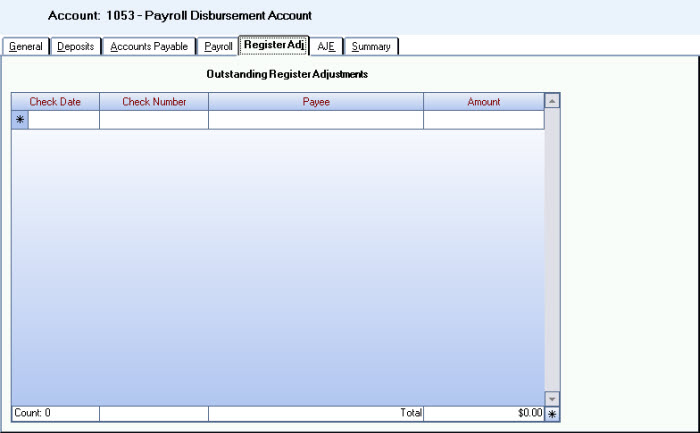
- Enter Deposits in Transit, AP, and Payroll checks that are included in your Beginning GL Register Balance, but have NOT been entered into WinTeam.
- Click the AJE tab.
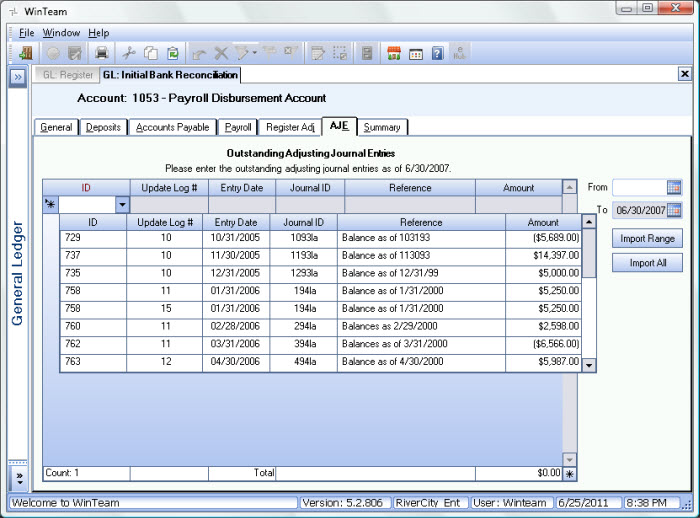
- Select the Outstanding Adjusting Journal Entries that have not cleared the bank as of the ending bank statement date. These may be a positive amount to increase cash or negative amount to decrease.
Remember, select only those AJE's that have not cleared by the Ending Statement Date. Any remaining AJE's (those that are not added to this grid) will be marked as cleared.
- Click the Summary tab.
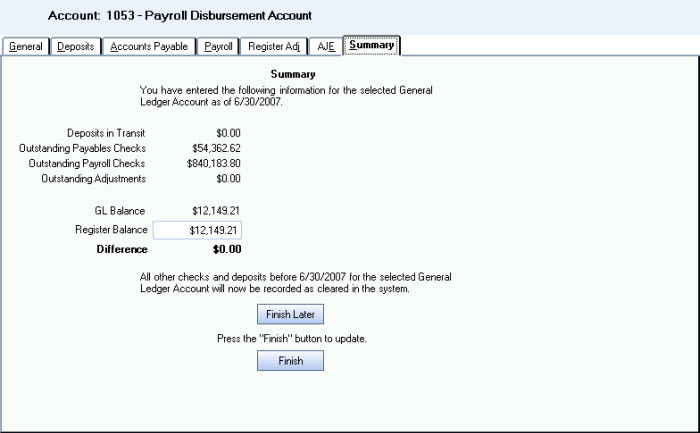
- Review the Summary. Your GL Balance and Register Balance should match, and therefore the Difference amount should be $0.00. If any entry does not appear correct, click a tab to modify your entries or make an adjustment.
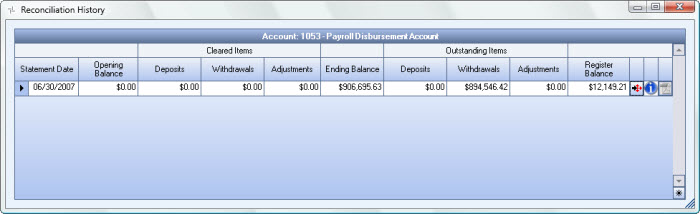
- If you cannot balance or for some reason cannot complete the bank reconciliation at this time, click the Finish Later button. Your reconciliation in progress will be saved, and you can come back later to finish. An entry is made in the Reconciliation History screen.
- If all entries appear correct, click the Finish button.
- Once you click Finish, the system checks to see if the Register Balance and GL Balance are equal. If they are not equal, a message displays notifying you of the imbalance ands allows you to go back and make an adjusting entry or correct any previous entry. If the Register Balance and GL Balance are equal, the system marks all records that were previously marked as "Cleared" as being "Cleared and Reconciled" and clears all selected entries. The Reconciliation History screen is also updated, but a pdf is not created for the initial bank reconciliation.
- When you receive your next bank statement and are ready to reconcile, you will follow the normal bank reconciliation process. For more information see Reconciling Bank Accounts.