Overview
You open this window from the Schedules window by clicking Find and Replace Employee in the Menu drop down or by pressing CTRL+Shift+H. Use the functionality in the Schedule Find and Replace window to replace employees in schedules without a lot of manual work. This can help you manage terminated employees in schedules, reassign existing employee shifts, and handle vacations and time off. You may find other scenarios where you can leverage this powerful feature to save time. This functionality works with both the working schedule and the master schedule.
Important: The process to replace an employee is slightly different depending on whether the employee is still included on the schedule.

If the employee being replaced is still included on the schedule, do the following:
Example: An employee is going on leave of absence and is still on the schedule, and you need to schedule other employees to those shifts.
- The employee's ID number is automatically populated in the Employee Being Replaced field if a shift with an assigned employee is selected when the window is opened. This field is blank if you open the window and there is no assigned employee for the selected shift. You can also use the lookup feature to find the employee.
- In the Shifts to Reassign area, select the date range for the shifts being replaced.
- Select the Include Master Schedules check box to also include the master schedule—when this check box is cleared, only the working schedule is included.
- Click the Load Schedules button to display all shifts for the employee in the date range in the grid.
- In the grid, select the shift or shifts being replaced (by selecting the line). You can press the Ctrl button while you click to select multiple separated rows or press the Shift button while you click to select multiple rows that are together.
- In the lower right corner of the window, in the Replacement Employee field enter the replacement employee's ID number. Use the Lookup feature to find the employee if you don't know their number.
- Click the Replace button. The system uses the same validation process that is used when scheduling an employee in the Schedules window. If all validations pass, the employee is replaced in the selected shifts.
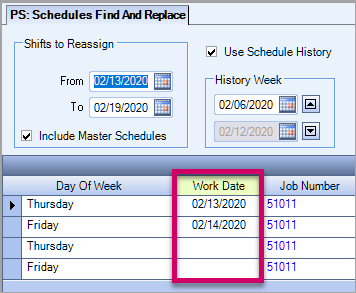
You can easily identify master schedules versus working schedules in the grid because only working schedules have a Work Date—this is blank for master schedules.

If the employee being replaced is no longer included on the schedule, do the following:
Example: An employee has been terminated and the system has automatically removed the employee from future shifts, and you need to schedule other employees to those shifts.
- The employee's ID number is automatically populated in the Employee Being Replaced field if a shift with an assigned employee is selected when the window is opened. This field is blank if you open the window and there is no assigned employee for the selected shift. You can also use the lookup feature to find the employee.
- In the Shifts to Reassign area, select the date range for the shifts being replaced.
- Select the Include Master Schedules check box to also include the master schedule—when this check box is cleared, only the working schedule is included.
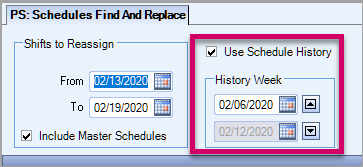
- Select the Use Schedule History check box. In the History Week fields, select a past week to use as a template for the employee's shifts. This allows you to see the shifts from the employee's schedule history that correspond to matching shifts in the Shifts to Reassign date range.
- Click the Load Schedules button to display shifts in Shifts to Reassign date range that match shifts the employee was scheduled to during the template week.
- In the grid, select the shift or shifts being replaced (by selecting the line). You can press the Ctrl button while you click to select multiple separated rows or press the Shift button while you click to select multiple rows that are together.
- In the lower right corner of the window, in the Replacement Employee field enter the replacement employee's ID number. Use the Lookup feature to find the employee if you don't know their number.
- Click the Replace button. The system uses the same validation process that is used when scheduling an employee in the Schedules window. If all validations pass, the employee is replaced in the selected shifts.
You can easily identify master schedules versus working schedules in the grid because only working schedules have a Work Date—this is blank for master schedules.


When you are replacing an employee who is no longer on the schedule, there are special system rules if the Post Setup uses either a Rollover Type or Rotating Shifts. The system will not allow you to replace the employee if there is a conflict. For example, you selected a history week that was rotating shift "B" but the employee you are trying to replace was assigned to shift "A" that week.

