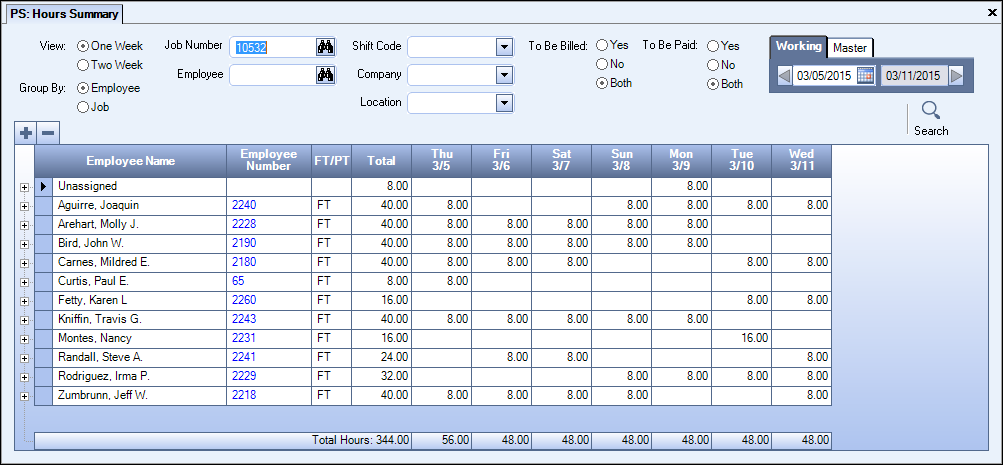
Overview
The Hours Summary screen is accessed from the Schedule screen. It is an interactive screen you can use to view data by Job, Employee, and schedule week. The Hours Summary screen provides a unique display of your data. But more than that, it provides a working environment to display content in a clear outline format, with each level indented to represent their level in the overall hierarchy. This is a great tool to assist in approving the schedules prior to running payroll.
If you are grouping by Employee, there are normally 2 levels: Day and Employee. These records will then sort by Employee Last Name, then First Name.
If you are grouping by Job, there are normally 3 levels: Job, Employee, and Post Details. These records will sort by Job Number.
If you are on an existing schedule when accessing the Hours Summary screen, the Job Number and week start date (if used) will populate to this screen.
Once you have defined criteria for this information, you must click the Search button to display data.
You can use the Detail button to drill down to the actual cell in the Schedule.
Each column in the grid can be sorted in ascending or descending order by clicking the Column Header.

Key Functionality
You can set the view to either one or two weeks. The default selection is One Week.
The week end date field will adjust accordingly.
Use the Group By option to determine the layout of the records. The default selection is Employee.
If you are grouping by Employee, there are normally 2 levels: Day and Employee. These records will then sort by Employee Last Name, then First Name.
If you are grouping by Job, there is normally 3 levels: Job, Employee, and Post Details. These records will sort by Job Number.
Click the lookup button to open the Lookup Jobs window where you can search for a job. You can also make entries directly in the Job Number field to search for a job; enter letters to search by job description or numbers to search by job number.
Double-click in the Job Number field to open either the Job Information window or the Job Master File window, depending on your security settings.
Enter or use the Lookup to search for an Employee Number.
Double-clicking in the Employee Number field will display either the Employee Information screen or the Employee Master File, depending on your security settings.
If a week was entered on the Scheduling screen, it will populate here.
Only dates that are valid Week Start Dates can be entered.
Use the Shift Code filter to limit the data in the grid to include only Cell Detail records for that Shift Code.
This field is visible if you have more than one company.
If this field is visible, but you only have one Company that you can view, then the Company field will populate with that Company number.
If this field is left blank, the system filters for all Companies that you have rights to view.
Note: The system always uses the Job’s Company to determine which records you can view, since the main Scheduling screen is always Company-Filtered at the Job level.
This field is visible if you have more than one Location.
If this field is visible, but you only have one Location that you can view, then the Location field will populate with that Location.
If this field is left blank, the system filters for all Locations that the User has rights to view.
Note: The system always uses the Job’s Location to determine which records you can view, since the main Scheduling screen is always Location-Filtered at the Job level.
Use the To Be Billed filter to limit the Cell Details records based on the Invoice Description field being blank.
If you select Yes, the Invoice Description must NOT be blank.
If you select No, the Invoice Description must be blank.
If you select Both, then it does not matter if the Invoice Description is blank or not. This is the default selection.
Use the To Be Paid filter to limit the Cell Details records based on the Hours Description field being blank.
If you select Yes, the Hours Description must NOT be blank.
If you select No, the Hours Description must be blank.
If you select Both, then it does not matter if the Hours Description is blank or not. This is the default selection.
Security
The User who is logged in must have PS Schedules Hours Summary rights. The PS Schedules Hours Summary security group consists of access to the Hours Summary screen. The PS Schedules Hours Summary group is part of the PS ALL and SYS ALL groups. For more information, see Learning about Groups.
