You can use this procedure to create AP: Vendor Invoices by importing records using a .csv file. You may want to review the AP: Vendor Invoices topic before importing invoices.
To create (import) invoices using a .csv file, a user must belong to the SYS ALL Security Group or belong to a custom security group with AP Invoices added to the Screens tab, with the Import Feature selected.
Once the Import Feature is set up, the Import button is displayed in the lower right-hand area of the AP: Vendor Invoices screen.
| Section | Item | Value | Purpose |
|---|---|---|---|
| AP | UseExpandedImport | Yes |
This setting allows for importing the following additional fields to the Invoice Import:
This setting also allows invoices from a prior closed posting period to post within the current month. Also allows qualifiers in the MemoLine1 and MemoLine2 columns. When the custom setting is enabled, users are able to select from the Invoice button drop-down, if they are doing a Standard or Expanded Import. When enabled the AP:Default screen displays a new section - AP Invoice Entry Import Options.
Example: In the file below, there are six records evenly split between two invoices.
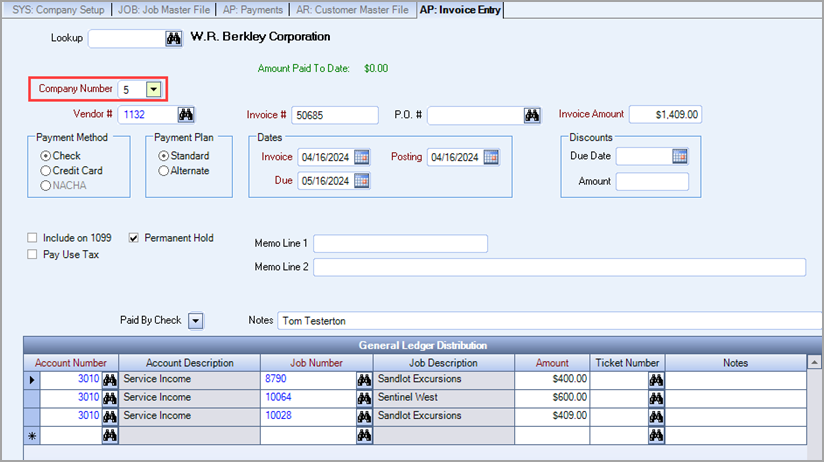
The first Job Number on file is 8790. The database performs a query to find what Company Number Job 8790 belongs to, even if there is no Company Number listed in the Import file. The Job Master File record shows it belongs to Company Number 5. All records for this invoice inherit this property, which can be seen on the AP: Invoice Entry page.
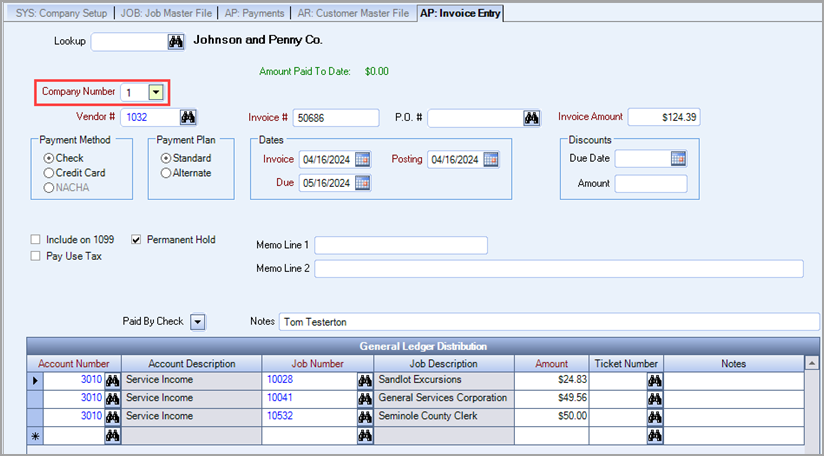
In the same Import file, the first Job Number in the distribution for Invoice Number 50686 is Job 10028. That Job belongs to Company Number 1. That Company Number is assigned to all other records that are part of the distribution as seen in the AP Invoice Entry screen.
|
| APInvoices | CCAlways | Yes | This setting defaults the Payment Method to Credit Card when importing AP Invoices: |
| APInvoices | ImportPermHold | No | If the Import Feature is set up and this Setting is in place, the Permanent Hold check box is removed when creating invoices through the import. |
Document: Download the standard sample file to use as a template.
Vendor Invoices in the .csv file should be created in a consecutive order.
File must be saved as a CSV file. If you rename an extension to CSV, your data may be lost due to invalid format.
The columns of information MUST be in this order, and you must have a header record.

Document: Download the expanded sample file to use as a template.
Vendor Invoices in the .csv file should be created in a consecutive order.
File must be saved as a CSV file. If you rename an extension to CSV, your data may be lost due to invalid format.
The columns of information MUST be in this order, and you must have a header record.

When there are multiple distribution lines for an invoice, enter the same Vendor Number, Invoice Number, PO Number, Invoice Date, and Invoice Amount with each line item. The GL Number, Job Number, and Distribution Amount could be different, but they must be entered in consecutive order in the .csv file.
- From the AP: Vendor Invoices Entry screen, click the Import button.
Note: If you are licensed for more than one company, you will need to select the Company before clicking the Import button. - If an arrow appears on the Import button, click the arrow and select Standard or Expanded for the Import.
- Select the .csv file you want to import.
- If there are records in the .csv file that fail to import, the system will display an error message.
Once you click OK, the Missing Information grid displays.
A record may fail to import if an invoice number is missing.
If using GL Distribution in the .csv file, a record will fail to import if any of the GL Distribution information fields (GL #, Job #, or Distribution Amount) are missing.
There are some other exceptions that will cause an import to fail, they are listed at the end of this document.
Close the report. The valid records that were imported will display. - The system displays a message when all records were imported without exceptions. Click OK.
- The screen will display a filter of all records processed. Use the record selector in the lower, left-hand corner to view each record.
Important Information
- The Due Date is calculated based on the terms for the vendor and the Invoice Date.
- The file will be rejected if the Discount Due Date is later than the Invoice Due Date. It will also be rejected if the Discount Amount is greater than the Invoice Amount.
- The Posting Date defaults to the first day of the month from the Accounts Payable Valid Dates for Data Entry. This applies to both the standard AP import and the extended import. Both the standard and the expanded (custom setting AP | UseExpandedImport | Yes) file versions can include the Posting Date. The PostingDate field can be added to any column in the file, but it is not required to be a part of the file. If the PostingDate column is added to the import file, the field is optional and the data can be left blank. If a Posting Date is not specified, or if the PostingDate column is omitted from the file, the import will use the Invoice Date to populate the Posting Date.
- Each invoice will be marked as
- Permanent Hold
- Payment Method - Check (Note: You can add a Custom Setting to default the Payment Method as Credit Card. See AP: Vendor Invoices for more information.)
- Payment Plan - Standard
- GL Distribution information is NOT required in the .csv file, but if using GL Distribution in the .csv file, a record will fail to import if any of the GL Distribution information fields (GL #, Job #, or Distribution Amount) are missing. If all GL Distribution information (GL #, Job #, or Distribution Amount) is in the .csv file, the GL Distribution information will automatically be added to the invoice.
- If the GL Distribution information is NOT entered on the import file, you will need to add the GL Distribution information manually once the invoice information has been imported. You will also need take the invoice off Permanent Hold prior to paying the invoice.
- The system will allow for importing invoices outside the valid dates of entry.
- When AP Invoices are imported, the Include on 1099 check box is selected on the invoice if the 'Compute 1099' check box is selected in the Vendor Master File (Payments tab).


